
New England Woods
| KIT #: | Aurora 407/403 |
| PRICE: | $ |
| DECALS: | None |
| REVIEWER: | Scott Lyle |
| NOTES: |
| HISTORY |
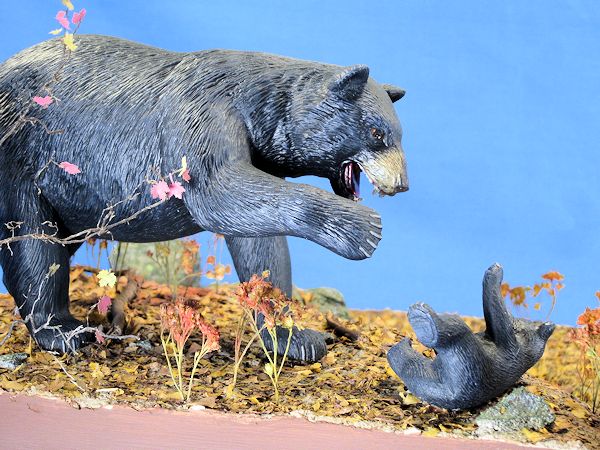
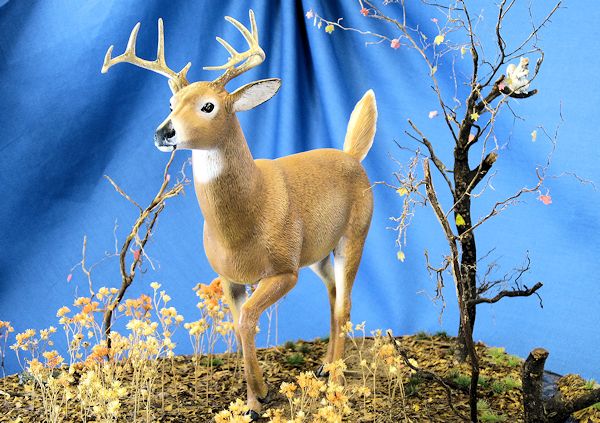
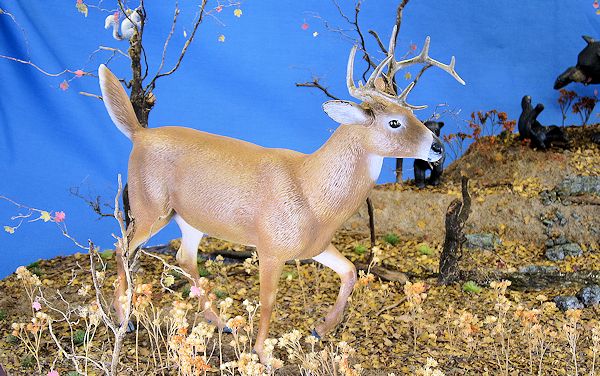
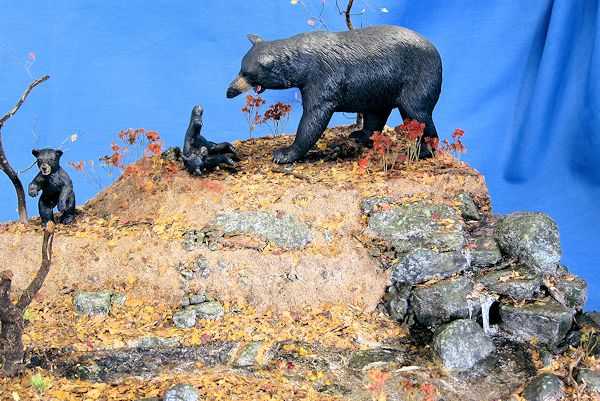
A diorama featuring Aurora’s Black
Bear and White Tail Deer
 and
black bear (I have neat pictures of a bear destroying my neighbor’s bird
feeder) from time to time, so I decided to try my hand at a New England
woods scene using those two old Aurora models.
and
black bear (I have neat pictures of a bear destroying my neighbor’s bird
feeder) from time to time, so I decided to try my hand at a New England
woods scene using those two old Aurora models.
Besides the deer and bears, I
wanted to incorporate a couple of other elements into the scene.
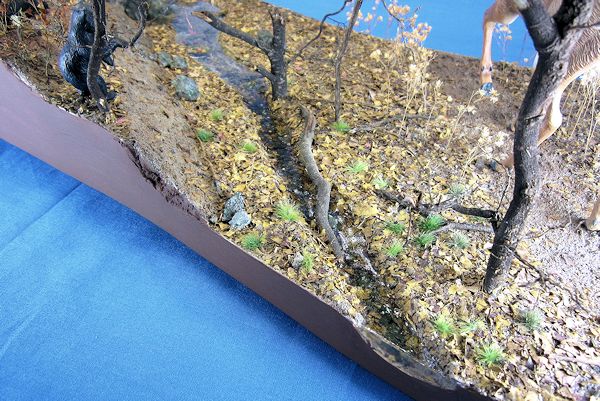
First were a clear babbling brook including fish
(fake ones…) and a small falling water effect.
Second was a rocky formation, something that is
commonly seen in these parts.
Third I wanted to set the scene in autumn, which is
perhaps New England’s most scenic time of the year.
Finally I wanted to tie all of the elements together
into a realistic looking scene with realistic groundwork.
I’ve built plenty of armor dioramas over the years,
but always tended to focus on the armor at the expense of the scenery.
I wanted to expand my scenic skills beyond just
sprinkling sand and static grass onto a white glue-coated base.
How to model realistic clear water, trees, and
undergrowth?
I wanted to take a stab at these trickier effects and
hopefully acquire some new skills.
| THE KITS |
Aurora’s old wildlife kits are gems; blasts from the past that are little dioramas in their own right. I built the Black Bear and Cubs kit a while ago; pictures and the write-up can be found on this site. It consists of parts to build an adult bear and two cubs set on a woodsy-themed base. All parts were molded in black plastic. The White Tail Deer kit consists of beige colored parts for an adult male (it has antlers) and a similar woodsy base complete with a squirrel chewing on a nut. These kits hail from the early 1960s so the build quality is what it is, but I find the shape and detail of the animals to be excellent. A good assembly and paint job will yield an accurate model of the animal as opposed to something that looks like a child’s toy.
| CONSTRUCTION |
Since I’ve already written about the bear kit in a previous article I’ll skip to the deer, but suffice to say that the assembly of both is about the same. The deer breaks down into left and right halves, onto which you assemble the inner halves of each leg. Each side has two belly panels that you assemble next, which is followed by gluing the two body halves together. All of the seams have to be cleaned up, which entail the use of sanding sticks, Squadron Green putty, and then a scribing tool to rescribe some “fur” over the seam areas to blend them into the molded fur a bit better. Once that was done the ears and antlers were glued to the head, and the assembly stage was complete.
| COLORS & MARKINGS |
 I primed the deer using
Tamiya’s Fine Surface Primer, sprayed right from the can.
I then sprayed a tan base coat on the deer using
Tamiya AS-15 Tan.
This color is too light for the red-brown typical of
deer, but it provided a good starting point.
I then made a batch of roughly 60:40 Testors
Military Brown and US Army/Marines Gulf Armor Sand and sprayed this in light
coats over the upper parts of the deer, avoiding those areas that are white
on the real animal (the belly, the insides of the legs, under the chin, and
of course, the tail).
I then carefully sprayed Tamiya XF-2 White onto
those areas.
I primed the deer using
Tamiya’s Fine Surface Primer, sprayed right from the can.
I then sprayed a tan base coat on the deer using
Tamiya AS-15 Tan.
This color is too light for the red-brown typical of
deer, but it provided a good starting point.
I then made a batch of roughly 60:40 Testors
Military Brown and US Army/Marines Gulf Armor Sand and sprayed this in light
coats over the upper parts of the deer, avoiding those areas that are white
on the real animal (the belly, the insides of the legs, under the chin, and
of course, the tail).
I then carefully sprayed Tamiya XF-2 White onto
those areas.
The hooves and nose were brush-painted Vallejo Black Gray, and then I brushed some MIG Productions P245 “Brown for Dark Green” filter over the whole model. This acted as a very light wash, adding some depth to the deer. Some subtle dry-brushing followed using Testors US Army/Marines Gulf Armor Sand to add some highlights to the deer. I then painted the eyes, first base-coating them with Vallejo Chocolate Brown, then adding eyeballs using Vallejo Black Gray and pupils with Testors Black. A tiny dot of white in each eye was followed by some Testors Gloss. The deer had an overall slightly glossy sheen which I left alone since animals’ fur seems to look either glossy or flat in different lighting conditions.
| THE BASE |
Besides
“woods”, I wanted to incorporate two other main scenic elements into the
diorama, an elevated area for the bears, and a babbling brook with a small
waterfall effect.
Since the brook was going to be modeled using some
sort of clear liquid resin, I was going to need a substantial base that
offered some stiffness and ruggedness.
I started by cutting a piece of ½” thick MDF that
was roughly 11.5” by 23” with a jigsaw.
I don’t add wood trim to the edges of my dioramas;
instead I like to cut subtle curves into the outline of the base and then
paint the edges in a color that frames the scene.
 In order for the brook to have
some depth I built up the base using more pieces of ½” thick MDF, leaving
open the outline of the brook.
This made my diorama base 1” thick overall, but gave
the brook an initial depth of ½”.
I then glued pieces of Styrofoam to the base using
white glue to create the rough shape of the elevated rocky area.
Other pieces of Styrofoam were added to create the
various sloping contours.
Small rocks and pebbles from my yard were glued in
place using Walthers Goo to create the small waterfall area.
In order for the brook to have
some depth I built up the base using more pieces of ½” thick MDF, leaving
open the outline of the brook.
This made my diorama base 1” thick overall, but gave
the brook an initial depth of ½”.
I then glued pieces of Styrofoam to the base using
white glue to create the rough shape of the elevated rocky area.
Other pieces of Styrofoam were added to create the
various sloping contours.
Small rocks and pebbles from my yard were glued in
place using Walthers Goo to create the small waterfall area.
The next step was to create
the groundwork, and for this I relied on an article I found on the “Maschinen
Krueger” website (www.maschinenkrueger.com) entitled “Creating Realistic
Groundwork with Textured Gel Medium”, written by Bryan Krueger.
The article nicely explains how to combine sand and
other items found around the home with Textured Gel Medium and some hobby
pigments (Mig pigments in this case) to create an earth-colored paste that
is easy to mix up and apply to your diorama base.
I did exactly that and applied it all over my base,
pressing small rocks and pebbles into the stream bed as I went.
It seems like one of the real
challenges posed to diorama builders working in scales like 1/35th
or larger is the creation of realistic deciduous trees.
Most techniques I’ve seen consist of taking pieces
of tree roots, spraying them with spray-on glue, and then sprinkling on some
type of leafy material (oftentimes a kitchen spice like basil).
Since my diorama was an autum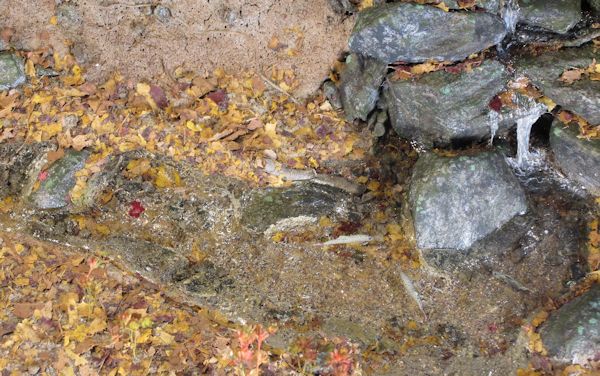 n scene, I took a
slightly different tack.
I bought a couple different colors of Plus Model
1/35 scale laser cut leaves and glued them on one at a time on to some
pieces of tree root.
I was going for a late fall effect where there are
only a smattering of leaves left on the trees (I also call this effect
“being lazy”).
I then drilled holes in the base and glued the trees
in place using white glue.
n scene, I took a
slightly different tack.
I bought a couple different colors of Plus Model
1/35 scale laser cut leaves and glued them on one at a time on to some
pieces of tree root.
I was going for a late fall effect where there are
only a smattering of leaves left on the trees (I also call this effect
“being lazy”).
I then drilled holes in the base and glued the trees
in place using white glue.
To paint the base I made a
50/50 mix of Testors US Army/Marines Gulf Armor Sand and Testors Light Gull
Gray and airbrushed it over the whole scene, letting some of the original
brown show through.
I then picked out the rocks by hand with a few
different shades of Testors gray.
Looking at real rocks in the woods around my house,
I realized one of the most dominant colors on them was actually green.
Most of the rocks I encountered were literally
covered in moss and lichen, so after dry brushing some Vallejo Black Gray
onto the rocks I added some Testors Dark Green all over them using the damp
sponge technique.
I then added patches of lichen by hand using Testors
Pale Green.
With the rocks and groundwork
painted it was time to add the fallen leaves.
To create this effect I went outside and gathered
some yellow, red, and orange colored leaves and ran them through my wife’s
blender (adds an interesting flavor to next daiquiri).
This minced them up into very fine, scale-sized
pieces.
Mixing up a batch of water and white glue, I then glued them
all over the base, in amongst the rocks, and on the bottom of the streambed.
After a few nights of that it was time to tackle the
water.
I’ve used Woodland Scenics
Realistic Water before, but for this project I wanted to try my hand at a
clear polyester resin.
After reading some reviews I tried Castin’ Craft
Clear Casting Resin, a product you can buy (along with its hardening
Catalyst) at your local big box arts and crafts store.
Reading the instructions revealed there is an art to
using this stuff.
To know how much catalyst you have to add you have
to know fairly precisely how much resin you’re going to use - the
temperature in the room in which you’re working plays a role in that as
well.
I wanted to try it first before committing it to my diorama,
so I made a small box measuring about 4” x 6” out of some wood scraps, mixed
up a batch of the resin, and poured it in.
 The first thing you notice
about the stuff is that IT STINKS TO HIGH HELL!
I mean this stuff smells bad.
Imagine the smell of the old stringy tube cement we
all grew up using, only on steroids.
The package says to obviously use it only in a
well-ventilated area, and they’re not kidding.
You really have to use it outside or at the very
least in your garage.
If you use it in your basement (like I did), it will
stink up the whole house (like I did) unless you’ve got the best ventilated
basement of all time (I don’t).
The first thing you notice
about the stuff is that IT STINKS TO HIGH HELL!
I mean this stuff smells bad.
Imagine the smell of the old stringy tube cement we
all grew up using, only on steroids.
The package says to obviously use it only in a
well-ventilated area, and they’re not kidding.
You really have to use it outside or at the very
least in your garage.
If you use it in your basement (like I did), it will
stink up the whole house (like I did) unless you’ve got the best ventilated
basement of all time (I don’t).
But enough about the stench.
My experimental pour went fine.
The mixture gels in about 15 minutes, at which point
you can begin adding subtle waves and ripples to the surface using an old
paint brush handle.
It has the advantages of drying crystal clear and
not seeking to leak out of your base through any small crack.
It can be dammed at the edges simply by using
masking tape.
On the downside it pulls away from the edges as it
dries, but that was consistent with what I had read about it.
People using it for scenic water purposes usually
dress those edges with more groundwork.
Thus emboldened I took
everything out to my garage, mixed up a batch of resin, and poured it into
my streambed to a depth of about ¼”.
Once it began gelling I added some fish from Mantis
Miniatures that I had painted previously to look like Rainbow Trout.
Following the instructions, I added the second
layer, a little less than ¼”.
I left it to cure in all of its stinkiness
overnight, but when I looked at it the next morning, I wasn’t too thrilled.
Unfortunately, the resin had
pulled back not only from the sides of the streambed, but also from large
parts of the bottom.
This made it look like there were a million tiny air
bubbles trapped on the bottom of the stream!
I thought about living with
it, ripping it out and starting over, or fixing it.
To try fixing it I first diluted some Realistic
Water with real water and used a hypodermic needle to inject some down along
the edges to hopefully fill in all of the gaps underneath.
This looked like it was going to work, but when it
dried I couldn’t tell any difference.
Ultimately I didn’t see any way out and decided to
live with it.
I suspect my main mistake was
that I poured too thick of an initial layer and that I may have had too much
catalyst in the mixture, causing it to shrink too much as it dried.
Since it was about 60 degrees in my garage at the
time I overcompensated by adding a couple of extra drops of catalyst (per
the instructions).
I really like the look of the resin in the areas of
the stream where it worked properly, so I’d like to try it again on future
projects.
I think next time I’ll wait for the warm months where I can
 do it
outside at the optimum temperature and pour it in thinner layers.
If anyone has experiences of their own with resin,
please let me know!
do it
outside at the optimum temperature and pour it in thinner layers.
If anyone has experiences of their own with resin,
please let me know!
I added more leaves around the
edges of the water to hide the gaps where the resin shrank and then added
more undergrowth, fallen twigs and branches.
I added some clumps of grass that were made by
Joefix Studios, a company that offers some great products for dioramas.
The last step was to create the small falling water
effect over the rocks.
For this I used clear caulking.
I squirted a couple of lines of the caulking onto a
piece of wax paper, and once it was dry peeled it off and cut it up into
small pieces.
These were glued onto the rocks to look like small
streams of falling water.
Some artist’s Clear Gloss Medium was used to sculpt
a bit more life into the falling water and to add ripples onto the water’s
surface.
When it had dried I added some touches of white paint to make
it look more dynamic.
I painted the base’s edges with brown craft paint, and then glued the animals in place using Walthers Goo. My last step was to paint a small yellow triangle on the tree trunk near the trail to represent a trail marker. And with that the diorama was done.
| CONCLUSIONS |
-
Bryan Krueger, “Creating Realistic Groundwork with
Textured Gel Medium”,
www.maschinenkrueger.com
December