Aurora's 'American Bison
| KIT #: | ? |
| PRICE: | $ |
| DECALS: | None |
| REVIEWER: | Scott Lyle |
| NOTES: | From Aurora's American Wildlife Series |
| INTRODUCTION |
 If variety is the
spice of life, than Aurora’s old kits are the chili powder in my chili bowl full
of military models. Lately I’ve taken to building some of Aurora’s long
discontinued wildlife kits every now then between my usual 1/48 scale aircraft.
Maybe it’s the nostalgic trip back to my childhood, maybe it’s my interest in
wildlife and nature, or maybe it’s a masochistic need to file away endlessly at
seams and gaps, but every now and then I find myself really looking forward to
doing one of these kits.
If variety is the
spice of life, than Aurora’s old kits are the chili powder in my chili bowl full
of military models. Lately I’ve taken to building some of Aurora’s long
discontinued wildlife kits every now then between my usual 1/48 scale aircraft.
Maybe it’s the nostalgic trip back to my childhood, maybe it’s my interest in
wildlife and nature, or maybe it’s a masochistic need to file away endlessly at
seams and gaps, but every now and then I find myself really looking forward to
doing one of these kits.
| THE KIT |
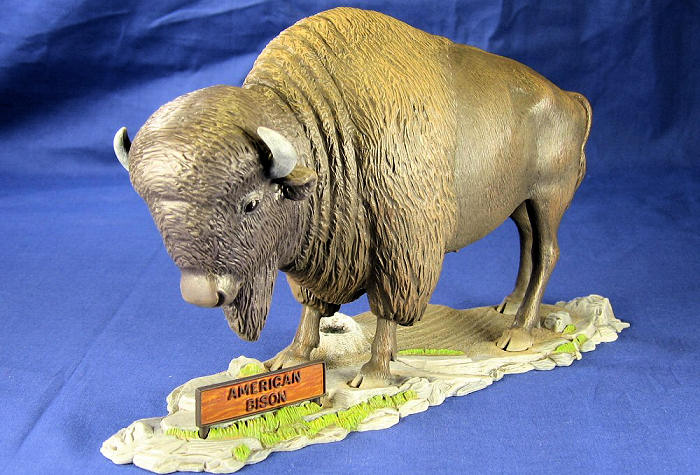
Aurora’s “American Bison” kit depicts a large bison standing on a rocky base accompanied by a pair of prairie dogs. The parts are all molded in dark brown plastic. No cow patties are included, leaving the modeler to either sculpt his own or search for resin alternatives.
| CONSTRUCTION |
 This is the third
Aurora wildlife kit I’ve tackled, and construction is very straightforward.
Basically the various parts of the buffalo are glued together. The challenge is
in making the seams look good, which isn’t easy considering the beast is covered
in fur! My basic system is to assemble the legs, head, and body as
subassemblies, sand the seams flat, fill the gaps with lots of Green Squadron
putty and Mr. Surfacer 500, and then use a scribing tool to scribe “fur” – lots
of random lines in different directions - over the appropriate areas. Several
times during the process I brush-paint on some acrylic neutral gray paint to see
how the seams look. This process is repeated ad nauseum until it’s hard to see
where the seam is.
This is the third
Aurora wildlife kit I’ve tackled, and construction is very straightforward.
Basically the various parts of the buffalo are glued together. The challenge is
in making the seams look good, which isn’t easy considering the beast is covered
in fur! My basic system is to assemble the legs, head, and body as
subassemblies, sand the seams flat, fill the gaps with lots of Green Squadron
putty and Mr. Surfacer 500, and then use a scribing tool to scribe “fur” – lots
of random lines in different directions - over the appropriate areas. Several
times during the process I brush-paint on some acrylic neutral gray paint to see
how the seams look. This process is repeated ad nauseum until it’s hard to see
where the seam is.
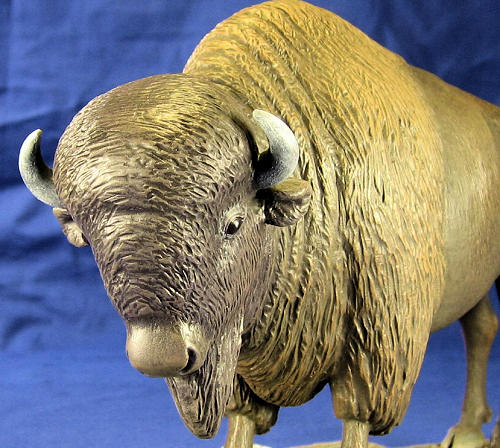
Aurora actually did a good job deciding where the seams should go; often they are hidden in large wrinkles on the animal’s body. But sometimes the molding process dictated that the seams be out in the open, in full view to everyone. Those are the seams that you work on a lot, always aware that if you look closely enough you’ll be able to see them, and that you could probably spend forever trying to improve them. Eventually you reach the point where you have to move on! Luckily the base is just one piece and requires no assembly of rocks or trees, so once the buffalo was finished, it was time to start painting.
| COLORS & MARKINGS |
I used
Tamiya’s Light Gray Spray Primer right out of the can to prime the buffalo and
base. Using my Aztek A470 airbrush with the beige tip, I pre-shaded the buffalo
by spraying Testors Acrylic Raw Umber onto all of his wrinkles, folds, and
shadow areas. I then added some Testors Acrylic Wood to the Raw Umber and
filled in the remaining areas, taking care to let the darker shade show
through. Looking at pictures of real buffal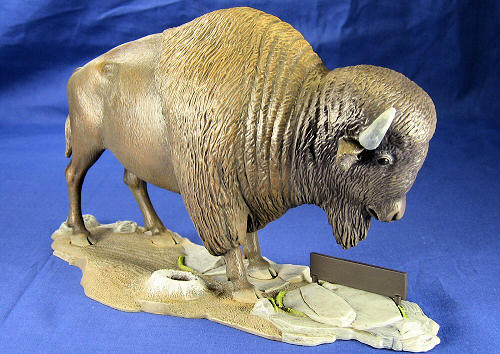 o
I realized they are basically all brown – different shades of brown, but still
brown. I knew he would end up being a pretty monotone model if I didn’t liven
him up a bit, so I dry-brushed him all over with some Testors Enamel Military
Brown, and then lightened that up with a few drops of Sand and dry-brushed him
again on his upper surfaces and especially his shaggy head and “mane”.
o
I realized they are basically all brown – different shades of brown, but still
brown. I knew he would end up being a pretty monotone model if I didn’t liven
him up a bit, so I dry-brushed him all over with some Testors Enamel Military
Brown, and then lightened that up with a few drops of Sand and dry-brushed him
again on his upper surfaces and especially his shaggy head and “mane”.
To make his colors stand out a little bit more I very gingerly dry-brushed some Testors Yellow on the top of his head and his “hump”. His horns and hooves were painted Testors Acrylic Panzer Gray and then dry-brushed with Neutral Gray, and then his eyes were painted Testors Acrylic Raw Umber. Looking again at real pictures of buffalo it seems like their eyes are so dark that you can’t easily see any detail, so I painted a tiny dot of white in the center of each eye and called it a day. My final step was to airbrush some Testors Semi-Gloss all over him to depict the sheen that fur tends to have, and then brush-painted some Testors Gloss on his eyes. I’ve never been up close enough to a real buffalo to know for sure, but I suspect that they are nasty, stinky, and droolie, so I added some gloss around his nose and mouth as well.
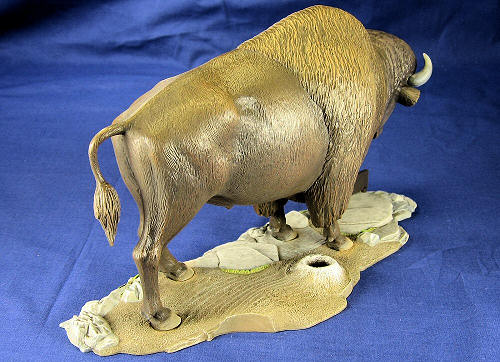
The kit’s base is a single molded piece complete with rocks, bare earth, tufts of grass, and a raised burrow entrance where one of the aforementioned prairie dogs is supposed to sit. While building the kit I was thinking of different ways to spruce up the base. I remembered back to a trip I took to Yellowstone National Park a few years ago to the colorful geysers and craters and thought that the prairie dog burrow would make a nice geyser (I was never taken with the idea of including the two prairie dogs in the kit – it just seemed weird to me that they would sitting there inches away from a huge buffalo).
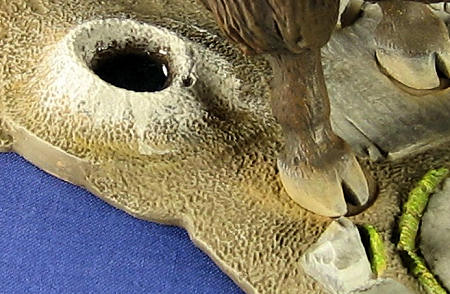 I started painting the base
by airbrushing the bare earth areas Testors Dark Tan. I next brush-painted the
rocks some different shades of gray, and the grassy areas green. I painted the
inside and outside of the geyser light gray, and then gave the whole base a
thorough wash of a 50/50 mix of raw umber and black oil paints. Once that was
dry I began dry-brushing – lighter and lighter shades of brown on the earth,
gray on the rocks, and yellow/green on the grass. I dry-brushed the geyser
white, and then poured in a few layers of Woodland Scenics’ “Realistic Water”.
This is a thick gel that you can pour in 1/8” thick layers. Once each layer was
dry I painted some Tamiya Clear Blue in spots on the layer, hoping to create the
illusion of depth. In all honesty however I wasn’t wowed by my geyser when it
was finished. Perhaps it needs some dry ice or something to create a “smoking”
effect.
I started painting the base
by airbrushing the bare earth areas Testors Dark Tan. I next brush-painted the
rocks some different shades of gray, and the grassy areas green. I painted the
inside and outside of the geyser light gray, and then gave the whole base a
thorough wash of a 50/50 mix of raw umber and black oil paints. Once that was
dry I began dry-brushing – lighter and lighter shades of brown on the earth,
gray on the rocks, and yellow/green on the grass. I dry-brushed the geyser
white, and then poured in a few layers of Woodland Scenics’ “Realistic Water”.
This is a thick gel that you can pour in 1/8” thick layers. Once each layer was
dry I painted some Tamiya Clear Blue in spots on the layer, hoping to create the
illusion of depth. In all honesty however I wasn’t wowed by my geyser when it
was finished. Perhaps it needs some dry ice or something to create a “smoking”
effect.
The sign was the last thing that needed to be painted. I painted it Testors Acrylic Wood, and then using a small brush painted streaks of Testors Acrylic Leather on it to simulate wood grain. I then gave it a coat of Tamiya Clear Orange, which made it look like varnished wood. I picked out the letters and border in Testors Raw Umber, and then glued it to the base.
With all of the painting finished, I glued the big bison to the base, dusted some earth-colored pastels onto his hooves, and called it done. I then immediately went out and had a big buffalo burger to celebrate. It was yummy.
| CONCLUSIONS |
Aurora’s “American Bison” is a neat old kit which turns into a neat looking, good-sized model. I’ve been finding that while the construction steps in these kits are tedious, the painting steps are really fun. I’ve learned a lot about washes and dry-brushing with these animal kits, and I definitely try new effects (and thus learn new things) that I wouldn’t ordinarily try. My comfort level with these techniques, as well as my knowledge of the artistic side of modeling has really increased, and that has carried over into my military modeling. I will continue to build more animals and dinosaurs in the future!
April 2008
Copyright ModelingMadness.com
If you would like your product reviewed fairly and fairly quickly, please contact the editor or see other details in the Note to Contributors.