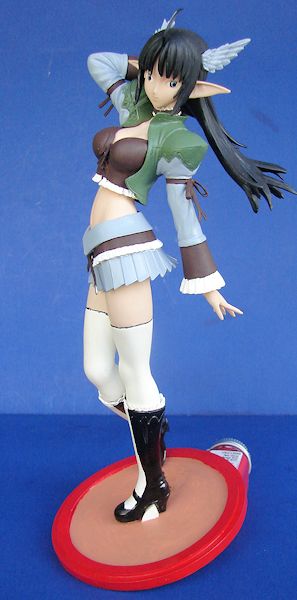
E-2046 1/8 Xecty
| KIT #: | FG 4298 |
| PRICE: | $50.00 SRP (currently OOP) |
| DECALS: | None |
| REVIEWER: | Mark Hiott |
| NOTES: | Resin kit |
| HISTORY |
 Shining Wind
is an action role-playing game developed by Nextech and Amusement Vision and
published by
Sega for
the PlayStation 2, and the 18th game in the Shining video game series. It was
released on May 17, 2007 in Japan. The game is the sequel to Shining Tears. The
main characters from Shining Tears appear in Shining Wind as well. An anime
adaptation of the two games, called Shining Tears X Wind, began airing in early
April 2007. Like Shining Tears, the game is illustrated by artist Tony Taka.
Shining Wind
is an action role-playing game developed by Nextech and Amusement Vision and
published by
Sega for
the PlayStation 2, and the 18th game in the Shining video game series. It was
released on May 17, 2007 in Japan. The game is the sequel to Shining Tears. The
main characters from Shining Tears appear in Shining Wind as well. An anime
adaptation of the two games, called Shining Tears X Wind, began airing in early
April 2007. Like Shining Tears, the game is illustrated by artist Tony Taka.
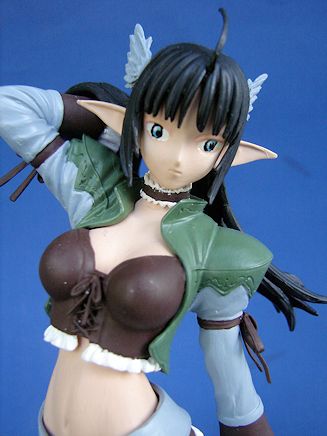
Xecty
is one of Baelgard's four guardians, who is an artificial life-form made by
Hiruda, using an ancient weapon as base. She is in fact Killrain's sister,
Celestia, as Hiruda made her body as Xecty using Celestia's cells, but then she
ended up getting infected by the darkness and Hiruda created a dark matter to
absorb the forces of darkness, preventing her from further infection.
During a duel with Kiriya, an earthquake causes the two to fall into a cavern.
Kiriya talks with Xecty and tells her the importance of hope and believing in
your self, forming a close bond with her. Later, during the fight between Kiriya
and Saionji, she gets in the middle and is stabbed by Saionji, sacrificing her
life in order to stop the war. She explains to him that she did it in order to
give hope to the world, and that Kiriya is her hope. Her spirit then joins the
wind, as a way to protect both. She is later revived by one of the pods from the
Sea Dragon King Ruins, and joins the Luminous Knights. She also becomes the
priestess of Astraea's Tower of the Wind. Her soul blade is called Sword of
Emperors Excelion, Kentei Ekuserion). She also contains Kiriya's Holy Grail,
being drawn from Kiriya's Ultimate Soul Blade.
The character is voiced by Houko Kuwashima.
| THE KIT |
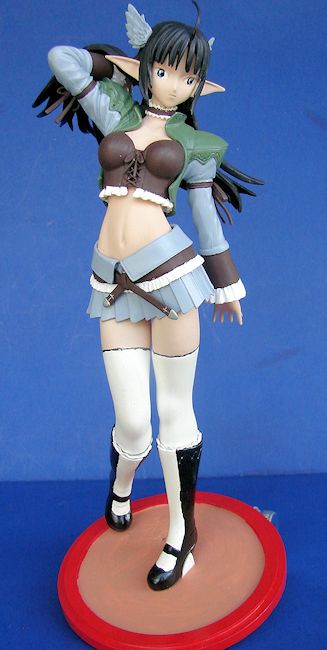
 An
all resin kit, the parts are cast in light beige resin. The casting is very nice
and there were very few mold seams to take care of. One thing I really like is
that all the pour stubs are removed, leaving the modeler to do minimal cleanup.
All of the major parts are keyed, so installing them is a breeze. Also included
is a strange bird like thingy for the top of her head, but it is not shown in
the picture do I didn't use it.
An
all resin kit, the parts are cast in light beige resin. The casting is very nice
and there were very few mold seams to take care of. One thing I really like is
that all the pour stubs are removed, leaving the modeler to do minimal cleanup.
All of the major parts are keyed, so installing them is a breeze. Also included
is a strange bird like thingy for the top of her head, but it is not shown in
the picture do I didn't use it.
The
parts were packed securely and come in a Tupperware container. None of
the parts were broken, but one of the legs in mine was
deformed. I'm told this is a rarity in E2046 kits.
There is a simple instruction sheet with a blow-up
view of how the parts go together. This and a color photo on the front of the
tube is all you get. However, it is more then adequate to assemble the figure.
There are no color callouts, so the builder is left to match the picture or use
his or her imagination.
| CONSTRUCTION |
This is my first "real" figure. The only other one I
have done is a dragon bust, so take my assembly steps with a grain of salt.
Once that was done, I washed all the parts in warm
soapy water. This was done to remove any mold release that may have been on the
parts.
I started with the torso and joined the upper and
lower halves. There w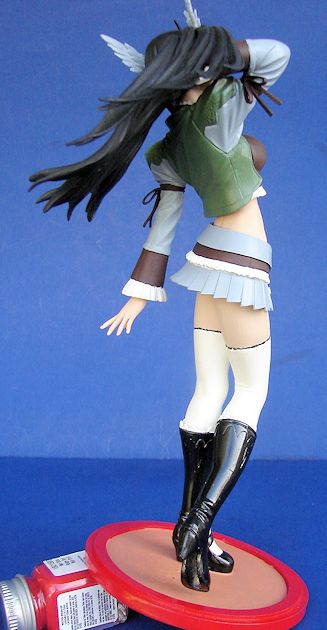 as
a slight seam here, but the skirt will hide most of
it. Setting that aside, I attached the arms to the
jacket and glued the 2 main hair parts together. At this point I painted all the
major parts.
as
a slight seam here, but the skirt will hide most of
it. Setting that aside, I attached the arms to the
jacket and glued the 2 main hair parts together. At this point I painted all the
major parts.
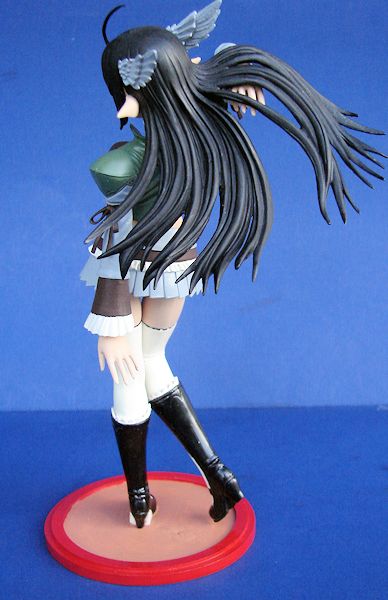
A note on the hair... it is made up of
2 rear pieces and the bangs. You have to trap the head
between the parts as you assemble them. This leaves a rather prominent seam
across the top of the head. Care was needed to fix this as by this time, I had
already painted the hair.
I next attached the upper legs to the torso. The fit
here was very good with no seams. The skirt is installed over the torso and down
into place at the waist. I didn't use any glue on this part, as it seemed to
fall into place naturally. The jacket/arms were placed down over the neck next
and glued to the bodice, trapping the torso in between. Once everything was in
place, I touched up the paint. At this point, all the tiny bows, the belt and
the hands were attached.
Attaching the boots is a bit of a job, as these are
the only parts not keyed to their locations. Instead, the ends of the upper legs
are slightly different in shape, as are the pockets in the boots. It's a
difficult to tell which leg is which. The boots were also the only parts I
pinned as I assembled them. The mating surface is a butt joint and I wanted it
to be as strong as possible.
The last part added was the head. As I stated before, the hair is 3 parts and leaves a bad seam across the top of the head. I carefully filled the seam with 3M glazing putty and allowed it to dry over night. I then used flexible sanding sticks to sand down the filler while doing minimal damage to the paint. When I was done, I did my best to repaint the area. It looks ok, but the seam is still slightly visible.
| COLORS & MARKINGS |
The first thing I did was apply an enamel primer to
all the parts. This and the boots were the only enamel paints that I used. All
other paints were acrylics. Also they were the only spray paints used.
 As I'm
new to figure building, I had to use what paints I had
on hand, so some of my choices may seem kinda strange.
As I'm
new to figure building, I had to use what paints I had
on hand, so some of my choices may seem kinda strange.
All the "body" areas were painted with Model Masters
Light Skin, this includes the torso, head, hands and the upper section of the
legs. The skirt and jacket were painted with a combination of MM Haze Gray and
Testors Flat Green. I thought these 2 colors best matched the color photo. The
bodice and all the brown trim was painted using Folk Art Burnt Umber. I tried
black, but decided it was to harsh. The panties, tights and all the jacket trim
was painted with FA Whicker White. The boots were painted MM Gloss Black and the
hair MM Flat Black. I was gonna do some shading of the hair, but I thought I'd
better photograph her first in case I muck it up. Better safe then sorry...
I realized during painting that I shouldn't have
glued to arms to the jacket first. While not impossible, it made painting the
right arm a bit difficult.
Now the part that I was dreading the most... the
eyes. I tried several times to do the eyes but ended up stripping and repainting
the head 3 or 4 times. Finally I just had to set it aside for awhile and come
back to it later. I ended up painting the eyes flat white with a flat black
cornea. I then added a light blue iris, leaving just a small ring of black
visible. I added a black pupil to the center of the eye. A flat white "life
light" was added slightly to the left and just above the pupil. A very slight
dusting of white was applied across the entire eye to blend it all together. The
final touch was a coat of Floquil clear gloss. I also added a slight line above
the eye with a darker skin tone to help break up the face.
There was suppose to be some fancy trim on the jacket
and boots, but painting it proved to be beyond my meager abilities.
| CONCLUSIONS |
All in all, I liked building this figure. I liked it
so much, I've already started my next one. I made a few mistakes along the way,
but I think it came out ok. She doesn't fit the supplied base very well, but
that may have been the result of the problems with the legs. I'll be making a
new base for her in the future.
If you have ever wanted to try a figure, I can
recommend the E2046 figures. If I can build one anyone
can!
| REFERENCES |
Review kit courtesy of your editor who somehow ended up with two of them.
If you would like your product reviewed fairly and fairly quickly, please contact the editor or see other details in the Note to Contributors.