 1/2
scale Snowy Owl
1/2
scale Snowy Owl
1/2
scale Snowy Owl
| KIT #: | None |
| PRICE: | Free, except for the paper and ink |
| DECALS: | None required |
| REVIEWER: | Greg Ewald |
| NOTES: |
Not the easiest of paper models, best use card stock. |
| HISTORY |
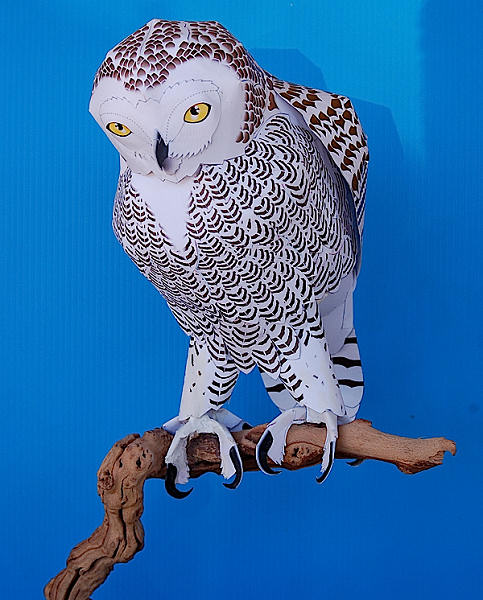
The Snowy Owl is one of the largest birds of prey in the world, and of course,
with it’s white dappled body, blends in perfectly to the arctic tundra where it
hunts.
They fly silently , typically at dusk and just over a few inches of the ground
to kill unsuspecting quarry. The large talons typically enter the rear of the
brain pan of a prey animal, killing it almost instantly.
Of course, with the change in global climate, their numbers are being reduced. Luckily, with the popularity of the “Harry Potter” series, there has been quite a lot of activity on the ecological front to save these magnificent birds.
| THE KIT |
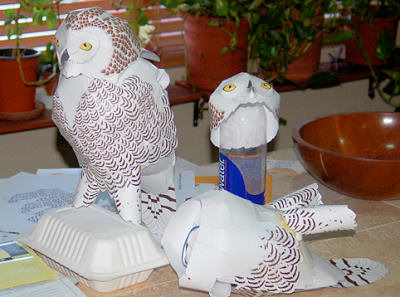
Free paper models are nothing new. This one was built for a very dear friend who
is an owl fancier (the whole house is full of owl stuff).
The instructions are very concise and clear, but it isn’t a beginner’s
kit.
If you decide to have yours professionally printed, expect to pay 20-30 USD for
the project. You can do it at home on any printer, using thick paper. Do not use
glossy paper, it will haunt your nights.
You will need several sharp #11 blades, and a good brand of clear glue. I also
recommend having the drinks of choice available, as this is NOT a quick build at
all. You have to do it in stages.
A nice thick metal ruler or the like will make it a lot easier to bend the paper.
| CONSTRUCTION |
 Of course,
with paper models, you spend a lot of time cutting out the object.
With simple ones, you can do all of the cutting at once, but I would
heavily argue to not do that with this one. The pieces sometimes look quite a
like, and it is easy to screw up. (that’s why I built two)
Of course,
with paper models, you spend a lot of time cutting out the object.
With simple ones, you can do all of the cutting at once, but I would
heavily argue to not do that with this one. The pieces sometimes look quite a
like, and it is easy to screw up. (that’s why I built two)
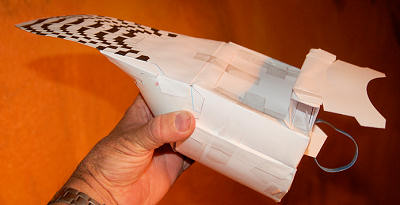
The Body: The foundation for the
whole thing is basically a box. I used clips to hold the sections together while
the glue dried. Be sure to let the glue completely set up before moving onto the
chest.
Pay very close attention to how the chest attaches to the main body, test fit to
make sure that the legs and wings won’t be askew. Since there really is no way
to clamp the breast onto the structure, I used super glue as a “tack”, and then
brushed on white glue later for a more permanent fix.
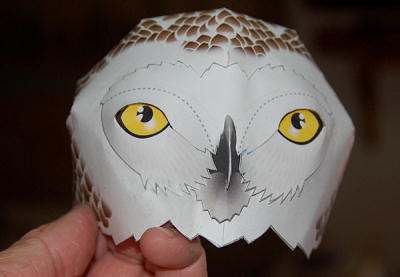 The Head:
This bit is probably the trickiest of the build, especially the bill. The
head is meant to be able to rotate when the kit is finished, and I did not trust
the simple paper bandages from the design, so I used medical tape and a foaming
resin glue to hold everything together (gorilla glue). Yep, it is messy, but I
know that sucker isn’t going to fly off. Pardon the pun.
The Head:
This bit is probably the trickiest of the build, especially the bill. The
head is meant to be able to rotate when the kit is finished, and I did not trust
the simple paper bandages from the design, so I used medical tape and a foaming
resin glue to hold everything together (gorilla glue). Yep, it is messy, but I
know that sucker isn’t going to fly off. Pardon the pun.
The Wings: While they look the most
complex, the wings actually go together quite easily, though once again, you
have to take your time and do it all in stages. Make sure that the glue has set
up prior to moving to the next fold.
The Feet: These can be confusing,
four toes, each one slightly different, with different talons as well.
Pay close attention to the instructions !
(can you believe I actually said that?)
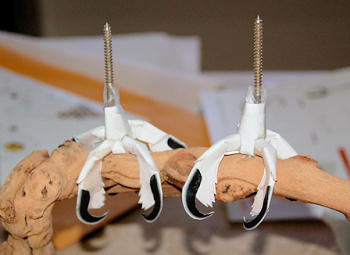 I filled
the legs with Urethane foam (the stuff you use for sealing doors,etc) in order
to provide a solid base for the mounting screws.
I filled
the legs with Urethane foam (the stuff you use for sealing doors,etc) in order
to provide a solid base for the mounting screws.
I waited to put on the coverlet (lower mantle feathers) until I had attached the
feet. I also did not attach the talons at this time, as I wanted the bird
perched on a branch. More on that in a bit.
The Tail: This is probably the
simplest part of the build. Fold and glue, once again using spot welds of C/A
glue to get everything in place, and then brushing with white glue.
 The
Perch: I bought a bit of a branch
at a local reptile store, and mounted it to a wooden plinth. Using the foaming
resin glue again, I attached the owl feet to the perch, with large screws going
from underneath, and up into the owl’s legs.
Now, it was safe to glue on the talons, so that they would appear to be
gripping onto the branch naturally. As a side note, owls rarely place the talons
against a perch, as it dulls them, so they should be slightly held away (1/8”).
The
Perch: I bought a bit of a branch
at a local reptile store, and mounted it to a wooden plinth. Using the foaming
resin glue again, I attached the owl feet to the perch, with large screws going
from underneath, and up into the owl’s legs.
Now, it was safe to glue on the talons, so that they would appear to be
gripping onto the branch naturally. As a side note, owls rarely place the talons
against a perch, as it dulls them, so they should be slightly held away (1/8”).
Attaching the head: This is not for the faint of heart. The rubber band that you
have glued the living heck out of will need to be stretched out over the body,
and attached to the head. The instructions call for you to just simply glue it
in place. Right. On what planet?
I cut the proverbial Gordian knot by using two smaller rubber bands, joined in
the middle by a paper clip. Viola! Problem solved!
| COLORS & MARKINGS |
Since the owl is pre-marked, there really is nothing to do but apply a good
clear coat when you are finished. Be sure to let the inked paper to dry for at
least a week prior to spraying on a finish though, or the black will run, and
you will end up with a soppy owl.
L
| CONCLUSIONS |
One of the best of the paper kits I’ve built, and a very impressive model.
Highly recommended.
| REFERENCES |
http://cp.c-ij.com/en/contents/3157/03387/index.html
http://en.wikipedia.org/wiki/Snowy_Owl
July 2010
If you would like your product reviewed fairly and quickly, please contact me or see other details in the Note to Contributors.