
Verlinden 1982 V Brigada Aerea Fighter pilot –
Fuerza Aerea
| KIT #: | 2010 |
| PRICE: | CAN $40.00 |
| DECALS: | None, paper printed items. |
| REVIEWER: | Pablo Calcaterra |
| NOTES: | 120mm figure |
| HISTORY |
 This
is a project I always wanted to tackle. I had seen some white metal pilot
figures in
This
is a project I always wanted to tackle. I had seen some white metal pilot
figures in
Except for the 1/48th ones that some of the
planes I have built bring, I have never made pilot figure before. Of course, as
you can see, it shows!
The pilots of the V Brigade
flew the oldest attack planes of the Air Force (1950s Skyhawks) and were
responsible for the following losses incurred by the British Task Force:
HMS Coventry, HMS Antelope,
LCU Foxtrot 4 - Sunk
RFA Sir Gallahad badly damaged - sunk
HMS Ardent damaged (according
to some sources) when first attacked single handedly by the then Capt. Pablo Carballo – later sunk by 2 further attacks of the Argentine Air Force and Navy.
Carballo was later to be the only pilot of the V Brigada to receive the most
important medal by the Argentine Congress (along with the 4 A4-C pilots that
took part in the attack to HMS Invincible): “To the Heroic Valour in Combat”.
For more information about medals issued to the pilots, you can visit the
Argentine Air Force website at:
http://www.fuerzaaerea.mil.ar/conflicto/condecoraciones.html
 Of the 26 Skyhawks B that
took part in the conflict, 10 were shot down.
Of the 26 Skyhawks B that
took part in the conflict, 10 were shot down.
Vice Commodore Dubourg
(Squadron Commander)
| THE KIT |
I saw the Verlinden Top Gun pilot (2010) and thought that it was a close match of what the Argentine Air Force (c.1982) pilots would have looked like. I purchased also kit 561 and with the initial help of Air Forces (Osprey) book I decided to start with a V Brigada Pilot (flying A4-B Skyhawks for the 5th Air Brigade, based in Villa Reynolds, San Luis Province). The second pilot (561) will be a VI Brigade one (Dagger).
|
CONSTRUCTION AND PAINTING |
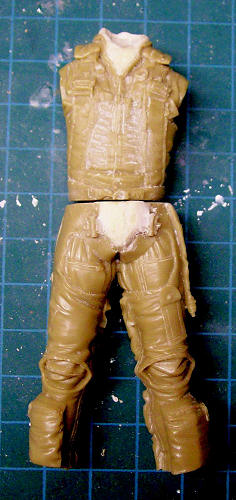
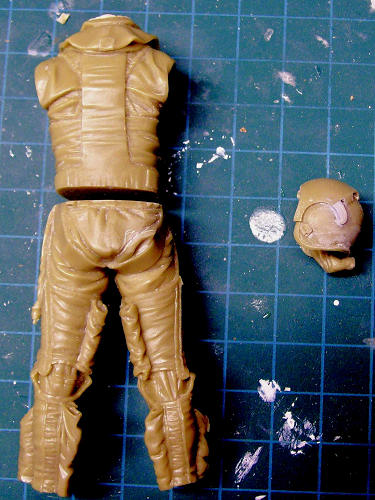
As I had never paid too much
attention to the pilots themselves and their equipment and suits, I soon found
that I had lots of questions and there seemed several major differences between
the original kit and what I wanted to achieve. S0 / T2
 pilot.

 Using
rolled sandpaper, I added some waves to the fabric.
Using
rolled sandpaper, I added some waves to the fabric.
 used two halves of the Airfix’s Mosquito in 1/48th
bombs, removed the tail, sanded and twisted them. I attached these two pieces as
the front “continuation” of the floating device.
used two halves of the Airfix’s Mosquito in 1/48th
bombs, removed the tail, sanded and twisted them. I attached these two pieces as
the front “continuation” of the floating device.
 vest.
vest.
 ided to give it a more “argentinized” look
by sanding the nose a little bit (making it flatter, not so pointy and sharp)
and adding a moustache made with epoxy and applied and shaped using a toothpick (practically worn “by regulations” by most of the pilots of the Air Force during
those years). Now, as I was afraid of making a blunder with the head, I copied
it using a rubber molde and casted 3 new ones using two-part resin (Araldite).
So I used one of those copies to practice, but I was so happy with the results
that that’s the only one I worked on and I used it for the kit.
ided to give it a more “argentinized” look
by sanding the nose a little bit (making it flatter, not so pointy and sharp)
and adding a moustache made with epoxy and applied and shaped using a toothpick (practically worn “by regulations” by most of the pilots of the Air Force during
those years). Now, as I was afraid of making a blunder with the head, I copied
it using a rubber molde and casted 3 new ones using two-part resin (Araldite).
So I used one of those copies to practice, but I was so happy with the results
that that’s the only one I worked on and I used it for the kit.
Hand and head were given a coat of Aeromaster4603 and 4601Skin tones mixed together to check for imperfections. None that I could find. I painted the eyes and teeth in white, the hair in black and drybrushed the eyebrows. Using a toothpick I painted the pupils. I sanded pastels Brunt Sienna Tint 1 and 3 and applied it to give the face and hands different shades of skin color. With dust of sanded black pastel and a little piece of cotton I added a not too well shaven beard. The head was left aside practically ready.
 I airbrushed the body in
green. Using different greens, I brush painted all the different layers of
equipment the pilots had: one color for the anti G, another one for the pants,
yet another one for the survival vest, a fourth for the floating vest. The
colors used were Aeromaster 4720, 4724, 4726 and 4727.
I airbrushed the body in
green. Using different greens, I brush painted all the different layers of
equipment the pilots had: one color for the anti G, another one for the pants,
yet another one for the survival vest, a fourth for the floating vest. The
colors used were Aeromaster 4720, 4724, 4726 and 4727.
The 3 reflective bands on the
front of the helmet were made using Tamiya tape. The helmet was airbrushed with
gloss white, having previously masked the hand that holds it. The central band
was painted red and the other two were brushed with a mix of silver and white,
trying to give it a slightly different glow that would represent the shininess
of these bands. The knobs were painted blue, the earphone pads black, the
cushion behind the head in brown and the different hoses and mask that are
bundled inside the helmet in green. The attac hment points for the chin strap in
silver, the chin straps were cut from Tamiya tape and painted in blue. A buckle
was scratchbuilt, painted silver and slid on one of the chinstraps. These straps
were then glued inside the helmet.
hment points for the chin strap in
silver, the chin straps were cut from Tamiya tape and painted in blue. A buckle
was scratchbuilt, painted silver and slid on one of the chinstraps. These straps
were then glued inside the helmet.
I painted the palms of the hands and the nails using a lighter shade of skin color. I attached the left hand. The shoes were painted in black, with the shoelaces picked out drybrushing them in brown. Brown pastel was sanded and applied with a brush on the shoes, to represent some dirt.
The scarf (yellow for the V
Brigada pilots) was brush painted (3 different coats to cover the green and add
some shades).
As the V Brigada badges had
to have some thickness (the one on the helmet was a sticker, the one on the
jacket was a XXX) I printed them in paper, gave them a careful coat of Future to
protect the ink and added them in place using white glue. Note: the head of the
hawk should have been grey, not light blue.
I drybrushed some pastel dust
in areas where there would be more wear/contact: around the zippers, pockets,
etc. Some parts of the zippers, the antiG plug and the buckles were painted in
silver.
A difficult task was to make
the cord/handle on the left side of the floating vest. I took a piece of
stretched plastic (I always keep the ones from the price tags when we by
clothes) and added drops of plastic glue at intervals to represent the little
yellow beads. I took three or four different nights to add different layers of
glue to get an acceptable (at least, for me!) size and shape for those beads. It
is a very fragile structure and carefully painted it in yellow and attached it
to the side of the vest.
 I gave the whole pilot
(except for the helmet) a good coat with matt clear varnish. The helmet was
given a couple of coats of Future with a brush to further protect the badge and
the reflective bands. And a drop of Future on the eyes
I gave the whole pilot
(except for the helmet) a good coat with matt clear varnish. The helmet was
given a couple of coats of Future with a brush to further protect the badge and
the reflective bands. And a drop of Future on the eyes
Finally, I added the head,
the hand with the helmet and the shoes. The pilot was finished but I wanted to
have it standing without fear that it would fall and break.
My good friend Dave from
Hornet Hobbies in Toronto suggested using 400-grit sandpaper to represent
pavement and I painted with 5 (!) different coats a wooden base. I dirtied the
sandpaper in parallel lines and then I brushed a thick layer of matt clear
varnish. I made a couple of little holes in the sandpaper, glued it to the base
and when dry, I attached the pilot to the base thru those holes using instant
glue.
The Skyhawk pictured behind the pilot is my heavily modified 1/48th Esci A4-M (converted to A4-B C-214 with overpainted brown 1982 ID band on tail and wings).
Pilot in front of the somehow inaccurate artwork of the Hobbycraft A4-B kit.
| CONCLUSIONS |
It took me practically 2 months to complete this project.
But 20 years to start it! I am quite happy with the
results.
Again, thanks Tony!
| REFERENCES |
Tony Zelaya
Falklands War - Air Forces
(Osprey, 1983). Only relatively good for the pilot figures/paintings. The rest
of the book is extremely inaccurate. It shows that it was written immediately
after the war.
Halcones de Malvinas – Pablo
Carballo (Ediciones Argentinidad, 2004)
A-4P/C Skyhawk – Cettolo, Marino, Mosquera & nunez Padin (Nunez Padin, 1997)
November 2008
If you would like your product reviewed fairly and quickly, please contact me or see other details in the Note to Contributors.