The Battle of France
| KIT #: | 9040/6739 |
| PRICE: | $45/65 MSRP |
| DECALS: | |
| REVIEWER: | Scott Lyle |
| NOTES: | Main kits include photo etched parts |
| HISTORY |
When Hitler invaded Poland in September 1939 one of his main fears was
that France and Britain would attack Germany from the west.
In the end the two countries did nothing, preferring to talk instead of
go to war. Hitler on the other hand,
emboldened by the Wehrmacht’s success and the Allies’ inaction, ordered his
generals to begin planning his next campaign – the invasion of France.
When World War I ended, France vowed that bloodshed on that level would
never be seen on her home soil again.
The country began building the famed Maginot Line along its border with
Germany, a system of bunkers, forts, pillboxes, and every other conceivable
device meant to discourage or annihilate an intruder.
Spanning from its eastern border with Switzerland to the thick Ardennes
forests on its western border with Belgium, the line was thought to be
invincible, and because of it France began to feel a false sense of security.
The vaunted line had a fatal flaw however; it was static.
Based on the idea that firepower would rule the battlefields of the
future like it had during the Great War, the Maginot Line was obsolete by 1940.
By the late thirties many armies of the world, and especially the
Wehrmacht, were mobilizing on a large scale.
Tanks and halftracks could now roll around any obstacle, and the Maginot
Line, impressive but motionless, would be no exception.
Mobility was now as important as firepower, if not more important.
 After several iterations the Wehrmacht’s plan for the invasion of France
ultimately relied on one central element of warfare - deception.
Since France thought that the Maginot Line and Ardennes forests were
impenetrable, Hitler knew that France expected a future German attack to come
through Belgium and Holland. To take
advantage of that expectation, the Wehrmacht crafted a plan based around two
Army Groups, Army Group “B” to the north and Army Group “A”, the more powerful
of the two, to the south. Army Group
“B” would head west into the neutral countries of Belgium and Holland, subdue
both of them, and draw the bulk of the French and British forces up to them.
Simultaneously Army Group “A” would strike through the Ardennes, cross
the Meuse River at Dinant and Sedan, and then bypass the Maginot Line.
Once past those obstacles the northeastern plains of France would lie
wide open, along with the opportunity to make a dash for the English Channel.
If the Wehrmacht could make it to the Channel coast quickly, it could
surround and capture the British Expeditionary Force (BEF) and then subjugate
the French Army to its south.
After several iterations the Wehrmacht’s plan for the invasion of France
ultimately relied on one central element of warfare - deception.
Since France thought that the Maginot Line and Ardennes forests were
impenetrable, Hitler knew that France expected a future German attack to come
through Belgium and Holland. To take
advantage of that expectation, the Wehrmacht crafted a plan based around two
Army Groups, Army Group “B” to the north and Army Group “A”, the more powerful
of the two, to the south. Army Group
“B” would head west into the neutral countries of Belgium and Holland, subdue
both of them, and draw the bulk of the French and British forces up to them.
Simultaneously Army Group “A” would strike through the Ardennes, cross
the Meuse River at Dinant and Sedan, and then bypass the Maginot Line.
Once past those obstacles the northeastern plains of France would lie
wide open, along with the opportunity to make a dash for the English Channel.
If the Wehrmacht could make it to the Channel coast quickly, it could
surround and capture the British Expeditionary Force (BEF) and then subjugate
the French Army to its south.
On the morning of May 10, 1940 the first panzers crossed the border into
Luxembourg. Overhead the Luftwaffe
swarmed on its objectives, mining the Channel, attacking airfields, and
achieving air superiority, if only to make sure no Allied spy aircraft would
happen upon the massive concentration of tanks and supply vehicles in the
Ardennes – the supply train reaching back 100 miles in some places.
The deceptive plan worked immediately as the French and British, thinking
the attack was unfolding as they expected it would, began marching their forces
up towards Belgium and Holland. The
way was soon clear for the Germans to swoop down through the Ardennes and onto
the plains of northeastern France.
Moving with speed that overwhelmed the more antiquated armies of the
Allies, the Wehrmacht made excellent progress.
Rommel and his 7th Panzer Division began crossing the Meuse
during the night of May 12, and later on the 13th Guderian’s units
began crossing the river near Sedan.
For almost a week the French Command continued to misinterpret German
intentions, first incorrectly assuming that the main German thrust was that of
Army Group “B” in the northern countries, and then later believing that the main
German goal was Paris, not the Channel coast.
The speed and violence of the German attack was something the Allied
armies were not prepared for. The
combined use of aircraft, tanks, and mobile troops overwhelmed Allied units that
were trained to fight yesterday’s war with yesterday’s tactics.
A scene repeated over and over again during the campaign saw hapless
French infantry units trying to surrender to the German panzers, who would
simply motor past them, relentlessly heading west, leaving the job of rounding
up the French prisoners to the infantry divisions marching on foot behind.
The deeper
 the Germans penetrated into French territory the more panicked
the population became. Roads soon
became clogged with waves of refugees, their carts loaded with their
possessions, desperately fleeing the Panzer columns.
The few times the French tried to counterattack their mobility was badly
hampered by the crowded roads, overflowing with throngs of people.
the Germans penetrated into French territory the more panicked
the population became. Roads soon
became clogged with waves of refugees, their carts loaded with their
possessions, desperately fleeing the Panzer columns.
The few times the French tried to counterattack their mobility was badly
hampered by the crowded roads, overflowing with throngs of people.
By the 18th Rommel took Cambrai, and by the end of the 19th
the bulk of the German panzers were less than 50 miles from the Channel coast.
At that point it became apparent to the British that the battle was lost,
and under the codename “Dynamo” they began to formulate plans for evacuating the
BEF. On the 20th one of
Guderian’s units arrived at the coast in Noyelles, traveling some 60 miles in a
day, a remarkable achievement for an armored force at the time.
The next day the British counterattacked Rommel at Arras, inflicting some
heavy damage and buying some time, but the die was cast.
The next two days saw the BEF pull back to Dunkirk amid heavy losses, and
there they would have been annihilated had it not been for Hitler’s misguided
decision to call off the army and let the Luftwaffe finish the job.
For three days the Luftwaffe bombed targets in and around Dunkirk by
which time Hitler realized his error and unleashed the Panzers once again.
By that time however the British evacuation had begun.
When the last ship left the French port on June 4 some 337,000 men,
including 110,000 Frenchmen, had been saved.
While the British have always considered the operation a triumph, Winston
Churchill dourly noted that “Wars are not won by evacuations”.
On June 5 Germany launched a fresh
attack southwards against the remainder of France.
Armed with 104 divisions and complete air superiority, the outcome was
basically a foregone conclusion.
Paris was taken on June 14 and on June 22 the French surrendered.
Overjoyed, Hitler demanded that the surrender ceremony take place in the
same train car that was used for the armistice agreement at the end of World War
I - the very agreement that sent Germany spiraling down a two decade-long path
of unrest that set the stage for the rise of one of history’s greatest villains.
Despite his success however, this moment was probably the high water mark
of the war for Hitler and his Third Reich.
Unable to subdue the RAF in the months to follow, Hitler gave up his
plans to invade Britain and instead turned his eyes to the great bear of the
east - a decision that would ultimately bring about the ruin of himself and his
country.
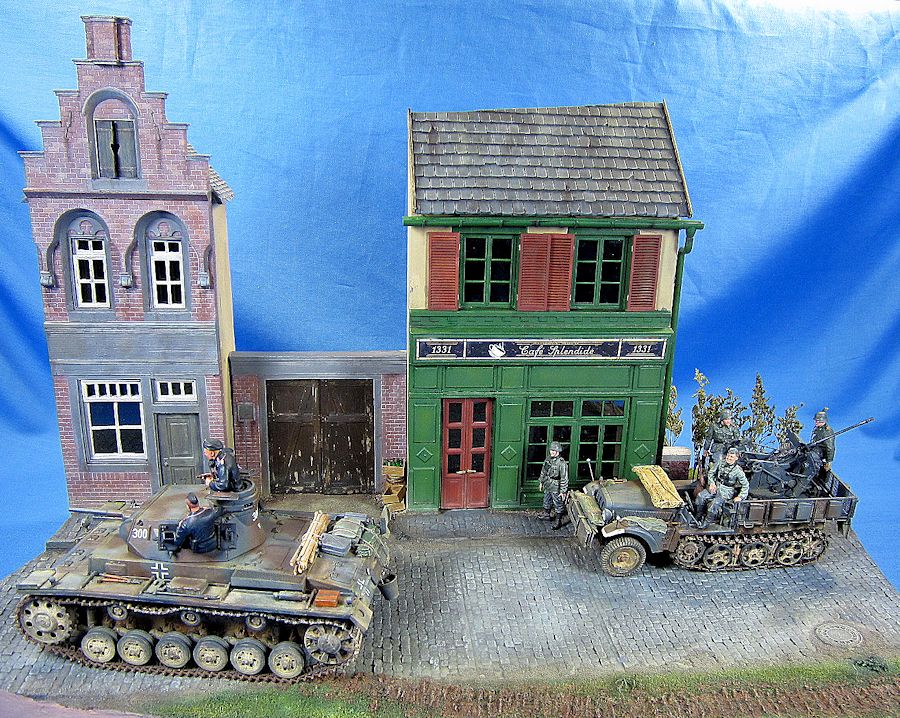
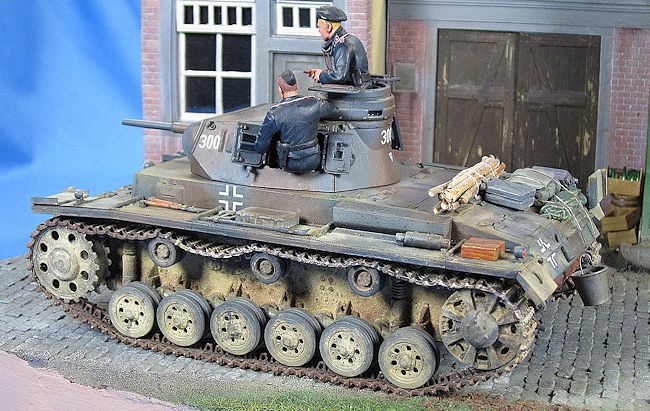
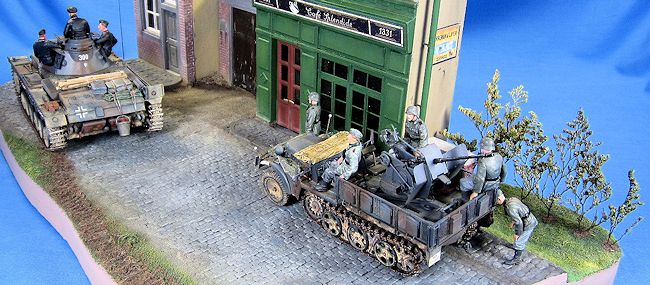
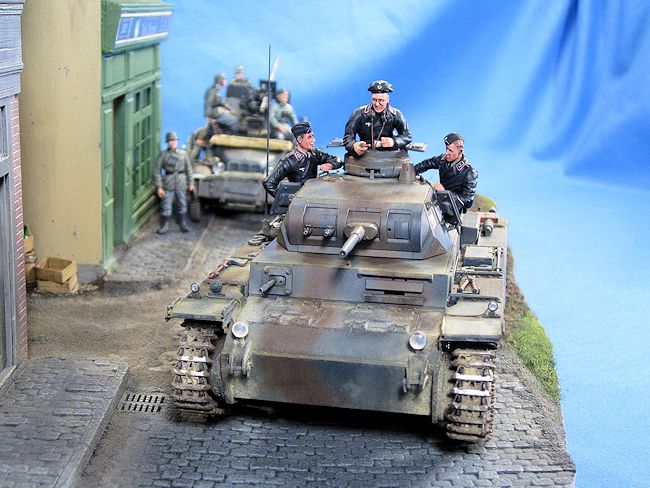
The
purpose of this diorama is to depict German armored might rolling into France in
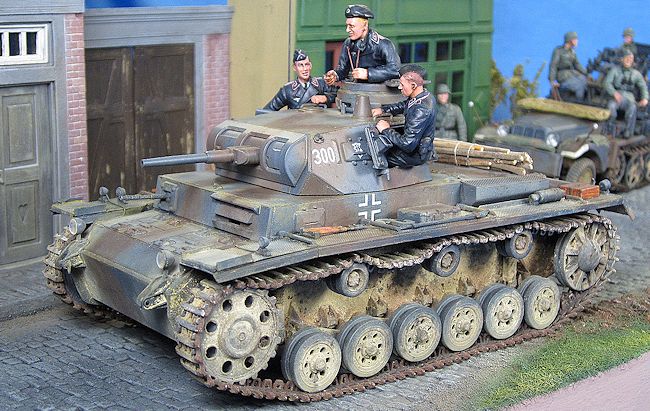
1940. To that end a Panzer III Ausf.
E of the 1st Panzer Division is moving down a street in Bouillon,
Belgium on the French border on May 12, 1940, a day before reaching the Meuse
River at Sedan. It is passing a
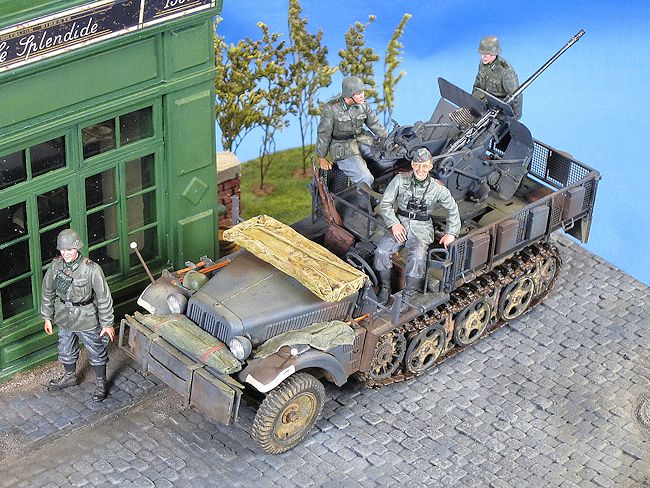
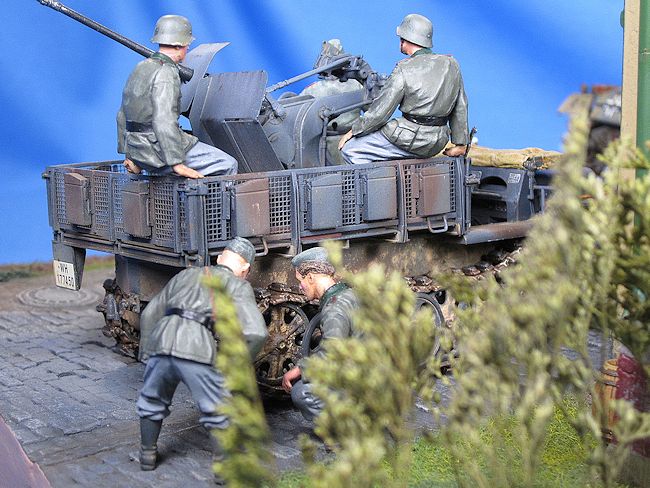
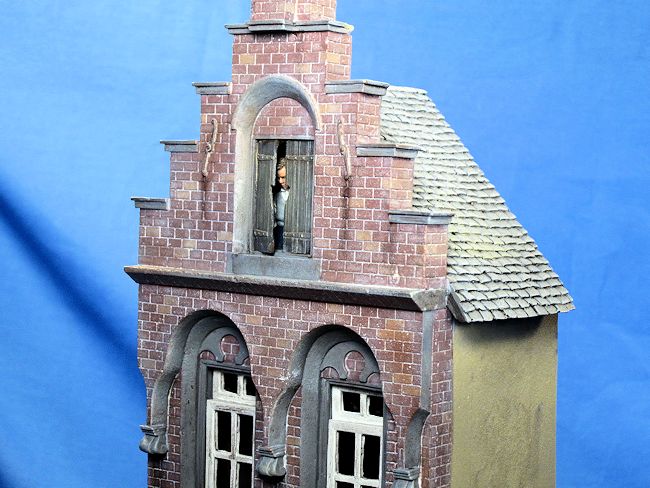
Sd.Kfz. 10/4 that has paused on the side of the road while a young local spies
on them from the tower of a building.
The vehicles are both from Dragon, while one house is a Verlinden kit and the other is a Miniart kit. The figures are a mixture of Warriors, Dragon and Miniart figures.
| THE KITS |
The Dragon
Panzer III Ausf. E I used (#9040) is an older kit hailing from the 1990s.
It has since been replaced in their lineup by a newer, fully updated kit
that makes me wish I didn’t have the older one in my stash.
Oh well. Despite that, the
kit was well molded, highly detailed, and included separate track links
 and a
small fret of photo etch parts.
and a
small fret of photo etch parts.
Dragon’s Sd.Kfz. 10/4 kit is brand new.
Issued in 2012, it is from their line of “Smart Kits” and it includes
separate track links and fairly comprehensive photo etch frets.
The level of detail is outstanding with many small, finely molded parts
and it includes a full engine and transmission; perfect for a “maintenance”
diorama.
Verlinden’s #1624 “The Old City” is an-all resin kit from my stash that
may now be out of production and hard to find.
Only the exterior of the building is detailed; the interior is empty.
Miniart’s “French Café” on the other hand
is a vacuum formed kit that includes detailed walls, roof, and floor surfaces on
both the inside and outside of the building, allowing the modeler to construct
and paint the interior of the kit as well as the exterior.
The kit also includes typical European style lamp posts and other such
street-type parts.
| CONSTRUCTION |
Moving to the Sd.Kfz. 10/4, this thoroughly modern kit is a joy for an
armor modeler. The parts count is
very high with some of the smallest, finest parts I’ve seen in injection molded
plastic - the level of detail is almost mind-boggling.
The engine and transmission could be kits on their own – not only do you
actually assemble the engine’s belts and pulleys as separate parts, but the
pulleys have tiny v-grooves molded into them!
 As with most armor kits you build up the suspension first, followed by in
this case the driver’s compartment.
Although I wasn’t going to show the engine compartment open, you still need to
build the engine since its rear end pokes through the firewall to connect to the
transmission, which sits between the driver’s and passenger’s seats.
I decided to paint and weather the driver’s compartment at this time
before moving onto the rest of the assembly.
I did this by spraying it in Testors Gunship Gray, which was followed by
an overall wash of MIG Productions Dark Wash.
Some details were picked out by hand (based on my imagination) and then a
little bit of dry-brushing using Testors Neutral Gray finished it.
As with most armor kits you build up the suspension first, followed by in
this case the driver’s compartment.
Although I wasn’t going to show the engine compartment open, you still need to
build the engine since its rear end pokes through the firewall to connect to the
transmission, which sits between the driver’s and passenger’s seats.
I decided to paint and weather the driver’s compartment at this time
before moving onto the rest of the assembly.
I did this by spraying it in Testors Gunship Gray, which was followed by
an overall wash of MIG Productions Dark Wash.
Some details were picked out by hand (based on my imagination) and then a
little bit of dry-brushing using Testors Neutral Gray finished it.
The 2cm gun is another masterful kit in and of itself, though the
instructions sometimes call out some incorrect part numbers, forcing you to
search for parts on the sprues. The gun shield is made up almost completely of
photo etch parts, again with many small details including tiny wing nuts!
While you cannot (easily) leave the gun so it can pivot up and down, you
can leave it unglued on its base so it can swivel 360° for positioning on the
vehicle later.
A curious inclusion in the kit is a sprue of parts representing the ramps that were installed on the back of the halftrack to allow the crew to roll the gun off the vehicle and set it up on the ground. Pictures of these vehicles during the France campaign often show these ramp parts stowed in a rack that was attached to the front of the halftrack. So even though the kit’s instructions don’t make any mention of these parts, I assembled them and glued them in place. Perhaps they are meant for a future release.
| COLORS AND MARKINGS |
My first
painting step was to prime the vehicles, and for that I used Mr. Surfacer 1000.
To apply the Panzer Gray basecoat I tried a new product I hadn’t tried
before, Vallejo’s AFV Painting System (Panzer Gray).
This is a set of 6 small bottles from their Model Air line and includes a
light gray primer, a satin varnish final coat, and four shades of gray ranging
from very dark to medium gray. The
back of the box gives you instructions on how to use the set, and one set should
get you through quite a few AFVs.
The purpose of this set is to give you all the pre-mixed shades you would need
to apply the “color modulation” technique to your model (basically a fancy
phrase for spraying the lower parts of the vehicle in darker shades and the
upper parts of the vehicle in lighter shades).
With the “cockpit” of the halftrack masked off I started airbrushing the
vehicles, starting with the darkest gray shade and working my way to the
lightest, making sure each lighter shade was applied as more of a highlight.
Once that was dry I applied the early war camouflage coat of dark brown
over the panzer gray using Tamiya Flat Brown sprayed in a random pattern.
 Up next were the markings, and for the tank I used some Archer Fine
Transfers I had in my stash while the halftrack received some of the decals that
came with the kit. To weather both
vehicles I followed the same basic plan, though I made the tank dustier and the
platform of the halftrack “chippier”.
Up next were the markings, and for the tank I used some Archer Fine
Transfers I had in my stash while the halftrack received some of the decals that
came with the kit. To weather both
vehicles I followed the same basic plan, though I made the tank dustier and the
platform of the halftrack “chippier”.
The first step was a pin wash, for which I used some heavily thinned
medium brown artist’s oil paint.
Next I sprayed a filter made of very, very thin Testors Wood over the whole
vehicle. When that was dry I added
some paint chips using Vallejo Chocolate Brown onto the areas liable to receive
a lot of crew traffic. I applied
some MIG pigments to the running gear, fixing them in place with Turpenoid
thinner. I then added more pigments
in the recessed areas of the vehicles, rubbing them into the paint surface dry
with an old brush to replicate dust.
Finally I used more beige and brown colored washes to add more dust and dirt
effects to various parts of the vehicles.
All of these steps combined to create the dirty effect I was looking for,
but I had to be careful to not overdo any of the single steps.
At this point I picked out the pioneer tools by hand, and then added some
rust colored pigments to the exhausts.
The tracks were sprayed medium brown and then given a good dusting with
pigments, after which they received a light dry-brushing of Testors Steel.
With the vehicles painted and weathered but devoid of any crew or extra
gear, I set them aside and turned my attention to the buildings.
| THE BASE AND FIGURES |
 I next began working on the diorama’s base, for which I used a Woodland
Scenics 12” x 24” x 1” thick foam sheet.
I added some curves and contours to the base using a hand saw and then
laid out two sheets of Verlinden Cobblestone Street that I had in my stash,
using the two buildings as a guide to set the scene.
After cutting them to size, I glued them to the base with white glue,
after which I decided to paint the buildings.
I next began working on the diorama’s base, for which I used a Woodland
Scenics 12” x 24” x 1” thick foam sheet.
I added some curves and contours to the base using a hand saw and then
laid out two sheets of Verlinden Cobblestone Street that I had in my stash,
using the two buildings as a guide to set the scene.
After cutting them to size, I glued them to the base with white glue,
after which I decided to paint the buildings.
As usual I had to search for figures that were in realistic poses and
would fit the tone of my diorama. In
this case the figures sitting in the Panzer III’s turret were relatively easy to
find – they were sourced from the Dragon “German Tank Crew” set (#6375) and an
old Warriors set (#35311) I had in my stash.
The halftrack’s crew was harder to figure out however.
The two behind the halftrack staring at a leaky bearing are from Dragon’s
“Germania Regiment” set (#6281). The
two sitting on the gun platform railings are from Miniart’s “German Artillery
Crew Riders” set (#35040), and the final two are older figures from my stash;
I’m not sure where they came from! I used
Hornet heads for four of them, and old Tamiya heads for the other two.
To paint them I used Vallejo’s acrylics, painting the tunics and helmets
Field Gray and then dry brushed them with some Field Gray that was lightened
with white. The trousers were
painted Vallejo Neutral Gray and then washed with a very dark gray wash.
The faces were painted using Andrea paints.
Once everything was dry I glued them to their respective vehicles with CA
glue.
 Finishing it up:
One of the final steps was to fit the vehicles with some stowage.
I first added some jerry cans and packs to the back of the Panzer III,
and then added some canteens, gas mask cans, and rifles to the halftrack.
I left the gun platform empty because I figured the crew wouldn’t want
any clutter in that area. Many of
the photos of the halftracks in action show the windscreen wrapped in a tarp and
folded flat on the vehicle’s hood, so I replicated that by wrapping the kit’s
windscreen in Kleenex and coating it with a water/white glue mixture.
I used the same technique to drape a couple of tarps on the vehicle and
then painted the three of them with Vallejo acrylics.
With everything finally glued in place I applied some Vallejo Matt finish
to anything shiny that needed to be turned flat, and called it a day
Finishing it up:
One of the final steps was to fit the vehicles with some stowage.
I first added some jerry cans and packs to the back of the Panzer III,
and then added some canteens, gas mask cans, and rifles to the halftrack.
I left the gun platform empty because I figured the crew wouldn’t want
any clutter in that area. Many of
the photos of the halftracks in action show the windscreen wrapped in a tarp and
folded flat on the vehicle’s hood, so I replicated that by wrapping the kit’s
windscreen in Kleenex and coating it with a water/white glue mixture.
I used the same technique to drape a couple of tarps on the vehicle and
then painted the three of them with Vallejo acrylics.
With everything finally glued in place I applied some Vallejo Matt finish
to anything shiny that needed to be turned flat, and called it a day
| CONCLUSIONS |
| REFERENCES |
-
Firefly Collection #5, “Case Yellow”
-
Osprey Publications, Campaign #264,
“Fall Gelb 1940 (1)”
-
Concord Publications #6001, “The German Army: Blitzkrieg 1939-41”
- Wikipedia, the Online Encyclopedia
August 2014 If you would like your product reviewed fairly and fairly quickly, please
contact
the editor or see other details in the
Note to
Contributors.