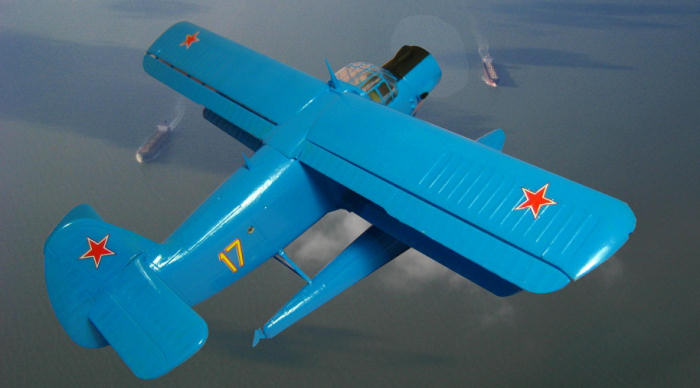
Trumpeter 1/72 Antonov An-2V "Colt" floatplane
| KIT #: | 01606 |
| PRICE: | 43 yuan at LeiShan in Beijing (US$6) |
| DECALS: | Two options |
| REVIEWER: | Richard F |
| NOTES: |
| HISTORY |
I have a fond memory of the boxy biplane known as the Colt. At an airshow in 1992, I went aboard an An-2 with my grandfather, who hadn't sat in the cockpit of a plane since handing back his Catalina after World War II. He sat in the pilot's seat, grabbed the control column, and I could see him instinctively looking over all the instruments as if he was already doing the pre-flight checks. I have no doubt he could have started her up and taken her into the air with no problems. But of course, we didn't steal the plane, and had to be happy watching someone else put it through its paces later that day.
 According
to wikipedia, the air force of the DPRK (North Korea) has a large fleet of
Colts, which supposedly are harder to pick up on radar thanks to their
wooden propellers and canvas flying surfaces. They are designed to sneak
paratroops into South Korea undetected. Personally, I wouldn't like their
chances getting across the De-Militarized Zone, which is probably the most
heavily Militarized Zone in the world!
According
to wikipedia, the air force of the DPRK (North Korea) has a large fleet of
Colts, which supposedly are harder to pick up on radar thanks to their
wooden propellers and canvas flying surfaces. They are designed to sneak
paratroops into South Korea undetected. Personally, I wouldn't like their
chances getting across the De-Militarized Zone, which is probably the most
heavily Militarized Zone in the world!| THE KIT |
 Did you
ever have kit that was just really hard and about 90 per cent of the way
through you just couldn't face it any more? No doubt we've all been there
but even though I mostly build older Airfix, Matchbox and Heller kits, I
really lost my motivation with this one.
Did you
ever have kit that was just really hard and about 90 per cent of the way
through you just couldn't face it any more? No doubt we've all been there
but even though I mostly build older Airfix, Matchbox and Heller kits, I
really lost my motivation with this one.| CONSTRUCTION |
Reportedly, four people can convert any An-2 to a floatplane in 20 hours (80 person-hours). Well, I wish those four people were at my place when I built this. It seemed to take me a lot longer than that to get the floats on this sucker.
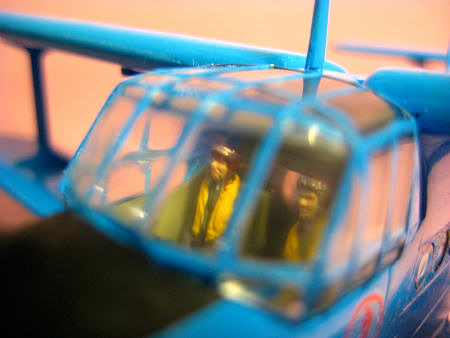
 But, first
of all, I built the plane, starting where else but up front. The cockpit really
calls for something extra, because it is big and has an enormous window. I
painted on some instruments and gave it two pilots, kidnapped from one of my
Airfix kits. The window is not crystal clear, not like some of those clear parts
in really modern kits, so I was comfortable with the pilots and some general
detail.
But, first
of all, I built the plane, starting where else but up front. The cockpit really
calls for something extra, because it is big and has an enormous window. I
painted on some instruments and gave it two pilots, kidnapped from one of my
Airfix kits. The window is not crystal clear, not like some of those clear parts
in really modern kits, so I was comfortable with the pilots and some general
detail.
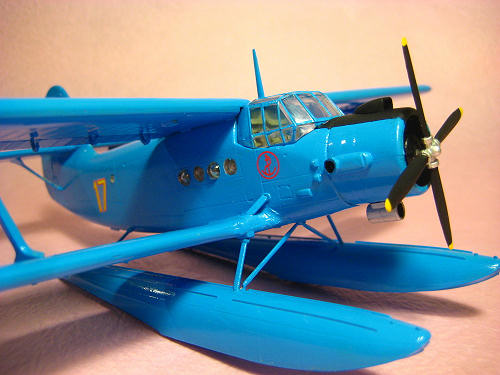
The engine needs some filler to get it to fit properly. Mine snapped off after I'd finished cleaning it up. Only the beginning of what was to come! The fuselage goes together ok - remember to install the cabin windows - and the tailplanes go on easily enough.
The wings on this kit don't fit so well, and because it's a biplane there's double the trouble. I added the lower wings first, and a lot of work was needed to get a smooth fit between the wing and the rear part of the fuselage (the bottom wing, when built, is one piece, with a bit of fuselage moulded in between). I spent a while sanding away here and eventually decided that good enough was good enough. I test fitted the top wing - also a one-piece affair once built - and did a lot of sanding to make it fit better where the trailing edge of the wing joined the fuselage.
At this point I made the decision to paint the whole plane (on colours, see below) before attaching the upper wing. When that was dry, I came to install the upper wing. Like its buddy down below, it didn't fit so well at the rear and despite my dry-fit earlier, it required a lot of filling to get a reasonable appearance. Because I had already painted the top wing and the rest of the plane, I had to gently work some filler into the gap as smoothly as possible and then paint over that. Not perfect, but more than adequate.
 Here is where
the trouble really began. It turns out that the struts between top and bottom
wing didn't really fit at all. They either went flush to the top, or to the
bottom, but they wouldn't go "sort-of flush" to both. It was either/or - I tried
all kinds of bending and twisting, cutting, sanding and shaving. I didn't want
to pack that gap full of filler because I had already painted everything and I
wasn't sure I was going to be able to see it, and for various reasons I was
starting to lose patience with this model. There was still a long way to
go.
Here is where
the trouble really began. It turns out that the struts between top and bottom
wing didn't really fit at all. They either went flush to the top, or to the
bottom, but they wouldn't go "sort-of flush" to both. It was either/or - I tried
all kinds of bending and twisting, cutting, sanding and shaving. I didn't want
to pack that gap full of filler because I had already painted everything and I
wasn't sure I was going to be able to see it, and for various reasons I was
starting to lose patience with this model. There was still a long way to
go.
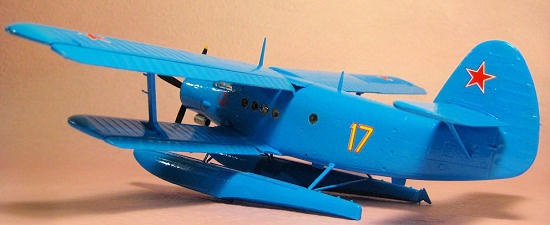
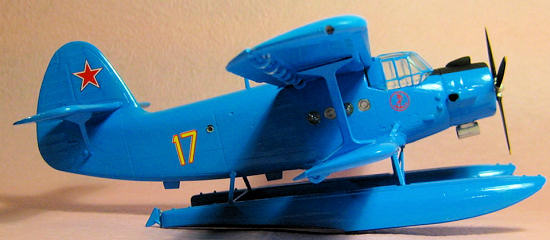
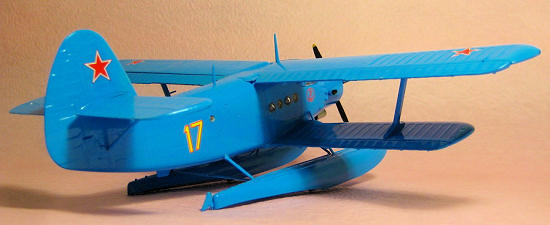
So I pressed on, and settled for the gap you can see in the side profile photograph.
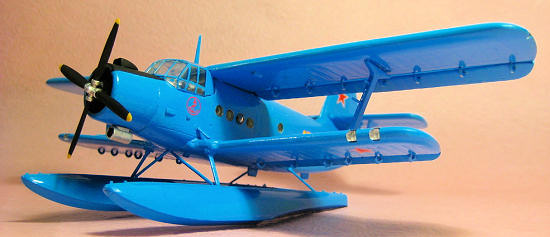
Next came the dreaded floats.
Where to start? The supports themselves are very flimsy, and I nearly broke them getting them off the sprues. How on Earth, I wondered, would they hold up the plane? I built a jig from paint jars and blue tack, and had my first, second, third, fourth and fifth attempts at getting it all to fit together and stay that way. Each time, something different went wrong. The struts didn't reach. The floats weren't straight. The floats were at the wrong angle. The struts didn't reach again!
Now, bear in mind I am a modeler of only average skill. I don't have the ability or the time to rebuild the support structure with brass tubing, which I would have done had I the skill to do so. A more advanced modeler contemplating this kit might not have the trouble I had.
 But I didn't
let that stop me. No! Onwards and upwards and one way or the other this plane
was going to FLY!
But I didn't
let that stop me. No! Onwards and upwards and one way or the other this plane
was going to FLY!
So I kept struggling with the floats and eventually, after (no lies!) about my ninth crack at it, everything came together and I had the courage to let it sit overnight and dry. I was sceptical that it would stand on its own two floats the next day, but by some modeling miracle it actually worked. I put the decals on at this point.
So, finished, right? Nuh-uh. I next had to move onto the wings' full-width control surfaces, which I'm going to call flaps.
Oh, Mighty Modeling Gods, why do you mock me so! This was really a pain, and I am dreading building my Dornier seaplane that has the same type of flaps. First, I had to cut off, sand down and paint all 26 tiny parts that connect the flaps to the wings. Fair enough. Then I attached all these links to the flaps and lined it up against the wing, to see if any of the links needed to be at a different angle once installed.
Later, when the links were basically dried into place, but I could still move them a little if I needed to, I started to install the flaps (on top and bottom wings). It took forever for me to attach these flaps and again all kinds of things went wrong. The lower ones went on reasonably well, but the top ones, and especially the top left one, just kept refusing to stay where they belonged. The top left wing was cursed. Possessed! And the Exorcist was nowhere in sight. So, despite its petulant, cruel "flap droop", I just kept trying, building jigs, holding my breath and holding the flap, trying to keep it at the same angle as its more merciful right-side counterpart. And then, "yes!". I did it! I look away, catch my breath, look back at the plane and...NooooOOO!!! Out, damn flap droop!
Far out! But eventually, somehow, I managed to get
all four flaps roughly at the same angle. The left one kept drooping for a while
and now, when I enter the room, I am certain it freezes when I look at it, then
droops the second I look away. The room temperature falls whenever I think of
the word "Colt" and last night, just after 3am, I could have sworn I heard it
scream maniacally at me. Bwahahah!
You can imagine why, after all that, I decided not to rig this biplane (nor look too hard for the missing rudder on one float, which will probably turn up at a crime scene one day, implicating me in some awful murder!).
And that's why we must never speak of it again.
| COLORS & MARKINGS |
 There are
basic decals for a Soviet or Polish version. The white-bordered Soviet stars are
badly out of register so only the Polish ones are really usable. But Soviet
stars are easy enough to obtain from your spares or from aftermarket sheets. I
got mine from a Tamiya 1/100 Il-28 in my stash.
There are
basic decals for a Soviet or Polish version. The white-bordered Soviet stars are
badly out of register so only the Polish ones are really usable. But Soviet
stars are easy enough to obtain from your spares or from aftermarket sheets. I
got mine from a Tamiya 1/100 Il-28 in my stash.
The whole aircraft was painted in Mr Color 34 - "Sky Blue". It took about five minutes to decal this thing. There should be a red stripe along the floats, but like the novice I am, I thought I could paint it after installing the floats. The idea of even touching the floats chills my blood, so it's staying the way it is.
| CONCLUSIONS |
March 2009
If you would like your product reviewed fairly and quickly, please contact me or see other details in the Note to Contributors.