| KIT #: | 72102 |
| PRICE: | £13-50 |
| DECALS: | Two options |
| REVIEWER: | Frank Reynolds |
| NOTES: | A challenging short run kit |
| HISTORY |
At the end of World War 2 at treasure trove of advanced aeronautical technology
was discovered in Nazi Germany, much of it relating to high speed jet-powered
flight and critically, the use of swept wings on high speed aircraft. The
knowledge was shared out between the victorious allies, the United States, Great
Britain, France and the USSR. In some cases whole design teams from Germany were
relocated to assist in developing the new technologies on both sides of the Iron
Curtain that would divide Europe. In the new arms race a whole range of new,
sometimes weird and wonderful projects emerged, designs t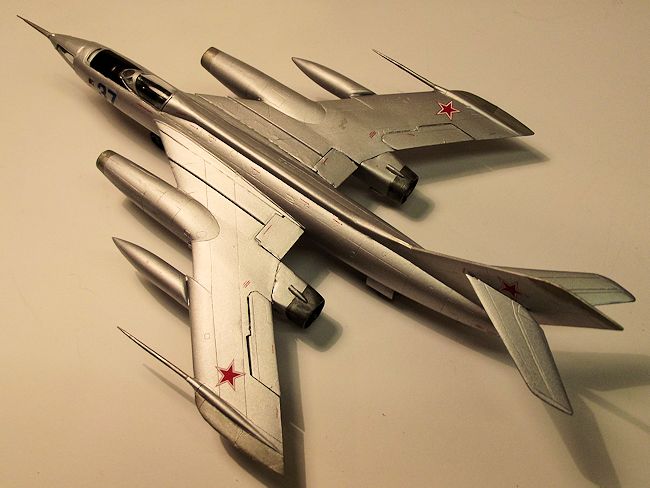 hat seemed to owe more
to Buck Rogers or Flash Gordon than the previous World of propeller driven
warplanes.
hat seemed to owe more
to Buck Rogers or Flash Gordon than the previous World of propeller driven
warplanes.
No design team was more energetic or more vigorous than the Yakovlev Design
Bureau in the Soviet Union. Having established its credentials in a
progressively improved series of piston engine fighters in the Yak-1/3/7/9
series it embraced the jet age with innovation and enthusiasm. Its first efforts
were minimally adapted versions of its piston engine tail dragger fighters, with
a jet engine grafted under the lower part of the forward nose, progressively
adapted further with a tricycle undercarriage and more powerful engines. It is
this pattern of incremental design improvements that led to a remarkable series
of versatile twin jet aircraft that would rival the likes of the Ju-88 or
Mosquito of World War 2, or the B-57/Canberra for versatility.
The USSR issued a requirement for a two seat radar equipped interceptor that
would emerge as the Yak-25, which first flew in June 1952. In the words of Bill
Gunston and Yefim Gordon it “led to a prolific and important family of
derivative aircraft” that transformed an initial subsonic design weighing less
than nine tonnes to a supersonic aircraft weighing twice as much. Through the
process of never making too many changes simultaneously , the -25 evolved into a
tactical bomber, a tactical and strategic reconnaissance type and even an early
form of unmanned drone. Via the -26 and -27 the family line was developed and
refined with progressively more powerful engines. What remained constant was the
basic configuration: a sharply swept shoulder mounted wing, each carrying a
single podded turbojet, the long slender fuselage and the distinctive
bicycle-type landing gear with wing tip outriggers.
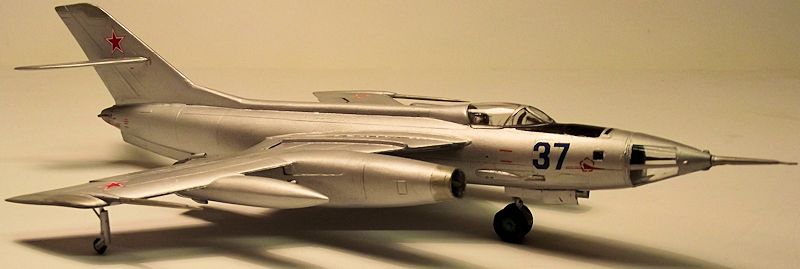
 The Yak 28 emerged from a ministerial decree of March 1958 for a supersonic
bomber, and the -28L first flew in early 1961. Although it was a wholly
different aircraft from the original – 25, its family resemblance was
unmistakable. It was configured for tactical nuclear strike and featured a
navigator’s station in a distinctively glazed nose. It was powered by two
R-11AF2-300 engines of over
13,000lb thrust with afterburner. It was
easily supersonic and a formidable attack bomber. The Yak 28L entered production
in January 1962 and a total of 111 were manufactured. Its NATO reporting name
was “Brewer-B”.
The Yak 28 emerged from a ministerial decree of March 1958 for a supersonic
bomber, and the -28L first flew in early 1961. Although it was a wholly
different aircraft from the original – 25, its family resemblance was
unmistakable. It was configured for tactical nuclear strike and featured a
navigator’s station in a distinctively glazed nose. It was powered by two
R-11AF2-300 engines of over
13,000lb thrust with afterburner. It was
easily supersonic and a formidable attack bomber. The Yak 28L entered production
in January 1962 and a total of 111 were manufactured. Its NATO reporting name
was “Brewer-B”.
The -28L had an all up weight of around 34,000lb and was capable of Mach 1.8 at
over 25,000ft with a range of 1500 miles.
Over 1,000 aircraft of all these Yak variants were built, the last lingering on in test and evaluation roles until the early 1990s.
| THE KIT |
The project comes in a small, rather flimsy, tray-type box with a water colour
illustration of one aircraft on the lid.
The box is crammed with a stack of nine small parts frames in a rather greasy
pale grey plastic. First impressions are of flash-choked parts with vague and
irregular edges. The parts breakdown is comprehensive and ambitious but the
short run medium means that many of the smaller parts are
 rather crude and
ill-defined. Surface detail consists of recessed panel lines of variable and
inconsistent depth. This is an all plastic project, no resin, etch or film is to
be found here.
rather crude and
ill-defined. Surface detail consists of recessed panel lines of variable and
inconsistent depth. This is an all plastic project, no resin, etch or film is to
be found here.
The clear parts are rather thick and comprise a one piece pilot’s canopy and a
two-part nose cone for the bombardier/navigator, split longitudinally. The kit
also includes a ground trolley and single bomb that could be a tactical nuclear
weapon
The instructions are six pages of cheap grey-scale newsprint. There are twelve
stages of construction set out in pictogram style and a chart with reference to
each parts frame and the parts themselves clearly numbered. One neat idea that
could be adopted by other manufacturers is that each assembly stage also list
the parts required, by number, at the top of the pictogram.
The smallish decal sheet provides six red stars and a choice of two bort numbers “Red 06” and “Blue 37” for otherwise anonymous silver finished aircraft. Tiny red airframe stencils are also provided.
| CONSTRUCTION |
From first impressions, I anticipated that this would be a long haul build. Each
and every part had to be cut from the frame, trimmed, sanded and fettled to
ensure that it would fit. This is everything that you hear about a short run
kit, and then some. Having examined the parts at some length I decided that,
although some of the finer detail is decidedly clunky, I would use all of the
components supplied.
Construction commences with the interior and the cockpit, weapons bay and nose
wheel bay are built up as box sections from flat panels, a common method of
construction with short run kits. There are plain side consoles in the cockpit
and a couple of indistinct boxes for the nose compartment. The ejection seats
have moulded in arm rests and a separate head rest. I did not have any great
hopes for 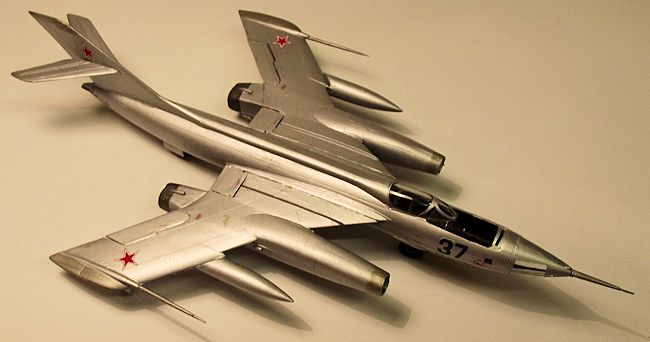 the clarity of the transparencies so the fuselage interior was sprayed
in a home brew concoction of lurid blue-green and simple masking tape seat belts
completed the minimal internal detail. The nose and rear wheel bays were
finished in aluminium silver
the clarity of the transparencies so the fuselage interior was sprayed
in a home brew concoction of lurid blue-green and simple masking tape seat belts
completed the minimal internal detail. The nose and rear wheel bays were
finished in aluminium silver
The internal sub assemblies were jiggled, fettled, trimmed, sanded and juggled
into position then the fuselage halves were joined. The fit of most parts was
challenging to say the least and I found that the best result was to use a
jointing technique that goes way back to the early 1960s. Kits of that era, and
to my best recollection especially Monogram, recommended that if parts did not
fit too well then a liberal amount of tube cement should be applied to the
joining faces and left to soften the plastic before the parts are joined
together. So squeezed together and heavily taped, the halves were joined and
left overnight to dry. No nose weight is needed since the airframe is supported
by the rearmost main undercarriage unit. At the same time I gathered up all the
parts that I could find that similarly needed to be paired up such as the wing
tanks and engine shock cones and gave them the same treatment.
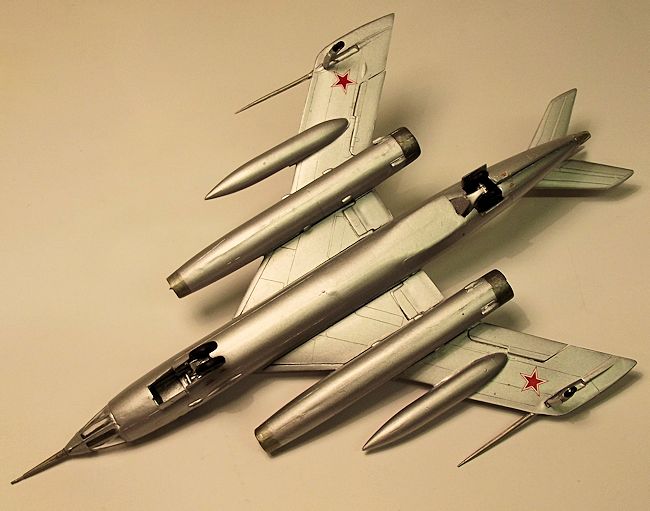
The wing halves consist of a one-piece main unit forming the upper surface from
root to tip with part of the upper engine nacelles and I was impressed with the
fact that this complex component was free from major distortion, although there
were a few minor sink marks of the upper surface. Separate wing flaps and
ailerons are provided and a small infill panel completes the under surface
between the nacelle and wing. The fit of parts was, at best, variable.
The engine nacelles were next, formed as left and right halves that trap a
centre body shock cone and a representation of a turbine wheel. One again the
halves were joined by well soaked tube cement.
I returned to the fuselage and glued in the weapons bay doors and the upper
fuselage hatch for the bombardier. The fit of these parts was atrocious so they
were levelled off as best I could and left to dry overnight.
 Next the wing assemblies were joined onto shallow stubs on the fuselage sides. I
got the impression that the slots and tabs on the respective parts must have
been raised by different tribes because they had little in common. In the end I
reduced the tabs to a minimum to assist in lining up the joints. The fit was so
sloppy that the wings and fuselage had to be jigged up with clothes pegs and
paint tins until the joint had hardened, again after an overnight wait. The
horizontal tails were also fixed at this time.
Next the wing assemblies were joined onto shallow stubs on the fuselage sides. I
got the impression that the slots and tabs on the respective parts must have
been raised by different tribes because they had little in common. In the end I
reduced the tabs to a minimum to assist in lining up the joints. The fit was so
sloppy that the wings and fuselage had to be jigged up with clothes pegs and
paint tins until the joint had hardened, again after an overnight wait. The
horizontal tails were also fixed at this time.
When all dry the whole airframe was rubbed down with coarse and medium sanding
sticks and then filler was slathered everywhere.
Green putty to just about every joint line on every surface.
This was rubbed down and the airframe
coated with grey auto primer from a rattle can to check for any imperfections,
which were many, so further dings and scratches were filled with white Revell
Plasto, which I find useful since it softer and more runny in application than
Green Putty. Again primed and rubbed back the airframe was acquiring a coat of
many colours, grey plastic streaked with green and white filler. The nose and
canopy transparencies were trimmed and fitted, and masked with Tamiya tape. The
three very prominent probes to the nose and wingtips were fitted at this stage
so that the joints could be blended in before painting. This makes the airframe
awkward to handle at the finishing stage, but I could not find a better option.
| COLORS & MARKINGS |
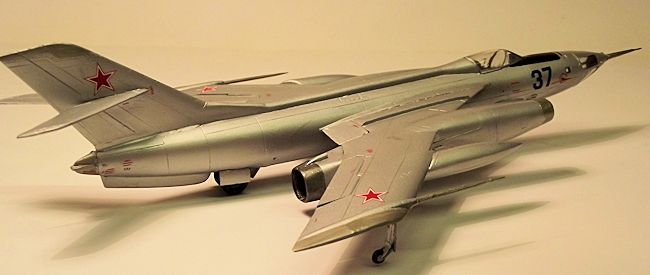
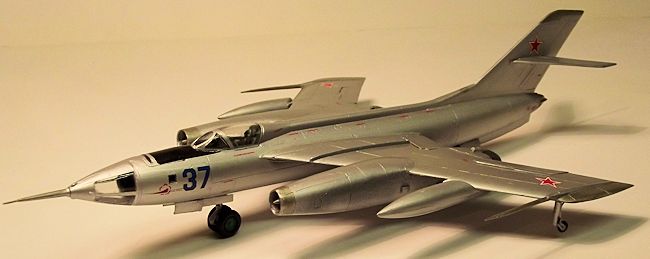
Now at last it was time for painting. A coat of that long suffering (and fast
dwindling) auto primer, followed by a finish of Tamiya XF-16 acrylic Aluminium
Silver with the small anti-glare panel over the nose picked out in XF-1 Matt
Black. Paint was applied with my
ever-reliable Iwata HP-C airbrush,
 thinned about 80:20 with Tamiya acrylic
thinners. The wing and fin tips, the engine intakes and exhaust areas were
picked out in X-32 Titanium Silver and XF-32 Metallic Grey for contrast. When
dry a brushed on coat of Future/Klear provided a base for the decals.
thinned about 80:20 with Tamiya acrylic
thinners. The wing and fin tips, the engine intakes and exhaust areas were
picked out in X-32 Titanium Silver and XF-32 Metallic Grey for contrast. When
dry a brushed on coat of Future/Klear provided a base for the decals.
The decals went on fairly easily. They are thin and potentially fragile but
settled down without the need for setting solutions. The instructions consist of
a 3-view drawing showing the top and underside of each subject but only a left
side view of the fuselage. Since there are 55 small stencils in red lettering,
this proved to be a minor problem in decorating the right side of the fuselage,
so where a numbered pair was provided on the sheet I assumed a mirror
arrangement for the right side.
| FINAL CONSTRUCTION |
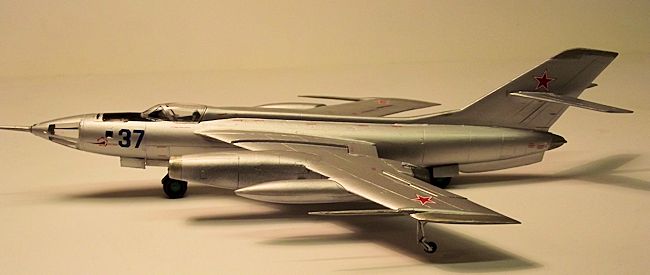
The undercarriage assemblies were a challenge since the legs had a heavy seam
line along their length and needed careful cleaning up. Each of the main gear
assemblies, front and rear, were in three parts and the vague joining surfaces
made life more difficult. However the instruction sheet includes full size side
view sketches of the assemblies which show the relationship of the main legs to
the support struts. These were built up, set into the front and rear gear bays
and once again left overnight before the gear doors were added. The wing tip
outrigger assemblies were added last. The final touch was filling the tiny
fuselage windows with Kristal Kleer.
| CONCLUSIONS |
This one of those kits that fought me at every turn, it was not so much finished
as having reached the stage that I could do no more with it.
This is certainly a “three footer” in my collection, the result of a challenging
kit and a test of my limited skills. It is a project that dragged on for weeks,
in part because so many overnight drying sessions
 were required and the amount
of time that I spent in rubbing down and refinishing. For those who want finer
detail or a competition-standard model there is much work to do in refining
parts such as gear and weapons bay doors and rescribing surface detail.
were required and the amount
of time that I spent in rubbing down and refinishing. For those who want finer
detail or a competition-standard model there is much work to do in refining
parts such as gear and weapons bay doors and rescribing surface detail.
For all that, I like it. A-Model produces the Yak-28 as one of their many
subjects that are not available anywhere else, so it is worth the effort. It may
have left me yearning for a crisp Tamiya kit that starts to assemble itself as
soon as the box lid is lifted, but it is satisfying to have fought it to the
finishing line and it is like nothing else that has ever appeared in my
collection. The price is reasonable, too.
Recommended to fans of the weird and wonderful.
| REFERENCES |
January 2014
If you would like your product reviewed fairly and fairly quickly, please contact the editor or see other details in the Note to Contributors.