Amodel 1/72 Tsybin NM-1
| KIT #: | 772229 |
| PRICE: | About £20 here in the UK |
| DECALS: | One option |
| REVIEWER: | Chris Peachment |
| NOTES: |
Amodel call it a 'Limited
Edition', which take to mean Short Run. No etched parts, and one clear
canopy is all you get. |
| HISTORY |
In 1954, the design bureau headed by Pavel Tsybin started development of
a ramjet
powered supersonic bomber, the RS. This design proved impracticable, and
a
smaller derivative, the
2RS
was proposed, which would achieve intercontinental
The NM-1 was a simplified, aerodynamic prototype for the improvement of
the Tsybin RS's handling. Intended for low-speed handling tests, the NM-1 had a
steel-tube fuselage with duralumin and plywood skinning. Powered by two Mikulin
AM-5 turbojets it first flew on 7 April 1959.
After
these trials, the RSR was redesigned as the R-020 to make it m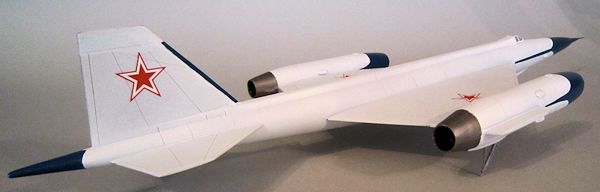 ore
manoeuvrable at high altitude. One very strange quiek was that it was intended
to avoid surface to air missiles by carrying out a barrel roll during which
manouevre it reached an altitude of 138,000 feet.
ore
manoeuvrable at high altitude. One very strange quiek was that it was intended
to avoid surface to air missiles by carrying out a barrel roll during which
manouevre it reached an altitude of 138,000 feet.
The RS was primarily of aluminium construction,
with a long circular section fuselage, which housed a pressure cabin for the
pilot together with cameras and fuel, with trapezoidal wings. The engines, two
Soloviev D-21 turbofans, were mounted at the tips of the wings. The aircraft had
a bicycle undercarriage, with outriggers under the engine nacelles. It was
planned to cruise at more than Mach 2 at a height of 65,600 feet and a
range of 2,340 miles.
Tumansky turbojets, the engine used in the Mig 21 replaced the Soloviev
turbofans. Five R-020 airframes were almost complete, with another 10 planned
when Soviet Premier Khrushchev cancelled the program.
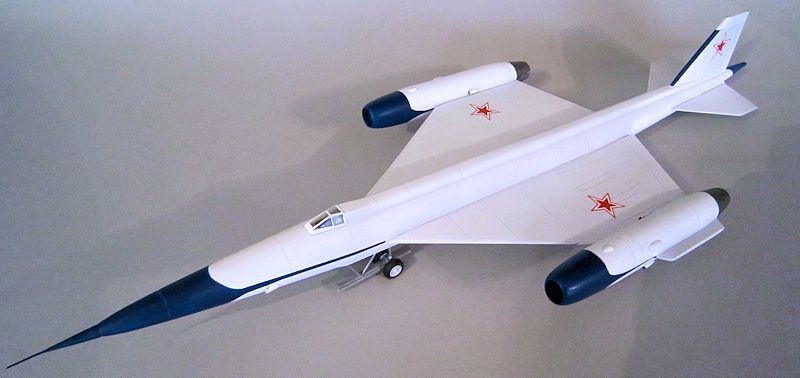
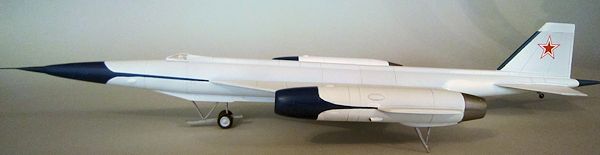
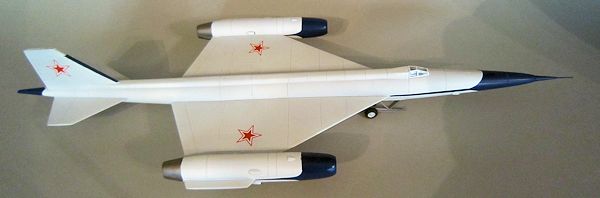
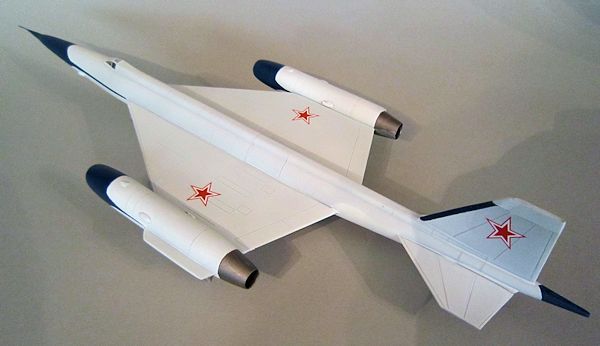
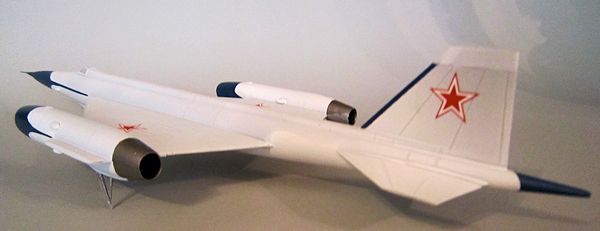
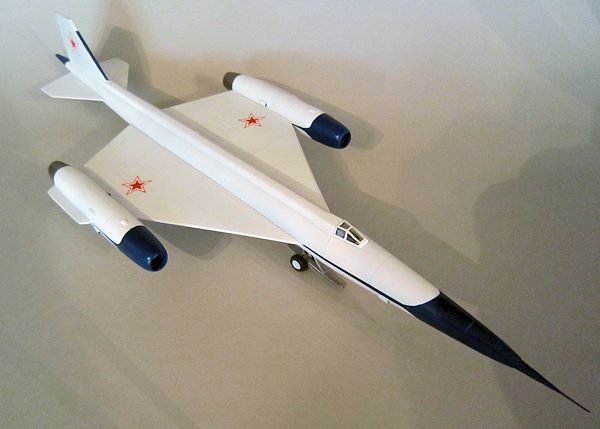
It is a strikingly handsome aircraft, with its trapezoidal wing plan, very long streamlined fuselage and wingtip engines, and reminiscent of the SR-71 Blackbird, which it resembles in intended mission.
| THE KIT |
I have taken Amodel to task in the
past for their iniquities, but nothing I say will ever get through to the
Ukraine, where they carry on supplying us with a good wide range of otherwise
unavailable Russian
 aircraft,
in their own inimitable fashion. The canopies still stay the same old glass
brick, the fit of the parts is appalling, and some of the results along the way
are just plain baffling (such as mystery tabs appearing out of nowhere, see
below). Still in a perverse way, one comes to love them. They demand a good
level of skill to get anything acceptable, and if you want this fascinating
beast, then it is the only game in town, apart from a resin version from Kora.
aircraft,
in their own inimitable fashion. The canopies still stay the same old glass
brick, the fit of the parts is appalling, and some of the results along the way
are just plain baffling (such as mystery tabs appearing out of nowhere, see
below). Still in a perverse way, one comes to love them. They demand a good
level of skill to get anything acceptable, and if you want this fascinating
beast, then it is the only game in town, apart from a resin version from Kora.
The plastic is moulded in light grey and is easy to work. Which is a blessed relief as you are going to have to do some serious trimming and sanding.
| CONSTRUCTION |
Beginning
as usual with the cockpit, you will find a very basic tub, with a seat. I
dutifully painted it in that queasy shade of turquoise greeny-blue, favoured by
Soviet aircraft, after some Russian psychologist had done some work to find the
least stressful colour to paint a cockpit interior. I don't
 know the
results on the pilots, but just looking at it makes me air-sick.
know the
results on the pilots, but just looking at it makes me air-sick.
I wondered whether to install a
little more detail, but am glad I didn't bother, as nothing, not even the
turquoise can be seen through the canopy, which looks like a solid lump of
vaguely translucent crystal. My plunge moulding skills are hopeless, but if
yours are good, you might want to make a new canopy, using the old as a master.
Be warned though that pictures of the interior are rare.
You can then join the two forward
fuselage halves together, and note, with a happy laugh, that they don't match.
Your laughter will then turn hollow as you realise that for some reason Amodel
have chopped the fuselage in half vertically somewhere around the mid point. The
only reason for this that I can guess at is that it is a very large beast, with
an exceptionally long fuselage, and they wanted to save money on the box, by
making the model fit into it, rather than the other way around. After cementing
the two rear halves together, you can then match up front and rear fuselage,
observe the
 way that
they don't match up, and wonder whether to cease modelling altogether, lose
faith in humanity and become a hermit.
way that
they don't match up, and wonder whether to cease modelling altogether, lose
faith in humanity and become a hermit.
Soldiering on, I carved and sanded for some hours until a reasonable fit
was achieved, mated the two halve together and left them overnight to dry solid.
They must be fully dry, to withstand the further sanding and re-scribing of the
panel lines, which restores some semblance of an aircraft.
Once that is achieved, you will
notice two things. One, just how large it is. And two, how few parts there are
left. Overcome with relief I then tried mating the inner wings to the fuselage,
only to relapse into something approaching clinical depression.
The fit is appalling. I have found the best thing to do in the past is
to cut off the locating tabs, which are either misplaced or have a nasty
shoulder on them which prevents a snug fit. Once that is done, you can start
carving and fettling the wing roots, until they match up to the fuselage
mounting points. This will only take you several days. You won't achieve a
perfect fit, but will instead reach a point where it is acceptable, and the
wings have lost at least a scale three inches in span.
And even now that I have glued them in place, I can still detect a gap
in one place if it is held up to a bright light. The answer to which is: don't
hold it up to a bright light.
 After
which the engine pods are plain sailing, simply requiring a few hours of sanding
the seams until they match, and inserting plugs inside them to prevent that
hollow look. The kit supplies some, but they don't fit.
After
which the engine pods are plain sailing, simply requiring a few hours of sanding
the seams until they match, and inserting plugs inside them to prevent that
hollow look. The kit supplies some, but they don't fit.
The engine pods complete with wing
tips are then offered up and glued in place.
It wasn't until after this is done,
that I noticed two odd tabs on the trailing edges. I thought that they might be
just that, tabs, but they are much too large, and anyway, extend past the
ailerons. I then realised that the under wing tip panels were simply too large,
and protrude aft of the trailing edge, after I had matched up the leading edge.
It was a simple task to cut them off and sand the resulting edge down. But it
says something about how carelessly the kit has been manufactured.
Never mind, what is life without
challenge.
| COLORS & MARKINGS |
I found two other models of the Tsybin on the internet, one by Phil
Bondo Brandt in some very impressive shades of aluminium, which looks like he is
a master of Alclad.
And another one in 1/61 scale in white with red
trimmings, which
looked very handsome. It was also made out of paper. Now there is
a world I have yet to look into.
And I may well do so because the results look
impressive. And I note that many IPMS meetings nowadays are admitting paper
models.
I digress.
 Just for
variation, I opted for the white and blue markings from the box art. After
masking the canopy very carefully, I blasted the whole thing with Humbrol White
Primer, which is an excellent paint for overall white as it seems to be self
levelling.
Just for
variation, I opted for the white and blue markings from the box art. After
masking the canopy very carefully, I blasted the whole thing with Humbrol White
Primer, which is an excellent paint for overall white as it seems to be self
levelling.
Once dry, the trimmings were careful masked off using Tamiya yellow
tape, of
which there is nothing better. The recent Revell attempt at masking tape just
doesn't match up.
For the blue I used Tamiya Blue X-4,
which is slightly darker than the box art, but a nice shade. Once dry, the usual
blobs which had crept under the tape were gussied up with a fine brush and some
Vallejo off-white. Then the whole thing given a coat of Satin sheen varnish. I
imagine the original was polished, but a high gloss finish never looks right to
me on a scale model. And it is the devil to photograph, as you get all sorts of
unwanted reflections, which make the aircraft look like it is made of shiny
corrugated iron.
Once everything was dry, you can turn attention to the undercarriage. And here things turn ugly again.
| FINAL CONSTRUCTION |
Landing gear location
points are vague, and I ended by having to drill some new location holes in the
forward undercarriage tub, and mess around with the various struts and skids
until it looked like the photographs. The tiny rear wheel just plugs in place
with no retraction gear. And the wing tip skids likewise need to be mounted
carefully. The whole undercarriage arrangement for such a huge aircraft looks
decidedly puny, and I can only imagine the horrors of landing it. And since it
has skids on the nose gear and wing tips, I imagine it was designed for rough
fields. In which case the pilot would have
 had his
eyeballs rattling in his skull on touch down. The aircraft sits with a strong
nose up attitude on the ground, and I think mine is a little understated in that
respect. In other words the wing tip skids should be lower.
had his
eyeballs rattling in his skull on touch down. The aircraft sits with a strong
nose up attitude on the ground, and I think mine is a little understated in that
respect. In other words the wing tip skids should be lower.
Why it could not be given a
conventional undercarriage is a mystery known only to Comrade Tsybin. He died in
1992, never having been consigned to a gulag, which was the fate of many
aircraft designers, so presumable he had the Kremlin's approval, if not his
pilots'.
Markings are simply six red stars in the usual positions. Since this was Amodel, I gritted my teeth before beginning, with an extra sheet on hand from the spares box. But all went well, and they bedded into the panel lines with a little micro-sol. Well done Amodel.
| CONCLUSIONS |
Recommend it to anyone who is tired
of comfortable living. And it makes a very nice companion for a Bell X-15, or a
SR-71
| REFERENCES |
http://www.century-of-flight.net/Aviation%20history/evolution%20of%20technology/sov_composites.htm
http://www.testpilot.ru/russia/tsybin/nm/nm1_e.htm
http://prototypes.free.fr/nm1/nm1-6.htm
http://hsfeatures.com/tsybinrsrpb_1.htm
And a short one on youtube, showing it flying to a backdrop of hydrogen
bombs going off. A fanciful idea, since it never dropped one.
October 2013
If you would like your product reviewed fairly and fairly quickly, please contact the editor or see other details in the Note to Contributors.