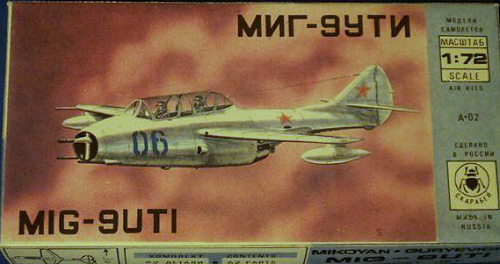
| KIT: | Scarebei 1/72 MiG-9 UTI |
| KIT #: | A-02 |
| PRICE: | $5.00 (approximately) |
| DECALS: | One option |
| REVIEWER: | Andrew Desautels |
| NOTES: | Crude, but workable |
| HISTORY |
In Stalin's Soviet Russia, just as the Great Patriotic War
(that's World War II for those of us in the west) was coming to an end, the
first Soviet jet fighter was still a year from its first flight. On April 24,
1946 the Soviets entered the jet age with the near-simultaneous first flights of
the MiG-9 and Yak-15. The MiG-9 was the more advanced of the two with its
all-metal construction and twin turbojets, but only a year later would be made
obsolete by the birth of the MiG-15 with its vastly superior performance due to
its swept wing aerodynamic layout. Within a few short years the MiG-9 was
largely forgotten.
As development of the MiG-9 progressed, it was clear that such an advanced
aircraft would need a suitable trainer to familiarize pilots only used to
propeller-driven machines. The first attempt, dubbed the FT-1, was judged
unsuitable because of poor visibility from the instructor's rear cockpit. The
design was refined with the rear cockpit being raised resulting in the long
canopy having a sloped appearance from the side, and the aircraft was put into
production as the MiG-9UTI.
| THE KIT |
 The
MiG-9 as a modeling subject was largely overlooked until the fall of the Berlin
Wall with the exception of the occasional vacuform kit (and a resin one as your
editor built one about 20 years ago. ed). Since the 1990's, however, several
attempts have been made in the injection-molded kit community. Most center on
the MiG-9F, numerically the most important variant, but the Russian firm "Skarabei"
(which may also be spelled "Scarabey", "Skarabey", or "Scarabei" depending on
how the Cyrillic alphabet is translated) released two kits of the overlooked
variants, namely the MiG-9M and the MiG-9UTI trainer. Typical of many Eastern
European kits, the molding is fairly crude with very rough fit, but fortunately
it does appear possible to make an acceptable model of the UTI if one is not
averse to working the raw modelmaker's skills. Both kits have also been reboxed
by the Maquette company with improved decals, the UTI as kit# MQS0003.
The
MiG-9 as a modeling subject was largely overlooked until the fall of the Berlin
Wall with the exception of the occasional vacuform kit (and a resin one as your
editor built one about 20 years ago. ed). Since the 1990's, however, several
attempts have been made in the injection-molded kit community. Most center on
the MiG-9F, numerically the most important variant, but the Russian firm "Skarabei"
(which may also be spelled "Scarabey", "Skarabey", or "Scarabei" depending on
how the Cyrillic alphabet is translated) released two kits of the overlooked
variants, namely the MiG-9M and the MiG-9UTI trainer. Typical of many Eastern
European kits, the molding is fairly crude with very rough fit, but fortunately
it does appear possible to make an acceptable model of the UTI if one is not
averse to working the raw modelmaker's skills. Both kits have also been reboxed
by the Maquette company with improved decals, the UTI as kit# MQS0003.
Let's just state right away that this will never be on the same level as the
current Tamigawajimi "wonderkits", or even anything from the past 20 years or
so. Still, this does not mean that the kit has nothing to offer. Besides the
fact that this is the only injection-molded option in any scale for the MiG-9UTI
(as of this writing), a respectable level of effort has been made in some areas
to offset its rather obvious shortcomings.
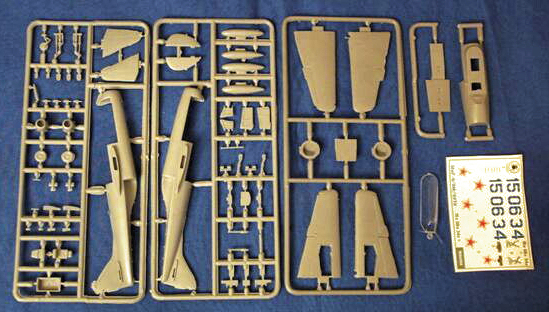
The UTI kit is molded in four sprues plus the cockpit transparencies, and
actually the non-transparent sprues contain all parts for both Skarabei kits.
Indeed, the only difference between each kit seems to be the transparencies
included, as even the decal sheet is common between kits. In examining the
major airframe components, it appears certain that major gaps will be
encountered, especially in joining the forward fuselage plug. Airframe detail
is raised, but the flight control surfaces are recessed, though very wide and
deep (think Matchbox).
Good effort was made for the cockpit, and indeed is far
superior to the first-generation Hasegawa kits where an L-shaped plastic slab
used to suffice for an ejection seat and a control stick and cockpit floor was
nonexistent. Skarabei actually offers multi-part ejection seats, control
sticks, full cockpit flooring, rudder pedals, and a simple instrument panel with
decals for instruments. It's certainly no True Details cockpit, but honestly,
it's probably plenty since the canopy does not have the option of being
positioned open. Good attention has also been given to detailing the landing
gear struts, traditionally a badly lacking feature in Eastern European kits.
The canopy, although very thick, is also nicely transparent and smooth, and not
cloudy or brittle.
DECALS
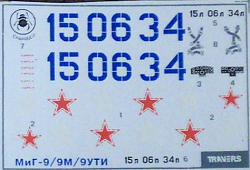 Decals are minimal, and are
under a single, solid sheet of decal film instead of the more traditional method
of individual films for each individual marking. To their credit, the white
background of the red star is provided as a separate decal, so if the colors are
misaligned, then it can only be your fault! On the other hand, the white is
admittedly NOT very white (and is pretty much invisible against the off-white
paper backing in the photo), so their separate printing may be a moot point at
best. Fortunately, replacement stars are readily available on the aftermarket
decal scene. I can't vouch for their quality in use as yet, but I personally
would opt for aftermarket replacements. As mentioned earlier, you will find the
same decal sheet in both the UTI and the 9M kits, although the Maquette release
has definitely improved decals.
Decals are minimal, and are
under a single, solid sheet of decal film instead of the more traditional method
of individual films for each individual marking. To their credit, the white
background of the red star is provided as a separate decal, so if the colors are
misaligned, then it can only be your fault! On the other hand, the white is
admittedly NOT very white (and is pretty much invisible against the off-white
paper backing in the photo), so their separate printing may be a moot point at
best. Fortunately, replacement stars are readily available on the aftermarket
decal scene. I can't vouch for their quality in use as yet, but I personally
would opt for aftermarket replacements. As mentioned earlier, you will find the
same decal sheet in both the UTI and the 9M kits, although the Maquette release
has definitely improved decals.
| CONCLUSIONS |
If you're used to the so-called "shake-and-bake" Japanese kits, you will likely
have some frustrations with this one. If, on the other hand, you're familiar
with the "diamond-in-the-rough" Eastern European kits, where the filling of
massive gaps and treating misaligned parts is a way of life, then this could be
a neat little project just for something completely different. The shape seems
reasonably close, and it is the only option other than scratchbuilding or
kitbashing to make a trainer MiG-9. Besides, you can't beat the price!
April 2006
If you would like your product reviewed fairly and quickly by a site that has over 300,000 visitors a month, please contact me or see other details in the Note to Contributors.