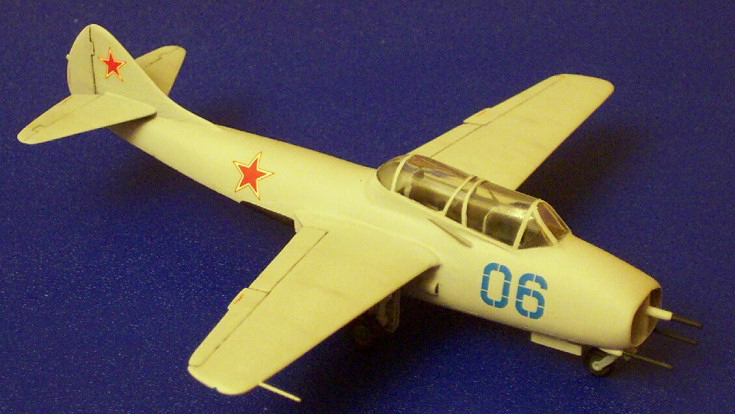
Skarabei 1/72 MiG-9 UTI
| KIT #: | A-02 |
| PRICE: | approx $5.00 |
| DECALS: | See review |
| REVIEWER: | Andrew Desautels |
| NOTES: | Not easily recommended |
| HISTORY |
In
Stalin's Soviet Russia, just as the Great Patriotic War (that's World War II for
those of us in the west) was coming to an end, the first Soviet jet fighter was
still a year from its first flight. On April 24, 1946 the Soviets entered the
jet age with the near-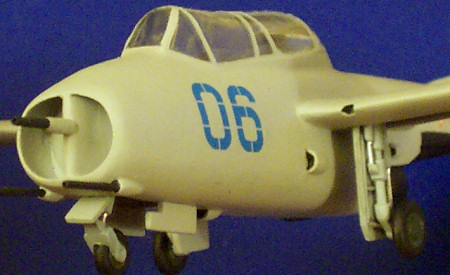 simultaneous first flights of the MiG-9 and Yak-15. The
MiG-9 was the more advanced of the two with its all-metal construction and twin
turbojets, but only a year later would be made obsolete by the birth of the
MiG-15 with its vastly superior performance due to its swept wing aerodynamic
layout. Within a few short years the MiG-9 was largely forgotten.
simultaneous first flights of the MiG-9 and Yak-15. The
MiG-9 was the more advanced of the two with its all-metal construction and twin
turbojets, but only a year later would be made obsolete by the birth of the
MiG-15 with its vastly superior performance due to its swept wing aerodynamic
layout. Within a few short years the MiG-9 was largely forgotten.
As development of the MiG-9 progressed, it was clear that such an advanced aircraft would need a suitable trainer to familiarize pilots only used to propeller-driven machines. The first attempt, dubbed the FT-1, was judged unsuitable because of poor visibility from the instructor's rear cockpit. The design was refined with the rear cockpit being raised resulting in the long canopy having a sloped appearance from the side, and the aircraft was put into production as the MiG-9UTI.
| THE KIT |
 As of
this writing, the only injected-molded MiG-9UTI trainer in any scale is
Skarabei's 1/72 offering. Typical of many Eastern
European kits, the molding is fairly crude with very rough fit, but with some
almost redeeming features. It will never approach the same level of quality or
accuracy as the current high-tech "wonderkits", or even anything from the past
20 years or so.
As of
this writing, the only injected-molded MiG-9UTI trainer in any scale is
Skarabei's 1/72 offering. Typical of many Eastern
European kits, the molding is fairly crude with very rough fit, but with some
almost redeeming features. It will never approach the same level of quality or
accuracy as the current high-tech "wonderkits", or even anything from the past
20 years or so.
I believe I can best sumarize this kit as the opposite of a Czech KoPro (KP) MiG kit; whereas the KP MiGs are famous as being amazingly accurate diamond-in-the-rough airframes with almost useless cockpit and landing gear, Skarabei seems to have put most of its effort into producing a somewhat decent cockpit and landing gear while neglecting the airframe. Amazingly enough, although Skarabei provides the same four non-transparent sprues for both MiG-9 (9/9M vs. UTI) kits, one is far better served in building the UTI trainer...but this is hardly a recommendation of the kit.
| CONSTRUCTION |
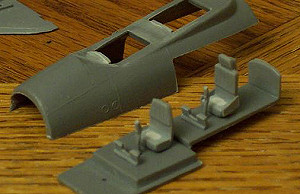
It all
starts with the cockpit. It's certainly no resin-detailed item, but it's still
a jump ahead of what used to pass as cockpit "detail" until the 1970's.
Multi-part seats with quilted cushioning, control sticks, rudder pedals and
decal seatbelts are all included. The wing halves go together without much fuss
if you're willing to use sandpaper and take care of relatively minor gaps. Wing
drop 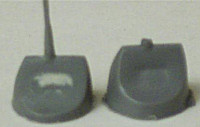 tanks are provided should you wish for that option. The first major snag
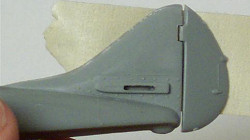
was hit when I found the intake splitter plug was much too long to fit properly
into the fuselage halves, as you can see in the photo. The blurred photo
(sorry, folks!) shows an uncorrected intake splitter next to a formerly
identical splitter, corrected for length and sink marks.
tanks are provided should you wish for that option. The first major snag
was hit when I found the intake splitter plug was much too long to fit properly
into the fuselage halves, as you can see in the photo. The blurred photo
(sorry, folks!) shows an uncorrected intake splitter next to a formerly
identical splitter, corrected for length and sink marks.
The biggest problem is the fuselage assembly itself. The major halves go together relatively okay once the intake splitter is dealt with, but the upper fuselage plug joins terribly with the forward fuselage, resulting in some of the worst gaps I've ever seen. Fortunately, if aligned properly, everything can be filled to the point that no problem with shape can be easily detected, but it is a lot of work and it destroys most of the fine rivet and panel detail.
 The
next big issue was the separately molded rudder; it is definitely too tall, and
must be filed and sanded down to size. In addition, the guns and wing pitot are
badly molded, but then these are usually tougher items to make in the old
standard injection molding, and are easily replaced with drilled plastic rod and
brass wire (which I did). The shape of the empennage (rear fuselage) where it
should blend with the vertical tail is crudely shaped, as it should definitely
have a more blended, fluid look. A mention must be made of the alignment of the
horizontal tails; the way the kit is produced, the right slab is very noticeably
further forward than the left slab. Fortunately,
this would not be the hardest thing to correct, especially compared with the
other problems one has to deal with.
The
next big issue was the separately molded rudder; it is definitely too tall, and
must be filed and sanded down to size. In addition, the guns and wing pitot are
badly molded, but then these are usually tougher items to make in the old
standard injection molding, and are easily replaced with drilled plastic rod and
brass wire (which I did). The shape of the empennage (rear fuselage) where it
should blend with the vertical tail is crudely shaped, as it should definitely
have a more blended, fluid look. A mention must be made of the alignment of the
horizontal tails; the way the kit is produced, the right slab is very noticeably
further forward than the left slab. Fortunately,
this would not be the hardest thing to correct, especially compared with the
other problems one has to deal with.
Very
good effort was made on nice landing gear doors, with interior detail, instead
of the flat, featureless slabs which usually pass for these items on Eastern
European kits. The only problem is, they're completely the wrong shape!! This
is not the worst thing to correct, except they are also a perfect match to the
equally misshapen gear wells. On the other hand, the landing gear struts are
nicely molded, far better than the fuselage, and are again a major improvement
from the featureless items normally found in kits from this region. One could
certainly nitpick their accuracy, but they are still better than much of the
kit. The main wheels appear
 slightly undersize, but are not the worst kit tires
I've ever seen.
slightly undersize, but are not the worst kit tires
I've ever seen.
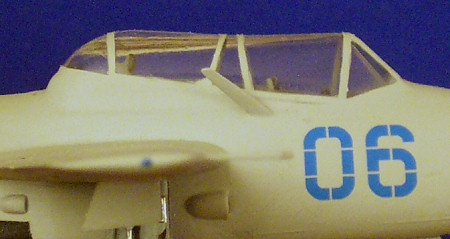
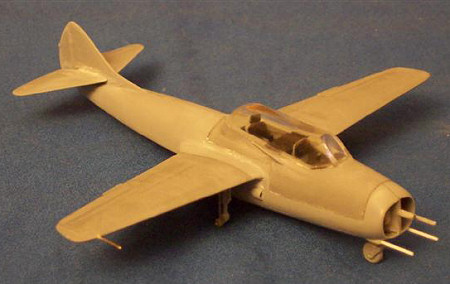
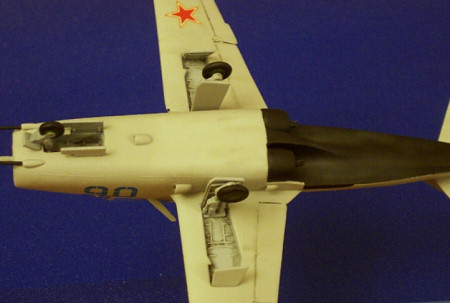
One final area of construction to point out is the canopy. It is admittedly very nicely molded, quite clear and smooth despite the thickness. The fact that there is no scribing to indicate where to mask the panes vs canopy framing is a minor annoyance if one has a photo or two of the real thing. The trouble is its profile shape, which is concave front to back, giving the impression that it is sagging in the middle. In addition, the windscreen area is raised considerably and is very different from photos of the real thing, bearing a closer resemblance to the original (and rejected) MiG-9 trainer prototype, the FT-1. Still, even the FT-1 did not have the sloped, sagging profile of this kit part. (See image way abover) Solutions are limited for those who do not have vacuforming capability; one cannot simply use a MiG-15UTI canopy from the KP kit or from Aeroclub, as the canopies of the MiG-9 and MiG-15 trainers are completely different.
| COLORS & MARKINGS |
 First of
all, if one wants an accurate MiG-9, then they must avoid at all costs any
suggestion to paint it in natural metal! Certainly this once made good sense
since nearly all early Soviet jets followed this practice, including all the MiG
jets from the MiG-15 until the mid-series MiG-21's. All good photos of MiG-9's,
however, clearly show aircraft finished in overall gray paint. Fortunately for
us model makers, it appears that many differing shades of gray were used, so we
are free to explore our own preferred mixes and shades.
First of
all, if one wants an accurate MiG-9, then they must avoid at all costs any
suggestion to paint it in natural metal! Certainly this once made good sense
since nearly all early Soviet jets followed this practice, including all the MiG
jets from the MiG-15 until the mid-series MiG-21's. All good photos of MiG-9's,
however, clearly show aircraft finished in overall gray paint. Fortunately for
us model makers, it appears that many differing shades of gray were used, so we
are free to explore our own preferred mixes and shades.
I made a mix of Model Master light ghost gray, light gull gray, and light gray. The wheel wells and struts are in a mix of medium gray and dark ghost gray. I mix colors so as not to use a specific FS number on any Soviet item, as I'm very sure the Soviet government could not have cared less about American Federal Color Standards!!
DECALS
I wasn't
expecting much from the decals, and in the case of the all-important
red-and-white stars, my (low) expectations were unfortunately met. Actually the
bort numbers did okay, as did the stenciling and the whi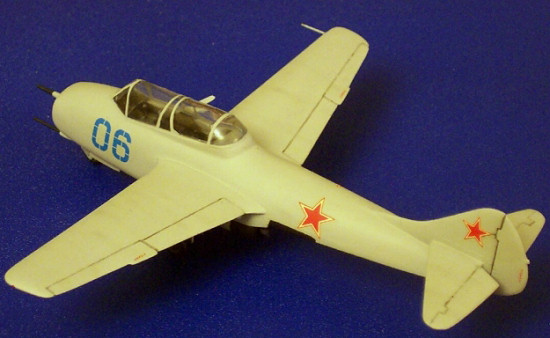 te backgrounds for the
stars, even if they weren't the purest white, nor was their shape perfect. The
decal film is very thin and required no solvent to adhere to the model surface,
a rare thing! The problem was in the red stars themselves, which were to be
positioned with the white background. It seems that the normally wonderful gift
of very thin decal film proved TOO thin, and since the red ink has several areas
with no ink to make it thicker and stronger, they had a horrible tendency to
crumple up at the ends into unrepairable masses. I only got one on without
destroying it, and in the end I removed the white backgrounds and used the stars
from a Hasegawa MiG-23 kit instead.
te backgrounds for the
stars, even if they weren't the purest white, nor was their shape perfect. The
decal film is very thin and required no solvent to adhere to the model surface,
a rare thing! The problem was in the red stars themselves, which were to be
positioned with the white background. It seems that the normally wonderful gift
of very thin decal film proved TOO thin, and since the red ink has several areas
with no ink to make it thicker and stronger, they had a horrible tendency to
crumple up at the ends into unrepairable masses. I only got one on without
destroying it, and in the end I removed the white backgrounds and used the stars
from a Hasegawa MiG-23 kit instead.
Maquette reboxed this kit with improved decals (which I used on the MiG-9M kit), although they are much brighter in color, the bort numbers much larger, and actually look more toy-like in my opinion. So, although the decals themselves are improved in printing and quality, I am hesitant to recommend them based on their final appearance.
| CONCLUSIONS |
 This
would definitely be a very frustrating kit to anyone not used to
"diamond-in-the-rough" Eastern European kits. On the other hand, if you enjoy
such kits where the filling of massive gaps and
treating misaligned parts is a way of life, then this could be a neat little
project just for something completely different, and this subject is definitely
different! The shape is not perfect, but once finished it is not quite a
complete pig, either. Not easily recommended, but not one to completely
discount either. Who knows? If anything is possible, then maybe someone who
loves filling massive gaps and rescribing detail could stick a True Details F-94
resin pit into it, vacuform a decent canopy, and fix the shape of the empennage,
resulting in a little beauty!! But it would take an AWFUL lot of work and
dedication, and even I'm not crazy enough to undertake it in my foreseeable
future.
This
would definitely be a very frustrating kit to anyone not used to
"diamond-in-the-rough" Eastern European kits. On the other hand, if you enjoy
such kits where the filling of massive gaps and
treating misaligned parts is a way of life, then this could be a neat little
project just for something completely different, and this subject is definitely
different! The shape is not perfect, but once finished it is not quite a
complete pig, either. Not easily recommended, but not one to completely
discount either. Who knows? If anything is possible, then maybe someone who
loves filling massive gaps and rescribing detail could stick a True Details F-94
resin pit into it, vacuform a decent canopy, and fix the shape of the empennage,
resulting in a little beauty!! But it would take an AWFUL lot of work and
dedication, and even I'm not crazy enough to undertake it in my foreseeable
future.
May 2006
| REFERENCES |
Belyakov, R; MiG: Fifty Years of Secret Aircraft Design
If you would like your product reviewed fairly and fairly quickly, please contact the editor or see other details in the Note to Contributors.