Czech Model 1/48 JRF 'Goose'
| KIT #: | 4812 |
| PRICE: | $49.95 SRP |
| DECALS: | Three options |
| REVIEWER: | Pat Earing |
| NOTES: |
Flying Colors Aero (Sheets : FAC48001,
FAC48006 and FAC48105) |
| THE KIT |
Sometimes kits that I have waited for
years to see produced and gotten very excited about when they were,
prove to be a disappointment for no apparent reason.
For me, the Czech Models JRF Goose is a
classic case.
In the late 1990’s I was building anything
that landed on or near water in terms of modeling, and although I
desperately wanted a Grumman Goose on the shelf the only option
available was a spendy and difficult to find resin kit.
However, this was the beginning of the
magical time when Classic Airframes and
 others began fleshing out
available options in 1/48 scale that we never hoped to see as
injection molded kits; so it was only a matter of time and-bam-there
it was-an easy to find kit of a highly desirable (at least to me)
subject.
I immediately purchased two and started
building.
others began fleshing out
available options in 1/48 scale that we never hoped to see as
injection molded kits; so it was only a matter of time and-bam-there
it was-an easy to find kit of a highly desirable (at least to me)
subject.
I immediately purchased two and started
building.
Unfortunately, it wasn’t an easy kit to
assembly; or I made it that way in my case.
Furthermore, I chose a really mundane scheme
that fit a time frame for the ‘theme’ I was building at that time
but little else.
So, right after decals were applied, and in
a very nearly finished state I tossed the model into the Box O’Doom
where it sat for the better part of five years.
Back about three years ago now, I pulled
the kit out and spent a day finishing it up and putting it on my
display shelf.
I did not do much in the way of finish
work-no weathering or extra-just finished and on display was the
order of the day.
Although finished, the kit nagged at me as
it really wasn’t inspiring, yet it was well built and I had harbored
such high hopes for the kit.
Oh well, it was finished, and on to the next
kit I went.
Recently I have started building models
by country themes.
For 2012 I ‘visited’ Ireland and for 2013
the theme is focused on aircraft from Scandinavian air forces.
This thematic method of choosing builds has
 proved to be satisfying and fun for a number of reasons; foremost,
it forces me to build kits way outside my usual interest comfort
zone as well as my modeling comfort zone, and two, it creates
research opportunities that challenge me.
The only real rules for my builds are that I
try and build ‘oddball’ and lesser known planes and in deference to
my wife I try not to load them out or display too many guns.
So, starting some research on Sweden and
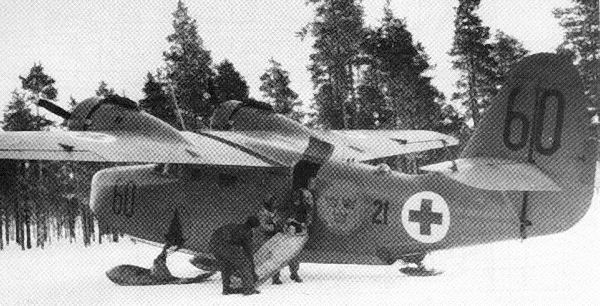
Norway I began utility planes and I ran across some photographs of a
bright orange Goose on skis.
What?
A triphibian JRF?
Not exactly, as the skis were static for the
time they were installed, but the scheme was fantastic and exactly
what I had in mind when I originally built my Czech kit!
But… I have to admit I did not relish
finding another kit (I had long since sold my second copy) or the
prospect of building another; but, glancing at my display case an
epiphany occurred-why not restore the wart I had already built?
proved to be satisfying and fun for a number of reasons; foremost,
it forces me to build kits way outside my usual interest comfort
zone as well as my modeling comfort zone, and two, it creates
research opportunities that challenge me.
The only real rules for my builds are that I
try and build ‘oddball’ and lesser known planes and in deference to
my wife I try not to load them out or display too many guns.
So, starting some research on Sweden and
Norway I began utility planes and I ran across some photographs of a
bright orange Goose on skis.
What?
A triphibian JRF?
Not exactly, as the skis were static for the
time they were installed, but the scheme was fantastic and exactly
what I had in mind when I originally built my Czech kit!
But… I have to admit I did not relish
finding another kit (I had long since sold my second copy) or the
prospect of building another; but, glancing at my display case an
epiphany occurred-why not restore the wart I had already built?
So, here you have a brief article focused
on the restoration of a previously completed model that represents a
true rag to riches transformation.
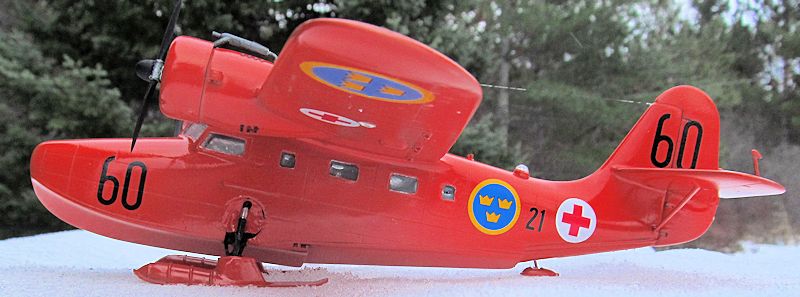
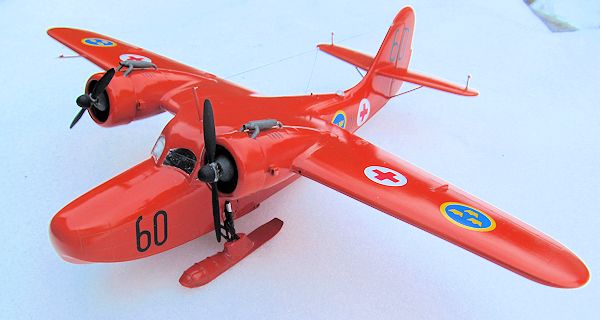
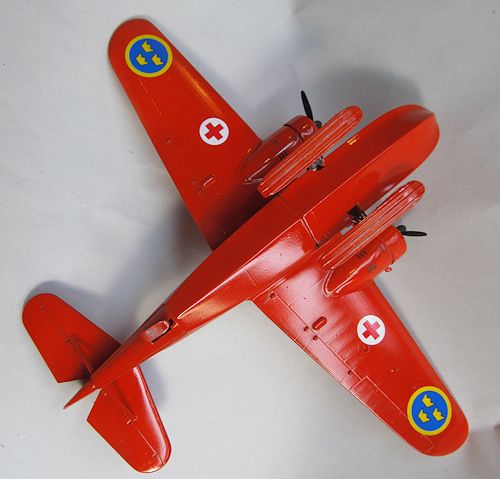
For a history of the goose I will refer the reader to the numerous websites available through a quick Google search. In regards to the Goose in Swedish service, I know that they had one and it served from 1951 until 1962 when it was stricken due to a takeoff mishap. The plane was used on skis in the winter; the outriggers were removed and skis similar to those used on the Gloster Gladiator were fitted to the landing gear. Summer use found it back on wheels or in the water.
| CONSTRUCTION |
Construction really began with a
search for decals.
If I could find the numbers in the correct
font and Swedish roundels, I figured everything else could be
painted or scavenged.
Looking on the Hannants web site
using a Swedish site search I found not only roundels, but
the decals needed for this specific aircraft in
 1/48 scale-BINGO!
The decals are from Flying Colors Aero, and
in order to recreate this particular aircraft the modeler is
required to buy three sheets of decals… and they are not of the most
affordable or often used sort.
The actual decals for the Goose are set FCA
48105.
This sheet covers the six red-cross decals
and the two small 21 numerals on the side of the fuselage.
In addition to this set, the modeler also
needs sheet FCA 48001 Swedish National Insignia and FCA 48006
Swedish Narrow Black Numerals.
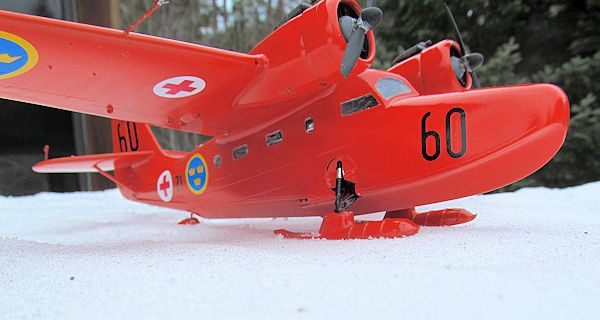
The skis were a harder item to find.
There exists a 1/72 scale conversion set,
but nothing available for 1/48 scale.
The Flying Colors instruction sheet mentions
that the Roden Gladiator skis are a nice match for those used on the
Swedish JRF-unfortunately, I did not have a Gladiator in my stash,
and I certainly wasn’t interested in buying one just for the skis.
Knowing that somebody out there had to have built the Gladiator and
not used the ski option I put out a plea to the modeling community
at large and I soon had a set of skis for my Goose!
We modelers are nothing if not a helpful
bunch.
With decals and skis in hand it was time to
model.
1/48 scale-BINGO!
The decals are from Flying Colors Aero, and
in order to recreate this particular aircraft the modeler is
required to buy three sheets of decals… and they are not of the most
affordable or often used sort.
The actual decals for the Goose are set FCA
48105.
This sheet covers the six red-cross decals
and the two small 21 numerals on the side of the fuselage.
In addition to this set, the modeler also
needs sheet FCA 48001 Swedish National Insignia and FCA 48006
Swedish Narrow Black Numerals.
The skis were a harder item to find.
There exists a 1/72 scale conversion set,
but nothing available for 1/48 scale.
The Flying Colors instruction sheet mentions
that the Roden Gladiator skis are a nice match for those used on the
Swedish JRF-unfortunately, I did not have a Gladiator in my stash,
and I certainly wasn’t interested in buying one just for the skis.
Knowing that somebody out there had to have built the Gladiator and
not used the ski option I put out a plea to the modeling community
at large and I soon had a set of skis for my Goose!
We modelers are nothing if not a helpful
bunch.
With decals and skis in hand it was time to
model.
I honestly cannot comment on the
construction of this kit due to the sheer number of years that have
transpired.
I do remember that I did a fair amount of
scratch building inside and that the canopy fit poorly,
necessitation lots of filler, priming and rescribing.
That said, the work that I did do was
adequate to above average.
I started the current transformation by
removing the outriggers, tires and tail wheel.
I further removed and saved the propellers,
horizontal tail counter balance ‘thingies’, exhaust collectors and
the antenna.
The next order of business was to carefully
wet-sand the entire model with 600 grit sandpaper.
This step allowed me to remove the existing
decals, and feather out any problem areas in the existing paint job.
 In terms of converting the airframe,
these are the changes I made based on visual research of existing
photographs:
In terms of converting the airframe,
these are the changes I made based on visual research of existing
photographs:
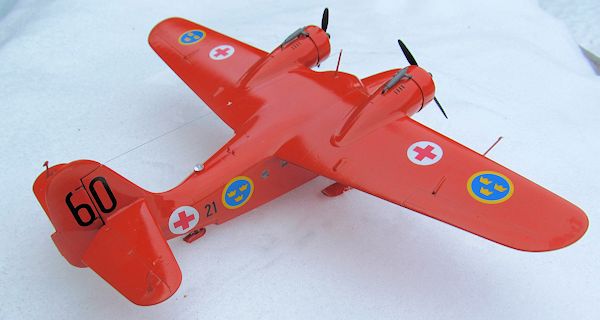
I. Added small clear dome just behind cabin door on left upper fuselage. This Item came from a leftover clear sprue from a Hasegawa F-18 build and some plastic tubing.
II. Two small vents using micro brass tubing centered on the spine of the fuselage just ahead of the cabin door.
III. I drilled and set small bolt heads from a model railroad aftermarket set I bought years ago for the mounting points of the outriggers.
IV. Wine bottle foil wheel well canvas covers. These were the hardest part of the conversion to make.
V. The skis were installed. I created a cap on the top with 15 thousands sheet plastic that covered and helps hold the skis to the gear legs. To strengthen the mounting point I drilled through the leg and installed a small section of 1mm stainless wire that sets on each edge of the ski boot. The same wire was used for the tail ski leg.
Once everything was installed and re-masked I re installed the antenna and balance units on the tail and moved forward with the painting process.
| COLORS & MARKINGS |
Nothing fancy here-just one solid color and that is orange.
Flying Colors recommends Humbrol HU 18
orange.
I did not have any of this paint, and
justifying my choice based on cash outlay to date, I chose to use
Model Master international Orange (FS 12197 and Testors number TS
2022) instead.
This color looks very close to HU 18 (and
images), and I had a bottle in hand.
Starting with Floquil Engine Black I did a
 quick panel shade, followed by a complete overcoat with Model Master
Flat White (TS 1768) for a uniform base coat under the somewhat
translucent International orange.
When dry I reducing the International Orange
paint 1:1 with Testors Universal Thinner tacked the model off with a
tack cloth and sprayed away.
I ended up doing three light coats to
achieve coverage, and when tacky I over-sprayed the entire model
with Testors Glosscoat from a rattle can.
quick panel shade, followed by a complete overcoat with Model Master
Flat White (TS 1768) for a uniform base coat under the somewhat
translucent International orange.
When dry I reducing the International Orange
paint 1:1 with Testors Universal Thinner tacked the model off with a
tack cloth and sprayed away.
I ended up doing three light coats to
achieve coverage, and when tacky I over-sprayed the entire model
with Testors Glosscoat from a rattle can.
After a few days of dry time I sat down and applied the
decals.
The Flying Colors decal sheets were printed
on two different types of paper backing; clearly two different types
of decal paper were used.
This became very apparent when I began
trying to use them as the decals from the ‘blue’ backed paper
released, but those printed on the ‘gray’ paper did not want to
release from the backing paper.
Other than this little hiccup, the decals
went on perfectly and settled down nicely with MicroSol.
Once the decals were dry, I wiped the model down with a
paper towel and water to remove any leftover decal residue and gave
the whole model another coat of GlossCoat.
 After another few days of dry time I set about highlighting
panel lines with a wash of artists oils thinned with Turpeniod.
This is my second attempt using oils instead
of acrylics, and I am trying to bond with the system but I honestly
think I get better results with the acrylics. I also dry brushed
Model Master steel on the bottom of each ski.
After another few days of dry time I set about highlighting
panel lines with a wash of artists oils thinned with Turpeniod.
This is my second attempt using oils instead
of acrylics, and I am trying to bond with the system but I honestly
think I get better results with the acrylics. I also dry brushed
Model Master steel on the bottom of each ski.
Once done with the washes I began reassembly.
I reinstalled the propellers, the exhaust
collectors and that was that.
I used .007 fishing line for a wire antenna,
tensioned with a hairdryer.
Finally, I realized I had forgotten to touch
up the landing gear legs, so I touched them up with Floquil Engine
Black and created the oleo section with Model Master chrome.
| CONCLUSIONS |
 Overall the restoration was stunning
success.
I have always been disappointed with this
build, but now… it is beautiful, bright and an eye catcher!
I spent about 10 hours total on the
reconstruction, but unfortunately almost the cost of the kit again
in decals!
Oh well, I feel that it was worth it, and
that is what counts at the end of the day. I seldom revisit kits,
but this changes that mindset for me-if a scheme loses interest,
there may be a better one that only needs a bit of ‘restoration’
work to achieve.
The transformation can be stunning, and
relatively painless.
For me, it’s now time to rethink the
firecrackers and look at those old builds in a different light.
Overall the restoration was stunning
success.
I have always been disappointed with this
build, but now… it is beautiful, bright and an eye catcher!
I spent about 10 hours total on the
reconstruction, but unfortunately almost the cost of the kit again
in decals!
Oh well, I feel that it was worth it, and
that is what counts at the end of the day. I seldom revisit kits,
but this changes that mindset for me-if a scheme loses interest,
there may be a better one that only needs a bit of ‘restoration’
work to achieve.
The transformation can be stunning, and
relatively painless.
For me, it’s now time to rethink the
firecrackers and look at those old builds in a different light.
Kit, decals and paint courtesy of
my pocketbook.
| REFERENCES |
Google is your friend
February 2013
If you would like your product reviewed fairly and fairly quickly, please contact the editor or see other details in the Note to Contributors.