Hasegawa 1/48 A-4M Skyhawk
| KIT #: | Pt 33 |
| PRICE: | $32.00 |
| DECALS: | Two options |
| REVIEWER: | Blair Stewart |
| NOTES: | Great detail and good fit; several small parts |
| HISTORY |
From Wikipedia: The Douglas A-4 Skyhawk is a single-seat subsonic carrier-capable light attack aircraft designed and produced by the American aerospace manufacturer Douglas Aircraft Company.
Douglas developed the Skyhawk during the early 1950s on behalf of the Navy and United States Marine Corps as a replacement for the propeller-driven Douglas A-1 Skyraider. The A-4 is a compact, straightforward, and lightweight aircraft; its maximum takeoff weight of 24,500 pounds (11,100 kg) was roughly half of the Navy's weight specification. The Skyhawk has a short-span delta wing configuration, a tricycle undercarriage, and a single turbojet engine. The U.S. Navy issued a contract for the aircraft on 12 June 1952. On 22 June 1954, the XA4D-1 prototype performed its maiden flight; it went on to set a world speed record of 695.163 mph on 15 October 1955. On 1 October 1956, the Skyhawk became operational.
The Skyhawk's five hardpoints can carry a variety
of missiles, bombs, and other munitions. It can carry a bomb load equivalent
to that of the World War II-era Boeing B-17 bomber and can deliver nuclear
weapons using a low-altitude bombing system and a "loft" delivery technique.
It pioneered the concept of "buddy" air-to-air refueling, which reduces the
need for dedicated aerial tankers. The Skyhawk was originally powered by
the Wright J65 turbojet engine. From the A-4E onwards, the Pratt & Whitne y
J52 engine became the standard A-4 engine. By the time production ended in
February 1979, McDonnell Douglas had built a total of 2,960 for a variety of
operators, including 555 as two-seat trainers.
y
J52 engine became the standard A-4 engine. By the time production ended in
February 1979, McDonnell Douglas had built a total of 2,960 for a variety of
operators, including 555 as two-seat trainers.
The Skyhawk saw combat in several conflicts. The Navy operated the type as its principal light attack aircraft during the Vietnam War, carrying out some of the first U.S. air strikes of the conflict. The Skyhawk was the Israeli Air Force's main ground attack aircraft during the War of Attrition and the Yom Kippur War. In the Falklands War, Argentinean Skyhawks bombed Royal Navy vessels, sinking the Type 42 destroyer Coventry and the Type 21 frigate Ardent. Indonesian Air Force Skyhawks were used for counterinsurgency strikes in East Timor. Kuwaiti Air Force Skyhawks saw action during Operation Desert Storm.
The A-4M Skyhawk is a variant specifically designed for the U.S. Marine Corps. It was introduced in 1971 and is known for its close air support capabilities. The M model features a cockpit with enhanced visibility via a larger canopy and a heads-up display for improved situational awareness. The A-4M was primarily designed for close air support and was equipped with advanced targeting systems, including the Hughes Angle Rate Bombing System. Although it did not see combat during the Vietnam War, it was a significant improvement over earlier models, enhancing the Marine Corps' ground support capabilities. 160 A-4M units were built, marking the end of the Skyhawk production run in 1979.
| THE KIT |
 Hasegawa
entered the 1/48 scale A-4 business sometime in the early 2000s, and since
then has issued numerous kits for various A-4 models. They issued this kit,
PT-33, in 2004.
Hasegawa
entered the 1/48 scale A-4 business sometime in the early 2000s, and since
then has issued numerous kits for various A-4 models. They issued this kit,
PT-33, in 2004.
For a detailed description of what’s in the box, you can check out Da Boss' preview of the initial (2004) A-4M kit release. What I noticed the most is the number of small parts on the sprues (i.e., various antennae, pitot tube, etc.), including some very tiny clear plastic lenses and lights. The landing gear is particularly detailed with numerous parts. The cockpit and ejection seat are adequate. Hasegawa includes decals for the instrument panels, which are nicely detailed if one chooses to not use the decals and paint them instead.
| CONSTRUCTION |
Assembly begins as usual with the cockpit and ejection seat. Another assembly at this stage is the engine duct assembly, as it and the cockpit will be sandwiched between the fuselage halves. The model requires a ballast weight in the nose to avoid it becoming a “taildragger” (the instructions call for 8 grams). I cut off a chunk from an old lead tire weight and glued it into the nose using Gorilla Glue. Before gluing the fuselage halves together, there are some holes that need to be opened, so don’t overlook these, especially if you want to display the model with the included boarding ladder.
I opted to paint the cockpit instruments via dry-brushing and picking out some of the red and yellow knobs using a toothpick dipped in the appropriate paint.
 At this
stage, I glued the fuselage halves together, and they aligned quite well. I
then assembled the top electronics enclosure and glued it to the fuselage,
along with the engine intakes and splitter vanes and the tail antenna
fairing.
At this
stage, I glued the fuselage halves together, and they aligned quite well. I
then assembled the top electronics enclosure and glued it to the fuselage,
along with the engine intakes and splitter vanes and the tail antenna
fairing.
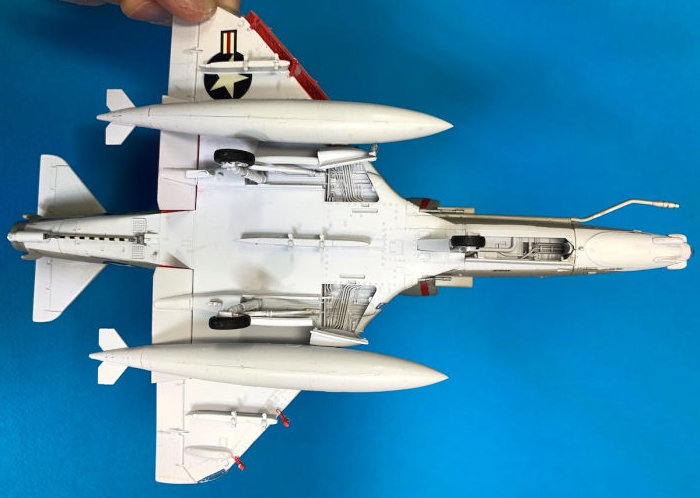
Step 6 is the main wing assembly, and here you are given the choice displaying the flaps in an up or down configuration, as well as open or closed leading-edge slats. Hasegawa provides different attachment parts depending on your chosen positions. If you choose to display the flaps and/or the slats in the down and open positions, don’t forget that the exposed wing surfaces and insides of the flaps are painted red. Once I had assembled the wing, I glued it and the horizontal stabilizers to the fuselage. Another advisory: if you intend to attach the included wing and fuselage pylons, be sure and open up the holes for these parts before gluing the upper wing halves to the bottom wing assembly (I have spaced this step on more than one model, and it is a pain to locate accurately where these holes should be and drill them from the outside of the bottom wing).
Steps 8-10 involve the assembly and installation of the nose gear and main landing gear. These are rather intricate and delicate, so be careful. Since the landing gear are painted the same color as the aircraft’s underside, I decided to attached the landing gear to the model at this stage (along with the various small antennae), knowing full well that in all likelihood I would accidentally break one or more of these off during the remaining assembly process (fortunately, I did not – probably a “first” for me!). I also attached the landing gear doors at this point.
I then moved to Step 11, the tail assembly. Here one needs to decide on open or closed air brakes (I opted for closed, which makes the assembly and painting process a little easier).
Step 12 involved the assembly and installation of the drop tanks and their wing pylons as well as the fuselage centerline pylon.
The final Step 13 includes attaching various antennae, the guns, the refueling probe, and the canopy, which I masked using Tamiya masking tape and then attached to the model with clear gel Tacky Glue.
| COLORS & MARKINGS |
 I
first airbrushed the entire model with Rustoleum flat white from a rattle
can. Once this was dry, I masked off the fuselage demarcation line, covered
the protruding drop tanks, and painted the model’s upper surfaces with
Tamiya XF-20 flat medium gray.
I
first airbrushed the entire model with Rustoleum flat white from a rattle
can. Once this was dry, I masked off the fuselage demarcation line, covered
the protruding drop tanks, and painted the model’s upper surfaces with
Tamiya XF-20 flat medium gray.
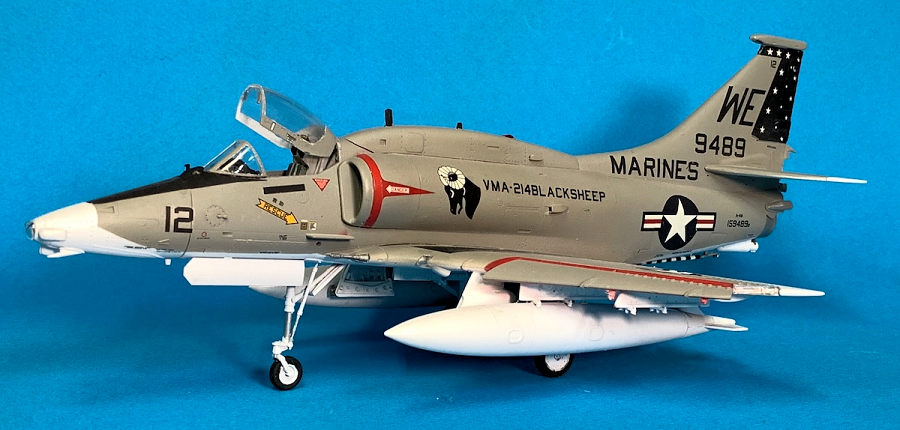
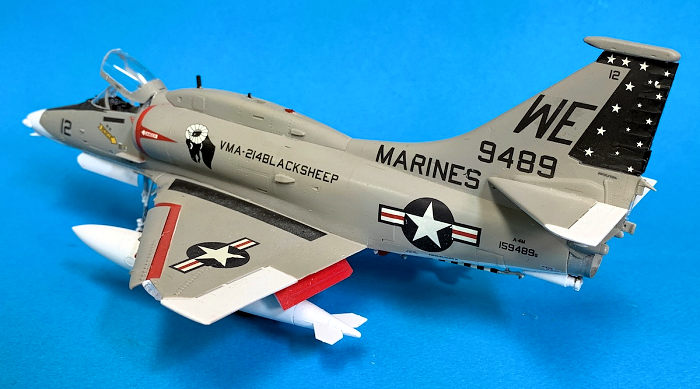
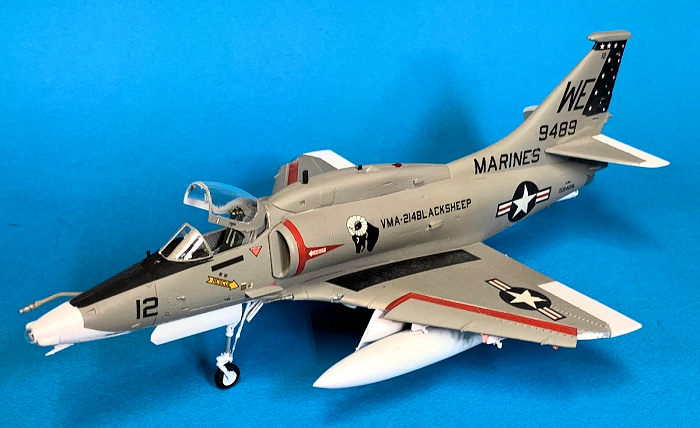
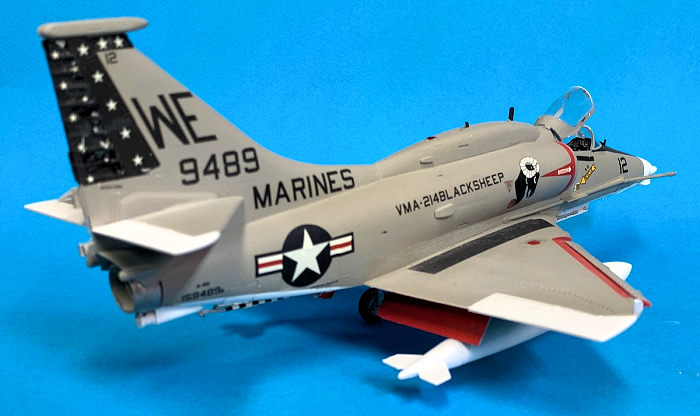
In choosing between the two included aircraft markings, I was a little leery of the VMA-331 “Bamble Bees” markings due to the rather large tail decals (given the kit’s age, I was concerned about the decals disintegrating or tearing during application), so I opted for the markings of VM-214 “Black Sheep.” The tail decals tore during installation, requiring me to touch up the torn areas with paint (fortunately, Tamiya XF-17 Flat Sea Blue was a perfect match for the torn areas). I encountered another decal problem when trying to install the colorful drop tank decals, which completely disintegrated as I tried to slide them off the backing paper. Fortunately, the rest of the decals withstood the application process.
A nice Hasegawa inclusion is a decal for the tailhook. When I saw this on the decal sheet, I was somewhat skeptical about it working, but since I wanted to avoid if possible, the tedious process of painting the black and white stripes on the hook, I decided to try it. After coating the tailhook with several layers of Future, I applied the decal. I was amazed that it fit perfectly around the tailhook, lined up the stripes, and nicely laid down once it dried (thanks in part to a good dose of Micro Sol).
As a final step, I removed the canopy and windscreen, touched up the clear areas with a nice coat of Future, and then reglued both with the canopy in the open position.
| CONCLUSIONS |
 In
the seventies I built Monogram’s 1/48 scale A-4E, and I thought it was a
nice kit at the time. The Hasegawa A-4 kits clearly surpass the Monogram
kit in both fit and detail. I have not yet seen Magic Factory’s recently
released A-4M kit, but I am sure it is nice. However, at a price of
$60-80 on eBay, the modeler will have to decide whether it is worth the
added price over the Hasegawa kit. If you don’t already have an A-4M on
your shelves, I highly recommend this kit!
In
the seventies I built Monogram’s 1/48 scale A-4E, and I thought it was a
nice kit at the time. The Hasegawa A-4 kits clearly surpass the Monogram
kit in both fit and detail. I have not yet seen Magic Factory’s recently
released A-4M kit, but I am sure it is nice. However, at a price of
$60-80 on eBay, the modeler will have to decide whether it is worth the
added price over the Hasegawa kit. If you don’t already have an A-4M on
your shelves, I highly recommend this kit!
| REFERENCES |
Douglas A-4 Skyhawk, Wikipedia.
A-4M Skyhawk, Scalemates.com.
12 December 2025
Copyright ModelingMadness.com. All rights reserved. No reproduction in part or in whole without express permission.
If you would like your product reviewed fairly and fairly quickly, please contact the editor or see other details in the Note to Contributors.