
| KIT #: | 483/A08014 |
| PRICE: | $1.85 USD and 57 USD |
| DECALS: | Two options in each |
| REVIEWER: | Torben Plesberg |
| NOTES: | K-681 built 1967 and K-682 built 2017, Flyvevåbnet anno 1964. |
| HISTORY |
For a general history of the DC-3/C-47 see here, and for a history of the Danish C-47s see here.
K-681:
This C-47 A was built by Douglas Aircraft, Long Beach, California under the contract number AC-20669, and it was delivered 8 -6 -1943 at a price of 109.663 USD. She got the USAAF serial number 42-23802. The aircraft was allocated 1st Troop Carrier Command. On 12 -6 -1943 the aircraft left Long Beach for Palm Springs. On the 18 -6 – 43 it arrived at Baer Field, Fort Wayne, Indiana. This base was primarily used for keeping new aircraft in stock.
 On
19-6-43 the aircraft left for Wright Field, Dayton, Ohio, and arrived on
24-6-43. Later – on 4-7-43 the aircraft arrived at Stout Field, Indianapolis.
From this base she made a flight to Brookley Field, Mobile, Alabama with arrival
7-7-43. She continued to Baer Field, Fort Wayne on 15-743.
On
19-6-43 the aircraft left for Wright Field, Dayton, Ohio, and arrived on
24-6-43. Later – on 4-7-43 the aircraft arrived at Stout Field, Indianapolis.
From this base she made a flight to Brookley Field, Mobile, Alabama with arrival
7-7-43. She continued to Baer Field, Fort Wayne on 15-743.
After some fourteen months without movements the aircraft was allocated to 805th AAF Base Unit at George Field, Lawrenceville, Illinois and arrived on this location 29-8-1944. On 24- 4-1945 the aircraft was handed over to Norway. The following day the Ferry Division of the Air Transport Command at George Field got the task to fly the aircraft to Montreal, Quebec, Canada via Nashville Municipal Airport. She arrived in Montreal on 30-4-1945, where the she was handed over to Norwegian authorities, and finally she was out of the USAAF.
The aircraft was flown to Norway and adapted as a civil DC-3. She then entered service with the Norwegian airline DNL as LN-IAP under the name “Nordpol” (North Pole). Later DNL was merged with SAS (Scandinavian Airlines Systems). The aircraft kept its registration LN-IAP, however, got a new name: “Halvdan Viking”. She flew on scheduled airline flights until late 1953, when she was sold to Flyvevåbnet, the Royal Danish AF. She got the AF serial 68-681, which was changed to K-681 later.
When the plane was phased out in 1980, it was handed over to the Danish Museum of Aviation. It got a new color scheme - of the Danish Air Lines, which was the Danish part of SAS. The registration was OY-DDA, the name “Sven Viking”, and the aircraft was - and still is - shown on permanent exhibition in the Technical Museum at Elsinore.
K-682:
She was rolled out from the Douglas Long Beach factory April 4 1944 with airframe serial no 20019 as a C-47 A. Six days later she was officially handed over to the US Army AF. On April 14 she was handed over to the 1st Troop Carrier Command at Baer Field, Indiana. Here the crew was trained and August 29 she left B F for 805th Base Unit, George Army Airfield, Illinois, a place where advanced training was performed. April 26 1945 she left George Field for Montreal, Canada.
May 24 1945 she was handed over to Norway as a Lend-Lease aircraft, meaning that she was still property of the USA, but at disposal for Luftforsvaret, the Royal Norwegian AF. Unofficially she was bought for the sum of one dollar! After one year of service she was leased to the Norwegian Airline (DNL) and got a civil registration on October 16 1946 as LN-IAT and the name “Nordtind”. Two days later she was on scheduled flights.
On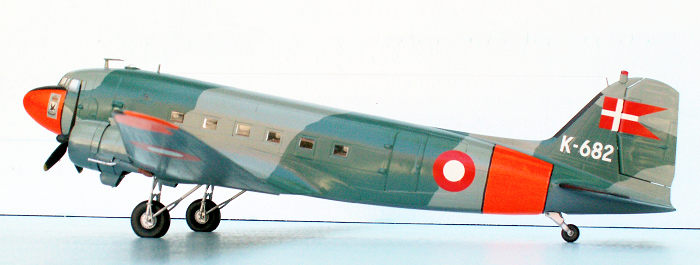 August 1 1948 she was handed over to SAS (Scandinavian Airlines System). She got
an SAS color scheme, kept the registration and got an SAS name: “Terje Viking”.
On December 15 she was bought back by DNL for 125.000 Norwegian Kroner (about
16.000 USD). On February 8 1951 she was taken over by SAS.
August 1 1948 she was handed over to SAS (Scandinavian Airlines System). She got
an SAS color scheme, kept the registration and got an SAS name: “Terje Viking”.
On December 15 she was bought back by DNL for 125.000 Norwegian Kroner (about
16.000 USD). On February 8 1951 she was taken over by SAS.
On July 30 1953 she made her last scheduled flight for SAS, and was stricken from the Norwegian civil register on September 16.
On October 1 1953 she was sold to Flyvevåbnet, the Royal Danish AF for 588.200 Danish kroner (78.000 USD, a good bargain for SAS!) She got the air force serial 68-682, and was transferred to squadron 721 at Værløse AFB on January 1 1954. On January 2 1955 she got her camouflage color scheme: light grey, green, light blue. And later the day-glow areas on fuselage and wings were added.
On December 15 1960 the air force serial was altered to K-682, and she got the radio call sign OV-JBM. On December 9 1966 she was painted in her VIP color scheme: White top and fin and two black thin side stripes outlining the cabin windows. The rest of the aircraft silver, and including day-glow areas outlined in black on fuselage and outer wings. She still has this color scheme, July 2017!
On July 30 1982 she made her last flight with Flyvevåbnet. The last five C-47s of the air force were retired after 29 years of service. The oldest three aircraft had already been retired in December 1980. The retirement was marked by a formation flight with four aircraft flying “Denmark round”, i.e. making a fly-past over all of the Danish air bases. The four aircraft were: K-682, K-683, K-684 and K-688.
K-682
was kept at Værløse air base from August 6 1982. The official owner was the
Museum of Arms, in Danish: “Tøjhusmuseet”. She was leased by a car dealer (Bohnstedt-Petersen)
from March 3 to October 31 1983, who used the plane as a business plane. From
February 21 1985 the plane was leased once more by the car dealer, and now she
got a civil registration: OY-BPB. The car dealer was actually a pioneer in
D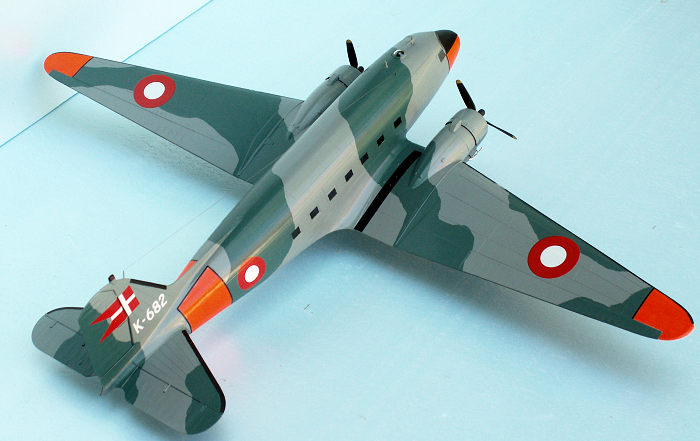 anish aviation at the first airfield in Denmark: “Kløvermarken” (Field of
Clover), and his firm assembled Taylor and Piper Cub planes.
anish aviation at the first airfield in Denmark: “Kløvermarken” (Field of
Clover), and his firm assembled Taylor and Piper Cub planes.
June 4 1992 OY-BPB went back to Tøjhusmuseet, and shortly after the plane was leased to the Association of Flying Museum Planes, which was responsible for keeping the OY-BPB in flying condition. To celebrate the 50 years Anniversary of SAS, K-682 was painted in the original SAS color scheme as “Arv Viking” on April 19 1996. In the spring of 1998 the plane was repainted in its air force VIP color scheme.
Air base Værløse was closed in 2006, and the new home base of K-682 became Roskilde Airport - and still is. During the flying season all flights take place from Roskilde Airport. A flight with the veteran C-47 might be a visit to the Flygvapen Museum at Malmslätt, or to the former V-2 base at Peenemünde, or to an airshow in England, Norway, Sweden, Denmark, Holland, Belgium France or Germany. However, flights are only for members of the “DC-3 Vennerne” (the Friends of the DC-3), and the prices are very fair.
| THE KIT |
483: Comes in a relatively small box with a C-47 of the US Army Forces on the lid. It is a reboxing from 1967 of the original kit released in 1960. There were five (or six?) sprues in silver grey styrene and a smaller one with the clear parts including the stand. The instructions is a single fold out sheet with four pages. Page one is a short story of the Douglas Dakota and Silver City Airlines – in English only. Besides a description of the Airfix construction kits series 1 to 6, dependent on size and number of parts. The Dakota is a series 4 kit. Page two is an exploded sketch with numbers of all parts, 68 altogether. Page three is a plan for the assembly of the model in 36 steps. There is a guide for suggested colors of the accessories with Airfix paints. For fixing use Airfix Polystyrene Adhesives! Page four shows the color schemes and decaling of the two options. The decal sheet is sparse, but have the necessary markings for the two options of the model. The quality of the Airfix decals used to be good, and probably also in this case. But I don’t know for sure, as I used alternative decals for my model.
The quality of the kit was good for its time. The airframe is heavily covered with rivets, and the ailerons, rudder, and elevator are movable, as the propellers and the main wheels. The “toy” concept is evident. The fin was warped on one of the fuselage halves – so much (45 degrees!) that it was not possible to assemble the fuselage halves. However I used the slip that comes with the kit, and asked for a replacement part, which I got within 10 days, a fairly good service. The replacement part was also warped (standard with the Airfix Dakota kit?), but only half as much as the original part in the box, and an assembly was now possible!
There is
no interior detailing. Only the “seats” for the pilots are “built in” in the
fuselage halves. I don’t find th e interior interesting, because on a finished
model, you can see nothing, not even the interior color, unless you use a small
flashlight through the windows. If the interior is important, you are asking for
quite a different model with transparent fuselage sides!
e interior interesting, because on a finished
model, you can see nothing, not even the interior color, unless you use a small
flashlight through the windows. If the interior is important, you are asking for
quite a different model with transparent fuselage sides!
As to the authenticity of the model it certainly looked like a C-47. However if you take a closer look and compare with photos of the real thing, you will find a lot of weak spots. The Airfix Dakota (1960) is not a correct replica to a 1/72 scale of the actual aircraft. The exhausts, however, have the small tube protruding forward. Later and far more accurate kits don’t have this detail!
If you have done a lot of Airfix aircraft kits, what can you do with all the stands, if you don’t place the models on them? I glued the bases together, underside to underside, and I got a “UFO”. You can use 4, 6 or 8 UFOs to make a mobile, and the UFOs may be painted in any color you like. An Airfix UFO mobile is very decorative and quite unique!
A08014: Comes in a large sturdy box with a dramatic picture of a Skytrain during the invasion. Actually the kit commemorates the 70 years anniversary of D-day. The sprues are in a light blue-grey styrene and the parts are very finely detailed with a lot of recessed panel lines to simulate the plating of the aircraft – no rivets. The clear parts are also of a very high quality. However, the cabin windows come as singles, not in the usual row to be applied from the inner side of the fuselage. The philosophy is that the cabin windows should be applied from the outer side, when the fuselage has been assembled, but not painted.
The interior is rather detailed, however, on a finished model most of these details are invisible, with the exception of the pilot seats and their surroundings – especially backwards. The idea of making a “main spar” for the wings ending with the landing light in each side is not a new one. Monogram has this kind of engineering for their 1/48 C-47 kit. I don’t like a complicated engineering inside fuselage or wings, because this often causes problems to make the fuselage or wing halves fit properly together, and also in this case!
A simple engineering is always preferable to a complex one.
The kit
comes with an option for a ski undercarriage, and this is really a good extra.
This makes it possible to make the K-687, which is on permanent exhibition in
the Danish Air Force Museum with the ski underca rriage used in Greenland. The
overall dimensions of the kit are very accurate and the scale is definitely
1/72. The dihedral seems right, however, when measured it is too small by 2 mm.
It is 22 mm and should be 24 mm. But compared to the 10 mm dihedral of the 1960
kit it is a tremendous step forward.
rriage used in Greenland. The
overall dimensions of the kit are very accurate and the scale is definitely
1/72. The dihedral seems right, however, when measured it is too small by 2 mm.
It is 22 mm and should be 24 mm. But compared to the 10 mm dihedral of the 1960
kit it is a tremendous step forward.
The instructions is a booklet of 16 A 4 pages. Page one and two gives a description of the Skytrain in five languages: English, French, German, Spanish and Swedish. Besides there are some general assembly and assembly icon instructions in twelve languages, including Danish, Norwegian, Dutch, Italian, Finnish, Portuguese, polish and Greek. The next ten pages show in 67 illustrative drawings how to put the model together. Pages 13 to 15 show how to paint and decal the two options. Page 15 is dedicated to the position of common stencil data. Page 16 is blank – could be used for personal notes or information.
The decal sheet is very comprehensive and absolutely first class. The two options are: an aircraft of the USAAF on D-day with invasion stripes, and a MATS aircraft with ski undercarriage and an arctic color scheme as used for operations in North West Territory of Canada in 1949. There is a lot of common stencils and with a magnifying glass all of these are easily readable! The size of the letters is 0.3 mm. The sheet is of course printed by Cartograf, as all Airfix decals are nowadays.
| CONSTRUCTION |
483: If you follow the instructions, you will end up with an assembled construction kit – not with an exact replica of the real thing! The only problem was to glue the fuselage halves together in spite of the + 15 degrees warped fin. It took a couple of clamps to do this job. I did not much filling and sanding. Only on the dorsal and the ventral because the fuselage halves were not in perfect alignment – as with most kits, including the new tool Airfix C-47! The rivets did not bother me at that time. On the contrary! I had to scratch build the beacon on the top of the fin, and also the “horseshoe” antenna above the cockpit. There were two small rod antennas above and behind the cockpit, the smaller of these was actually the holder of the wire antenna. The rear wire holder was on the fin a little ahead of the beacon.
A08014:
Building up the interior of the model is actually an unnecessary task, because
when the model is finished, you can see almost nothing of your effort. The cabin
windows have the right dimensions, but still the interior is too dark to see any
details inside the fuselage. The only way to get some light inside is to leave
the large cargo door open on the model. However, I don’t fancy a model with a
built in risk of breaking some parts off or of getting dust inside the model. An
argument that goes for the interior structure is that it strengthens the
fuselage. On the other hand if you are not extremely careful doing the interior
assembly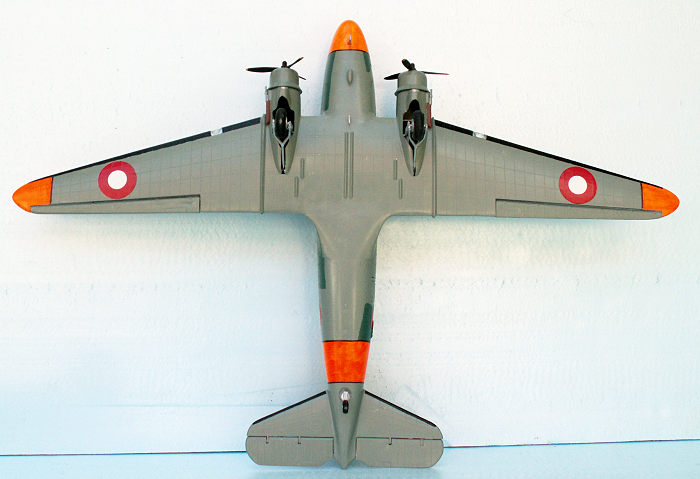 exactly right, you might end up with problems to make the fuselage
halves fit properly together when assembling them. The same can be said about
the “main spar” of the wings. It is okay, when it works, but a hell when it
doesn’t.
exactly right, you might end up with problems to make the fuselage
halves fit properly together when assembling them. The same can be said about
the “main spar” of the wings. It is okay, when it works, but a hell when it
doesn’t.
The assembly will be a success if you carefully follow the steps of the instructions. A couple of times I did not follow the instructions, and I was punished for that! Do follow the instructions, and you won’t run into problems, because you forgot to do something, which might be important for later steps in the construction.
Some of the parts must be cut very carefully from the sprues: D 15, D 32 + 33 and D 35. Otherwise the parts may be damaged. The clear parts for the landing lights are too small and cannot be applied. You will have to make some new ones from acryl or another transparent material. I find parts D 37 + 38 an unnecessary way of complicating the assembly and an obvious risk of a bad fit, which means filling and sanding.
To make the Danish K-682, some of the smaller parts should not be used: parts E 4, E 6, E 7, E 29 and E 30. The carburetor intakes are the smaller ones. The beacon on the fin was made of a small piece of clear sprue.
Finally: I don’t see the purpose of applying the cabin windows from the outer side of the fuselage. They fit very precisely, but still you get an extra frame around the windows, a frame which does not exist on the full scale C-47. These frames should be filled and sanded. However I did not take the trouble to do that. This is a flaw of the finished model, an unnecessary flaw if the cabin windows were applied from the inner side before the assembly of the fuselage halves. I think Airfix has made a mistake here!
The ski undercarriage seems very accurate and is an important option if you choose the MATS C-47 – or the Danish K-687, which is exhibited with this ski undercarriage.
| COLORS & MARKINGS |
483: The challenge of this model, however, was getting the right colors for the camouflage scheme of a Danish C-47 in 1964. A guy of my acquaintance, who was a modeler, too, worked with the Material Command at Værløse air base near Copenhagen. He gave me a sheet of paper with samples from the original paints used for C-47 and Catalina. None of the colors of the samples were offered by Humbrol or any other brand, with the important exception of day-glow. All I had to do was mixing the right shades from existing HB colors. It took quite a long time before I had mixed the five colors matching the samples. I was happy, because my C-47 now could get a camouflage with colors as close to the originals as possible.
I primed the model with two layers of aluminum. I knew, that the camouflage painting hardly would cover the top of the rivets, and it would look realistic with tiny spots of aluminum on the top of the rivets. Half a year before, I did the same with a Halifax from Airfix.
There was no need for interior green, except for the wheel wells. The whole aircraft got two layers of the light grey-green. When set, the dark green color was applied on the upper side, using some photos showing the pattern of the camouflage. The rivet tops were visible – more or less.
Next the
day-glow areas were marked, certainly not with Tamiya tape! I used a soft pencil
for the marking, and the areas got three times of gloss white, and five times
with day-glow. All of the painting was done free hand. The black outli nes were
drawn free hand with a black marking pen – very carefully. The anti-icing
devices were masked with some 3 mm wide elastic tape (for isolation), and the
areas were painted with a flat black enamel bought in a paint shop in 1962. This
paint is still useable (2017).
nes were
drawn free hand with a black marking pen – very carefully. The anti-icing
devices were masked with some 3 mm wide elastic tape (for isolation), and the
areas were painted with a flat black enamel bought in a paint shop in 1962. This
paint is still useable (2017).
The decaling was easy enough. At my disposal was a Stoppel sheet with Danish roundels and flags. However, the roundels were too small and only the flags in the right rather large size were applied. In my stocks I had a small sheet from DMI (Danish Model Industry) with Danish roundels, and these were larger than the Stoppel ones, but still a little too small. The carrier film was very thin and elastic, and the rivets were no problem at all. The marking “K-681” came from another Stoppel sheet with white Danish letters and numerals. The squadron badge did not exist as a decal at that time, I expected a sheet with Danish badges once in the future.
Updating K-681: 50 years later it was about time for an up dating and touch up of the veteran K-681 Airfix model:
Now I had the sheet with Danish Squadron Insignia, however, this wasn’t a Stoppel sheet. It was printed in the USA by Flying Colors Aerodecals, especially for IPMS Denmark. The badge of squadron 721 was placed beneath the cockpit in the top of the day-glow area. Stoppel has over the years released a lot of sheets for almost every type of Danish military aircraft, and now I had the roundels in the right size for the C-47. However, the Stoppel roundels were by far not as elastic as the old ones were, and suddenly the rivets became a problem. I simply had to sand them down, where the new decals should be placed! The red color of the old roundels were a little too bright, but if you don’t have the correct color on another aircraft to compare with, it doesn’t matter. But now it did matter!
The door in the rear fuselage was missing! That was a major problem. My son Nicolai had a spare door from an Airfix AC-47 kit, and he offered it to me. This door should be painted in exactly the same color, as the old one was: the special light grey green camouflage color. And how would I get this? In my stocks I still had the tin with the color I mixed fifty years ago! It was exciting to open the tin – fortunately the paint seemed to be OK. I remember that I added some extra thinner for long time storage. The paint got a thorough stirring for five minutes, and the new door got the right color – the paint worked perfectly with my brush.
The upper half of the numeral 1 in
 K-681 on the starboard side was gone. In my
stocks I found a white 1 on a sheet with numerals for Flygvapnet in the right
size and shape. No problem to restore the half 1. And since I had learned how to
make a wire antenna, see
here, this was also put on the model as the last
feature.
K-681 on the starboard side was gone. In my
stocks I found a white 1 on a sheet with numerals for Flygvapnet in the right
size and shape. No problem to restore the half 1. And since I had learned how to
make a wire antenna, see
here, this was also put on the model as the last
feature.
A08014: All details were painted before assembly according to instructions with the exception of the inner structure. However, the pilot seats and their surroundings were painted with interior green, HB 226. The entire airframe was primed with aluminium color, Revell Aqua 361-99. The upper sides got C-47 light grey, and the camouflage pattern was painted with C-47 dark green. These colors were mixed 50 years ago using samples of the original paint from the Danish AF (Flyvevåbnet) as reference. I was very happy to realize, that the paints were still useable after 5 minutes of stirring. I remember that in 1967 I put some extra thinner in the tins, before they were stored with the bottoms up. I did not know if or when, I would need these special colors again!
The underside got PRU-blue, HB 230. Two of the Danish C-47 had light grey undersides, K-681 being one of them, probably because the stocks of PRU-blue were exhausted. And in some cases, a C-47 would have a bare metal underside – probably just waiting for a visit to the paint shop. The day-glow areas were carefully masked, and got three layers of Reefer white 4873 and five layers of fluorescent red 4703, both Model Master aqua colors. The anti-glare area in front of the windscreen was painted with a flat Engine black, also a Model Master aqua color 4888. The walkways on the wings were made as decals. A “used” piece of white decal paper was painted satin black – enamel Revell 302.
The decaling was done with a sheet from Stoppel, who stocks at least five different decal sheets for Danish C-47s. The quality is reasonable, the colors and sizes are always correct, only the stencils are not to a Cartograf standard. But as Stoppel says: “If it takes a magnifier to read the text, it doesn’t matter if you can read it or not. The important thing is, that there is something to be seen and understood as stencils.”
The wire antenna and the pitot tubes were added. Just as with the touch up of the K-681.
| CONCLUSIONS |
483: It
was a challenge to make a Danish C-47 of the Airfix Dakota kit in 1967. The
problem was to obtain the correct camouflage shades, as it was not possible to
buy them anywhere – in the least not for a model aircraft. When the model was
finished, I was a little proud of it, because I might be the only modeler, who
had taken the trouble to get the right colors for a Danish camouflaged C-47.
Fifty years later I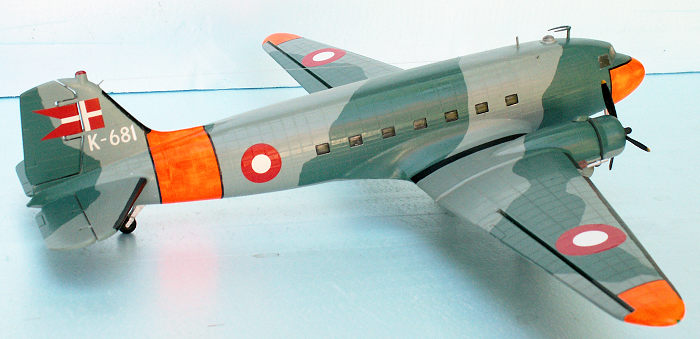 have done 3 other C-47s from far more sophisticated and
correct kits. My conclusion on the ancient Airfix Dakota is: the kit is not
recommendable today, unless you get it cheap and intend to use it for learning
the art of airbrushing - or how to sand rivets away!
have done 3 other C-47s from far more sophisticated and
correct kits. My conclusion on the ancient Airfix Dakota is: the kit is not
recommendable today, unless you get it cheap and intend to use it for learning
the art of airbrushing - or how to sand rivets away!
A08014: There is a tremendous difference between the Airfix classic 1960 Dakota kit and the new tool one from 2014 – also in price! All the dimensional errors, movable ailerons, elevators and rudder, and the oversize rivets are gone. Now we have a very correct kit of a C-47 with fine recessed panel lines and an almost correct dihedral. However, Airfix kits seem always to have some flaws: warped or damaged parts. The idea of applying cabin windows from the outside is a bad one, as mentioned above. Therefore my recommendation is not high or warm, the kit is just recommended! My first choice for a C-47 1/72 kit is still the Italierei kit and with ESCI as my second choice. Both these kits are much cheaper and gives more value for money, and the cabin windows are applied from the inner sides of the fuselage halves!
| REFERENCES |
https://da.wikipedia.org/wiki/OY-BPB#cite_note-flyet-1
Aviation Historical Quarterly, 2000/4 December page 14-15: “C-47 A K-681 alias 42-23802”by Ove Pygh Wilche.
August 28, 2017
Copyright ModelingMadness.com
If you would like your product reviewed fairly and
fairly quickly, please
contact
the editor
or see other details in the
Note to
Contributors.
Back to the Main Page
Back to the Review
Index Page
Back to the Previews Index Page