
Tamiya 1/48 F-84G Thunderjet
| KIT #: | 61060 |
| PRICE: | 130 Danish Kronor |
| DECALS: | Three options |
| REVIEWER: | Nicolai Plesberg |
| NOTES: | Added HVAR rockets from Tamiya Skyraider kit. |
| HISTORY |
The Republic F-84 Thunderjet was probably one of the most important fighter bombers of the early 1950s and certainly the plane that brought the Royal Danish Air Force (RDAF) really into the jet age. Starting in August 1951 six F-84Es were delivered as MAP aircraft. In the following years no less than 238 F-84Gs (also MAP aircraft) of various blocks were delivered. Neither before nor ever since the RDAF has possessed so many aircraft of a single type as was the case with the Thunderjet. In the following I will, as good as possible, describe the history of the aircraft that I decided to model.
 SE-G:
SE-G:
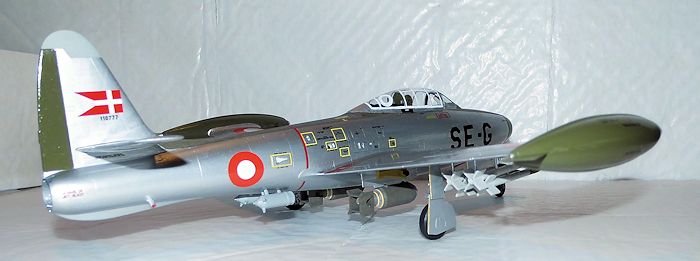
BuNo 51-10777 F-84G-21-RE. As this aircraft had served for a number of years in the Koninklijke Luchtmacht (Royal Netherlands Air Force) with the registration K-126, it was flown directly to Denmark entering service as SE-G with ESK 730 at Skrydstrup Air Base on 2nd of February 1957. Its operational service period, however, became rather short because the Thunderjet was at this time starting to be replaced by the F-100 Super Sabre in service. SE-G was retired as an operational aircraft on 26th of May 1959 and entered a life as an instructional airframe at the mechanics school at Værløse Air Base. Following the RDAF’s change of registration numbers in 1960 it received the registration A-777, but it never flew with it! It kept serving as an instructional airframe long after the type’s service exit, having performed its last engine start-up on 29th of October 1974! Today it resides at the Technical Museum in Elsinore although in the false guise as “SY-H” (and with “false” I mean that the registration “SY-H” has never been assigned to this airframe in real life – but that must be considered a museum “thing”).
| THE KIT |
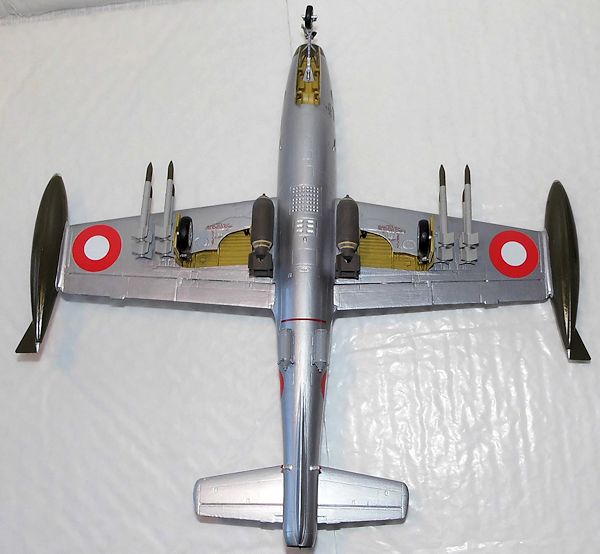
This kit was tooled back in 1998 (or thereabout) so it spots all the features also seen today: fine recessed surface detail, excellent fit and excellent distortion free clear parts. Some under wing stores are included consisting of two 1000 lb. bombs, two drop tanks, two wing tip tanks and alternate wing tips, a nice feature by the way, although the F-84 was rarely seen without the tip tanks. Also two RATO bottles are included, but I must say that it would also have been nice if HVAR rockets had been included as they were an important part of the Thunderjet’s punch delivering capacity.
| CONSTRUCTION |
The construction of this build followed along the same lines as my 1/72 build, so there is really nothing much different although I will mention a few things to look out for.
 When removing
the control stick from the sprue, in my eager to avoid damaging the firing
button, which unfortunately is on the top of one of the sprue gates (probably
the only bad engineering of the entire kit), it simply snapped in two parts.
Putting them together again also proved to be a challenge as in the first
attempt I glued them reversed together! The CA glue that I had used did not seem
to stick very well because in my attempt to sand the glue collar away, it simply
snapped again! Later and also after changing the type of CA glue I finally
succeeded in getting the stick whole again in the right way. In short – just
avoid snapping the stick because it’s a pest to repair – so I found out the hard
way.
When removing
the control stick from the sprue, in my eager to avoid damaging the firing
button, which unfortunately is on the top of one of the sprue gates (probably
the only bad engineering of the entire kit), it simply snapped in two parts.
Putting them together again also proved to be a challenge as in the first
attempt I glued them reversed together! The CA glue that I had used did not seem
to stick very well because in my attempt to sand the glue collar away, it simply
snapped again! Later and also after changing the type of CA glue I finally
succeeded in getting the stick whole again in the right way. In short – just
avoid snapping the stick because it’s a pest to repair – so I found out the hard
way.
Anyway the kit supplied nose weight didn’t seem to be enough so I put some extra weight in the nose intake splitter parts before joining them. Still it seemed not to be enough so I opted to add some extra weight to the gun deck. I still didn’t want to use the details of the four nose guns, where I knew that space should provide enough room to get the nose wheel down on the ground.
When joining the fuselage halves don’t forget to (no gluing!) insert the gun deck cover to ensure the best possible alignment of the nose section in order to minimize the use of filler afterwards.
Otherwise the build went quite uneventful from here and as soon as the completed airframe was given the last finishing touches and after attaching the gear the model went to the paint shop.
| COLORS & MARKINGS |
As I also in this case had decided to do a machine with natural metal finish, I chose, as my new standard dictates, to paint the entire airframe flat white – with two coats necessary to get a perfect covering as possible.
 The silver color
was applied in three coats, but something was not right; the brush was leaving
streaks in the applied paint. The paint also seemed to dry too quickly in the
hairs so it wasn’t easy to paint with. When dry the whole airframe got a slight
wet sanding with grain 1200 sandpaper. At the second coat I tried to make sure
that the paint was more flowing (adding thinner), but that didn’t help really
much, so after the obligatory sanding I took a radical change in approach; when
about to apply the third coat, I had a small bowl with a few drops of thinner.
Before starting painting I moistened the brush hairs with the thinner and during
painting when the paint seemed to clog the hairs, I simply dipped it into the
bowl to loosen up the hairs. This was better! Not only was the brush prevented
from clogging, but also virtually no brush marks appeared in the applied paint
so this was the way to go! Downside were the fumes of the thinner, but by
switching the range hood on (I do all my painting in the kitchen) the influence
of the fumes wasn’t bad and upon finishing painting, I could do a proper air out
by opening a window.
The silver color
was applied in three coats, but something was not right; the brush was leaving
streaks in the applied paint. The paint also seemed to dry too quickly in the
hairs so it wasn’t easy to paint with. When dry the whole airframe got a slight
wet sanding with grain 1200 sandpaper. At the second coat I tried to make sure
that the paint was more flowing (adding thinner), but that didn’t help really
much, so after the obligatory sanding I took a radical change in approach; when
about to apply the third coat, I had a small bowl with a few drops of thinner.
Before starting painting I moistened the brush hairs with the thinner and during
painting when the paint seemed to clog the hairs, I simply dipped it into the
bowl to loosen up the hairs. This was better! Not only was the brush prevented
from clogging, but also virtually no brush marks appeared in the applied paint
so this was the way to go! Downside were the fumes of the thinner, but by
switching the range hood on (I do all my painting in the kitchen) the influence
of the fumes wasn’t bad and upon finishing painting, I could do a proper air out
by opening a window.
The rest of the painting was somewhat easier. The fin top was painted Light Grey (Humbrol 64) – two coats being necessary. The rest of the things to be painted were masked off with Tamiya tape. The nose ring, rudder and wing tip tanks were painted Green (Humbrol 150) –three coats necessary here. Last but not least the anti glare panel was painted Olive Drab (Humbrol 155); after the first coat the masking tape was removed to prevent the usual edge of paint; if the tape sits too long on newly painted areas an edge will usually be created. The antiglare panel was given a second coat freehand (no tape!).
When the surface
was to my satisfaction I gave it the usual coat of Humbrol Gloss Cote to prepare
for the decals. “Gave” isn’t the exact word because, and lucky for me, I began
at the left side of the fin. After a few seconds, I saw t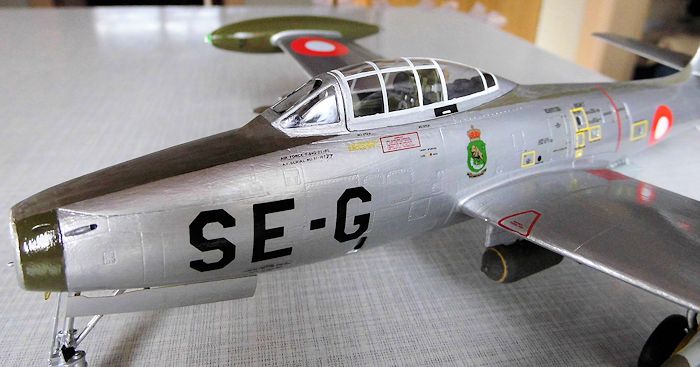 o my fright that
“silver streaks” was all over the green colored rudder. In short the Gloss Cote
dissolved the silver paint (which was Humbrol 11). I can understand if the
silver color had been from a different manufacturer (known risk of
incompatibilities), but incompatibility amongst products from the same
manufacturer??? After the initial curses and not so political correct phrases, I
sanded down the mishap after the paint had dried completely.
o my fright that
“silver streaks” was all over the green colored rudder. In short the Gloss Cote
dissolved the silver paint (which was Humbrol 11). I can understand if the
silver color had been from a different manufacturer (known risk of
incompatibilities), but incompatibility amongst products from the same
manufacturer??? After the initial curses and not so political correct phrases, I
sanded down the mishap after the paint had dried completely.
When all had been painted up again it was time to do some experiments. As I was determined to be absolutely sure that no damage would be done again on the model, I set up to experiment on the two drop tanks, which also had been painted with the same silver color. At first I tried the Mr. Metal Primer from Mr. Hobby. It also scorched the silver paint although not as bad as the Gloss Cote. The last option I had was the acrylic variant of the Clear Gloss from Humbrols ordinary range (no. 35 clear polyurethane varnish) as this was purely water based (the clear Mr. Metal Primer is not!). This third attempt was successful; the acrylic varnish turned out not to affect the silver paint at all, so it went immediately on in a single coat.
As to the decals there were also some issues that needed to be worked out. I had bought Stoppel decal sheet no 48-133 but at that time without knowing exactly which machine to make. When I decided to model the SE-G, I realized that this particular aircraft could not be modeled from this sheet as the code letters were not included (you can make target tugs, training variants as well as late style camouflaged aircraft and the recce configured F-84s, so-called RF-84Gs). The only solution seemed to be acquiring the 48-132 sheet, which did include the letters to make SE-G. As I was going to make an F-84 from the late 50s I also bought the squadron badge sheet (007048) to get the squadron badge for ESK 730.
There was also a
last issue to be worked out. As I came home after purchasing the 48-132 sheet, I
discovered by comparing the two F-84 sheets that the flags and roundels on the
48-132 sheet were clearly bigger than the ones on the 48-133 sheet. Was this
deliberate or an error? When consulting the F-84 bible, I concluded that it had
to be an error, because the pictures in the book showed that flags and
 roundels
were exactly the same size whether it was a camouflaged aircraft or natural
metal aircraft. Luckily I could scrape together some suitable flags and roundels
from the dungeon, so I could get on with the decaling.
roundels
were exactly the same size whether it was a camouflaged aircraft or natural
metal aircraft. Luckily I could scrape together some suitable flags and roundels
from the dungeon, so I could get on with the decaling.
The decals went on with no real issues, apart from the fact that also many stencils from the kit sheet were used, first and foremost around the cockpit, which needed quite some cutting and putting together to get the look (especially the serial number at the cockpit). Also the stencils along the fuselage plus the ones for the tip tanks was used to get things look busy. The only decals I used from the 48-132 sheet was the “SE-G” code letters plus the digits for the serial number placed below the flag on the fin. It is here important first to place the flag firmly in position and then the individual digits in the serial number can be placed two or three at the time, so some continuity is required here.
When fixing the red warning field decals (No Step) in the wing roots, one must be aware that they have been designed to be attached as they are if the flaps have been build in lowered position. If that’s not the case then the field in the middle has to be cut away as it will be surplus.
The decals performed as expected; only the Stoppel ones are a bit thin (compared to the Tamiya ones) so be careful when applying them; this is especially important when handling the nose code letters as they are quite big and can be destroyed if clumsily handled.
The only thing that was missing at this stage was two out of the three “7” digits at the serial number below the windscreen. I found some of the about size (less than a millimetre in height!) but they were white in color and they should be black! So, without sneezing, shaking or anything else, the finest brush, very little and thinned black acrylic color and, above all, patience, I succeeded in recoloring these tiny digits. Allowing them to dry for 24 hours and then applied them and it looks great!
When all decals had dried completely, I took a moistened antistatic cloth and wiped the entire airframe to catch any dust particle or other unwanted dirt before giving the whole model a coat of gloss acrylic varnish to seal everything in. As in my 1/72 build the anti-glare panel plus the fin top got a flat coat to get a realistic finish on these surfaces.
| FINAL CONSTRUCTION |
The final bits
consisted of the under wing stores, fuel dump vents, remaining gear doors and
the construction of the attachment points for t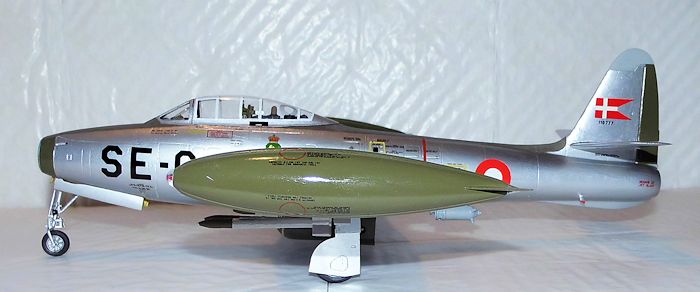 he HVAR rockets. I attached the
fuel dump vents, the remaining gear doors, the RATO bottles and the two 1000lb
bombs all with CA-glue.
he HVAR rockets. I attached the
fuel dump vents, the remaining gear doors, the RATO bottles and the two 1000lb
bombs all with CA-glue.
The next issue to work out was the attachment points for the HVAR rockets. They consisted of some stretched sprue bits, which were glued into holes, drilled in the wing undersides and fixed with CA-glue. They were painted silver together with the fuel dump vents, which had been attached already. The silver actually required three coats in order to look ok. A coat of gloss was given the aforementioned objects to secure a uniform surface.
When dry the short HVAR rockets (some of them had been lengthened) were attached, one at a time. When dry some small distance pieces made from stretched sprue were glued on the attached HVAR rockets and painted silver when dry. After that the long HVAR rockets were glued in place one at a time and when done the model was finished.
| CONCLUSIONS |
 This was one of
these builds where I thought at times “Will I ever be finished?” but in the end
I succeeded in doing so. The kit itself is in reality not difficult because the
fit is excellent and there are no really dark spots so it should be a quite
uneventful build provided that things doesn’t get hairy as it did with the
painting (damned Gloss Cote (!)) and decals in this case (should you choose to
build out of the box including using one of the kits decal options then it is
quite a different matter!). However, it would have been nice if also HVAR
rockets plus their attachment points had been included in the kit, as I don’t
think my interpretation of them is quite faithfully reproduced, but any way is
doing their job closely enough, namely showing the rockets as they actually hang
under the wings.
This was one of
these builds where I thought at times “Will I ever be finished?” but in the end
I succeeded in doing so. The kit itself is in reality not difficult because the
fit is excellent and there are no really dark spots so it should be a quite
uneventful build provided that things doesn’t get hairy as it did with the
painting (damned Gloss Cote (!)) and decals in this case (should you choose to
build out of the box including using one of the kits decal options then it is
quite a different matter!). However, it would have been nice if also HVAR
rockets plus their attachment points had been included in the kit, as I don’t
think my interpretation of them is quite faithfully reproduced, but any way is
doing their job closely enough, namely showing the rockets as they actually hang
under the wings.
| REFERENCES |
The F-84 “bible”: Republic F-84E & G Thunderjet in Royal Danish Air Force service 1951-1961 by Ole Rossel Stoppel Forlag 2014 ISBN 978-87-91327-01-8
This is the work of the service of the Thunderjet in RDAF. It contains hundreds of photos (color as well as b& w), color 5- views, black and white drawings; in short all what the modeler needs to complete a model of the F-84, whether it’s going to be in Danish colors or not. And of course it also includes the complete list of all Thunderjets received by the Danish Air Force, fate of each airframe and more. Without this book, I would not really have been able to decide which planes to model, simply because the material I did come over wasn’t really useful or detailed as the book provided. For only 395 DKK it was a find, since I valued it to be its own weight worth in gold (the book weigh approx 1355 grams – you do the math!). Oh – and it’s written in English so it is destined for an international audience!
November 2015
Copyright ModelingMadness.Com
Thanks to
for the preview kit. You can find this kit at your favorite hobby shop
or on-line retailer. If you would like your product reviewed fairly and
fairly quickly, please
contact
the editor or see other details in the
Note to
Contributors.