
Kinetic 1/32 F-86F-30 Sabre
| KIT #: | 3202 |
| PRICE: | $69.95 SRP |
| DECALS: | One option |
| REVIEWER: | Dan Lee |
| NOTES: |
|

| HISTORY |
The F-86F-30 Sabre
needs no real introduction.
It
helped ďwinĒ the air war over
The Golden Hawks
(Copied and cobbled together directly from Wikipedia and the
airforces.forces.gc.ca website entries)
The Golden Hawks
were a Canadian military aerobatic flying team established in 1959 to celebrate
the 35th anniversary or the Royal Canadian Air Force (RCAF) and the "Golden"
50th anniversary of Canadian flight, which began with the AEA Silver Dart in
1909.
Pilots for the
Golden Hawks flight demonstration team were selected from the Sabre Operational
Training Unit at 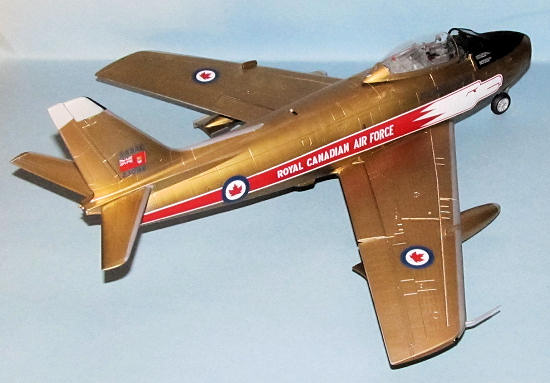 and each had operational experience with the Air Division.
With the selection of the team completed and having only two and a half
months to prepare for their first scheduled public appearance, the first
season's Golden Hawks team began a gruelling training schedule of three flights
a day, six days a week, weather permitting, and intense discussion of the
aerobatic maneuvers involved when the weather left them grounded. In spite of
being delayed for a day on account of the weather for their premiere show at
Torbay, Newfoundland on 16 May, 1959 and then having their take-off delayed
three times until the last clouds broke, their first season was an unparalleled
success right up to the climax at the Canadian International Airshow in Toronto
where, together with the USAF Thunderbirds, they became part of the first
international jet aerobatic team to fly in Canadian skies.
The Golden Hawks
were so popular after their single 63-show season that the team was expanded.
Another Sabre was added to the team, allowing for a five-aircraft main formation
with two solo jets. They continued performing for three more seasons until they
were disbanded for financial reasons, on
Not only did the
team perform the loops, rolls and other maneuvers standard to military formation
flying, they had their own trademark maneuvers. One of the Golden Hawks'
signature stunts was a low-level flyby of the crowd with their canopies open,
waving at the spectators. The Golden Hawks pioneered the bomb burst maneuver and
a two-aircraft coordinated solo program which virtually every military team
since has adopted in various ways.
| THE KIT |
See Tom Cleaverís excellent preview of the kit.
 Last year, I went
to a LHS anniversary sale which included heavily reduced prices of many under
selling kits.
One of the kits they
were selling was a special edition version of the Kinetic F-86F Sabre which
contained a decal sheet from Leading Edge of the RCAF Golden Hawks Aerobatic
Demonstration Team from the early 60s.
It was priced to go at $20 so who was I to pass up on an obvious bargain?
With some of the
money I saved, I bought three
One of my good
friends is a big fan of the Sabre so I built this for him as a birthday gift.
The only issue is his birthday is in the winter and I usually build NMF
projects only in the summer as I donít spray lacquer paints inside my basement
workshop so I started on this one rather early.
| CONSTRUCTION |
The plastic as
mentioned from other reviews is very very thick compared to what Iím used to.
This made the removal of the gun panels painful and tedious.
I had to first drill out all around the the Kinetic gun panels then using
cutters to cut away most of the excess plastic.
The remaining plastic was removed a lot of slicing and sanding.
I glued up most of
the interior bits together.
The
intake and exhaust have really obvious interior seams that need to be cleaned up
if you want to display the Sabre without intake and exhaust covers.
As some of you might remember, intake/exhaust seams
 arenít my favorite
task and the less I do is better for my sanity so I opted for the path of least
resistance and did no seam filling.
The only thing I added to the cockpit was the resin rear wall which fits
perfectly.
The interior of the
Sabre was closed up and the fuselage bits were glued together.
The fit wasnít all that great as I had some ugly gaps between the forward
and rear fuselage halves and the underside seam.
I waited two and a half weeks before tackling the seams (to prevent those
hated phantom seams.)
I used lots
of CA glue to fill the seams and lots of 400 grit wet/dry sandpaper.
It was a tedious process as it took several tries to fill each seam.
Meanwhile wings
were relatively easy to install.
No
major fit issues, but lots of sanding filling to do.
Next I carved out
the original instrument panel coaming.
It involved a lot of test fitting and careful (and I emphasize careful)
removal of the plastic so that it would sit properly on the remaining plastic.
The last task was
to install the corrected nose.
This
required a lot more work than I thought as it fit well but I ended up with some
really deep seams that needed to be dealt with.
About this time, I had sprayed on the first primer coat and noticed I had
some really ugly seams around the gun panels as well.
It took a lot of time, filler and effort to fix these seams.
A Canadair Orenda
powered Sabre (the Mk5 and Mk6) is a bit different than its US counterparts.
The first major difference is there are no panel lines at the base of the
tail so these were filled/sanded (many times) with CA glue.
I added resin Sugar Scoops made by
The last thing I
did was add the stabs (although later I would regret that.)
| COLORS & MARKINGS |
Painting
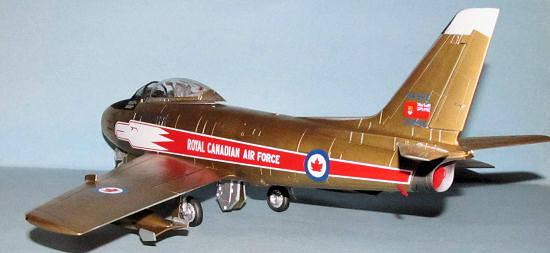
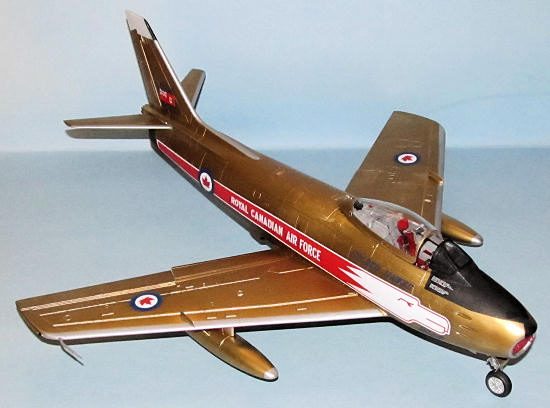
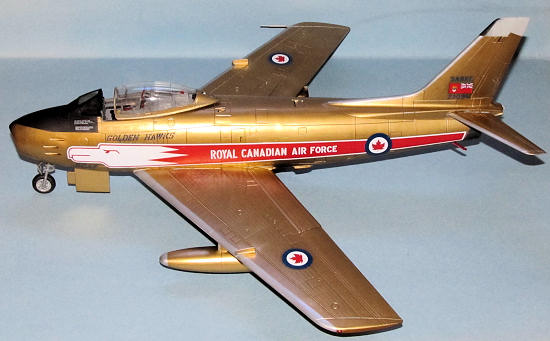
The Golden Hawk
F-86 paint scheme is one of the more flashy Sabre paint schemes of all time with
its golden metallic hue and polished metallic leading edges.
Of course it is probably one of the more difficult schemes to do.
 I normally donít
prime my models, but Iíve learned the hard way that metallic lacquers stick to
plastic way better with a couple of coats of Tamiya Grey Primer.
I ended up having to prime several times as the primer revealed many
flaws with my sanding.
This is
usually the stage where I get very frustrated with the model mostly due to the
fact I spent about almost 20 total hours just working on the primer coat.
Sanding Primer
Process
1)
I went to work on
the various primer flaws with various grades of sanding pads and polishing
cloths (1800 grit to 12000).
It
seemed every time I fixed one flaw then I found another. Wiped down model to
remove primer residue after each grade of grit.
2)
Glare at model
3)
Repeat again and
again.
After finally being
satisfied with the primer coat, I wiped the plane down thoroughly with a wet
paper towel.
Inspected for dust.
Once done, I sprayed on Old Leaf Silver for the leading edges.
Once it was dry, the various leading edges was masked off using painterís
tape and Tamiya tape.
Cut pieces of
foam were inserted into the cockpit and landing gear wells.
I sprayed on a thin
coat of Tamiya Gold Leaf paint straight from the can on the top of the model.
When the paint was cured, I flipped the model over and sprayed on a thin
coat for the bottom.
After the
paint was dry, I sprayed on a thin coat over any areas that didnít get enough
paint.
After everything was cured,
it was off to the sanding process.
At the same time, I
masked off the canopy parts.
The
windscreen was painted flat black as it was both black on the interior and
exterior while the rear canopy was painted Xtracrylix dark gull grey--the
interior color.
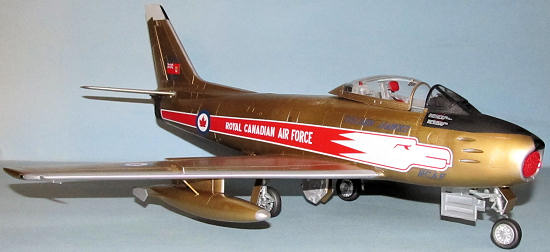
When the grey was
fully cured (I let it sit for a week), I sprayed on a couple of coats of gold
from the spray can.
 Sanding Paint
Process
1)
I went to work on
the various paint flaws with various grades of sanding pads and polishing cloths
(1800 grit to 12000).
It seemed
every time I fixed one flaw then I found another.
Wiped down model to remove paint residue after each grade of grit.
2)
Glare at model
3)
Repeat again.
Polishing took
around 5-8 hours to complete.
As
much as this was a lot of work, it could have been worse.
I have to admit that a primer coat isnít a bad thing for some types of
paint schemes and that being NMF.
It seems double the work but one thing Iíve learned
from building this and an F-100C is that a primer coat is much more
forgiving than a NMF coat.
The only real
headache I had was that I snapped off both stabs while pressing down too hard
with a polishing cloth.
I was
forced to drill out holes in the stabs themselves and the mounting holes and
then glue in some plastic rod to secure them in place.
However, I broke one of them a second time and ended up using CA glue to
hold it in place.
I masked off the
wheel wells and then sprayed interior green.
The details were hand painted with various colors and then dry brushed.
A dark colored was was used to dirty up the wells.
Once done, the
plane was wiped down with a wet paper towel in preparation or the decals.
Decals
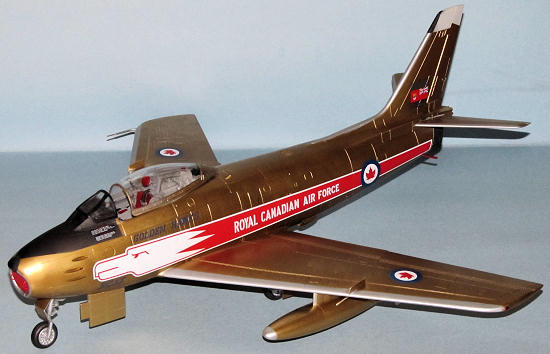 Leading Edge
supplied Kinetic with their decal sheet of the Golden Hawks Sabre Mk5.
Thankfully, there are not that many stencils so adding the decals was a
breeze compared to the paint job.
A little bit of
MicroSet before the decal was added and a thin coat of Solvaset on top after the
decal was dried did the trick as the decal conformed to the surface detail.
There was almost no silvering.
One annoying thing
I discovered is that the decal solution causes Tamiya gold paint to
oxidize/darken.
Annoying, but it is
a lesson learned.
If I do another
gold jet Iím going to put down a protective coat of Future first.
Weathering and
Final Coat
None.
The Goldenhawks F-86s were kept in pristine condition.
I wiped down the model to remove decal solution residue.
I will spray on a thin coat or two of Future at a later date.
| FINAL CONSTRUCTION |
FINAL CONSTRUCTION
The landing gear
parts were painted in various colors (Metallic Gold, Old Silver and Aircraft
Aluminum--all Tamiya Paints.)
Once
dry they were glued together and I added tinfoil (using MicroFoil glue) to the
oleo struts to make them stand out.
The landing gear was glued in using CA glue.
Next up, the
plastic wheels were easy to put together and paint.
No real issues there.
I hand painted the
cockpit details, glued the IP coaming and instrument panel.
The external fuel
tanks proved to be more of a challenge than I thought.
I glued these together and then realized that I used the wrong fins for a
RCAF Sabre so I had to hack them apart and add the correct part s.
There was a lot of sanding and filling involved due to the gashes and
cracks I made in the plastic.
The
parts were polished, wiped down and then sprayed gold.
I masked around the silver areas and sprayed on Tamiya X-11 Chrome silver
and Talon Aluminum as I was tired doing a lot of masking due to spray cans.
The silver areas were polished using SNJ polishing powder.
Once done, I glued them into the pre drilled holes and adjusted them.
Unfortunately, I
fumbled with model a little and snapped off the newly installed and polished
pitot tube.
I butchered fixing it
and ended up having to order a resin replacement which was painted and polished.
I drilled out holes
in both the intake and exhaust covers and added wire loops for the hand grips.
They were sprayed Tamiya italian red Lacquer paint from the spray can and
I had to trim the intake cover as it was designed to fit the Kinetic Intake.
Both were glued in using white glue.
The portside fuel
dump was the last piece.
It was
painted bright red and glued in place (the hole is provided.)
| CONCLUSIONS |
The Kinetic F-86
Sabre is a lot of work especially if one does a NMF plane but that seems to be a
lot of Sabre markings.
The only
thing I didnít like about it was the halves for the forward and aft halves of
the fuselage because they didnít line up as well it should have (maybe operator
error here) but otherwise it is a decent kit.
From what I understand it is an upgrade over the 40 year old Hasegawa
Sabre (because Iíve never built one so I really donít know and only going on the
word of those who have.) The Leading
Edge decals are excellent and a nice addition for this kit.
It was a lot of fun
to build and will be very happy when I hand this one over to my friend as a
birthday gift.
November 2011
If you would like your product reviewed fairly and quickly, please contact me or see other details in the Note to Contributors.