| KIT #: | 01605 |
| PRICE: | $16.95 MSRP |
| DECALS: | Three options |
| REVIEWER: | Joel Hamm |
| NOTES: |
This is off the World Wide Wacky Web, so differences of opinion should be
brought to the attention of Monsieur Wiki.
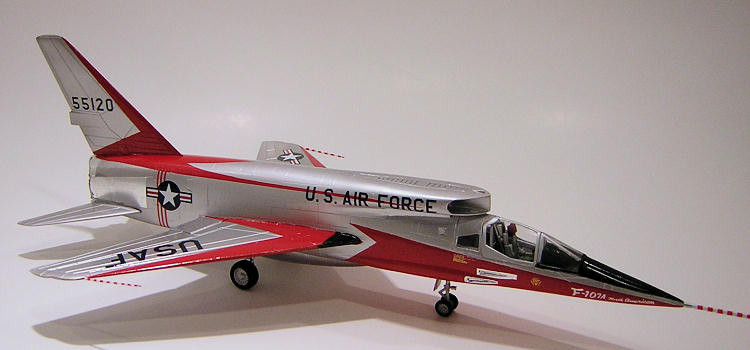
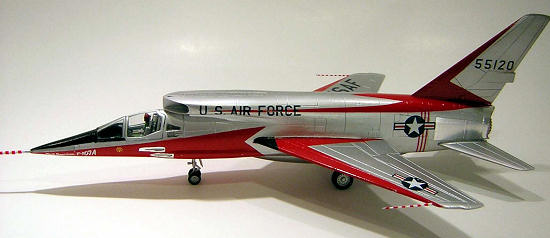
 The F107 was North American’s entry into an early 1950’s competition for
a nuclear capable tactical fighter-bomber, a contest lost to Republic’s F105
“Thud”. Three prototypes were built and, following the fly-off, relegated to
test roles. Despite the loss, they pioneered technical innovations that became
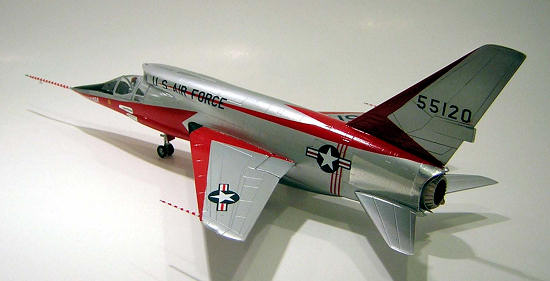
standard on high performance aircraft. Most notable was the variable geometry
engine intake. This was moved to the unusual dorsal position when its original
chin location was found to cause shock wave interference with release of the
nuclear weapons pod. In addition to restricting rearward visibility the
hunchback scoop caused concerns over the fate of a pilot forced to eject.
Wikipedia claims this earned it the name “Man Eater”, but Wikipedia says a lot
of stupid things. The occasion
never arose to either validate or dismiss these worries. One airplane was
damaged in an aborted takeoff and subsequently scrapped. One survivor went to
the
The F107 was North American’s entry into an early 1950’s competition for
a nuclear capable tactical fighter-bomber, a contest lost to Republic’s F105
“Thud”. Three prototypes were built and, following the fly-off, relegated to
test roles. Despite the loss, they pioneered technical innovations that became
standard on high performance aircraft. Most notable was the variable geometry
engine intake. This was moved to the unusual dorsal position when its original
chin location was found to cause shock wave interference with release of the
nuclear weapons pod. In addition to restricting rearward visibility the
hunchback scoop caused concerns over the fate of a pilot forced to eject.
Wikipedia claims this earned it the name “Man Eater”, but Wikipedia says a lot
of stupid things. The occasion
never arose to either validate or dismiss these worries. One airplane was
damaged in an aborted takeoff and subsequently scrapped. One survivor went to
the
| THE KIT |
The Chinese Trumpeter Company offers a wide and growing range of military
subjects. Their aircraft tend
toward the larger scales. The box
of this one sported an aftermarket sticker proclaiming “A cooperative project
with Monochrome Model”. GOOGLE
provided no help in determining
just who they might be.
 Inside were three sprues of perfectly molded gray plastic, plus one of
thin, clear, distortion-free transparencies. Instructions were adequate with
color call-outs that did not always jive with available photos.
Inside were three sprues of perfectly molded gray plastic, plus one of
thin, clear, distortion-free transparencies. Instructions were adequate with
color call-outs that did not always jive with available photos.
Decals are provided for all prototypes, but instructions do not address
the several marking differences between the three. Transfers are provided for a
“NASA” logo on the vertical fin, but this scheme is not diagrammed, neither
could any photos be found of the aircraft in NASA livery.
The decal sheet in my kit, which was scarfed up as soon as it was
announced, lacked
the large red areas, but a
| CONSTRUCTION |
Assembly starts with surgical removal of the “blank-out” portion of the
cockpit area behind the ejection seat bulkhead. This area is covered by a large
etched-for-painting transparency with two clear, small, unequal sized windows
through which the void can then be seen.
After joining the fuselage halves, this area should be “busied up” with
whatever parts can be found suggestive
 of the mechanical mish-mosh that may in
real life have filled the space. A few kilos of lead or depleted uranium should
be inserted into the nose to insure against tail-sitting, though the plane’s
geometry hints that this might in
fact be unnecessary. Nothing needs at this point to be added to the cockpit tub,
as everything, including the instrument panel can be added post-painting through
the opening.
of the mechanical mish-mosh that may in
real life have filled the space. A few kilos of lead or depleted uranium should
be inserted into the nose to insure against tail-sitting, though the plane’s
geometry hints that this might in
fact be unnecessary. Nothing needs at this point to be added to the cockpit tub,
as everything, including the instrument panel can be added post-painting through
the opening.
Painting the complex red-slash scheme on the aft fuselage
can be simplified by omitting the vertical fin until final assembly; also
by removing the molded-in wing-tip probes.
Separate flap surfaces can be affixed in the extended position, but no
photos could be found of this configuration.
Neither did any pictures show the plane with speed brakes extended, nor
with open forward doors on the main or nose landing gear,so everything was
sealed up sleek and tight.
Fit of most parts is filler-free; but the join of the under-belly section to the fuselage leaves a problematic lateral wrap-around mismatch in front of and behind the wing. The forward fix is particularly touchy where the compound curves around the gun bays must be faired together.
| COLORS & MARKINGS |
Box art and painting diagrams can never be relied upon. Thanks to the
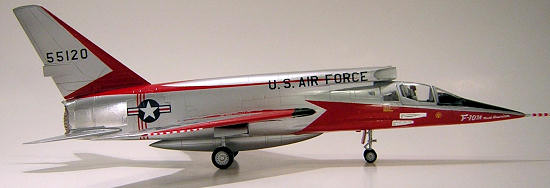
The main uncertainty to be resolved is the base fuselage color.
In-service mostly B&W photos
clearly show semi-shiny silver.
Museum snapshots say metallic gray.
An MM poster with ties to
 Metalized enamel would therefore have been legal and facilitated masking
(actually, those glittering flakes on the bottom of the Testors bottle are
pulverized fish scales); but bare
aluminum was more authentic and evocative of the plane’s Eisenhower era
heritage. Which caused another conundrum.
Throughout the galaxy there exists but one substance known to resist the
ravages of masking tape – Alclad II. I had once before experimented with the
stuff and found the chrome color produced an excellent sheen, but fell short in
the durability department when unmasking time arrived.
Further reading revealed
that “chrome” and “polished aluminum” were not formulated for masking , but that
all other colors were certified duct-tape-proof. For two reasons I chose white
aluminum: it offered the best contrast for “panelizing” with other shades;
and it was the only product available in any
walk-in or on-line hobby shop within the same afore-mentioned galaxy.
Metalized enamel would therefore have been legal and facilitated masking
(actually, those glittering flakes on the bottom of the Testors bottle are
pulverized fish scales); but bare
aluminum was more authentic and evocative of the plane’s Eisenhower era
heritage. Which caused another conundrum.
Throughout the galaxy there exists but one substance known to resist the
ravages of masking tape – Alclad II. I had once before experimented with the
stuff and found the chrome color produced an excellent sheen, but fell short in
the durability department when unmasking time arrived.
Further reading revealed
that “chrome” and “polished aluminum” were not formulated for masking , but that
all other colors were certified duct-tape-proof. For two reasons I chose white
aluminum: it offered the best contrast for “panelizing” with other shades;
and it was the only product available in any
walk-in or on-line hobby shop within the same afore-mentioned galaxy.
Alclad’s instructions call for priming with a lacquer
or acrylic undercoat. I
sprung for a schpritz can of Tamiya fine white primer, at $10 for 4 ounces.
I’m definitely getting daft in my declining years. That took a light
buffing with dry 200 grit paper.
Alclad sprays on easily in multiple very light mist coats. It is
extremely forgiving and blends into itself even if the airbrush spits out some
splatters, which mine decided to do, possibly because the concoction repeatedly
clogged the tip. It dries in minutes but is placarded against handling or
serious messing with for at least an hour or two.
I wasn’t exactly overjoyed
with the resemblance to real metal, but a test panel confirmed that it was
unaffected by masking tape; so I started laying on the acutely angled red
panels, using my favorite Scotch 471 auto pin-striping tape.
These red areas were applied in sections, starting with the wings, then
the forward fuselage, then the tail and forward sweeps.
With few scribing landmarks, I despaired of getting an absolutely
accurate and symmetrical job; and after the decals went on discrepancies with
published pics became evident. Oh
well, it’s just a toy.
 For masking the transparencies I tried a new-to-me technique of using
Bare-Metal Foil. The stuff snuggles
down, conforms, and cuts easily along framing borders with a fresh #11 blade.
When lifted with a sharpened toothpick it leaves a razor sharp demarcation
lines. It also leaves a sticky,
icky, gooey, gummy, gloppy residue
that is impossible to remove without boogering up your fresh razor-sharp
demarcation line. I had simultaneously tried it on a parallel build, the canopy
of MPM’s A-17 attack plane, which
is blessed with 5 miles of framing.
The results on that were disastrous, requiring a complete strip with ELO (Easy
Lift Off), which is not supposed to cloud plastic, but did.
I was able to polish it back to clarity, but I’ll not make those mistakes
again.
For masking the transparencies I tried a new-to-me technique of using
Bare-Metal Foil. The stuff snuggles
down, conforms, and cuts easily along framing borders with a fresh #11 blade.
When lifted with a sharpened toothpick it leaves a razor sharp demarcation
lines. It also leaves a sticky,
icky, gooey, gummy, gloppy residue
that is impossible to remove without boogering up your fresh razor-sharp
demarcation line. I had simultaneously tried it on a parallel build, the canopy
of MPM’s A-17 attack plane, which
is blessed with 5 miles of framing.
The results on that were disastrous, requiring a complete strip with ELO (Easy
Lift Off), which is not supposed to cloud plastic, but did.
I was able to polish it back to clarity, but I’ll not make those mistakes
again.
The decals are excellent quality, but stick tenaciously once they touch
plastic. Even with my usual trick
of adding wetting agent to the soak, they were difficult to maneuver unless
floated into position on a generous puddle.
They settle down of their own accord, but snuggle even tighter if rolled
or patted. A brush-on of Micro-Sol
makes the carrier film completely vanish.
One problem was evident with the markings. The wing national insignia were oversize, though the USAF’s were correct. I found a replacement pair but had to graft red stripes into the white bars. The aft fuselage insignia also posed a dilemma. Using the panel lines as a guide, they appeared to be the correct height, but the bars extended a quarter inch too far to the rear. The next smaller size looked wrong, so I used the kit decals, leading to a slight adjustment in the size and placement of the Bare Metal Foil panels flanking the engine compartment.
| FINAL CONSTRUCTION |
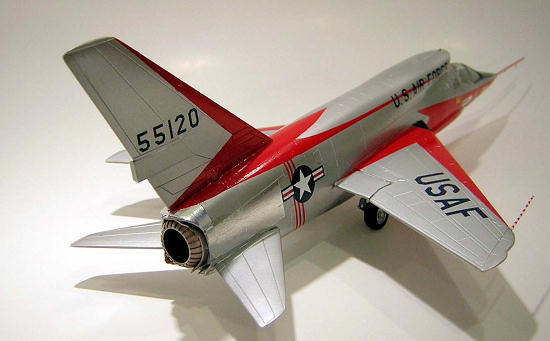
The under-belly pod needs considerable grinding down to properly fit.
Photos, and the box art but not the diagrams, show that the pointy nose
of the pod should be flush with the stomach skin, with the rear point hanging
just slightly below.
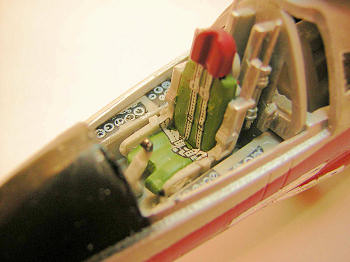 The only poor parts of the kit are the 5 pieces that make up the ejection
seat. Actually only 2 of those are
unacceptable, the seat cushion and back, which are slabs with strange
molded-in “Y” shapes that must represent the seat belts.
Using the side rails and some scraps I fashioned a more convincing,
though inauthentic couch. The belts and side console gauges are decals from a
True Details sheet of cockpit furnishings.
Decals are hardly convincing, but they beat tape strips and I was out of
The only poor parts of the kit are the 5 pieces that make up the ejection
seat. Actually only 2 of those are
unacceptable, the seat cushion and back, which are slabs with strange
molded-in “Y” shapes that must represent the seat belts.
Using the side rails and some scraps I fashioned a more convincing,
though inauthentic couch. The belts and side console gauges are decals from a
True Details sheet of cockpit furnishings.
Decals are hardly convincing, but they beat tape strips and I was out of
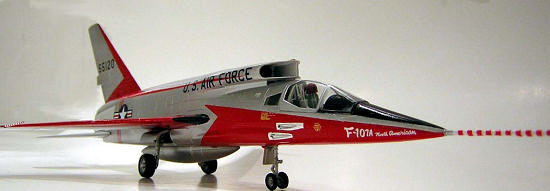
The canopy fit well, but the windshield refused to snap into place until I shaved down the sides of the glare shield. Perhaps there was just too much paint. I replaced the wing-tip probes with stretched white sprue and freehand painted the red stripes. The front proboscis didn’t look acceptable that way, despite 2 strippings and re-paintings. Rummaging through the decal trove I found a set of red stripes on a clear background, apparently from a PM Beech 18 kit. I doubted they could be successfully wrapped around the thin probe, but with a flooding of Micro-Sol they welded themselves together perfectly, needing only the barest trimming with a fresh Wilkinsons double edge. The width and spacing of the stripes is not accurate, but let’s not get obsessive about authenticity. Sticking way out in front, the barber pole probe is the sharpest part of the kit and suitably detracts from the slight clouding I caused on the windshield by the inexplicable decision to affix it with CA. I’ll not make that mistake again either.
| CONCLUSIONS |
 First, if I may, a word or three about Alclad II. As mentioned, prior
fiddling with the “Chrome” shade of the stuff had produced a very realistic NMF,
but one which is approached by
other media, notably Floquil
“Bright Silver” enamel, Krylon “Chrome” decanted from its aerosol bomb, and even
Wal-Mart’s bottom-of-the-line Color Place brand
“Aluminum” spray, also transferred to airbrush.
First, if I may, a word or three about Alclad II. As mentioned, prior
fiddling with the “Chrome” shade of the stuff had produced a very realistic NMF,
but one which is approached by
other media, notably Floquil
“Bright Silver” enamel, Krylon “Chrome” decanted from its aerosol bomb, and even
Wal-Mart’s bottom-of-the-line Color Place brand
“Aluminum” spray, also transferred to airbrush.
Where
surface imperfections need to be hidden, the heavy-bodied enamels enjoy
an advantage, as they do in requiring no primer coat or fancy preparation; and
also most notably in price. Since none of these is absolutely unaffected by
masking tape (the lifting up that is, not putting down), if fancy paint schemes
are not an issue, the old fashioned stuff will likely suffice, at least on
smaller projects on which the lacquer’s slight color superiority
is not overwhelmingly important.
Where sticky stuff of any
sort must be laid down, and subsequently lifted from a metallic finish, Alclad’s
maskable shades (anything other than “Chrome” and “Polished Aluminum”), despite
their $10 price tag, their need for impeccable surface preparation to produce a
convincing metal look, and their sometime scarcity on hobby shop shelves, are
undisputed winners in the NMF contest.
As for the kit - it’s got
some bloopers to it, but at normal viewing distance, I’d say it’s a pretty sharp
rendering of a Cold War cutey.
If you would like your product reviewed fairly and quickly, please contact the editor or see other details in the Note to Contributors.