Dragon 1/144 X-15
|
KIT #: |
4361 |
|
PRICE: |
$16.98
|
|
DECALS: |
options |
|
REVIEWER: |
Leszek Golubinski |
|
NOTES: |
Some scratchbuilding and some Brengun P.E. parts. |
North American X-15. Mach 6.7. 67 miles max altitude. An airplane, but some of
pilots earned their astronaut wings flying it. So far unbeaten in fastest speed
ever reached by manned aircraft. A hypersonic research vehicle, with program
roots in mid-50s, first flown in 1959. The three X-15 airframes were kept busy
throughout the 60s providing platform for wide array of aerial experiments. The
airframe itself proved robust, reliable and versatile, withstanding multiple
emergency landings, XLR-99 engine explosion on testbed, gear door malfunction at
Mach 4. Looking back at those extraordinary achievements one cannot help to
think of 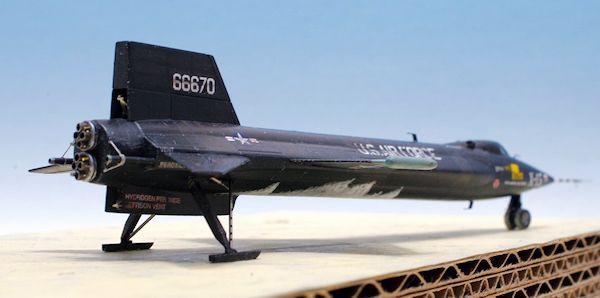 those
times as the pinnacle of aviation development...
those
times as the pinnacle of aviation development...
...but I'm getting melancholic. The business.
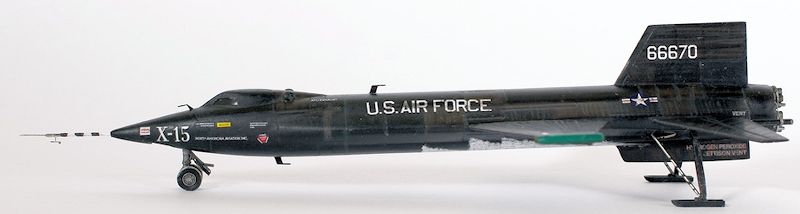
The model represents first produced (second flying) X-15 in its early stage of
life. It sports XLR-11 intermediate engines along with boom nose. The airplane
in this configuration logged rather low flying hours, having its propulsion
replaced to XLR-99 in 1961. No chance for spectacular wear and tear then... To
make the model more attractive visually I did some cheating. Or speculation. Or
both. I used well known X-15A-2 photos for reference of surface wear and panel
color variation. As for blue/green wingtip pods - the X-15-1 flew with them in
1964, and I found no reference against flying them earlier in life of this
airframe. So there you have me...
Double kit by Dragon provides two complete sets of parts for construction of
either XLR-11 or XLR-99 engined X-15-1 or X-15-2 (short version). The producer
chose to best
 Matchbox in
panel lines department. Undoubtedly they succeeded, a feature especially painful
if you compare this kit to, say, latest Eduard, or Platz 1/144 releases.
Matchbox in
panel lines department. Undoubtedly they succeeded, a feature especially painful
if you compare this kit to, say, latest Eduard, or Platz 1/144 releases.
Other pitfalls of this kit concentrate in rear area of the fuselage - XLR-11s
are badly misinterpreted and the air-brakes and landing skids are very
simplified.
One also has to pay attention to canopy shape, as there are two variants
available and only one of them proper for the short fuselage X-15. It is best
not to put complete faith in kit instruction and check other references.
Part fit is decent - the parts do fit together, but some gaps remain to be
filled. This applies to canopy (if, like me, you chose to leave it in closed
position), fuselage front/rear joint, wing roots and engine nozzle part.
The basic construction went quickly. I decided to leave canopy closed, so I only
painted the internal surfaces dark grey as there would be little to see through
tiny windows anyway...
Dragons take on panel lines and XLR-11 engines were two main headaches to deal
with. For the panel lines I applied several coats of primer and sanded it back
to bare plastic, hoping this would diminish the broad valleys. Nope. Complete
rescribing is recommended for next challengers. Or, c ome
to think of it... ditching the panel lines entirely. It is a small, sleek, high
speed, airplane. In 1/144. Proper panel shading during painting should suffice.
ome
to think of it... ditching the panel lines entirely. It is a small, sleek, high
speed, airplane. In 1/144. Proper panel shading during painting should suffice.
As for the engines: I sanded the whole rear thing flat, applied some putty to
get the fuselage shape closer to what reference photos show, and then
scratch-built those XLR-11 using plastic rods and 1.2mm brass tubes. At the same
time I deepened the upper air-brake interior, preparing the place for PE
actuators. I replaced the lower air-brake with PE part, but the fit was rather
poor. After all "heavy" work was done I added some more 0,5mm tubes and thin
wire to the engine nozzles area, to match what is visible on the photos (at this
stage the size of details meant the eyes begged for mercy, or at least something
in 1/72 scale).
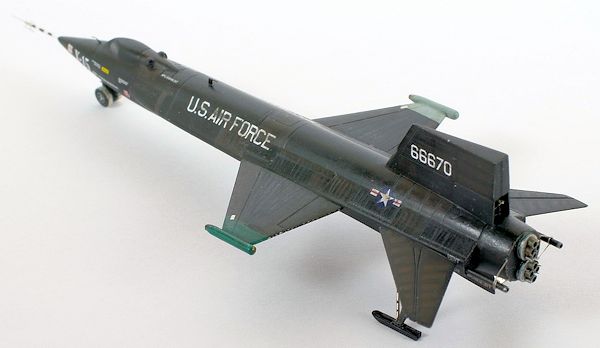
Front gear door was another assembly from Brengun PE set. As for the landing
skids - I replaced the support struts with 0.5mm injection needle, and slightly
modified the main struts and skids to make them resemble hollow U-profile rather
than solid block of metal. I added support strut actuators, which required
widening the openings in the fuselage.
Wingtip pods were made of plastic rod. I also prepared some wire for LOX
jettison pipes support - they add a nice extra detail there.
Painting started with a coat of Citadel Chaos Black, which I know to be tough
and friendly black base. I masked off the areas according to reference photos
and sprayed Lifecolor Tensocrom Burnt Brown. Next I masked the wingtips, sprayed
GS Base White, and then Pactra RLM65 went to the right and Akan Russian Interior
Green to the left. The green looked way too bright, but I left that for later.
That was the end of clean and easy work. In comes my trusty brush, and Lifecolor
Tensocrom Smoke, Oil, Rust and Burnt Brown and some neutral-to-dark grey
mixture. All applied in semi-transparent layers, building-up the effects with
near invisible pace.
 I tried to
simulate (a bit) a blueish tint on the upper surfaces, created by blue
californian sky reflecting in the surface of the airplane with use of Tensocrom
Kerosene.
I tried to
simulate (a bit) a blueish tint on the upper surfaces, created by blue
californian sky reflecting in the surface of the airplane with use of Tensocrom
Kerosene.
After having achieved the effect that was a step too strong and contrasty I
loaded the airbrush with Tamiya Smoke and toned the thing down. It was also a
good opportunity to dim that glowing Russian Interior Green on left wingtip.
Tamiya Smoke leaves the surface shiny, a good base for decals.
Those provided by Dragon were quite good - thin and with minimal film around
markings. Nothing is perfect though, as they seem to be incomplete. Again -
check your references.
I used some Tamiya White to simulate frost on the bottom of the fuselage. Then
there was another wave of Tensocrom Smoke and Burnt Brown to blend the decals
in, bring back some contrast and introduce some variation in surface glossiness.
The final touch was adding fin antennas (PE parts) and nose boom - made of 0.5mm
injection needle + wire on top + PE vanes (for which I am very glad that Brengun
provided extra one, carpet crawlers...).
And the display base. Some cardboard rectangles stacked together, and the top
painted to roughly resemble dry lake bed surface. Add some skidmarks, a snake,
some water from molten frost below the X-15... and X-15. Finished.
I know this model is not perfect. It is far from how I imagined it to be,
but then I have to take my skill into consideration, and maybe I aim too high?
:) I really wish I dealt with panel lines in a proper way, well... But on the
other hand, I am glad that the details I added do give this miniature some more
depth.
I'd recommend this kit to someone with will and skill to make it into a gem.
Otherwise it will remain a toy.
Jenkins & Landis "Hypersonic. The Story of North American X-15" (Specialty
Press)
Landis & Jenkins "X-15 Photo Scrapbook" (Specialty Press)
Leszek
GolubinskiMay
2013
If you would like your product reviewed fairly and fairly quickly, please contact the editor or see other details in the
Note to
Contributors.
Back to the Main Page
Back to the Review
Index Page