
| KIT #: | 80246/7 |
| PRICE: | @$10.00 SRP |
| DECALS: | Two options |
| REVIEWER: | Donald Zhou |
| NOTES: | “Easy Assembly” kits. |
| HISTORY |
Again, I’ll leave it to Mr. History Reviewer Tom Cleaver to do the honors on this jet.
| THE KIT |
The kit have already been previewed.
E version here. Me? Well, I’m tackling both kits at once! This is
because usually, I don’t go down to 1/72! Sorry they are too small and too
many small fiddley parts for m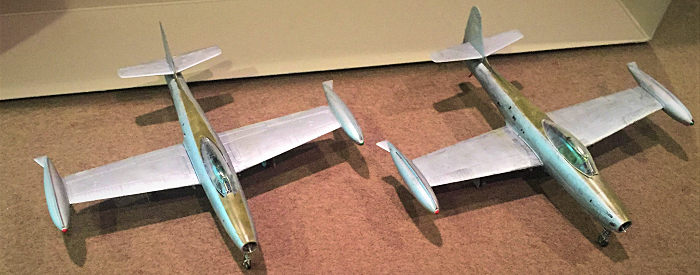 y
taste but however, while at a friend’s dad’s house, I discovered these two
kits sitting on a shelf there and being the fact “curiosity killed the cat”,
I asked and as it turned out, the man’s dad served in the Korean War and
flew the “plank wing” and received both kits from his other kid for his
birthday several years ago. Unfortunately, being at the age that he is now,
he doesn’t know how to do it anymore and doesn’t know how to get paints and
none of his friends know how either. So I gladly jumped in and told him I’ve
been making models since 13 and would love to build them for him! He gladly
gave both kits for me to build but with the caveat not to use the kits’
markings cause he is trying to get a special guy to making customized decals
for his personal Thunderjets that he flew in the War. So with that in mind,
I scanned both kits markings instead.
y
taste but however, while at a friend’s dad’s house, I discovered these two
kits sitting on a shelf there and being the fact “curiosity killed the cat”,
I asked and as it turned out, the man’s dad served in the Korean War and
flew the “plank wing” and received both kits from his other kid for his
birthday several years ago. Unfortunately, being at the age that he is now,
he doesn’t know how to do it anymore and doesn’t know how to get paints and
none of his friends know how either. So I gladly jumped in and told him I’ve
been making models since 13 and would love to build them for him! He gladly
gave both kits for me to build but with the caveat not to use the kits’
markings cause he is trying to get a special guy to making customized decals
for his personal Thunderjets that he flew in the War. So with that in mind,
I scanned both kits markings instead.
| CONSTRUCTION |
Both are part of
Hobbyboss’s “Easy Assembly” line and they are not kidding. Total parts are
only about 40 or so, excluding the armaments and the fuel bags, total for
jets are just 30. To start, I snapped off both wing tanks’ in-flight
refueling probe. I’m building two Korean War birds here and they are not
needed! Just don’t throw them away though. When I fed one of the control
stick to the carpet monster, I was simply able to grab one of the snapped
off probe, modified it for the new control stick. Cockpit as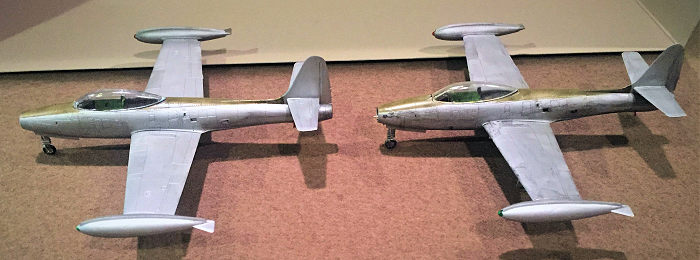 sembly
is easy. Both the late and early version seats are included and a small
instrument panel. Now, the cockpit, along with the nose wheel well, are
molded into the whole fuselage. This way not only makes the kit easy, but
also allows Hobbyboss to inject two huge blocks of plastic into the nose so
you don’t need any nose weight to weight the nose down. Clever!
sembly
is easy. Both the late and early version seats are included and a small
instrument panel. Now, the cockpit, along with the nose wheel well, are
molded into the whole fuselage. This way not only makes the kit easy, but
also allows Hobbyboss to inject two huge blocks of plastic into the nose so
you don’t need any nose weight to weight the nose down. Clever!
The only places which gave me problems are the two nose panels. Now, the G version has two blow in slits, to do this difference, Hobbyboss, like the 1/32 version, made two different side panels. The E has the non-slit version while the G has the slit version. However, these two panels, for some strange reason was very ill-fitting on both kits and it took a bit of cajoling and puttying and sanding to get them into place. Other than that, the rest of the kit might as well be a snap fit. I still used glue, but most of it fit so tightly, you can have you kids fit one together without using any cement. I did not attach the “Holly Moses” or the drop tank since 1. The rockets will get in the way of the markings under the wing and the guy is trying to source some bombs to hang under the pylons. 2. As stated before, my friend’s dad is trying to get custom decals made to represent the planes he flew during his flying career.
| PAINTING |
Colors are NMF. I used Testors small bottle silver for this. Now, since I’m building two of these, the E version will be somewhat clean while the G will look like it has gone through a war.
To start off, both
planes were washed with Tamiya flat black. Then the silver were sprayed on
lightly at first before a second coat went on on the E. For G, I did a second w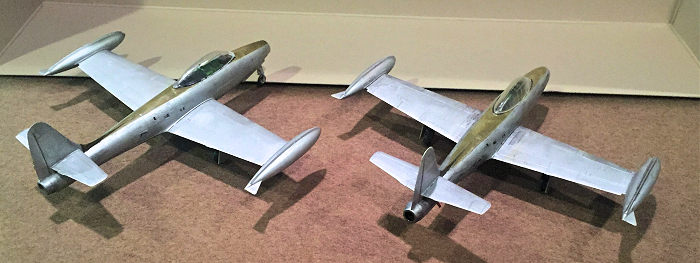 ash
with flat black, especially darken around areas that are heavy usage, such as
footsteps, armament panels etc. I then spray on the second and third coat. For
the G, some pinwashes were done on the airframe, especially the wings and I
“streak” the flat black when it was half dry to simulate airflow down the wings.
For the gears, I also added some artistic cream color to simulate dirt on the
wheels and gears.
ash
with flat black, especially darken around areas that are heavy usage, such as
footsteps, armament panels etc. I then spray on the second and third coat. For
the G, some pinwashes were done on the airframe, especially the wings and I
“streak” the flat black when it was half dry to simulate airflow down the wings.
For the gears, I also added some artistic cream color to simulate dirt on the
wheels and gears.
When that was done, I took
some masking tape, and tape up the anti-glare areas and prepared some olive drab
and sprayed that on. Both planes are complete except some details, such as
adding burnt-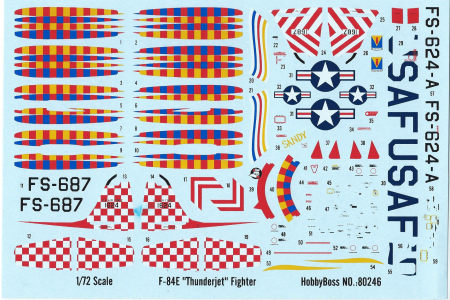 iron
and exhaust to the jet pipe, which I
iron
and exhaust to the jet pipe, which I did. I also streaked some thinned burnt-iron down the G’s entire tail pipe to
simulate the heat generated around this area. I did not put on any decals per
instructions but if experience is to go by, they should go on easy like any
Trumpy-boss decals, just be aware to dip them in water, wait until most of the
decal solutions are gone, then take them out and put it on the kit by wetting
the area first. After drying it, zap it with Mr. Marks and you are good to go.
did. I also streaked some thinned burnt-iron down the G’s entire tail pipe to
simulate the heat generated around this area. I did not put on any decals per
instructions but if experience is to go by, they should go on easy like any
Trumpy-boss decals, just be aware to dip them in water, wait until most of the
decal solutions are gone, then take them out and put it on the kit by wetting
the area first. After drying it, zap it with Mr. Marks and you are good to go.
Final construction consists of just putting on the canopy and landing gears. No, I did not tape up and paint the canopy. Again, Not used to working with 1/72 scale here and almost busted an eyeball trying to tape and then cut the panel lines.
| CONCLUSIONS |
To say these kits are easy is to say the
least! They are wonderful kits to get your kids started on and they are easy
and cheap as hell too! In fact, you can track down these kits and they cost
as little as $6 bucks in some places! If y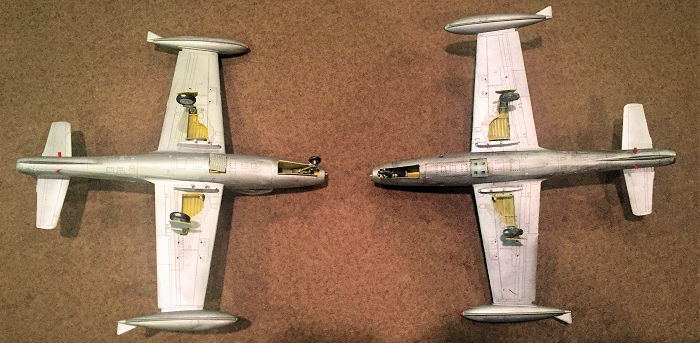 ou
want to do more than one, you can buy a dozen for the price of one of the
competitors, get some extra decal sheets and paint up several markings
without breaking the bank since the F-84 was used in several air forces with
some very neat markings. The tradeoff of course, is that the details are so
so and may not be the cup of tea of those who are all about these things but
then again, if you can scratch build, you can get some aftermarket parts and
still come under your budgets! With these two kits, I’m seriously thinking
about some other Hobbyboss’s easy build kits. They are extremely fun and a
distraction to keep your mojo when say, you are burnt out on one of your
ultimate kits that has over 1000 parts and cost a small fortune!
ou
want to do more than one, you can buy a dozen for the price of one of the
competitors, get some extra decal sheets and paint up several markings
without breaking the bank since the F-84 was used in several air forces with
some very neat markings. The tradeoff of course, is that the details are so
so and may not be the cup of tea of those who are all about these things but
then again, if you can scratch build, you can get some aftermarket parts and
still come under your budgets! With these two kits, I’m seriously thinking
about some other Hobbyboss’s easy build kits. They are extremely fun and a
distraction to keep your mojo when say, you are burnt out on one of your
ultimate kits that has over 1000 parts and cost a small fortune!
27 June 2017
Copyright ModelingMadness.com
If you would like your product reviewed fairly and fairly quickly, please contact the editor or see other details in the Note to Contributors.
Back to the Main Page Back to the Review Index Page Back to the Previews Index Page