| KIT #: | 48-020 |
| PRICE: | Around €25 in 2002 |
| DECALS: | One option |
| REVIEWER: | Spiros Pendedekas |
| NOTES: |
| HISTORY |
Initially intended as a very long-range (VLR)
escort fighter to Boeing B-29 Superfortresses on long missions to Tokyo, the
F-82 was the last American piston-engine fighter ordered into production by the
USAF. With the war ending well before the first production units were
operational, the type found its operational role in the postwar era, where
Strategic Air Command used them as long-range escort fighters.
Radar-equipped F-82s were used extensively by the Air Defense Command as
all-weather day/night interceptors, in replacement of the venerable P-61 Black
Widows. During the Korean War, Japan-based F-82s were among the first USAF
aircraft to operate over Korea, with the first three North Korean aircraft
destroyed by U.S. forces shot down by F-82s!
Like most versions of the P-51 Mustang, the first two prototype XP-82s as well
as the next 20 P-82B models were excellently powered by license-built
Rolls-Royce Merlins, re-engineered for increased durability and mass-production.
The following (“C” and onwards) models were powered by Allisons V-1710-100,
demonstrating a lower top speed and poorer high-altitude performance. With the
earlier P-82B models designated as trainers, and the "C" and later models
employed as fighters, the P-82
 was one of the few aircraft in U.S. military
history to be faster in its trainer version than the fighter version. A total of
272 units were built.
was one of the few aircraft in U.S. military
history to be faster in its trainer version than the fighter version. A total of
272 units were built.
Born in February 1918, Col. Bob Thacker was a USAF test pilot, but also an ample
modeling enthusiast and designer. Involved in modeling before the war, Col.
Thacker was one of the pilots of the 12 B-17s that arrived in Hawaii in the
midst of the surprise Japanese attack on Pearl Harbor. His wartime service
earned him two Silver Stars, three Distinguished Flying Crosses, ten Air Medals
and the French Croix de Guerre with Palm.
During his USAF career, he tested a wide variety of aircraft between 1939 and
1970, whereas in 1972 he was an advisor on a Lockheed solar-powered aircraft
project designed and built by Astro Flight Co. On January 9, 2010, he was
inducted into the Academy of Model Aeronautics Hall of Fame for his work in both
model and full-scale aviation.
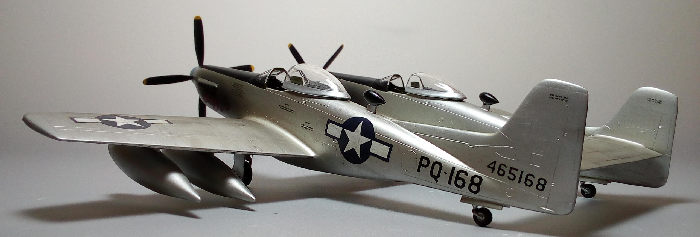
On 27 February 1947, Col. Thacker made history with P-82B USAF s/n 44-65168,
named “Betty Jo”, carrying a full internal fuel tank, augmented by four wing
tanks, for a respectable total of 1,816 US gal, when he flew nonstop from Hawaii
to New York without refueling, a distance of 5,051 mi (8,129 km) in 14 hr 32
min. He averaged 347.5 mph (559.2 km/h). This flight remains the longest nonstop
flight ever made by a propeller-driven fighter, and the fastest such a distance
has ever been covered in a piston-engine aircraft.
Lt. Col Thacker named the aircraft after his wife, the former Betty Jo Smoot of
Palm Springs, with NAA misspelling it as “Betty Joe”, the plane having gone
through a lot of publicity shots before it was finally corrected to "Betty Jo".
On 21 June 1957, “Betty Jo” was delivered to the National Museum of the United
States Air Force at Wright-Patterson AFB in Dayton, Ohio Museum, proudly
residing there today in pristine condition along with Col. Thacker’s flying
jacket and other artifacts used in that record-breaking flight!
Col. Thacker died in November 2020 at the age of 102.
| THE KIT |
Appearing in 1996-1997 in three versions (“E”, “B”
and “G”), never been re-released ever since, this is your definitive “old
school”, crude at places, limited run kit. For a detailed description of the
kit, as well as a nice historical part, please read Scott’s thorough review of
the exact kit here.
The kit comes with an attractive boxart of “Betty Jo” in a proud flight posture.
The obscurity of the subject (but also the kit itself: it was the last piece…)
and the attractive price, were the driving forces in order to grab it from one
of the usual two beloved hobby shops in Athens. Upon opening the box, all
Scott’s preview comments became apparent: a very challenging build would be
ahead of me. Well, I gritted my teeth and attacked the beast!
| CONSTRUCTION |
 The first thing I did was to clean the (massive at
places) ejector towers and mold glitches that would in any way interfere with
the build.
The first thing I did was to clean the (massive at
places) ejector towers and mold glitches that would in any way interfere with
the build.
Instructions are a hybrid intermediary, something between parts placement and
reference drawings. Do not expect your usual ultra-spread and clear “modern”
instructions here, but, truth is that if you carefully study them, they can be
followed. I performed the radical act of following them, no risks taken here…
I started by assembling the cockpits inside the starboard fuselage halves. I
first attached the cockpit floors, with the seat backs and their rear supports
onto them. I then added the instrument panels (they are labeled differently, but
look identical), side consoles, foot pedals and the seats. Details (including
sidewalls) are not bad, with the main issue being the crudity of the parts,
meaning good cleanup being necessary. Since no internal color callouts were
provided, I went generic, the basic cockpit color (including seats) being Hu221
Interior Green, with black instrument panels, consoles, grips and headrests.
Seat belts, made from masking tape, were added.
 I then went on and attached at each port fuselage half the turbocharger exhaust
ducts in closed position, along with their bases, then glued the fuselage halves
together, followed by attaching the fin tops. The engine cowlings (which, in
essence, are the fuselage fronts) were also assembled and attached to the
fuselages. The two assembled fuselages were subsequently attached onto the lower
center wing half, followed by attachment of the top center half and the one
piece rear wing that was trapped between the fuselage rears. The pair of 2-piece
turbocharger intakes were attached, as well.
I then went on and attached at each port fuselage half the turbocharger exhaust
ducts in closed position, along with their bases, then glued the fuselage halves
together, followed by attaching the fin tops. The engine cowlings (which, in
essence, are the fuselage fronts) were also assembled and attached to the
fuselages. The two assembled fuselages were subsequently attached onto the lower
center wing half, followed by attachment of the top center half and the one
piece rear wing that was trapped between the fuselage rears. The pair of 2-piece
turbocharger intakes were attached, as well.
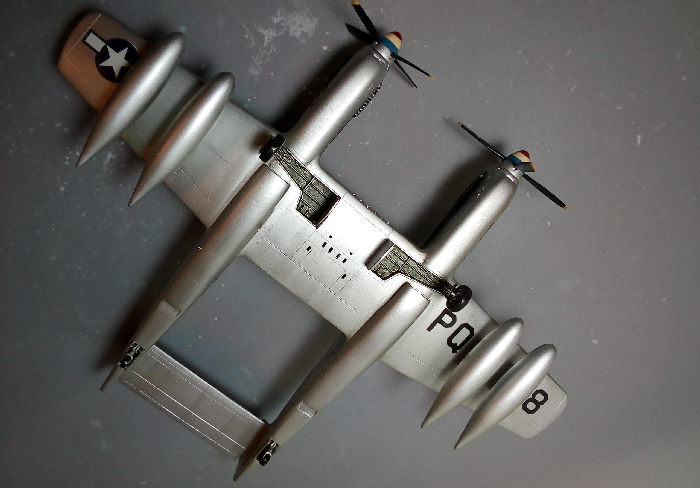
Having drilled the corresponding holes for pylons attachment beforehand, I
assembled the outer wings and attached them in position. As imagined, all the
above fit was very challenging, to say the least, with my prime focus being in
good alignment, especially regarding the very characteristic dihedral of the
outer wings, figuring out a way to smooth things later on.
I then went on and did some minimal subassembly-ing (the four 3-piece wing tanks
and the two 6-piece props, which have keyed blades).
In the meantime, glue at the basic model’s joints had cured. Alignment, to my
joy, was passable, so I went on and first shaved all “excess” plastic (at almost
every mm of every joint, trust me…), followed by an initial coarse sanding,
filling and finally (here I included the gear doors, too) 1500 grit smooth
sanding.
I then masked the cockpits and we headed to the paint shop!
| COLORS & MARKINGS |
Instructions call for an
NMF plane with olive drab anti glare panels and “red-brown” DF loop fairings. By
netting, I discovered that anti glare panels and DF loop antennas were black,
not only on the preserved “Betty Jo” today, but also on the pics taken back
then. The same attitude is expressed at all color profiles existing, save one.
It is true that in one old b/w pic of the “Betty Jo'', the anti glare panels
look to be a lighter shade tone than the neighboring prop blade (de rigeur
black). This might lead someone to suppose that the anti glares might have b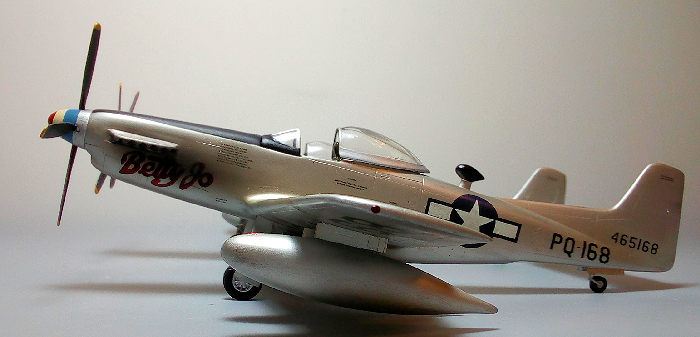 een
OD, but this tonal difference might very well be due to sunlight and /or
exposure. Anyways, the fact that Col. Thacker has posed and inspected the
preserved “Betty Jo'' with all black anti glare panels and DF loops, was my
absolute “GO” for black!
een
OD, but this tonal difference might very well be due to sunlight and /or
exposure. Anyways, the fact that Col. Thacker has posed and inspected the
preserved “Betty Jo'' with all black anti glare panels and DF loops, was my
absolute “GO” for black!
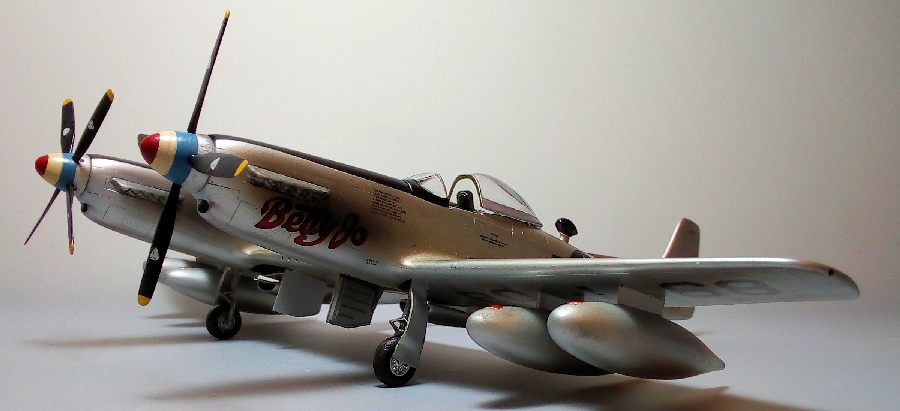
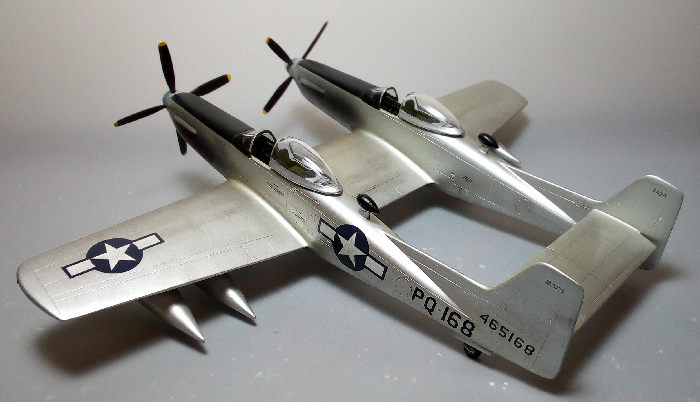
So, I first painted the anti glare panels black and masked them off. I then gave
the whole model, including the wing tanks and doors outer and inner sides a coat
of Hu191 Chrome Silver, which came out quite shiny (kind of distantly resembling
polished aluminum, but without shade “paneling”). I removed the masks and went
on to apply the decals, whose placement is (thankfully) clearly depicted at the
instruction sheet. Decals were seemingly printed by Propacteam, so I was extra
careful upon applying them. To my joy, they behaved like a dream, no remarks
whatsoever.
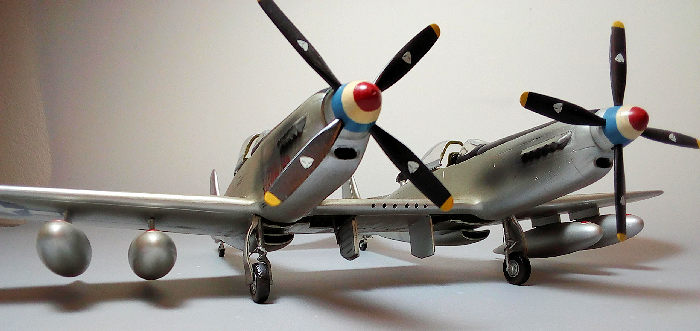
The props had their spinners hand painted red/white/blue and their blades black
with yellow tips. The decal logos were applied onto the blades and all decals
were sealed with Future.
| FINAL CONSTRUCTION |
I attached the two main
gear legs and, after assembling them, I attached the two tail wheels, followed
by the main wheels and gear doors. Two leftover doors retraction cylinders were
added, together with brake lines and drag door hinges that were fabricated from
stretched sprue. Unexpectedly, I was very pleased to find out that brake
calipers and discs were nicely molded at the inner sides of the main wheel rims!
Landing gear legs and rims were painted steel, bays were painted green zinc and
tires black.
 The four drop tanks had their filler caps painted red and, together with the two
DF loop antennas, were attached in position. DF fairings were beforehand painted
black. “Betty Jo” seemingly did not carry any sort of wire antenna, so none was
used.
The four drop tanks had their filler caps painted red and, together with the two
DF loop antennas, were attached in position. DF fairings were beforehand painted
black. “Betty Jo” seemingly did not carry any sort of wire antenna, so none was
used.
The four exhaust stacks had all their exhaust ducts drilled out, in order to
look less bland, and were subsequently painted Testors Burned Metal. In order to
sort of liven up the quite monotone looks, I misted thinned black paint aft of
the exhausts with my airbrush. The result looked quite overemphasized and
dramatic, but I decided to leave it like this, kind of resembling how the
aircraft looked after that very long distance 15-hour continuous record flight.
A minimal all-around weathering was added, as, presumably, “Betty Jo” was kept
in pristine condition. Inasmuch I was very tempted to give “Betty Jo” a gloss
finish (and I have to admit that I have seen many marvelous aircraft models
finished in pure gloss), I consider dead gloss finishes looking a tad “unreal”,
scale wise. I thus added a tad of matt to my gloss varnish and gave “Betty Jo”
its final coat.
The clear parts were cleaned from flash, dipped in Future, then had their frames
painted fuselage color and were attached in position. To my relief, fit was
manageable, the windscreen gaps faired with white glue. I finally attached a
gunsight only to the port cockpit (as it seemed to be the case in reality),
added red and green clear paint blobs at port and starboard wingtips
respectively (for the navigation lights) and called “Betty Jo” done!
| CONCLUSIONS |
This was not an easy kit
to build, requiring extra effort, in order to clean the parts, remove plastic
protrusions, then performing hefty loops of test fitting / sanding before final
attachment. It definitely falls into the “old school” limited run category,
approaching the typically very difficult French limited run kits (but without
resins and PE). Instructions are not bad, whereas they could have been more
informative and, most importantly, should contain internal paint callouts. On
the plus side, decals were great.
 With the Modelsvit offer about to hit the shelves very soon (as of 2021),
there’s little point in preferring this old kit over the Modelsvit one, which
will seemingly be a superb kit! Never been re-released since its 1997 launch,
the Modelcraft kit can even be found today at sensible prices: its difficulty in
building might be an explanation of the low sales numbers and present
availability.
With the Modelsvit offer about to hit the shelves very soon (as of 2021),
there’s little point in preferring this old kit over the Modelsvit one, which
will seemingly be a superb kit! Never been re-released since its 1997 launch,
the Modelcraft kit can even be found today at sensible prices: its difficulty in
building might be an explanation of the low sales numbers and present
availability.
Strangely attracted to obscure and “unbuildable” subjects, yours truly went on
building it, kind of enjoying putting it together: no kit manufacturers
wheedling whatsoever, just my belief that every kit (even a “most difficult”
one) deserves to be built, proudly standing as a finished model.
The final result is definitely no contest winner, but it might be considered a
passable one, regarding the ultra-limited run nature of the kit. I had a very
good time building it and I wholeheartedly dedicate it to the memory of the
talented Man, Col. Bob Thacker!
Happy modeling!
6 December 2021
Copyright ModelingMadness.com. All rights reserved. No reproduction in
part or in whole without express permission. If you would like your product reviewed fairly and fairly quickly, please
contact
the editor or see other details in the
Note to
Contributors. Back to the Main Page
Back to the Review
Index Page
Back to the Previews Index Page