Special Hobby 1/72 F-84F Thunderstreak
| KIT #: | SH 72492 |
| PRICE: | $28.00 |
| DECALS: | Three options |
| REVIEWER: | Rob Hart |
| NOTES: |
2023 release. Kelik 72079 F-84F Thunderstreak Interior 3D Decal AK Interactive 2mm white light lenses Special Mask M72049 Canopy and Wheel mask ASK 1/72 F-84F wheels Daco Products DCD 7262 Thunderstreak and -Flash Data stencilling Jack Peeters Decals 2 & 3 Belgian Air Force Serials/Codes Daco Products DCD4844 Hunter Mk.4 & Mk.6 Sqn Codes and Serial nrs |
| HISTORY |
 The Republic F-84F Thunderstreak was a swept wing
modification of the straight wing F-84 Thunderjet series of post-war
sub-sonic USAF jet fighters. The first production F-84F flew on November 22,
1952. Almost immediately control and stability problems surfaced. As a
result, numerous modifications were required before the F-84F was declared
operational on May 12, 1954 and throughout it's service life the type
suffered from poor take off performance, accelerated stall pitch up, engine
flame outs while flying through rain and snow, and practically non-existent
spin recovery. As a result of the problems the F-84F was quickly phased out
of service with the USAF and surviving aircraft were transferred to the Air
National Guard. Despite the type's marginal performance, 1301 examples would
serve in NATO nation's air forces with the last F-84F in service being
retired by Greece in 1991.
The Republic F-84F Thunderstreak was a swept wing
modification of the straight wing F-84 Thunderjet series of post-war
sub-sonic USAF jet fighters. The first production F-84F flew on November 22,
1952. Almost immediately control and stability problems surfaced. As a
result, numerous modifications were required before the F-84F was declared
operational on May 12, 1954 and throughout it's service life the type
suffered from poor take off performance, accelerated stall pitch up, engine
flame outs while flying through rain and snow, and practically non-existent
spin recovery. As a result of the problems the F-84F was quickly phased out
of service with the USAF and surviving aircraft were transferred to the Air
National Guard. Despite the type's marginal performance, 1301 examples would
serve in NATO nation's air forces with the last F-84F in service being
retired by Greece in 1991.
| THE KIT |
Here is an excerpt from Scott Van Aken's December 2023 preview of the USAF boxing of the kit. All of his comments apply with the exception of those regarding the decal options. I built the French Air Force boxing of the kit and it provided makings for three NMF Armee de L'aire examples:
Prior to this, the most often built injected plastic kits of the F-84F were those by Airfix and Italeri. Both of those are from the raised panel line era and while they still make into a nice model, it was time for a newer tooling.
It is fairly obvious from looking at the parts layout and all the crossed out bits that Special Hobby plans on multiple boxings to justify the expense of the new tooling. The engraved lines may be a bit large for some of us, but a coat of paint will reduce that impression.
As with most F-84F kits, the nose gear well is added to the splitter area of the intake. Atop this is room for a few grams of weight, which will be needed to keep it on its nose gear. Cockpit is nicely done with a five piece ejection seat and the kit offers a decal for the main instrument panel. A properly long exhaust pipe is provided with this along with the cockpit assembly and nose gear area being trapped between the fuselage halves.
 The fuselage has a
separate spine that is then added along with the fin. On the underside is a
separate parabrake housing. Wings are upper and lower halves on both sides.
Wheel well walls are a separate piece. Note that the instructions show
chromate green primer when Republic used yellow primer. A first for any
F-84F kit that I've seen is an optional open or closed refueling receptacle
on the upper wing.
The fuselage has a
separate spine that is then added along with the fin. On the underside is a
separate parabrake housing. Wings are upper and lower halves on both sides.
Wheel well walls are a separate piece. Note that the instructions show
chromate green primer when Republic used yellow primer. A first for any
F-84F kit that I've seen is an optional open or closed refueling receptacle
on the upper wing.
Once all the flight surfaces have been attached, the canopy area is next. SH offers both an open and closed canopy option with separate pieces for these. Note that Airfix has a somewhat narrow canopy while the Italeri kit has one that is much wider. This one seems to be the correct width. Landing gear is next with SH copying every other F-84F kit I've ever built by having the large main gear door molded onto the main gear legs. You are provided both inner and outer wing pylons along with the large wing tanks carried by the Thunderstreak due to its otherwise fairly short range. No bombs are provided and while there are rockets on the sprues, none are shown as being used.
Instructions are well done with a full color construction booklet. Paints are in Gunze references. All three options are in overall unpainted metal with OD anti-glare areas on the top of the fuselage. Three colorful options are give. The box art plane is the wing commander's plane with the 20FBW in 1956. Another wing commander's plane is provided from the 401FBW, also in 1956. This one has the checkerboard tail section. Finally a standard aircraft with the 511FBS/405FBW in 1955. To my eyes, the blue on the sheet is a bit too bright for this option as I believe it should be the much darker insignia blue, though I could be mistaken. If you have a color photo, I'd like to see it. Decals are nicely printed and provide all the stencils and stripes that you will need to complete the kit.
| CONSTRUCTION |
Construction started by joining the intake splitter to the nose landing gear bay. The splitter/gear bay assembly was then trapped between the left and right side outer intake walls. The five piece ejection seat was assembled next. The kit provides three different seats and I chose to use the example representing the AMI seat. The six piece cockpit was assembled after I scraped off the raised detail on the instrument panel and the console tops and replaced it with the Kelik 3D decals. The 3D decals also provide details for the console sides and the ejection seat safety belts/harnesses. All of the 3D decals fit perfectly and look superb. This was the first time that I had used 3D decals and I was pleasantly surprised by how easy they were to apply and how much they increased the level of detail.
 The next assembly was joining the two halves of
the jet pipe to the inlet nozzle and the tail pipe. The cockpit,
splitter/nose landing gear bay,, and jet pipe assemblies were then glued to
their very positive location points inside the fuselage and the two fuselage
halves were joined. Once the glue had cured and the seams where the fuselage
halves met had been sanded smooth, the nose intake ring, the spine, and the
fin/rudder (the subject of the model used the taller of the two fins/rudders
in the kit) were attached to the fuselage. With the fuselage assembly
largely complete, any panel lines that had been eradicated during the
filling and sanding were rescribed. The next step in the instructions called
for the ejection seat and the pilots head armor plate to be installed, but I
decided to hold off on attaching them until later in the interests of making
masking off the cockpit a little easier.
The next assembly was joining the two halves of
the jet pipe to the inlet nozzle and the tail pipe. The cockpit,
splitter/nose landing gear bay,, and jet pipe assemblies were then glued to
their very positive location points inside the fuselage and the two fuselage
halves were joined. Once the glue had cured and the seams where the fuselage
halves met had been sanded smooth, the nose intake ring, the spine, and the
fin/rudder (the subject of the model used the taller of the two fins/rudders
in the kit) were attached to the fuselage. With the fuselage assembly
largely complete, any panel lines that had been eradicated during the
filling and sanding were rescribed. The next step in the instructions called
for the ejection seat and the pilots head armor plate to be installed, but I
decided to hold off on attaching them until later in the interests of making
masking off the cockpit a little easier.
Work on the wings was next. Parts representing the walls of the main landing gear bays were trapped between the upper and lower halves of the wings. I was building the model with the refueling receptacle door closed. The receptacle port was deeper than the thickness of the door and I put a small blob of epoxy putty in the port to keep the door flush with the upper wing surface. The wing's leading and trailing edge seams were sanded smooth, any eradicated panel lines rescribed, and the wings were glued to the fuselage, The wings were a fair fit to the fuselage, but some filler was needed and once the seams were sanded down some panel lines had to be restored.
The instructions indicate that the horizontal tailplanes, the pitot tube, the windscreen/canopy, and the quarter windows should be attached at this point. However, the tailplanes are attached to the fin by two very shallow pins and, given the likelihood that they would come loose during the rest of the assembly process, I left them off until after the model was painted. The pitot tube provided in the kit was a tiny injection molded part that looked to be hard to separate from the sprue tree and clean up. I replaced it with one that I fabricated from a short length of aluminum tube and a piece of stiff wire. I held off on attaching the pitot until near the end of the assembly process. I attached, faired in, and masked the windscreen and quarter windows, but left the canopy off until later because I was planning on finishing the model with an open canopy.
| COLORS & MARKINGS |
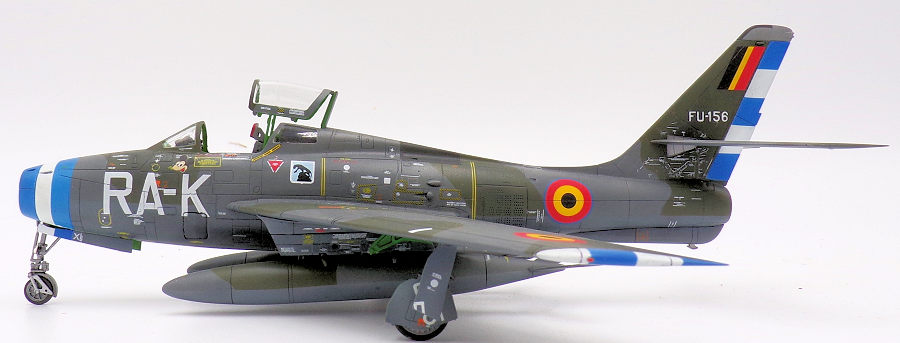
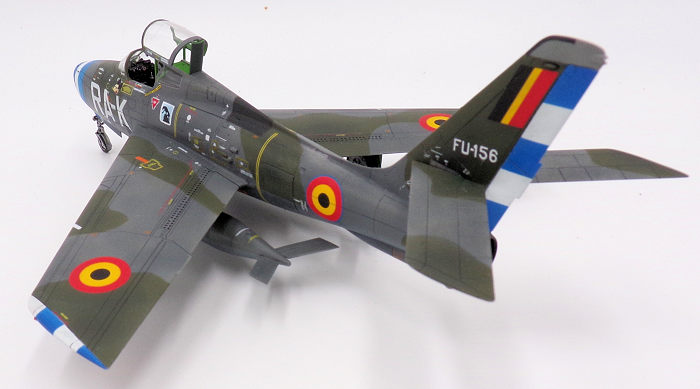
I originally intended to use decals for a Belgian
Air Force F-84F from an ancient Modeldecal sheet, but, upon closer
inspection, the white letters on the decals appeared to have turned an ivory
color and the decals were very thick.. I still wanted to build a Belgian
F-84F and found an example that I liked on a Daco Products Thunderstreak/Thunderflash
sheet. The Daco sheet did not provide the codes and serial numbers, but I
obtained those from a Jack Peeters sheet. The large code numbers on the nose
were difficult to source, but I eventually found those on a Daco Products
sheet for 1/48 Hawker Hunters. I primed the model with Tamiya Gray lacquer
primer and applied a black basing undercoat. I painted the model with AK
Interactive Real Colors RAF PRU Blue on the underside and AK Interactive
Real Colors RAF Dark Sea Grey and Tamiya XF-81 Dark Green 2 RAF for the
upper side segmented camouflage. These are WW2 colors and may be slightly
different than post war
 colors, but given all the variables inherent in
painting small scale models, I accepted the compromise. I gave the painted
model an overcoat of Tamiya X22 Clear and applied the decals. The Daco
Products decals went on nicely, but the Jack Peeters decals were on a thick
continuous film and had to be trimmed very closely. Unfortunately, even
after careful trimming, the film was so thick that it was still visible
under a couple of clear coats. After the decals had set, I applied another
coat of Tamiya X22 Clear and, after it cured, applied a dark gray oil paint
pin wash. When the wash was dry, I over coated the model with Tamiya XF-86
Flat Clear.
colors, but given all the variables inherent in
painting small scale models, I accepted the compromise. I gave the painted
model an overcoat of Tamiya X22 Clear and applied the decals. The Daco
Products decals went on nicely, but the Jack Peeters decals were on a thick
continuous film and had to be trimmed very closely. Unfortunately, even
after careful trimming, the film was so thick that it was still visible
under a couple of clear coats. After the decals had set, I applied another
coat of Tamiya X22 Clear and, after it cured, applied a dark gray oil paint
pin wash. When the wash was dry, I over coated the model with Tamiya XF-86
Flat Clear.
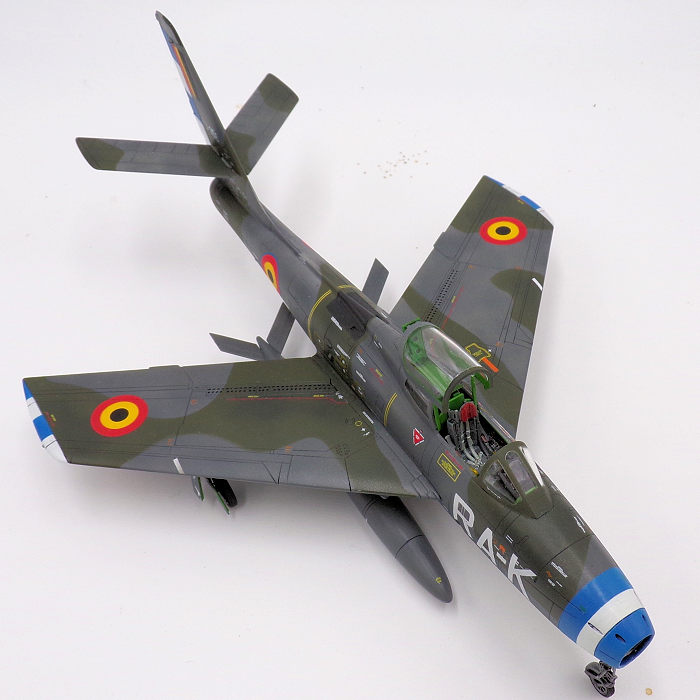
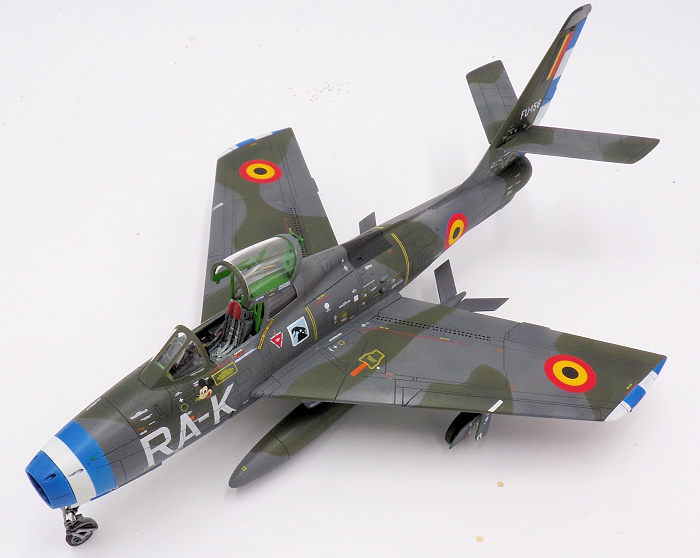
I next assembled the two part inner wing underside pylons. They are attached to the wings by very short pins. I was worried about if they were going to be strong enough to stay attached to the wing once they joined with the very large drop tanks. I ended up replacing the plastic pins with steel pins and drilling the sockets a little deeper. The landing gear legs have very positive attachment points that make getting them aligned fairly easy, but getting the wheels and the doors into the proper positions took more effort. With the landing gear finished, I turned my attention to the canopy. I wanted an open canopy to show off the cockpit detail. The F-84F has an “up and back” opening canopy and is suspended in the open position by three posts. After installing the ejection seat and the pilot's head armor, I attached the posts to the fuselage and the canopy respectively and carefully adjusted the alignment until the glue cured enough that the canopy would stay in position without me holding it. I finished building the model by attaching the horizontal tail planes, the pitot tube, and the landing light.
| CONCLUSIONS |
The Special Hobby F-84Fs are the best F-84F kits in any scale. They are typical modern kits with good fits, excellent detail, and high parts counts. They are also accurate and provide optional parts to enable building all of the the F-84F production variations. Hopefully Special Hobby will follow up with some RF-84F kits done to the same standard. Recommended to all Thunderstreak enthusiasts. .
9 December 2025 Copyright ModelingMadness.com. All rights
reserved. No reproduction in part or in whole without express permission from
the editor. If you would like your product reviewed fairly and fairly quickly, please contact the editor or see other details in the
Note to
Contributors. Back to the Main Page
Back to the Review
Index Page
Back to the Previews Index Page