Hobby Boss 1/72 F-86F-30
| KIT #: | |
| PRICE: | around $10.00 |
| DECALS: | Four options |
| REVIEWER: | Joel Hamm |
| NOTES: |
| HISTORY |
Of the F-86? Surely you jest. This site alone has volumes. If that’s not enough, go ask Siri. Of the project:
Mom was right.
I should have followed in Big Brother’s footsteps and become a hot-shot surgeon.
Great satisfaction comes from healing, making whole, and bringing back to life.
Not people. The sick ones are – ooh – so icky. Full of germs and body fluids.
But machines – motors, vehicles,
 vessels, and
airplanes real and replica deserve a second chance.
vessels, and
airplanes real and replica deserve a second chance.
This project started its first life as a simple, quick, and cheap weekend throw together; an easy OOB shot at a no-boogers build to replace the other sorry-state sabres on the early jet shelf. Alas – the best laid plans… A fist-full of incurable botches rendered the effort unworthy of continuance. A quick snap back of the wings and the model and modeler were relieved of their misery. The parts got tossed into the spares bin, the larger ones later used as test surfaces for various decals, paints, and finishes. One was an attempt to achieve a metal finish with real metal – aluminum foil; both household and the ridiculously expensive stuff sold to hobbyists for just such a purpose. The experiment showed promise, but priority went to building a decent version of an F-86.
| THE KIT |
Months later, while waiting for a highly unsatisfactory coat of MM silver enamel to dry on that replacement, the dismembered corpse tumbled out of the parts box. (Read the following as a poem)
 So I looked
at it, and thought a bit, and looked at that paint dull and glum.
So I looked
at it, and thought a bit, and looked at that paint dull and glum.
Here, said I, was a chance to try some real aluminum.
A foil sheet I tore from a kitchen drawer and I laid it on a pane of glass.
Then I burnished and scraped 'till it was properly shaped as smooth as a baby’s
---.
Then found some glue, and diluted the goo, with a piece of foam to smear.
Spread a layer of the stuff, thin and smooth, not rough, and let it dry till it
was clear.
Then I stuck on the foil and started to toil,
with a toothpick, a swab, and a pin.
Pressing down tightly 'till that Sabre gleamed brightly, in its new suit made of
tin.
| RECONSTRUCTION |
But I’m getting ahead of myself. As
usual, the excitement of experimentation pushed the project to the workbench
forefront and the important stuff back into the “Someday” dimension. First task
was reassembli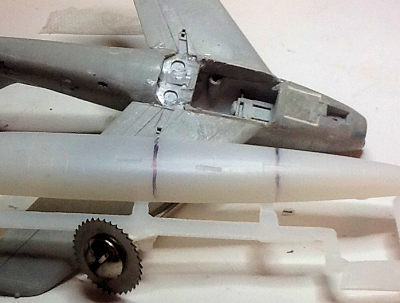 ng
and revivifying the dearly departed. All parts were present, including a
pristine canopy and several sprues of incidentals. The old finishes succumbed to
a soak in brake fluid mixed with a few drops of turpentine, followed by a brisk
Saturday night bath in assorted soaps and rinses. The surfaces emerged scratched
and pitted. Since metallic finishes accentuate every nook and cranny, a coat of
gloss primer should have been applied; but I was rushed, lazy, and mostly
interested in uncovering these foibles of foil.
ng
and revivifying the dearly departed. All parts were present, including a
pristine canopy and several sprues of incidentals. The old finishes succumbed to
a soak in brake fluid mixed with a few drops of turpentine, followed by a brisk
Saturday night bath in assorted soaps and rinses. The surfaces emerged scratched
and pitted. Since metallic finishes accentuate every nook and cranny, a coat of
gloss primer should have been applied; but I was rushed, lazy, and mostly
interested in uncovering these foibles of foil.
Tailplane attach would be deferred to facilitate foiling, but the wings mated neatly to their original fracture lines – except that a chunk of underside skin was missing. Best results would come from excising and replacing the entire inter-wing belly slab. The parts bin yielded up an unused fuselage half from a Meikraft F-6U Pirate that had been superseded by a better Czech rendering, but appeared to offer the precise sought-after shape. Minimal filing and filling snugged the section into the void. A few sanding strokes and rescribed panel lines left the assemblage ready for recladding.
| COLORS & MARKINGS |
The above bit
of doggerel outlined the skinning process, but some details need to be added.
First: Materials – Best results would likely come from self adhesive Bare Metal
Foil, but with a considerable cut into the modeling budget. Household Reynolds
Wrap is perfectly suitable, but must be thinned by squeegeeing on a smooth, flat
surface with a plastic card or similar tool. A better alternative can be bought
a tres bon marche at the Everything Costs A Dollar Store. Their Cheap-arino
brand is thin and flimsy, not good for wrapping a pastrami on rye, but admirable
attributes for this application. Adhesives: I used Microscale Metal Foil
Adhesive because I had a bottle of it sitting around. Any contact type glue will
do – aqueous if possible. Aerosols are handy but a foam brush yield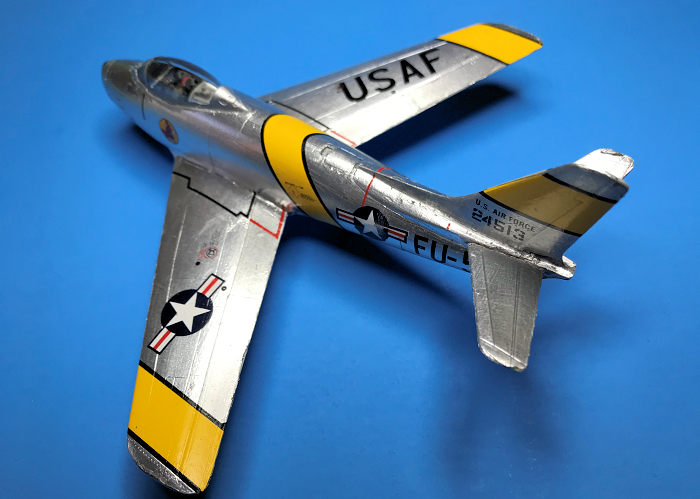 s
a thinner, more even coat. For large flat surfaces only the foil should be
glued; which allows removal and re-positioning until set with pressure. Sharp
curves, such as the F-86’s nose ring, benefit from the stronger grab provided by
coating both foil and plastic.
s
a thinner, more even coat. For large flat surfaces only the foil should be
glued; which allows removal and re-positioning until set with pressure. Sharp
curves, such as the F-86’s nose ring, benefit from the stronger grab provided by
coating both foil and plastic.
Tools: First positioning tool should be a finger, followed by
cotton swab. The side of a round toothpick makes good burnishing tool to press
the foil tight and into all depressions. The tip, or a dulled pin run LIGHTLY
along the panel lines will get them to properly pop out – or in. Technique:
Microfoil’s instructions advise laying down small sections, but I found it
easier and neater to use as large a piece as possible. Avoiding wrinkles takes
practice, which should be accumulated on a junk project – such as this. Working
from the convexity top outward and downward will cause the foil to conform
without crinkling. Boogers and bloopers can be cut out, lifted off, and
replaced. Burnishing will make joints and overlaps invisible; but there’s really
no need because they look just like the joints and overlaps by which actual
airframes are assembled. Alternating the dull and chrome foil sides produces a
contrasting panel effect, which can also be done by LIGHTLY stroking the panel
in one direction with wet 800 or finer grit paper. Create raised panels, such as
landing gear doors, by applying a properly shaped snippet of tape – Scotch, PVC
electrical, HVAC, or what have you, then covering with foil. Avoid lifting at
leading and trailing e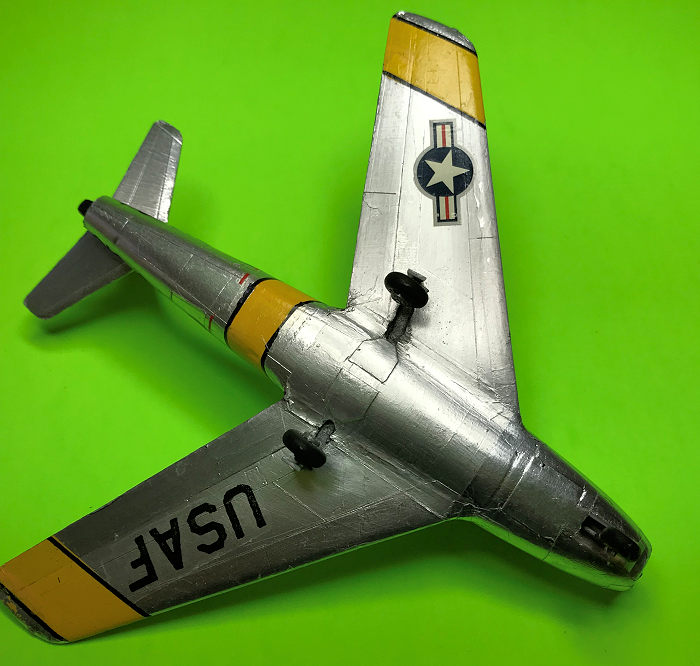 dges
by wrapping around and cutting the excess with a fresh tipped #11 blade run
along a panel line. Curved wing and tailplane tips are a problem best solved by
extra adhesive. Excess gloppy stuff comes off easily by damp swabbing with
solvent. Try that with a painted on finish!
dges
by wrapping around and cutting the excess with a fresh tipped #11 blade run
along a panel line. Curved wing and tailplane tips are a problem best solved by
extra adhesive. Excess gloppy stuff comes off easily by damp swabbing with
solvent. Try that with a painted on finish!
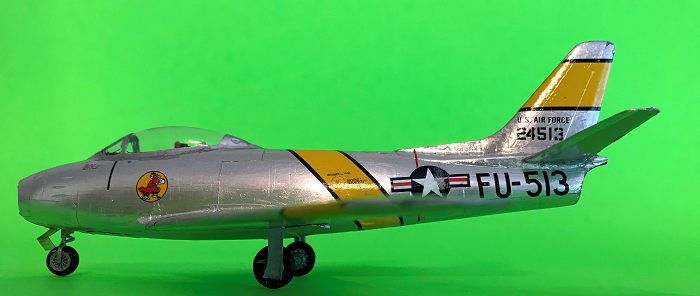
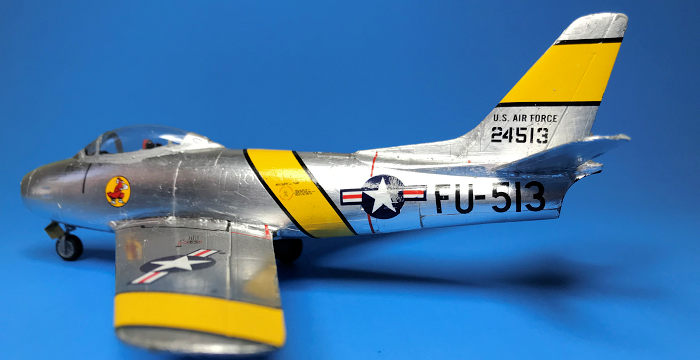
Decals came from the kit sheet, aided by some scrounging for insignia that had been cannibalized. Hobby Boss transfers are top notch, thick and strong enough to be manhandled, but conforming paint-like without setting fluids. They benefit noticeably from the Microscale system, but Solvaset makes them shrink and tear. They are faulted only by a slight oversize of the fuselage insignia and codes, causing them to extend too far aft; though part of the problem was putting the yellow fuselage band an extra eighth of an inch or so rearward. That points up a disadvantage of foil. On a painted surface the offenders could be lifted off with tape, but that would likely tear away the aluminum layer.
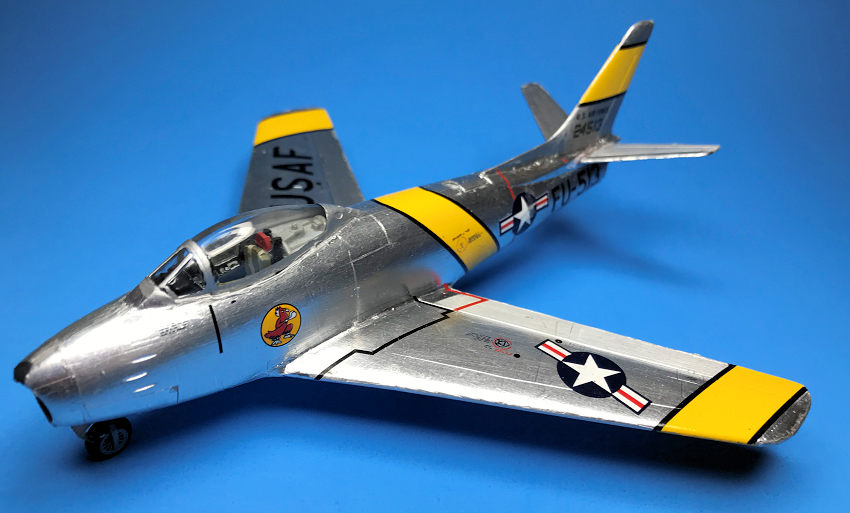
NMF finishes look most realistic left uncoated, but sealer is indispensible on a model residing in an Arizona desert house, vacant most of the year, with the AC set to go on just below the flash point of concrete. Two planes left here last year survived with disintegration only of their monofilm thread antennae, but they were encased in acrylic gloss coat; so the Sabre was sent to the schpritz booth. Surprisingly, a liberal airbrushing of Future didn’t at all dull the F-86’s foil shine, but rather enhanced it with depth.
| FINAL CONSTRUCTION |
Nothing notable here. A modified True Details resin seat filled the cockpit void. Canopy framing came courtesy of a Sharpie silver paint pen. I was tempted to try one of those liquid chrome markers, but Hobby Lobby’s $12 tab turned me away. That represents about 3 seconds worth of earnings in the soaring S&P 500, but I will never throw off the parsimony passed on by my depression era parents.
 In length
and girth Hobby Boss molds their landing gear struts the size of scale sequoia
trunks; and their main wheels were oversize shirt buttons. The spare parts
treasure chest produced a set from a long forgotten, unbuilt, unidentifiable
Sabre Jet. Those wheels were also a tad rotund, but on that topic I’m not
qualified to complain. The main gear doors had to be cut half length, while the
nose gear door had gone missing in inaction and was replaced by a PEB stand-in.
After completion, the plane took up stance as a tail-sitter, but thanks to the
long dark tunnel of intake trunking was brought into compliance by a few lead
shot dropped down its gullet. Rather like force feeding a goose to make foi gras.
In length
and girth Hobby Boss molds their landing gear struts the size of scale sequoia
trunks; and their main wheels were oversize shirt buttons. The spare parts
treasure chest produced a set from a long forgotten, unbuilt, unidentifiable
Sabre Jet. Those wheels were also a tad rotund, but on that topic I’m not
qualified to complain. The main gear doors had to be cut half length, while the
nose gear door had gone missing in inaction and was replaced by a PEB stand-in.
After completion, the plane took up stance as a tail-sitter, but thanks to the
long dark tunnel of intake trunking was brought into compliance by a few lead
shot dropped down its gullet. Rather like force feeding a goose to make foi gras.
| CONCLUSIONS |
Certainly no specimen of perfection, but it was never intended or expected to be. Rather, a very educational test bed whose lessons will be applied to more worthy projects. With practice, and depending on durability, this may become NMF method of choice. Still, considering how this project started its second life - not at all a bad result.
P.S. Apologies to poet Robert Service.
P.P.S Here’s a novel twist to a MM review: The first Reader’s Forum poster to correctly answer this riddle wins a prize of one Merlin model drawn from my Stash of Self Induced Suffering. Why is this build the opposite of a certain movie script?
Editor's Note: It seems like every airplane modeler tries an overall metal finish using foil of some sort at least once. Few of us do it again......
11 January 2018
Copyright ModelingMadness.com
If you would like your product reviewed fairly and fairly quickly, please contact the editor or see other details in the Note to Contributors.
Back to the Main Page Back to the Review Index Page Back to the Previews Index Page