| KIT #: | 81725 |
| PRICE: | $30.99 |
| DECALS: | Two options |
| REVIEWER: | John Cheyney |
| NOTES: |
| HISTORY |
The Lockheed F-80C was the final production version of what became America’s first operational jet fighter. The prototype XP-80 first flew in June 1944 after a very fast development cycle led by Kelly Johnson and Lockheed’s famed ‘Skunk Works’ secret development team. The design was built around the British Halford HB-1 engine. The second plane, designated XP-80A was built around a slightly larger engine, the GE I-40. The development program resulted in several deaths, including that of Major Richard Bong, the highest scoring US fighter pilot in history. Bong died when the fuel pump on the aircraft he was flying failed and he tried to exit the aircraft too low for his parachute to open.
 The P-80A
was too late for World War II, although four aircraft did make it to Europe. Two
were sent to England and two to Italy. One of the England based aircraft
crashed, killing the pilot. The Italian-based aircraft flew a very small number
of sorties before the war ended. Comparisons by the US Air Force against the
German Me-262 jet showed the Me-262 to be equal in climb performance and better
in acceleration and speed.
The P-80A
was too late for World War II, although four aircraft did make it to Europe. Two
were sent to England and two to Italy. One of the England based aircraft
crashed, killing the pilot. The Italian-based aircraft flew a very small number
of sorties before the war ended. Comparisons by the US Air Force against the
German Me-262 jet showed the Me-262 to be equal in climb performance and better
in acceleration and speed.
In 1948 the P-80C came online, with a different engine, an ejection seat, and wing tip fuel tanks. When the Korean War started in June 1950, F-80C’s played a major role flying both air to air and air to ground missions. An American pilot name Lt. Russell Brown claimed a MIG-15 as the first US jet to jet kill, although Russian records dispute that. The F-80C was not competitive with the MIG-15 and, after the arrival of the F-86 Sabre, was tasked to fly ground support and reconnaissance (as the RF-80) only. This resulted in many more F-80’s being lost to ground fire than to aerial combat. Standard armament was 6 x .50 caliber Browning M2 machine guns, as well as rockets and bombs in the ground attack role.
Lockheed developed the T-33 twin seat trainer from the F-80, as well as one version modified for carrier take off and landings. The F-80 was used by several international air forces into the early 1970’s. Some of the final airframes were converted to drones as the QF-80 and used as targets, and many have ended up in private hands and are flying today as warbirds.
| THE KIT |
Like many modelers, I like to do
kits based on a series or theme. One of my current themes is Korean War aircraft
in 1/48th scale. Some models are more difficult to find than others, and the
F-80 in 1/48th is one of those. I ran across this one during a trip to spend
some Christmas money and grabbed it. In the box are multiple sprues of light
gray plastic in separate bags, one clear sprue, and one photo-etch fret of
seatbelts. The plastic was uniformly thin and ejection pin marks and flash were
non-existent. The panel l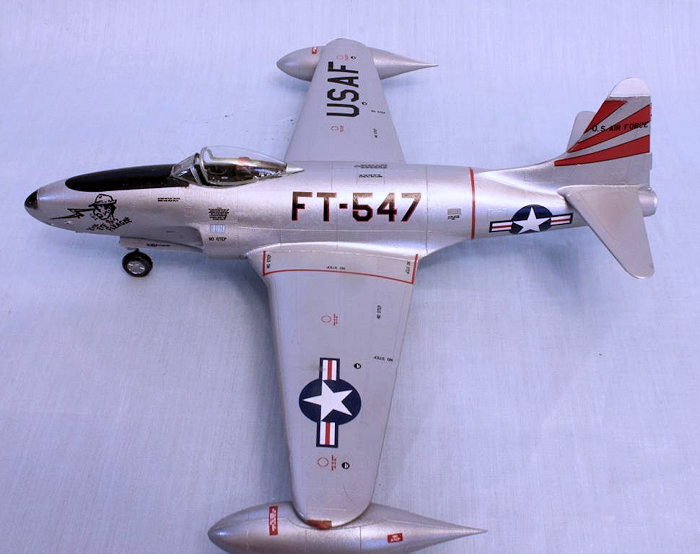 ines
and rivet markings are very finely recessed. I was impressed that the clear
parts are wrapped in thin foam to protect the canopy from scratches. The decal
sheet shows markings for two different aircraft. One thing I like about Hobby
Boss models is that there is a separate full color sheet showing the painting
and decal placement for each version. The kit comes with two options for the
wing tip tanks. One of the issues with the F-80C in Korea was the relatively
short range and loiter time flying from bases in Japan. This kit has the
standard Lockheed tanks as well as the larger ‘Misawa’ tanks. The Misawa tanks
are named after Misawa airbase in Japan where many of these were based. A couple
of enterprising pilots modified the standard tank to make it larger, adding an
extra 350 miles of flight range to the aircraft.
ines
and rivet markings are very finely recessed. I was impressed that the clear
parts are wrapped in thin foam to protect the canopy from scratches. The decal
sheet shows markings for two different aircraft. One thing I like about Hobby
Boss models is that there is a separate full color sheet showing the painting
and decal placement for each version. The kit comes with two options for the
wing tip tanks. One of the issues with the F-80C in Korea was the relatively
short range and loiter time flying from bases in Japan. This kit has the
standard Lockheed tanks as well as the larger ‘Misawa’ tanks. The Misawa tanks
are named after Misawa airbase in Japan where many of these were based. A couple
of enterprising pilots modified the standard tank to make it larger, adding an
extra 350 miles of flight range to the aircraft.
If you have read Scott Van Aken’s review of the Hobby Boss F-80A much of it applies here. Clearly there is a large commonality between the kits. One of the things I really liked was the organization of the parts on the sprue. Each sprue has a letter and each piece is number in order. If you need E39 you grab sprue E and start looking until you see the parts in the 30 range. That seems like such a small thing until you are trying to find a very tiny headrest, then it’s amazingly helpful.
| CONSTRUCTION |
I started with some of the subassemblies. I put together the smaller tanks, mostly because I like the way they look. Each tank has a top and bottom, which creates a horizontal seam that has to be dealt with. They went together nicely with a little glue and sanding taking care of the seam. There are aftermarket resin wheels and tires available, but I elected to go with the ones in the box. Small parts were painted on the sprue and the tanks, fuselage, and wings were coated with Tamiya spray primer.
The stock cockpit is well detailed.
I built the ejection seat and had my first near tragedy. While trying to clean
up one of the side pieces I broke it across the thin part where the ejection
handles would be. It was
 an easy
enough fix by lining up both pieces and hitting the spot with a little glue. The
painting guide calls out the seat frame in light gray and the seat bucket itself
in khaki. I found pictures online of a very similar seat from the T-33 that was
all green except the headrest. I decided to go with that and airbrushed it with
Tamiya acrylic Green Drab, painted the ejection seat handles yellow, and
finished it off with dry brushed Tamiya acrylic Steel. The kit comes with a
photoetch sheet for the seatbelts. Those were primed and painted. I saw one
picture online with green belts and one with white. I ended up grabbing olive
drab khaki and steel to complete them, just to give them a little color
distinction against the seat. The shoulder belts look fine, but the instructions
call for four pieces to be set in the seat bottom. That ended up looking a
little crowded, but maybe that’s how they looked in real life. I think it would
have looked better had I only put in two of the pieces, but by then the CA glue
was dry.
an easy
enough fix by lining up both pieces and hitting the spot with a little glue. The
painting guide calls out the seat frame in light gray and the seat bucket itself
in khaki. I found pictures online of a very similar seat from the T-33 that was
all green except the headrest. I decided to go with that and airbrushed it with
Tamiya acrylic Green Drab, painted the ejection seat handles yellow, and
finished it off with dry brushed Tamiya acrylic Steel. The kit comes with a
photoetch sheet for the seatbelts. Those were primed and painted. I saw one
picture online with green belts and one with white. I ended up grabbing olive
drab khaki and steel to complete them, just to give them a little color
distinction against the seat. The shoulder belts look fine, but the instructions
call for four pieces to be set in the seat bottom. That ended up looking a
little crowded, but maybe that’s how they looked in real life. I think it would
have looked better had I only put in two of the pieces, but by then the CA glue
was dry.
The instrument panel and side panels have gauges molded in them. They also come with decals. The main instrument decal was fine, but the decals for the side panels were not on the sheet. The decal numbers that were supposed to indicate them were entirely different decals. There was also an extra decal for the lower main panel that’s not in the instruction. I put those on with MicroSol. The lack of decals for the side panels was a minor issue. I detailed out the dials and placards and dry brushed the side panels with steel. In retrospect this reminds me why I don’t really like decals for instruments on top of panels with detail. If you don’t get it in exactly the right place it looks like, well, a decal placed on raised details. I took white, red, and yellow paint on a toothpick for the dials and lines. The gun sight has a couple of tiny pieces and was glued to the top of the instrument panel and painted flat black. The gun sight reflector is a clear piece that glues to the back of the gun sight.
Final assembly was smooth. I sprayed the tub with Testor’s Acryl Green Zinc Chromate. The pieces fit well into the tub and you can access the pins from the bottom, preventing you from having to try and reach down into the tub to get glue in place.
The back half of the fuselage has an
engine that fits in it. The engine doesn’t have much detail and I initially
wasn’t going to put it in, to make balance better. However, when I test fit
everything I noticed the tail of the engine sticks out very slightly, so I went
ahead and added it. The two halves of the fuselage fit
 together
with a very small gap at the front. I added the horizontal stabilizers and set
that part aside.
together
with a very small gap at the front. I added the horizontal stabilizers and set
that part aside.
During this build I was able to try out a new tool, the MicroMark Tweezer Sprue Cutter. It is essentially a very heavy tweezer with sharp jaws. It did an excellent job cutting parts off right next to the piece, leaving very little extra plastic to deal with. It’s best with small parts and thinner connections, but it is able to get in very tight places. I was very impressed with it and will definitely continue using it.
I sprayed the inside of the wheel wells with green zinc chromate and glued them in place in the wing bottom, then glued the wing tops on. As with the rest of the model, it took a small amount of clean up at the sprue attachment points to get a very tight fit. In his F-80A review Scott mentions that the flaps are designed to be shown open, and have little tabs meant to hold them at the correct angle. However, pictures of the F-80 on the ground never seem to show the flaps down. I cut the tabs off and with a very little sanding got the flaps glued in place in the up position. I also sprayed the interior of the forward fuselage zinc chromate green. The instructions call for 8 grams of weight. I had a couple of small pieces of lead that equaled 12 grams and glued them in place with CA glue. The gun barrels are actually just small round rods that project through the nose. These are glued from the inside and will have to be painted after the body color is put on. These would be very easily made better with some tubing or needles.
Once the cockpit was finished and dried I glued it to the side of the fuselage. As with the rest of this kit, the piece lined up well on the first try with no fitting. I tried to fit the two sides of the fuselage together and found my next near tragedy. The way I had glued the lead weights in place wouldn’t allow the halves to fit properly. What I should have done was used some putty to hold them in place. Thankfully I was able to pop one of the weights off and reseat it on top of the front wheel well. Another tragedy narrowly averted. The two front halves fit together with a small seam. What I didn’t realize initially was that the seam between the two is actually a panel line in some places, so I probably filled and sanded them a bit much. The panel and rivet lines are very delicate and while they fit the scale of the model they are easy to obliterate.
 At this
point I had the front and back halves finished and needed to mate the together.
The two pieces fit nicely but really could use some tabs and notches to make
sure they line up exactly. The alignment is critical, otherwise the wing
assembly will never fit. I ended up tacking them together in four places with a
small amount of glue, letting that dry, and then finishing the seam. Finally I
added the wing assembly. I had to clamp them together at one point to make sure
they fit, but that took care of it. I glued the wing root to the fuselage and
had to use a very minimal amount of Squadron White putty on one side. However,
the overall fit was smooth. Finally I glued on the tip tanks and let them dry.
At this
point I had the front and back halves finished and needed to mate the together.
The two pieces fit nicely but really could use some tabs and notches to make
sure they line up exactly. The alignment is critical, otherwise the wing
assembly will never fit. I ended up tacking them together in four places with a
small amount of glue, letting that dry, and then finishing the seam. Finally I
added the wing assembly. I had to clamp them together at one point to make sure
they fit, but that took care of it. I glued the wing root to the fuselage and
had to use a very minimal amount of Squadron White putty on one side. However,
the overall fit was smooth. Finally I glued on the tip tanks and let them dry.
The canopy has two pieces and there is a small clear piece that fits on the nose. All were masked with Tamiya yellow tape. I painted the front and rear deck flat black under the canopies and glued them in with Testor’s clear glue. Even when I intend to display an open cockpit I typically glue the moveable piece in place with a small amount of white glue, then remove it after painting. The front and rear cockpit met with a gap but if you chose to do it with the cockpit closed it would only take a small amount of work to make them fit. The clear pieces are nicely clear and appropriately thin. I painted the canopy frames green zinc chromate and let it dry. The wheel wells were masked with cotton balls and Tamiya yellow tape, then it was time to head to the paint booth.
| COLORS AND MARKINGS |
The good thing about modeling Korean
War aircraft is that there are a number of very interesting aircraft and great
history involved. The bad thing is that most of them (at least for the US Air
Force) were left in a bare metal finish. I have done a few before and had
moderate luck. I used Alclad II on one and it was OK, but I decided to do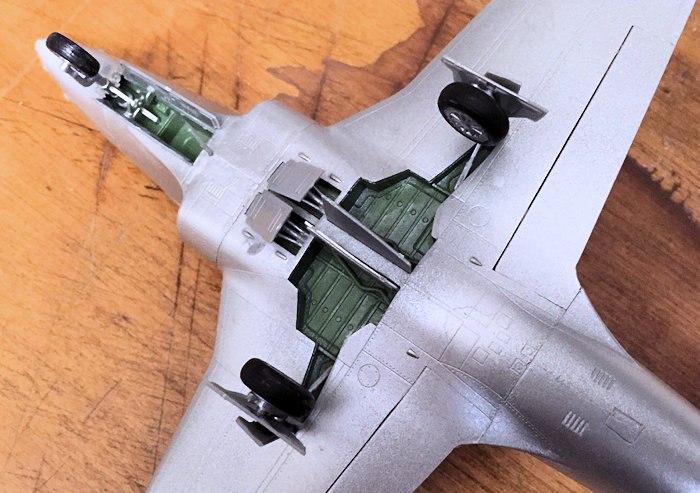 this one in Testor’s acrylic silver. My experience is that it covers a little
better and is easier to spray than Alclad. Any bare metal finish rewards
meticulous surface prep. You can expect every flaw to show through. I had done
the seams to the best of my ability, and sanded the primed finish with a red
(very fine) Squadron sanding stick. With any of the ‘metal’ paints you have to
very thoroughly mix the paint, more than just hitting the jar against your hand
a couple of times. I used a battery powered mixer to break up the chunks of
pigment in the bottom and get the paint into submission. This paint also tends
to flow and run very easily, moreso than other paints. This can be good when you
need to float it into an area for coverage. It can be bad because it runs very
easily. I sprayed the paint about about 20 PSI, in very light coats. Seeing the
silver paint against the gray primer can be a little challenging. When in doubt
stop and evaluate. I hit the entire model with one very thin coat, as well as
the gear doors and landing gear. The color sheet calls out the doors as silver
on both sides. After a couple of hours of drying I laid on another very thin
coat, with good coverage. The seams weren’t quite as clean as I would have
liked, but I don’t think trying to redo them would have been worth it. Time to
walk away and let things dry.
this one in Testor’s acrylic silver. My experience is that it covers a little
better and is easier to spray than Alclad. Any bare metal finish rewards
meticulous surface prep. You can expect every flaw to show through. I had done
the seams to the best of my ability, and sanded the primed finish with a red
(very fine) Squadron sanding stick. With any of the ‘metal’ paints you have to
very thoroughly mix the paint, more than just hitting the jar against your hand
a couple of times. I used a battery powered mixer to break up the chunks of
pigment in the bottom and get the paint into submission. This paint also tends
to flow and run very easily, moreso than other paints. This can be good when you
need to float it into an area for coverage. It can be bad because it runs very
easily. I sprayed the paint about about 20 PSI, in very light coats. Seeing the
silver paint against the gray primer can be a little challenging. When in doubt
stop and evaluate. I hit the entire model with one very thin coat, as well as
the gear doors and landing gear. The color sheet calls out the doors as silver
on both sides. After a couple of hours of drying I laid on another very thin
coat, with good coverage. The seams weren’t quite as clean as I would have
liked, but I don’t think trying to redo them would have been worth it. Time to
walk away and let things dry.
After a couple of hours I came back and the paint was dry and overall pretty smooth. I buffed it out with cotton balls and decided to call it good.
| FINAL BITS |
Next was the landing gear. The gear themselves fit fine. Each main gear has a main strut and an actuating strut to raise it and lower it. When all that was glued in place the gear lined up straight. I attached the gear and air brake doors. The tabs on the doors held things in place while the glue dried. The main gear doors fit nicely, but the fronts don’t have tabs to hold them in place. The landing lights are a small clear piece that glues to the front of the front gear strut. I really would have been better off gluing it to the strut before the gear went in. I took several minutes to finally maneuver it into place. After all the gear pieces and small pitot tube and antenna were glued in place I touched up the silver in a few places, and dirtied up the wheel wells by dry brushing them with silver to simulate wear and then black to simulate grime and oil. I didn’t do it heavily, just enough to make it show. After sitting it on the gear to make sure they would line up correctly I turned the model over and left it upside down while the glue on the gear dried overnight.
Normally I would have coated
everything with clear gloss before decaling, but given the smoothness of the
silver finish I decided not to do that this time. The kit comes with two decal
options. One is a really nice ooking dragon decal, but requires some painting to
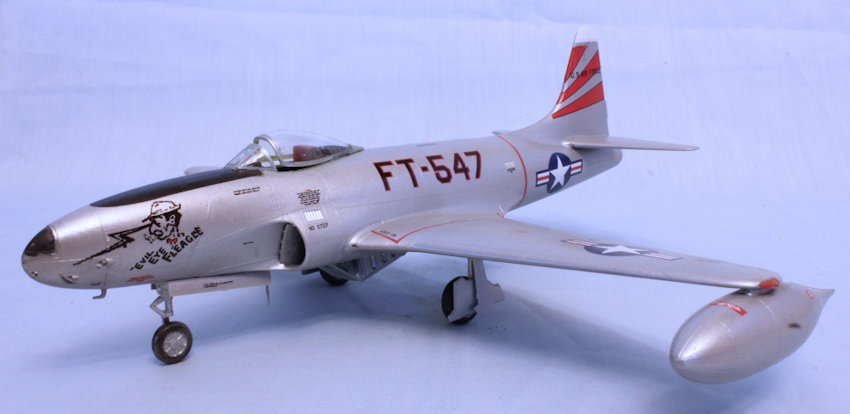
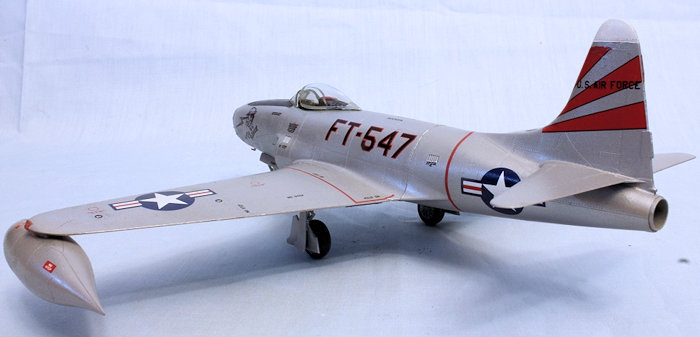
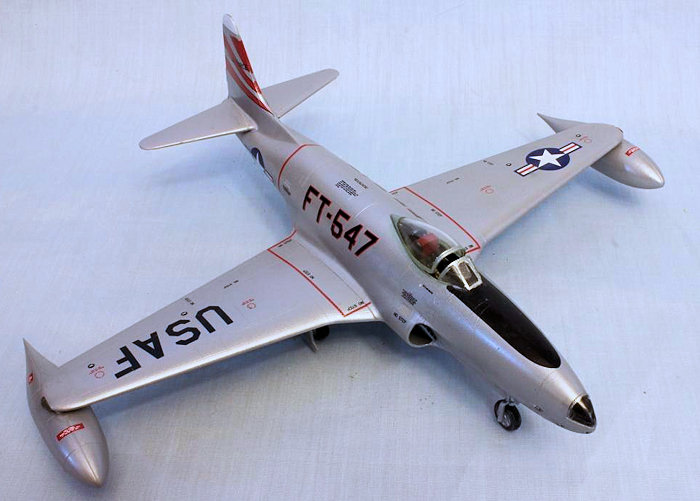
match the decal. I decided to go with the other, which has a piece of nose art
featuring ‘Eagle Eye Fleagle’ from the Lil’ Abner cartoon. I found multiple
pictures of matching aircraft from the 36th Fighter-Bomber Squ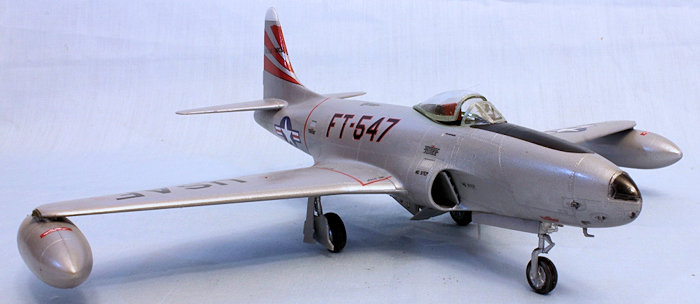 adron,
8th Fighter-Bomber Group (The ‘Flying Fiends’). In all of the pictures I saw,
the tip tanks are never marked and painted the way the kit shows them, so I left
those decals off. The decals are of high quality but have some issues that made
the process a little tedious. First of all, the numbers on the decal sheet don’t
always match the numbers on the paint guide. Not a huge deal, but clearly not
correct. The decals also had a tendency to fold up. Noting like spending 5
minutes trying to unfold a 1/48th scale ‘NO STEP’ decal on the end of your knife
to make you need a break. The kit does come with extra decals so in that case I
could have just used another one. The glare shield in front of the windshield is
a decal. That would be fine except it doesn’t fit the shape of the windshield
exactly, so I had to add a little paint to make it work. In retrospect I should
have masked and painted it. One thing I really didn’t like was that the ‘U.S.
Air Force’ decal on the vertical stabilizer sits on top of the decal for the
stripes. So once it’s in place it is almost impossible to move without moving
the other decal. I am not sure why they didn’t just make it one decal. There are
a number of small placard decals that are included but aren’t on the painting
guide. The pictures I saw online show those on the real aircraft, so I added
several in various places to make it look more realistic. Ultimately they all
went on, but this is the one area of the kit that I think needs a little work.
All of the decals were placed using MicroSol. While I was decaling it I also put
in the small clear pieces on each wing tip for the lights and painted them red
and green.
adron,
8th Fighter-Bomber Group (The ‘Flying Fiends’). In all of the pictures I saw,
the tip tanks are never marked and painted the way the kit shows them, so I left
those decals off. The decals are of high quality but have some issues that made
the process a little tedious. First of all, the numbers on the decal sheet don’t
always match the numbers on the paint guide. Not a huge deal, but clearly not
correct. The decals also had a tendency to fold up. Noting like spending 5
minutes trying to unfold a 1/48th scale ‘NO STEP’ decal on the end of your knife
to make you need a break. The kit does come with extra decals so in that case I
could have just used another one. The glare shield in front of the windshield is
a decal. That would be fine except it doesn’t fit the shape of the windshield
exactly, so I had to add a little paint to make it work. In retrospect I should
have masked and painted it. One thing I really didn’t like was that the ‘U.S.
Air Force’ decal on the vertical stabilizer sits on top of the decal for the
stripes. So once it’s in place it is almost impossible to move without moving
the other decal. I am not sure why they didn’t just make it one decal. There are
a number of small placard decals that are included but aren’t on the painting
guide. The pictures I saw online show those on the real aircraft, so I added
several in various places to make it look more realistic. Ultimately they all
went on, but this is the one area of the kit that I think needs a little work.
All of the decals were placed using MicroSol. While I was decaling it I also put
in the small clear pieces on each wing tip for the lights and painted them red
and green.
Unfortunately as I was decaling it, I realized I had missed some painting. The top of the nose is molded in clear, but actually gets painted flat black. That would have been a lot of easier to deal with if I had noticed that before I glued it in place. The tip of the vertical stabilizer is painted white, which I didn’t notice until this point. That required a bit of careful masking and painting. After all that was dry, the final step was a thin coat of Tamiya acrylic gloss.
When I looked online at pictures of these aircraft in Korea, I was struck by just how invisible the panel lines were. I decided against trying a wash to bring out the panel lines because I think is overemphasizes them. Mostly the aircraft in the pictures are dusty with a very light colored dust. I tried to simulate this with weathering powders but I don’t think it shows as well as it looks.
| CONCLUSIONS |
This is the second Hobby Boss model I have done and I have been very impressed with both. The kit is of good quality, well detailed but not overly so. The parts are detailed enough that you don’t need add-ons to get a good outcome. The instruction sheet was easy to use. My only real complaint was that the decal sheet was missing a couple of decals and the instructions didn’t quite match. This model has a lot of possibilities for an experienced modeler looking for a base model to modify, or for a diorama. Although it did remind me that my seam skills need some work, I very much enjoyed this build.
| REFERENCES |
Lockheed P-80 Shooting Star (https://en.wikipedia.org/wiki/Lockheed_P-80_Shooting_Star)
Project Extraversion: P-80 Shooting Stars in World War II (http://www.defensemedianetwork.com/stories/project-extraversion-p-80-shooting-stars-in-world-war-ii/)
F-80 (http://www.globalsecurity.org/military/systems/aircraft/f-80c.htm)
Lockheed P-80/F-80 Shooting Star (http://www.militaryfactory.com/aircraft/detail-page-2.asp?aircraft_id=86)
8th FBG, 35th & 36th FBS F-80’s & T-33, Korea, 1951 (https://jetpilotoverseas.wordpress.com/2010/11/24/f-80-korea-1951/)
January 2016
Copyright ModelingMadness.com
If you would like your product reviewed fairly and fairly quickly, please contact the editor or see other details in the Note to Contributors.