Revell 1/81 B-57B Canberra
| KIT #: | 00025 |
| PRICE: | AU$10-00 (at a Swap n' Sell) |
| DECALS: | Two options |
| REVIEWER: | George Oh |
| NOTES: | 1956 tooling reissued in 2008 |
| HISTORY |
The Korean War/Police Action saw widespread use of jet-propelled combat aircraft. This in turn, spelt the end of the dominance of aircraft with propeller-turning engines, so the USAF began a search for replacements for their existing fleet of aircraft. The replacement for the late-WWII propeller-driven Douglas A.26 Invader ground-attack aircraft, was the English Electric Canberra, because it was a proven design with all-weather capability. But the British production capability was at maximum capability, so the Martin Avation Company got a licence to build them as the B.57.
 The modified
Americanised version, the B.57B Intruder, moved the second crewmember from the
bowels of the fuselage, up into the light behind the pilot, so the offset
hemispherical British canopy got replaced by a long greenhouse one.
Additionally, it received 4 x 20mm cannons outboard of the engines, and the
British bomb doors were replaced by a rotating sleeve. Unfortunately for the
USAF aircrews, resistance to foreign technology prevented the B.57B from being
deployed to Korea. Instead, it became the first USAF jet-bomber to drop bombs in
combat, when it was deployed to Vietnam as tactical aircraft. The B.57B could
carry the ordnance of four F4 Phantoms, and for a greater range (without the
need to ait-to-air refuel). Initially dressed in SEA cam, they eventually
received an overall glossy night black scheme for its night intruder role. Chuck
Yeager flew them (and lots of other aircraft) in Vietnam, and found them very
pleasant to fly, and eminently up to their task.
The modified
Americanised version, the B.57B Intruder, moved the second crewmember from the
bowels of the fuselage, up into the light behind the pilot, so the offset
hemispherical British canopy got replaced by a long greenhouse one.
Additionally, it received 4 x 20mm cannons outboard of the engines, and the
British bomb doors were replaced by a rotating sleeve. Unfortunately for the
USAF aircrews, resistance to foreign technology prevented the B.57B from being
deployed to Korea. Instead, it became the first USAF jet-bomber to drop bombs in
combat, when it was deployed to Vietnam as tactical aircraft. The B.57B could
carry the ordnance of four F4 Phantoms, and for a greater range (without the
need to ait-to-air refuel). Initially dressed in SEA cam, they eventually
received an overall glossy night black scheme for its night intruder role. Chuck
Yeager flew them (and lots of other aircraft) in Vietnam, and found them very
pleasant to fly, and eminently up to their task.
There were two other versions - the EB.57B Night Intruder electronic warfare version , and the RB.57 stratospheric reconnaissance aircraft with greatly-elongated wings. But the B.57B had only a short life with the USAF - 1953-57. They ended their life as transitional trainers and target-tugs.
| THE KIT |
 This kit
hales from1956. I bought this Revell Classic re-release, because I had never
heard of a B.57, and because it was cheap (I seem to say that a lot). At
1/81-scale, it is a box-scale model. In other words, the kit parts were made to
fit into Revell's standard-issue shallow lid-&-tray kit-box. The box held four
sprues holding 45 parts (+ one clear part). The parts had little detail of the
raised type (with the usual grooves to differentiate the built-in control
surfaces). The one-piece cockpit, consisting of the two crew on their seats, is
the only internal piece. The external stores consist of tip-tanks, four pairs of
rockets (for moulded-on pylons) and four optional napalm tanks - optional,
because there are no firm locations for them.
This kit
hales from1956. I bought this Revell Classic re-release, because I had never
heard of a B.57, and because it was cheap (I seem to say that a lot). At
1/81-scale, it is a box-scale model. In other words, the kit parts were made to
fit into Revell's standard-issue shallow lid-&-tray kit-box. The box held four
sprues holding 45 parts (+ one clear part). The parts had little detail of the
raised type (with the usual grooves to differentiate the built-in control
surfaces). The one-piece cockpit, consisting of the two crew on their seats, is
the only internal piece. The external stores consist of tip-tanks, four pairs of
rockets (for moulded-on pylons) and four optional napalm tanks - optional,
because there are no firm locations for them.
The instructions are on two double-sided folded A4-sheets of cheap paper. Of the eight 1/2-sides, three contain information, and the other five show the parts lay-out map, 21 (very-brief) assembly steps and two nearly-identical decal-placement guides for all-black aircraft. The instructions direct that the model needs 5-grams of nose weight. I started building this kit because it qualified as an entry into a competition to build a model that is more than 25-years old. I had a lot in my stash to choose from.
| CONSTRUCTION |
(MAJOR) Trimming of the flash from the cockpit piece, then painting it, was the first order of business. This wasn't an easy task because it was a single piece, but painting the deeper parts first, worked well. The white bone-domes were painted last. I like the contrast. It was essential to dry-fit the cockpit and the canopy to ensure that they don't interfere with each other (because they will). The rest of the assembly was very straight-forward because it is a basic kit. I stuck a lead fishing sinker in the nose without weighing it first - whatever fit. Small amounts of filler was needed everywhere - more-so around where the single-piece the tail-planes slid into the aft-end of the fuselage. The wheel-wells weren't boxed-in or roofed, but the model sits so low that it probably won't be noticeable.
I built the whole model, less the undercarriage legs, external stores and engine tail cans, so I could paint it all in one hit.
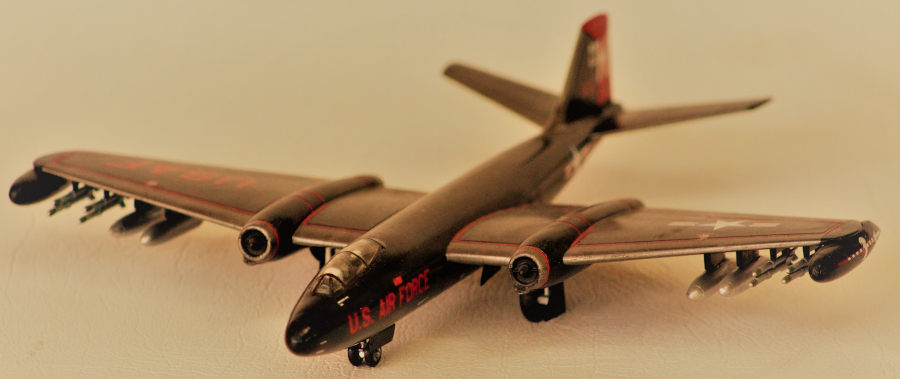
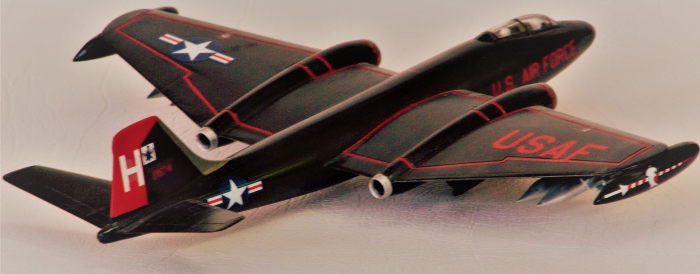
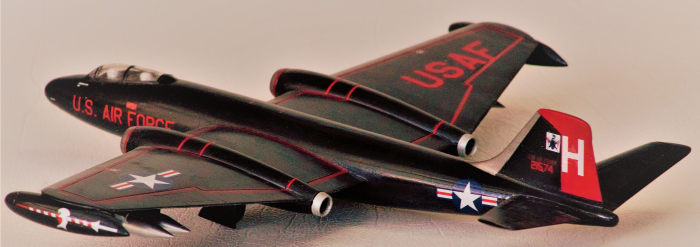
| COLORS & MARKINGS |
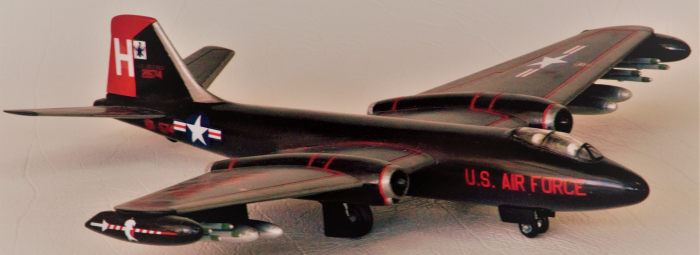 Painting was
easy. The rudder was sprayed with a bright red, then after it had dried and was
masked, the whole model, including the tip and napalm tanks, were sprayed with
Tamiya F-1 gloss black as per the boxart and photos on the Internet - especially
the famous one with a (several-times modified) UFO(?) in the background. The
wheel wells and inside of the doors, were brush-painted with a Citadel
Miniatures (CM) dark green instead of aluminium. The rocket pairs were
brush-painted with a CM grey, with green warheads and silver tips. Leading edges
were mask, then brush-painted with CM boltgun metal - a dark metallic colour.
And while I was at it, the engine tail cans were painted, too.
Painting was
easy. The rudder was sprayed with a bright red, then after it had dried and was
masked, the whole model, including the tip and napalm tanks, were sprayed with
Tamiya F-1 gloss black as per the boxart and photos on the Internet - especially
the famous one with a (several-times modified) UFO(?) in the background. The
wheel wells and inside of the doors, were brush-painted with a Citadel
Miniatures (CM) dark green instead of aluminium. The rocket pairs were
brush-painted with a CM grey, with green warheads and silver tips. Leading edges
were mask, then brush-painted with CM boltgun metal - a dark metallic colour.
And while I was at it, the engine tail cans were painted, too.
There were a heck of a lot of decals - mainly stencilling and red lines, and about a dozen standard markings. I hate lots of stencils, but I used them because they contrasted with the black paint. On the other hand, I love the red lines because they greatly enhance the model. They all went down nicely onto the gloss-black surface, then I sealed them in with a gloss coat.
| BIT MORE BUILDING |
The pylons, moulded as part of the napalm tanks, were masked, then the tanks were sprayed with a chrome silver. Next, the undercarriage legs and wheel hubs were painted a CM silver, then the tyres were painted CM black and the oleos were brush-painted with a chrome paint.
I filed a small flat area on the main wheels to help the model sit on its nose wheel, then I assembled and glued-on the undercarriage legs. External stores were glued-on, including the napalm tanks which were positioned according to measurements provided in the instructions as there were no locating guide marks on the model. This completed the build.
| CONCLUSIONS |
The unique thing about this build is that the model balances on the flat areas of the wheels, with the tail and the nose-wheel clear of the surface the model sits-on. Several really-terrific modellers have complimented me on my precise balance calculations. (Just pure dumb luck!!) The initial competition drew a LOT of complaints from modellers who objected to having to build so ancient a model. So the subject window was reduced to 10 years - spoil-sports!!
This was a quick build, and the end-product looks like a Canberra. It should be an easy build for even a junior modeller, so I'm happy to recommend to all modellers. A really-good modeller might want to scratch-build a bomb bay - or to buy a better kit.
12 July 2022
Copyright ModelingMadness.com. All rights reserved. No reproduction in part or in whole without express permission.
If you would like your product reviewed fairly and fairly quickly, please contact the editor or see other details in the Note to Contributors.