Hasegawa 1/72 B-47 Stratojet
| KIT #: | 04057 |
| PRICE: | $35.00 when new |
| DECALS: | One option |
| REVIEWER: | Christopher Campbell |
| NOTES: | A long running kit that has stood the test of time |
| HISTORY |
In 1943, while jet aviation was still in its infancy, the United States Army Air Force proposed a requirement for a jet propelled bomber. Even before the formal proposal was fielded the following year, Boeing went to work on designs. Ultimately, prototypes would be ordered from Boeing, Convair, Martin and North American.
Convair and North American designed four-engine aircraft while Martin and Boeing submitted six-engine designs. The former were orthodox straight win designs, while the later were quite radical for their day, each in its own way. Despite being a beautiful, sleek design for a straight wing jet bomber, it ultimately lost out to the North American XB-45 that would go on to be produced as the first American jet bomber, serving from 1948 to 1959. It was quickly overshadowed by newer designs but proved to be a most efficient reconnaissance platform, seeing action in direct overflights over Soviet airspace and in combat in Korea.
The Martin design was also straight wing, but featured six jet engines in three closely mounted angular pods on either wing. Its landing gear was of bicycle configuration with wing outriggers. Still, it was a dated design when it first flew. Boeing, on the other hand, had designed a true world beater.
It featured long, gracefully swept wings at a 35 degree angle. The pilot and co-pilot/gunner sat beneath a fighter type sliding bubble canopy while the navigator/bombardier had a compartment in the nose. It was equipped with radar for true all weather operation and could carry a variety of nuclear and conventional weapons. Defensive armament was in the form of a remote control turret in the tail mounting twin 20mm cannon.
Powered by six General Electric J-47 engines, it was the fastest, highest flying bomber of its day. These were mounted in pairs on an inboard pylon beneath the wings and a single engine in and outboard pod flush with the wing. Like the Martin design, it featured bicycle landing gear with outriggers in the dual engine pods.
 Its cruise
speed exceeded five-hundred-fifty miles per hour with a top speed just over six
hundred. A service ceiling of just over forty-thousand feet put it out of reach
of many fighters, including jets. It was also capable of maneuvers most bombers
could not dream of performing. One bomb approach for releasing nuclear weapons
was to put the aircraft into an Immelmann turn, lobbing the nuke at its target
from its zenith in order to allow the Stratojet to safely clear the blast. With
in flight refueling, it had global reach and was the cutting edge of the
Strategic Air Command until its big brother the B-52 would begin to supplant it.
Its cruise
speed exceeded five-hundred-fifty miles per hour with a top speed just over six
hundred. A service ceiling of just over forty-thousand feet put it out of reach
of many fighters, including jets. It was also capable of maneuvers most bombers
could not dream of performing. One bomb approach for releasing nuclear weapons
was to put the aircraft into an Immelmann turn, lobbing the nuke at its target
from its zenith in order to allow the Stratojet to safely clear the blast. With
in flight refueling, it had global reach and was the cutting edge of the
Strategic Air Command until its big brother the B-52 would begin to supplant it.
It was, to my knowledge, the first aircraft to be equipped with R.A.T.O. ports built into the fuselage to reduce takeoff run, boost takeoff time, and conserve valuable fuel for its thirsty jets. This gave its after fuselage a very distinct “cheese grater” look and their use has been captured in some very iconic photos.
More than two thousand would be built. Three-hundred-ninety-nine of these were of the B variant, the first service model. The majority of production would be the B-47E, the definitive version, which dispensed with the windows in the nose compartment and incorporated multiple improvements over the early B variant.
There were multiple and widely varied experimental versions tested, including one with turboprops on the inboard engine pylons, a tanker variant, and even a missile equipped variant testing the Rascal air launched cruise missile that would help pave the way for the Hound Dog that would be fielded on the B-52. Reconnaissance, electronics, weather, and training variants were all built or converted from existing airframes.
It was in front line service as a nuclear deterrent bomber and in the air constantly somewhere through 1969, usually with nuclear weapons aboard. At its peak, the Startojet equipped an astounding twenty-six(!) wings. There were a few incidents involving nuclear weapons having to be jettisoned or lost with the aircraft. Two were lost when an aircraft broke up or crashed over the Mediterranean and another was jettisoned near Tybee Island, Georgia, in shallow water, but has never been found.
Another was quite infamously jettisoned by accident in 1954 over Mars Bluff, South Carolina. While there was no nuclear core in the bomb when it was lost, it fell from 15,000 feet and destroyed a playhouse in a backyard on impact. This impact also set of the conventional explosives, causing injuries to a family of five and considerable property damage. Fortunately, there were no fatalities.
Due to the high performance of the aircraft and being at the cutting edge of the technology of its day, there were inevitable losses. To call it a widow maker is somewhat unfair. However, two-hundred-three aircraft were lost over its career, most in accidents, though a few in combat during reconnaissance flights. Out of these losses, more than four hundred aircrew were killed. When one looks at loss numbers and fatalities of many aircraft of this era, these numbers start to look fairly normal. F-100 suffered a staggering 40% loss rate compared to 10% for the B-47. F-104 losses were even higher, also exceeding 40% in some air forces.
 The B-47 may
have found its true calling as reconnaissance platform. Fitted with a special
three-man pod in the bomb bay and plethora of cameras and electronic sensors,
several variants were produced. Increased fuel capacity, as well as jammers,
chaff and flare dispensers improved its ability to enter hostile airspace,
though not with impunity. RB-47E’s were engaged by Soviet MiG’s on more than one
occasion with several losses occurring. The RB-47H would be the ultimate
development of this version as well as the ELINT variant EB-47E’s would serve
into the 1970’s.
The B-47 may
have found its true calling as reconnaissance platform. Fitted with a special
three-man pod in the bomb bay and plethora of cameras and electronic sensors,
several variants were produced. Increased fuel capacity, as well as jammers,
chaff and flare dispensers improved its ability to enter hostile airspace,
though not with impunity. RB-47E’s were engaged by Soviet MiG’s on more than one
occasion with several losses occurring. The RB-47H would be the ultimate
development of this version as well as the ELINT variant EB-47E’s would serve
into the 1970’s.
During the Vietnam War the B-47 was considered for service as a conventional bomber in theater. This made sense in a way, as there will still numerous aircraft in active service. However, they were nearing the end of their careers in the nuclear deterrent force, and one might consider them more expendable than more modern and capable B-52’s. (Imagine formations of these taking to the air in groups reminiscent of B-17’s and B-24’s of W.W.II and raining bombs over North Vietnam.)
Ultimately, the improved systems, in particular the electronic countermeasures systems of the B-52 were deemed to be superior and the B-47 never saw combat in its intended role. A very unusual proposal was considered in which a minigun or Vulcan cannon would be mounted in the bomb bay on a flexible, remote-controlled mount, allowing the B-47 to be used as a gunship alongside AC-47’s, AC-119’s, and AC-130’s. This never progressed beyond a proposal, however. (It would make for a most interesting subject to model!)
It also found use as a testbed for various engines and avionics. One was even loaned to Canada where it would be used to test the Orenda Iroquois engine being developed for the cancelled Avro CF-105 Arrow interceptor. Two were given to the United States Navy on indefinite loan where they were used to develop and test ECM systems. One of these made the final flight of B-47 in 1977.
Thus ended the career of magnificent and beautiful Boeing B-47 Stratojet. It was an extraordinary aircraft and had an extraordinary career that spanned nearly three decades. While we will never again see one in the air, twenty-three are preserved in museums across the United States. Today, whenever I visit a museum where one is on display, it is one of, if not the first aircraft I am drawn to marvel at its clean lines purity of function given form. (When I visited the Air Force Armaments Museum at Eglin Air Force Base with my wife, it was the first aircraft I told her about, despite her infatuation with the SR-71 on display.)
| THE KIT |
First released in 1968, I believe that this was Hasegawa’s first “big” 1/72 multi-engine aircraft. It was a very advanced and ambitious kit for its day. This kit sometimes gets blasted as being dated. Okay it is; but for when it was released it was fantastic and its still holds up well today for anyone who does not shy away from a little work.
It features petite raised panel lines and recessed control surface scribing. There are vortex generators molded onto the wings. There is a single clear canopy, and a bomb bay that can be positioned open or closed and a multitude of conventional bombs, though no nuclear weapon, which would be more appropriate for this kit.
 My kit was
purchased new at Homewood Toy and Hobby in Birmingham in 2005. This was nearly
forty years after it was introduced and the molds seem to have held up well.
This was from the 2003 release and my example was flash-free and without warpage.
My kit was
purchased new at Homewood Toy and Hobby in Birmingham in 2005. This was nearly
forty years after it was introduced and the molds seem to have held up well.
This was from the 2003 release and my example was flash-free and without warpage.
On decal option is provided for a relatively generic B-47E. There have been over a dozen releases of this, some of which have featured different markings for unique aircraft, but all that I have seen included only one decal option. Interestingly, this kit was released briefly by Frog in 1970 or thereabouts. All other releases have been Hasegawa, though some branded Minicraft-Hasegawa and in one case AMT-Hasegawa. The most recent release in 2020 features most unique decals for the 1000th B-47 produced.
This kit has never been out of production for long and shows no signs of going away anytime soon. Oddly, it became very difficult to obtain at times, though. I recall modelers at several shows when I was in college in the 1980’s remarking on how they had been looking for one for years. I went after one I saw on a vendor table around 1990 or 1991 only to watch someone grab it before I could get to it.
However, it is currently readily available as a new kit. I also frequently see them on vendor tables in the $20-$30 range, sometimes a little more or a little less.
| CONSTRUCTION |
First, I will say this kit is not the dog some would say that it is. Does it need filler in places? Yes. Is it less than perfect? Yes. Does it build up into a nice representation of a B-47? Also, yes.
Okay, it is not a “shake and bake” kit. If you can’t handle that, look elsewhere for a kit to build. Or better yet, hitch up your grown-up modeler drawers and go for it. It is a lot better than some of the semi-production, short run kits that some of the same modelers who lambast this kit rave about. While it does not have a plethora of detail parts, it also does not have a plethora of parts to be put in places that you will never see unless you build a cutaway presentation (Trumpeter 1/32 P-47 anyone? Does anyone really want or need a complete turbocharger system that will NEVER be seen?)
I started this build with the cockpit and the interior. There is not a great deal of detail here, but there is also not a great deal that can be seen through the canopy bubble unless one poses it open, which will require some cutting and scratch building (and if I build another, I may just do this). I sprayed the interior of the nose and the cockpit parts in Model Master Interior Green. Instrument panels were painted in Flat Black and accented with some dry brushing with Testors Silver. The ejection seats were paint and detailed with appropriate areas painted in Flat Red and Olive Drab, with some dry brushing for accents. A light wash of Tamiya Flat Black in denatured alcohol was given to imply some use and wear.
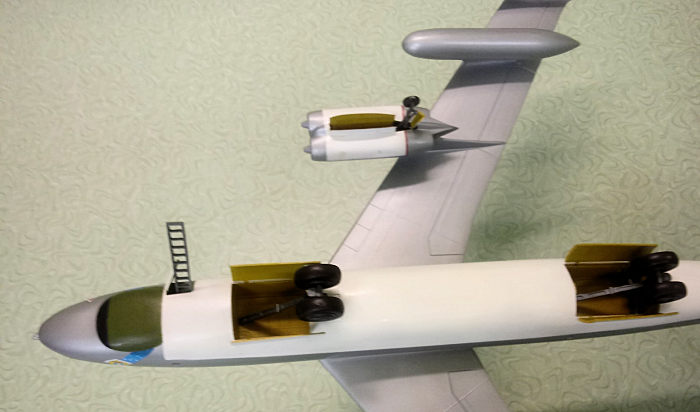 Once the
cockpit was assembled it was set aside and attention was turned to the main gear
wells and bomb bay. I planned to pose the bomb bay open and fit a resin 1/72
nuke to it (More on that later). There are some mold marks, though these are in
areas that they are not going to be especially noticeable unless you are looking
at these recesses with a pen light. I cleaned them up with some light sanding
but did not attempt to remove them. There is also a compartment for the drag
chute that was cleaned up an prepared for installation as well. These were all
sprayed in Testors Yellow Chromate and set aside to dry.
Once the
cockpit was assembled it was set aside and attention was turned to the main gear
wells and bomb bay. I planned to pose the bomb bay open and fit a resin 1/72
nuke to it (More on that later). There are some mold marks, though these are in
areas that they are not going to be especially noticeable unless you are looking
at these recesses with a pen light. I cleaned them up with some light sanding
but did not attempt to remove them. There is also a compartment for the drag
chute that was cleaned up an prepared for installation as well. These were all
sprayed in Testors Yellow Chromate and set aside to dry.
The fuselage hales were then trimmed and the mating surfaces test fitted. A little trimming and scraping was done with an X-Acto blade. The cockpit was glued in place with thick CA glue and given a shot of accelerator. The landing gear bays and bomb bays were given some dry brushing with Testors Aluminum and given a light wash of Tamiya Smoke in denatured alcohol, though the drag chute bay was left alone.
Now there was a choice to be made. The tail turret is made to be flexible and instructions would have you mount this along with the 20mm cannon at this point. I knew that there was no way that I was going to make it through this build with latter intact if I installed them at this point. I installed the turret but chose to fix it in a neutral position and glued in place with thick CA glue for strength. The landing bays and the drag chute bays were glued into place in with a hefty bead of the same. Care was taken to test fit the gear bays, as the attachment is somewhat vague, and these could be misaligned.
The instructions indicated that the bomb bay was to be inserted after the fuselage was assembled. This did not seem like a good idea, and it did not look like it would work. However, I decided that this must be correct, or they would not have put it in the instructions. So, I left it out. My mistake.
With everything aligned and test fitted, I began to glue the fuselage together. I thought of using Plastruct Liquid Weld or Tennax but thought that either would evaporate and become inactive by the time that I had covered such an extensive mating surface. Instead I used gap filling thick CA glue and clamped the fuselage halves together with enough rubber bands to restrain a Terminator.
I got a clean bond, but there were clearly gaps in the seam that would require filling. This was done with thin CA glue and retouched in some areas several times as I sanded it with 320 and 400 grit sandpaper followed by 0000 steel wool. This took three or four sessions until all of the seams and marks were fully filled and erased.
During this time, I glued the wings together much in the same manner. Many modelers have noted wing warpage, though I could detect none. Perhaps this was because my kit had all of its parts on sprues and had never lain loose in the box. The wings went together with no issues at all and only a small amount of filling in a few seam spots with CA glue. I also assembled the horizontal stabilizers and found them to be essentially without issue.
 I now went to
fit the bomb bay and was unable to determine how I was ever going to get it into
the opening. Short of breaking apart the joints that I had so painstakingly
filled, I could see no way to slip it into the void and secure it
satisfactorily. That was something that I was not willing to try at this point.
Instead, I reluctantly fitted the bomb bay doors, glued them shut, and did some
minor filling and sanded as needed. This was the only place in which the kit
truly disappointed me. I guess I will just have to build another, as I really
wanted this open bay with an atomic or hydrogen bomb at the ready. (Being a Cold
War junkie, I bought the whole series of 1/72 nukes from Wolf Pack resins.) I
suppose I shall just have to build another sometime, making certain to fit the
bay before assembling the fuselage.
I now went to
fit the bomb bay and was unable to determine how I was ever going to get it into
the opening. Short of breaking apart the joints that I had so painstakingly
filled, I could see no way to slip it into the void and secure it
satisfactorily. That was something that I was not willing to try at this point.
Instead, I reluctantly fitted the bomb bay doors, glued them shut, and did some
minor filling and sanded as needed. This was the only place in which the kit
truly disappointed me. I guess I will just have to build another, as I really
wanted this open bay with an atomic or hydrogen bomb at the ready. (Being a Cold
War junkie, I bought the whole series of 1/72 nukes from Wolf Pack resins.) I
suppose I shall just have to build another sometime, making certain to fit the
bay before assembling the fuselage.
The wings were fitted the fuselage with thick CA glue for strength and to fill any gaps. Here was the only area in which any significant actual filler was used. Squadron Green Putty was needed on both the upper and lower wing joins. This was smoothed with some nail polish remover on a paper towel and sanded when dried and cured the next day. Subsequent applications of CA glue were needed to fill and smooth this more until a satisfactory join was achieved. The horizontal tail presented some similar issues that were handled in the same manner.
I now had something that was really starting to look like a B-47, and a large one at that. One could say that I was starting to see the light at the end of the tunnel. There was still a great deal of work to do. However, aside from the problem with the bomb bay, all was generally going well.
The engine pods and wings tanks were next. The wing tank assembly was simple and required only some filling with CA glue and appropriate sanding. The engine pods were a little more complicated. The insides surfaces were first painted in flat black since one could look in through the tail pipes and anything that looked like it needed it was cleaned up with an X-Acto blade. Then everything was glued together and it was clear that there was going to be a bit of filling needed at almost every seam.
Most of this was done with thick CA glue, which when sanded, left some inevitable pinholes to be filled once more. This was now done with standard CA glue and it took three or four filling and sanding sessions to smooth everything out to my satisfaction. The interiors of the outrigger bays were also sprayed with Chromate Yellow once the pods were complete.
One word of caution here: the front cap of the dual inboard engine nacelles have a positive attachment point. However, they will fit upside down if you are not paying attention and I almost attached one of them this way in error. So, watch out for this.
Attaching the outboard engines went quite easily and required on a very small amount of filler. This was done with Squadron White Putty and smoothed out with nail polish remover on a Q-tip giving me a very clean fill that only required some minor smoothing with 0000 steel wool when dry.
The inboard pods were attached to their pylons and required no filling there. These were glued into place with thick CA glue and some minor filling done with CA glue at the attachment points. Everything was rubbed down several times quite thoroughly with drier sheets to remove residual scratches and get as smooth a finish as possible. With this done, the model was more or less ready to be painted.
| COLORS & MARKINGS |
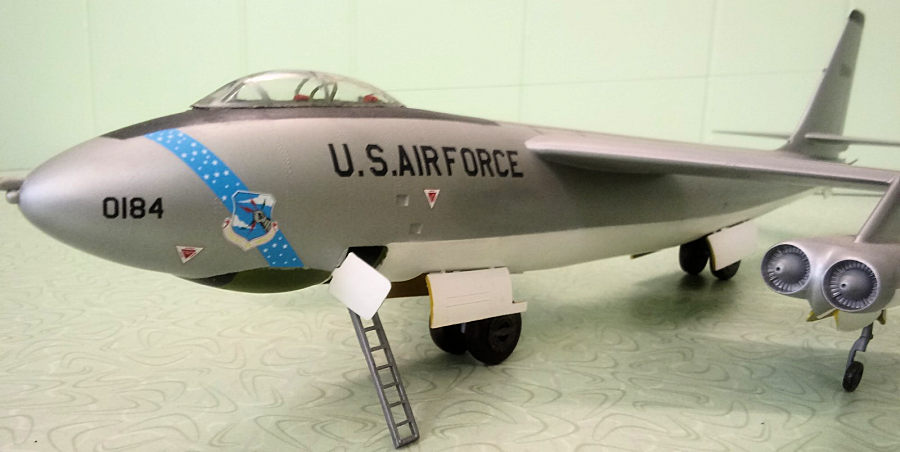
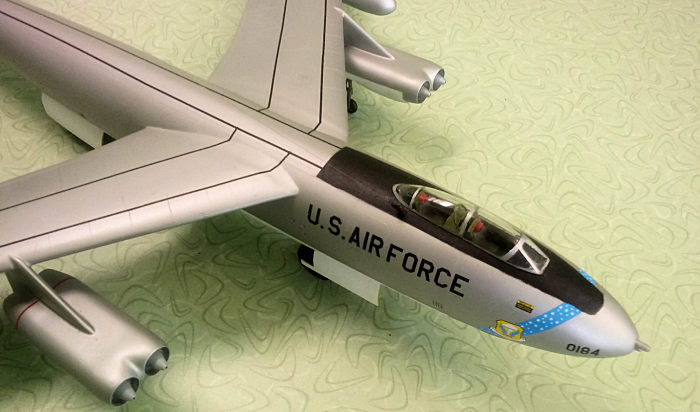
The kit was predominantly going to be natural metal and gloss anti-flash white underneath. However, there were a few spots that needed other colors and this was addressed first. The antiglare panel around the cockpit, ventral radome beneath the crew compartment, and the tip of the tail were sprayed in Testors Flat Black. Once these had dried the tail tip and glare panel were masked off with Tamiya tape. The forward area of the radome was masked off with Tamiya tape after which the after portion was sprayed in Model Master Interior Green. Masking this off once it was dry proved to be one of the most complicated jobs that I had building this, as well as some of the time consuming masking that I have ever done.
The radome does not have very clear demarcation and cutting and trimming Tamiya tape until the radome was symmetrically and cleanly masked took more than one attempt. I finally was satisfied that I had created the symmetrical, squared ovoid shape correctly after no less than four attempts.
Dampened paper towel bits were stuffed into all of the openings and the underside was sprayed with Testors Gloss White. All of the landing gear bay doors and drag chute doors had previously had their interiors sprayed with Testors Chromate Yellow. The exteriors were now sprayed with Gloss White as well and everything was set aside to dry for a day or two.
Tamiya tape was then used to mask off all areas under the fuselage, wings, and engine pods that would remain white. This kit actually requires as much masking as many camouflages, so be prepared to spend some time doing this when building this kit. Everything was then sprayed in Testors Aluminum and set aside again while the landing gear was assembled and painted.
The landing gear struts and wheel hubs were painted in Testors Dark Anodonic Grey. The oleos were painted in Model Master Chrome while the tires were all painted in Testors Rubber. This entire process went off without any problems. Everything was assembled with CA glue and the sub assemblies set aside until I was satisfied that the model could be handled. During this delay, the canopy framing was painted in Aluminum as well as the boarding ladder.
 When
everything had cured sufficiently, the landing and outriggers were glued in
place with thick CA glue. I was quite pleased to see that everything touched the
ground on all four points just as it was supposed to on the first try. As I
understand it, this is often a problem with this kit.
When
everything had cured sufficiently, the landing and outriggers were glued in
place with thick CA glue. I was quite pleased to see that everything touched the
ground on all four points just as it was supposed to on the first try. As I
understand it, this is often a problem with this kit.
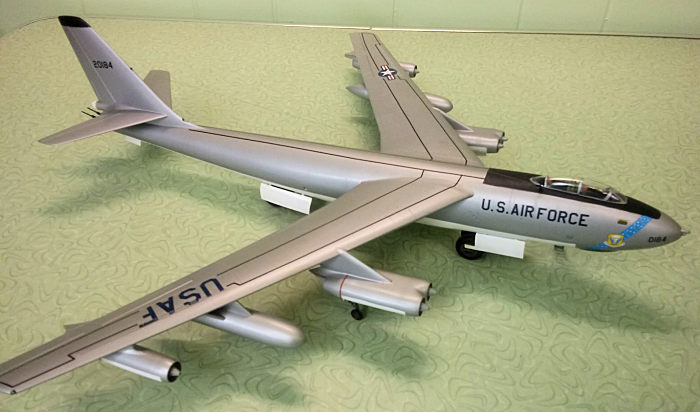
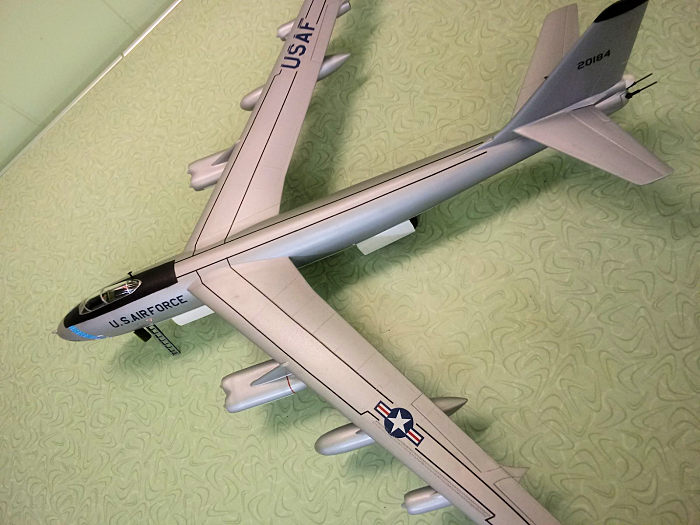
Everything was then given a coat of Model Master rattle can Gloss and I prepared to decal it. The kit decals were not used. They seemed well printed enough, but the carrier film seemed too heavy to my eyes for use on a kit with any sort of natural metal finish. Instead, I chose a recently released sheet from Wolfpack Decals, sheet # 72-023, choosing the scheme for a B-47E of the 509th Bomb Wing at Pease Air Force Base, New Hampshire.
These decals went on quite well and snugged down with only a very small amount of Solavaset. Wing walk lines were pieced together from some generic sheets of black line decals cut to individual sections. I have used this technique before and found it easier and more practical in many cases that trying to lay on full size walk decals in one piece. Once decals had dried and cured for a day, everything was given a coat of Model Master Semi-Gloss from a rattle can as well.
| FINAL CONSTRUCTION |
At this point, there was very little left to do. The canopy was glued in place with G-S Hypo Watch Crystal Cement. The 20mm cannon tail guns were trimmed, and test fitted to make certain that they could be slipped through the slots in the tail turrets. These were then painted in Testors Gun Metal, given a little thick CA glue on the contact surfaces, and slipped into place at the angle that I liked.
The boarding hatch was glued into place as well as the boarding ladder. This only left the radio mast stub and aerial. Once the former was glued on and painted Flat Black, thin E-Z line was used to rig the aerial. Some tissue was given a spray of Tamiya Clear Yellow and folded up into the drag chute well with a little Elmer’s Glue to represent the stowed chute. The only things left were the wing tip lights, painted on with Tamiya Clear Red and Clear Green as appropriate.
| CONCLUSIONS |
Wow, it was finally done. I now had a 1/72 B-47 on my shelf. This was something that I had wanted to build for about forty years, since I first saw the kit that I could not afford in the old black and white Squadron Shop catalog as child. I could say that it was worth the wait, as I was very pleased with the results.
In some ways, this is not an easy kit. If I had ever gotten that one back when I was eight or nine, I probably would have made a mess of it. I still did not get the bomb bay right. Given my love for the B-47, it will not take much encouragement for me to build another with the bay fitted and open and nuclear weapon within.
The kit has fit issues, but fewer than most kits of this era and better detail of many from this period as well. With some work it can be built up into a beautiful model of a beautiful aircraft. I would recommend it for modelers with some experience and multi engine kits under their belt. I spent between twenty and twenty-five hours working time on this one and I would definitely do it again (unless someone releases and injection molded 1/48 kit). I would recommend it for any fan of the Stratojet and Cold War aircraft.
| REFERENCES |
B-47 Stratojet by Lindsay Peacock, 1987, Osprey Publications, Ltd.
B-47 Stratojet in Action,by Lou Drendel & Tom Y’Blood, Squadron Signal Publication No.28, 1976 Squadron Signal Publications, Inc.
U.S. Bombers 1928 to 1980’s by Lloyd S. Jones, 1980, Aero Publishers, Inc.
https://en.wikipedia.org/wiki/1958_Mars_Bluff_B-47_nuclear_weapon_loss_incident
https://en.wikipedia.org/wiki/Boeing_B-47_Stratojet
https://www.scalemates.com/kits/amt-hasegawa-a671-600-boeing-b-47e-stratojet--950574
Christopher Campbell
29 September 2022
Copyright ModelingMadness.com. All rights reserved. No reproduction in part or in whole without express permission.
If you would like your product reviewed fairly and fairly quickly, please contact the editor or see other details in the Note to Contributors.