AMT/Matchbox 1/72 F-86A-5 Sabre
| KIT #: | 7108 (PK-32) |
| PRICE: | Kit long out of production |
| DECALS: | Two options |
| REVIEWER: | Victor Scheuerman |
| NOTES: | Only 1/72 F-86A Sabre on the market |
| HISTORY |
The North American Aviation Sabre was an outstanding day fighter. When Canada was looking for a new day fighter that would protect cities and strategic areas in the south (the then brand-new Avro Canada CF-100 all-weather fighter would protect the north), one would think that the selection would be a done deal. However, Canada’s strong ties with Britain were used to manipulate a rear-guard action to buy more British Vampires in lieu of the American jet. The firestorm was really about what city would get the jobs; either DeHavilland in Toronto Ontario with the Vampire or Canadair in Montreal Quebec with the Sabre.
The desperate attempt to buy more Vampires (so Toronto would get the jobs) reached farcical levels in the Toronto press with claims that for the same price as 130 Sabres that 800 Vampires could be had, or that the Vampire was ‘the world’s top-performance fighter’. Further claims were that the Vampire could reach 40,000 feet faster then the Sabre and then easily reach 50,000 feet. Perhaps the biggest leap of faith was the claim by the Toronto Telegram that the USAF was interested in the Vampire! Thankfully, the politicians made the wise choice and announced on August 1949 that the Sabre contract had been signed for 100 aircraft.
 The first Sabre that left the
Canadair plant was Sabre 19101 and it would be the only Mk 1 made and would to a
certain extend consist of subassemblies and parts purchased from North American.
This not only speeded up the delivery of the first jet (first flight was August
9, 1950), more importantly it was used to prove tooling jig verification and
with the initial contract requirement (this was changed) that Sabres produced in
Canada had to be interchangeable with opposite aircraft made in the US.
The first Sabre that left the
Canadair plant was Sabre 19101 and it would be the only Mk 1 made and would to a
certain extend consist of subassemblies and parts purchased from North American.
This not only speeded up the delivery of the first jet (first flight was August
9, 1950), more importantly it was used to prove tooling jig verification and
with the initial contract requirement (this was changed) that Sabres produced in
Canada had to be interchangeable with opposite aircraft made in the US.
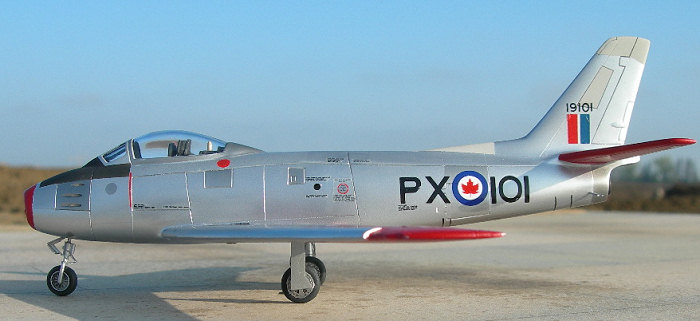
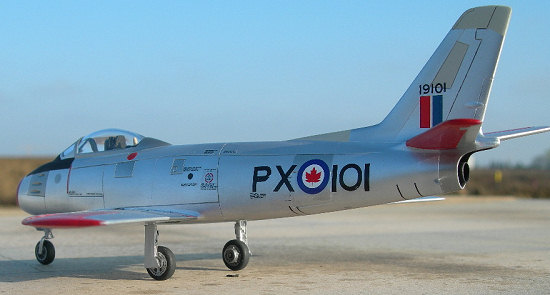
Sabre 19101 would be the only Mk 1 built. It was the equivalent of the later A-5 series in that the gun troughs lacked the troublesome door covers and could be fitted with drop tanks (the initial A-1 series could not carry wing tanks). This aircraft shared both of the A series signature features; a combination of the v-shaped windscreen and ‘normal’ horizontal tail surface with elevator. It was because of this that the A series has a smaller bulge along the aft fuselage where the horizontal tail surfaces attaches. This detail is the one feature that makes these noticeable externally different from the initial F-86E with the all-flying tail.
As mentioned previously, there was only one Mk 1 produced and this is also the only Sabre A produced outside of the US, so it is a significant aircraft in more then one way. This unique Sabre was struck off strength on September 7, 1965 and was passed to 700 Wing, Royal Canadian Air Force Association in Edmonton, Alberta on that date. It was mounted outdoors on a plinth in front of their building for several years until it found a new home indoors at the Alberta Aviation Museum, virtually across the street.
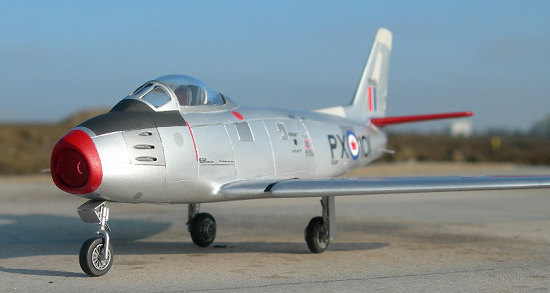
One of the first steps that I took when I retired after a thirty year career with the Edmonton Fire Department was to become a volunteer at this museum. On most Wednesday mornings I arrive to spend time on the model collection or other displays and it is still a bit of a thrill to walk by 19101 and give her an affectionate pat on that gloss-red nose.
I have always loved the beautiful lines of the Sabre. With this outstanding aircraft being such a large part of post-war aviation in Canada and so widely used internationally; it will be a subject that will be regularly added to my model collection.
| THE KIT |
| CONSTRUCTION |
 Having decided to use this kit to add
the Mk I to my Sabre collection, I had a look at some Hobbycraft parts that
could improve the Matchbox kit. While the kit landing gear was OK, the
Hobbycraft cadaver donated the entire landing gear minus the main and large nose
gear doors. Other parts used that will be covered in more detail were, almost
the entire cockpit and the landing slats.
Having decided to use this kit to add
the Mk I to my Sabre collection, I had a look at some Hobbycraft parts that
could improve the Matchbox kit. While the kit landing gear was OK, the
Hobbycraft cadaver donated the entire landing gear minus the main and large nose
gear doors. Other parts used that will be covered in more detail were, almost
the entire cockpit and the landing slats.
As Matchbox offers a cockpit that is not very accurate other then a seat with proper head rest, the kit items were turfed and a replacement made based on the much better Hobbycraft effort. This tub offers nice raised details on the separate side consoles and instrument face. Hobbycraft’s tub has the nose gear bay and intake tunnel attached, so these were removed. Next, a new aft bulkhead of card was made to conform to the Matchbox fuselage and this was glued to the tub and side consoles. With a little sanding on the sides this puppy fitted quite well.
Hobbycraft parts were also used on the aft deck after some trimming and this in hindsight is more important then the cockpit proper. This is due to the fact that this area can be readily seen under that large and clear bubble canopy. Fortunately, I had an Eduard Sabre photo etch set (meant for the Fujimi kit) that offers a seat harness and main instrument panel and these were used to improve the overall appearance. Some card and fine wire detailing was added to the very nice Hobbycraft seat and the gunsight was scratch built with card. With the new cockpit completed, it was time to paint this and glue the fuselage halves together.
At the time that the Mk I (later A5) was being assembled, Sabre cockpits were painted black. For this project my favourite black was used; Testors Model Master Aircraft Interior Black enamel. This was applied and when it had cured all the surfaces were dry brushed with a medium gray to pick out all the nice raised detail. This was followed with a brushing of graphite that imparts a most realistic metallic sheen to the surfaces. The final step was some detail painting with acrylics.
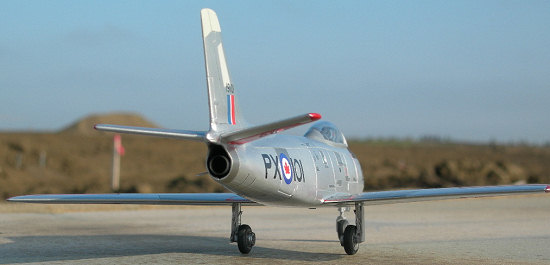
As an Eduard photo etch intake cover was going to be use, some weight was added to the nose and the halves glued together; nice fit. Next, the intake was attached and it was not a great fit. Superglue was used as filler and the area built up and sanded until a seamless join was produced. To improve the appearance of the gun troughs these were drilled cleaner with a small drill and the area sanded smooth and the two landing light locations below the intake were drilled open. Matchbox offers separate speed brakes but with no bay detail. These were simply glued into location and the port side required some Milliput Superfine filler to hide a minute gap.
 The wings were glued together and
the wing-tip light locations cut away and blue and red ‘toothbrush plastic’ was
inserted and sanded to final shape. To help get a good fit the wing tang was cut
a little narrower. Then, a generous supply of liquid glue is applied and then
the wing can be worked back and forth to get a tight fit. As hoped, a good join
was had that only required a minute bead of Milliput Super Fine (white) epoxy be
added that was then wiped smooth with a moisten Q-tip; no sanding and this is
great for any one planning a natural metal finish. Before the tailplanes were
attached they were sanded thinner and applied as the main wing.
The wings were glued together and
the wing-tip light locations cut away and blue and red ‘toothbrush plastic’ was
inserted and sanded to final shape. To help get a good fit the wing tang was cut
a little narrower. Then, a generous supply of liquid glue is applied and then
the wing can be worked back and forth to get a tight fit. As hoped, a good join
was had that only required a minute bead of Milliput Super Fine (white) epoxy be
added that was then wiped smooth with a moisten Q-tip; no sanding and this is
great for any one planning a natural metal finish. Before the tailplanes were
attached they were sanded thinner and applied as the main wing.
To mimic the museum’s Sabre, the gear doors were glued close and this resulted in some additional work. The main gear doors did not fit that well and after gluing them securely in position; the area was built up with card and superglue to reach the surrounding surface. This entire area was then sanded smooth. Some very minor detail was added to the nose bay and Hobbycraft’s separate landing slats were simply glued to the leading edge and sanded thinner.
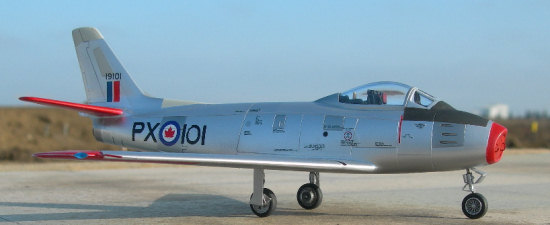
The kit canopy was polished and attached with clear five minute epoxy; then an outline problem became readily apparent. Matchbox’s aft canopy section does not fit the aft canopy framing very well. This was corrected with a combination of card and filler followed by careful sanding and polishing. After masking the canopy with Tamiya tape and then sprayed black to match the interior, the model was primed using the excellent Tamiya Surface Primer (Fine) spray can. What followed is the process that I normally use to give those Matchbox panel lines done with too much enthusiasm a better look and also ensures there are no seam lines.
| COLORS & MARKINGS |
One of the great things about the Tamiya rattle can primers are they are lacquer and dry really fast. In short order the model was given a wet sanding with very fine sandpaper, rinsed, air dried and this was done three times. The end result is a much better looking model with a very smooth finish with no seams and a added bonus I find it is much easier to engrave. A combination of the OLPHA P-Cutter blade and Testors tape had some panel lines added and the main gear doors outline back in short order.
A final wet sanding with 12000 emery
cloth was followed by buffing with a soft cloth, the model was ready for the
Alclad II application. One should really use a gloss black base to get the best
results when using their Polished Aluminum, but the finish
 was pretty good even
with the buffed grey. To add some variation to replicate some normal lighter and
darker panels on the aircraft, White Aluminum, Dark Aluminum and Stainless Steel
were applied after masking. All the Alclad was misted on over three coats using
less then 10 PSI.
was pretty good even
with the buffed grey. To add some variation to replicate some normal lighter and
darker panels on the aircraft, White Aluminum, Dark Aluminum and Stainless Steel
were applied after masking. All the Alclad was misted on over three coats using
less then 10 PSI.
The prototype Mk I featured the high-visibility trim that was becoming common on RCAF aircraft at that time. In normal Canadian practice a border was left around any markings that the red was applied to. To replicate this border around the wing roundels, some slightly larger circle masks were applied first, and then the red areas on the nose, wing tips and tail planes were masked and sprayed Model Master Insignia Red enamel as the base. Normally Humbrol gloss red enamel would be misted on top but alas my paint tinlet had dried and the local stock was out of this red due to the Humbrol/Airfix issues at the time.
Needless to say, Plan B was activated which was hand polishing these areas with a mild carnauba wax which produced acceptable results. The remaining painted areas were masked and sprayed. Once the painting was completed and the masking was removed including the canopy, the previously assembled and painted Hobbycraft landing gear was attached. The nose sat just a little too low so a brass tube extension was added and the result was much better.
With this model in a gloss finish, a combination of Arrow Graphics (most stencil markings and tail flash), Leading Edge (national markings and unit codes) were applied using the Micro Set and Sol on the former and Mr Mark Softer on the latter with pleasing results. Final things like the scratch built pitot tube and fuel dump pipe were added and weathering was limited to lightly brushing the landing gear with MiG Productions Coal Black pigment to give them a very light weathering.
| CONCLUSIONS |
 While I used some Hobbycraft parts to
upgrade the Matchbox kit, these are not truly appreciated (other then the wing
slat) unless you are up close and personal. Find one of those colourful Sabre A
schemes that appeals to you and enjoy!
While I used some Hobbycraft parts to
upgrade the Matchbox kit, these are not truly appreciated (other then the wing
slat) unless you are up close and personal. Find one of those colourful Sabre A
schemes that appeals to you and enjoy!
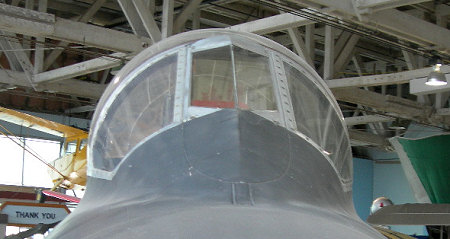
As a bonus, here is a close-up shot of the canopy of 10901 showing that Matchbox got this right.
| REFERENCES |
Personal photographs of 10901.
F-86 Sabre in Action, Larry Davis, Squadron/Signal Publications
The Canadair Sabre, Larry Milberry, CANAV Books
July 2007
Copyright ModelingMadness.com. All rights reserved. No reproduction in part or in whole without express permission.
If you would like your product reviewed fairly and fairly quickly, please contact the editor or see other details in the Note to Contributors.
Back to the Review Index Page 2021