|
KIT: |
AMT/ERTL 1/72
X/Y-B-35 Flying WIng |
|
KIT #: |
8615 |
|
PRICE: |
$Long OOP but
available |
|
DECALS: |
Two options |
|
REVIEWER: |
Lee Kolosna |
|
NOTES: |
|
Looking like something out of a science fiction
story, the Northrop B-35 and follow-on B-49 Flying Wing is a classic
example of a technological idea that was too far ahead of its time.
Proposed in 1941 by Northrop in response to an inquiry by the USAAF, the
futuristic bomber was given the green light for construction of a prototype
plus four smaller proof-of-concept aircraft. These test aircraft, dubbed
N9M, flew first to validate that the design of a flying wing was viable and
could deliver the perceived advantages of lower drag and higher lifting
capability than convention aircraft configurations. The flights of the N9M
were generally successful, although they were affected by the inevitable
teething problems of any new aircraft design. The fourth and last N9M
built still exists today at the Planes of Fame Museum in Chino, California
and flies occasionally.
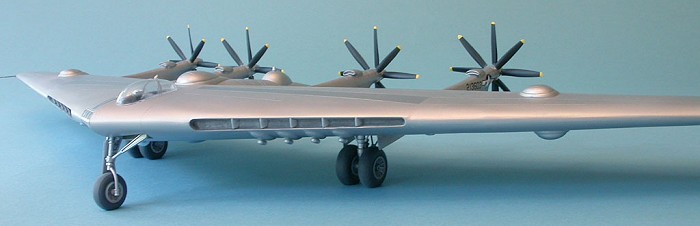
 The XB-35 emerged from the Northrop manufacturing
plant in Hawthorne, California and took to the air on June 25, 1946.
Powered by four Pratt & Whitney R-4360 Wasp Major engines which drove
contra-rotating four-bladed propellers in a pusher configuration, the XB-35
was instantly beset with problems with engine cooling and reliability of
the complex gear box arrangement. A second XB-35 was built and joined the
first at Muroc Army Air Field (later renamed Edwards Air Force Base for Air
Force pilot Capt. Glenn Edwards who died coincidentally enough while
testing the YB-49) for flight test. The third airframe, designated YB-35,
dispensed with the contra-rotating props in favor of a more conventional
design, but results were still disappointing as the range and top speed
were much less than originally predicted. Consequently, the design was
vastly modified to accommodate the newly emerging jet engine technology,
and the remaining YB-35s in the pipeline were built up as the all-jet
XB-49.
The XB-35 emerged from the Northrop manufacturing
plant in Hawthorne, California and took to the air on June 25, 1946.
Powered by four Pratt & Whitney R-4360 Wasp Major engines which drove
contra-rotating four-bladed propellers in a pusher configuration, the XB-35
was instantly beset with problems with engine cooling and reliability of
the complex gear box arrangement. A second XB-35 was built and joined the
first at Muroc Army Air Field (later renamed Edwards Air Force Base for Air
Force pilot Capt. Glenn Edwards who died coincidentally enough while
testing the YB-49) for flight test. The third airframe, designated YB-35,
dispensed with the contra-rotating props in favor of a more conventional
design, but results were still disappointing as the range and top speed
were much less than originally predicted. Consequently, the design was
vastly modified to accommodate the newly emerging jet engine technology,
and the remaining YB-35s in the pipeline were built up as the all-jet
XB-49.
As a combat weapon, the B-35/B-49 aircraft were not very good.
In addition to the disappointing results of flight-testing that revealed
shortcomings in range, payload, and top speed, the aircraft wasn't a
particularly stable bombing platform, which made for poor bombing
efficiency. After an extended test program and the realization that the
design wasn't living up to its promise, the Air Force abandoned the project
and scrapped all the airframes and the tooling. Much has been made by
conspiracy theorists about the underlying reasons for this vendetta by the
US government against Jack Northrop, but the simple facts were that the
flying wings weren't as capable as the B-36 and B-47 programs that they
competed against.
All was not lost, however, as four decades later came the
Northrop B-2 stealth bomber, a legacy to the original flying wing design.
With the help of computerized flight controls and modern manufacturing
technology, the flying wing is now a much more viable weapons system and
has entered the operational inventory of the US Air Force
This kit, released in 1995, came very near to the
end of the line of AMT/ERTL’s manufacture of aircraft model kits. It
was an audacious choice of subject and coincided with a release of a kit of
the jet-powered YB-49 flying wing. The modeler has the choice of
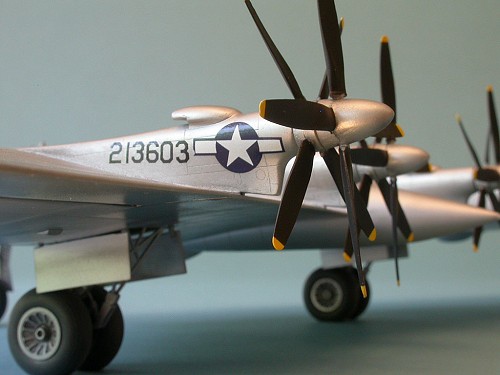
either making the first of the two XB-35s with contra-rotating propellers
or the sole YB-35 with conventional four-bladed props. The model is
molded in light g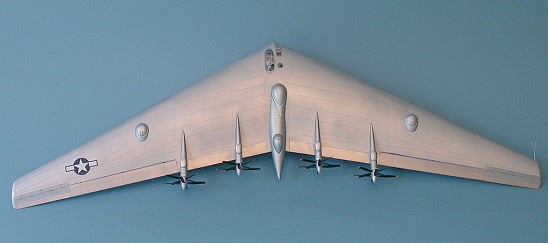 ray
plastic and comes in a huge sturdy box. The box is almost too big for
the contents. A fairly detailed interior is provided. There
aren’t a large number of parts to assemble. The tires are flattened
on the bottom, a nice feature, and the clear parts are thin and
transparent. The instructions guide the modeler during assembly to
the slight differences between the XB-35 and YB-35, and decals are provided
for one example of each.
ray
plastic and comes in a huge sturdy box. The box is almost too big for
the contents. A fairly detailed interior is provided. There
aren’t a large number of parts to assemble. The tires are flattened
on the bottom, a nice feature, and the clear parts are thin and
transparent. The instructions guide the modeler during assembly to
the slight differences between the XB-35 and YB-35, and decals are provided
for one example of each.
Since I built my kit in the XB-35 configuration, I
concentrated my research on that and found a few minor things missing.
There is a prominent pitot tube on the top of the wing near the co-pilot’s
greenhouse that is not provided, as well as a couple of aerial posts
further back on the wing and on the inside starboard drive shaft nacelle.
One set of engraved panel lines doesn't line up as it crosses the joint
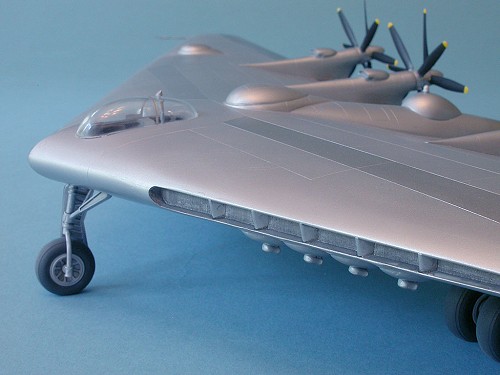
between the wing’s center section and the outer wing panels. Initial
inspection of fit reveals that this model will require filler in rather
large quantities. Problem areas are the wing leading edge air intakes and
the fit of the outer wing panels. Since natural metal is the only accurate
finish for this aircraft, the modeler will have to exercise care in
insuring as smooth a surface as possible before applying their metallizer
of choice.
The instructions call for an all aluminum interior
(instead of the expected Interior Green), so I went along with that
recommendation and painted the interior pieces with Floquil Platinum Mist
enamel. The seat cushions are Insignia Red and the instrument panels are
flat black with white instruments. One thing I've learned about 1/72 scale
bomber kits is that I know that spending a lot of time detailing the
interior is not warranted, as one can't see much if anything once the
fuselage is together. The XB-35 is a slight exception as the pilot’s and
gunner’s seats are very visible under the big bubble canopy, so you might
want to spend some time there by adding harnesses. Everything else is
pretty much hidden, though.
 I glued the cockpit interior into the bottom of the
center portion of the wing and stuck an automobile tire wheel weight right
next to it to insure that the model sits forward on its tricycle landing
gear. If you don't add the weight, the model will be a tail-sitter, which
is kind of ironic because it really doesn't have much of a tail to begin
with.
I glued the cockpit interior into the bottom of the
center portion of the wing and stuck an automobile tire wheel weight right
next to it to insure that the model sits forward on its tricycle landing
gear. If you don't add the weight, the model will be a tail-sitter, which
is kind of ironic because it really doesn't have much of a tail to begin
with.
I glued all the major pieces together and got to
work on filling the large seams encountered with the leading edge air
intake pieces and the join of the outer wing panels. I filled everything
with thick CA glue and sanded and polished until I was satisfied with the
result. On the underside of the model, the air intake piece cuts right
across the four engine exhaust fairings, making for more of a challenge to
get a smooth and seamless appearance. I wasn't terribly successfully, but
fortunately that area is not really noticeable unless you pick the model up
and look underneath.
The propeller drive shaft nacelles were glued on
next. Fit is merely adequate, and I used putty at the transition between
the nacelle and the wing to fill in a gap there. I spent a lot of time
cleaning up all thirty-two propellers and the spinners to remove mold
marks.
 I did a quick check of the fit of the
clear parts. The bubble canopy fits very well, as do the gunner
observation blisters. The large blister in the tail was faired over with
aluminum in the XB-35, but is clear in the YB-35. The co-pilot’s window
and greenhouse comprise two pieces and don't fit well at all. They really
should be faired into the wing, but I didn't have the fortitude to mess
with it, since I had just recently spent dozens of hours doing the same
onerous task with a Monogram P-61. The fit of the transparency is merely
okay on the topside, but large gaps abound around the bottom piece. Again,
I figured that no one would be picking up the model to look at the
underside, so I let it slide.
I did a quick check of the fit of the
clear parts. The bubble canopy fits very well, as do the gunner
observation blisters. The large blister in the tail was faired over with
aluminum in the XB-35, but is clear in the YB-35. The co-pilot’s window
and greenhouse comprise two pieces and don't fit well at all. They really
should be faired into the wing, but I didn't have the fortitude to mess
with it, since I had just recently spent dozens of hours doing the same
onerous task with a Monogram P-61. The fit of the transparency is merely
okay on the topside, but large gaps abound around the bottom piece. Again,
I figured that no one would be picking up the model to look at the
underside, so I let it slide.
Since the model was going to be finished in natural
metal, I carefully sanded and polished out each seam, them went on a
mission to find any stray scratches on the other portions of the model that
would stand out like a sore thumb under the metallic paint. Everything was
smoothed with a tri-grit sanding file, followed by Novus plastic polish #3
and #2. I restored the panel lines obliterated in the sanding process with
a scriber and a flexible ruler and washed the model in the kitchen sink
with some dishwashing soap and warm water before heading out to the paint
barn.
I primed the model with Floquil Old Silver enamel. This
allowed me to spot and correct any areas that I didn't get totally smooth
on the first go-round. After making the necessary repairs, I sprayed the
model with Alclad II Lacquer White Aluminum. After studying every photo of
the X and YB-35 that I could find, I determined that the rear portions of
the wings were made of a darker aluminum, with an even darker band of metal
around the ailerons. I masked the appropriate areas off and sprayed the
rear parts of the wings with Alclad Dark Aluminum, while the ailerons got a
s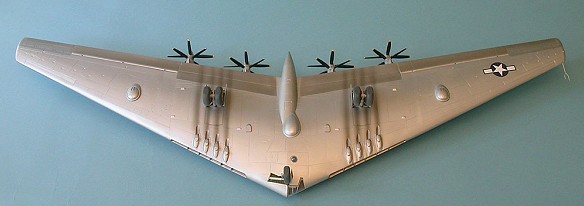 pray of Testors Metalizer Stainless Steel. I masked off a few more random
panels on the wings and used Alclad Duraluminum and Testors Metalizer
Aluminum Plate to add interest to the otherwise bland finish.
pray of Testors Metalizer Stainless Steel. I masked off a few more random
panels on the wings and used Alclad Duraluminum and Testors Metalizer
Aluminum Plate to add interest to the otherwise bland finish.
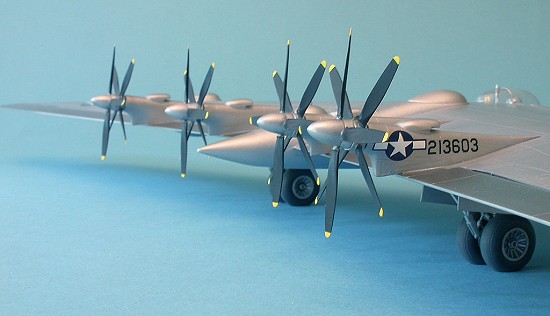
My kit decals had
yellowed, so I used aftermarket sheets from AeroMaster and Eagle Strike for
the national insignia and the serial numbers. Note that the XB-35’s wing
insignia are aligned in a non-standard manner for either 1940s aircraft
(perpendicular to the centerline) or 1950s aircraft (in line with the wing
centerpoint). I don't know why, but the photos are clear about this, so I
set my decals accordingly, canting them at about 10 degrees off from
perpendicular. After the decals dried, I sprayed a very light coat of
Future floor polish to blend everything together with a uniform sheen.
Photos show very prominent exhaust staining on all the piston-engined
flying wings, so I used Tamiya Smoke to replicate that. The landing gear
wells were painted with Polly Scale Interior Green. I added a black
acrylic wash to bring out the details. The landing gear and wheels were
painted with Floquil Platinum mist and the tires were painted with Polly
Scale RLM 66 and weathered lightly with Polly Scale Dust.
I masked the canopy
pieces with drafting tape and sprayed them with aluminum. The attachment
of the sprue to the main bubble canopy left a very noticeable mark that I
could not eliminate with sanding and polishing, so I took a little artistic
license and painted over that blemish as well. I don't think anyone will
ever notice.
Masking and painting the
yellow propeller tips, flat black blades, and aluminum spinners was time
consuming. The fit of the completed propeller assembly is not very
precise, either.
 I glued the landing gear on and was pleased at how everything
aligned properly. The clear parts were attached with Micro Krystal Kleer.
I glued on the pitot tube and pushed in all the propeller assemblies to
complete the project in just 32 hours of effort, which is a very low total
for me.
I glued the landing gear on and was pleased at how everything
aligned properly. The clear parts were attached with Micro Krystal Kleer.
I glued on the pitot tube and pushed in all the propeller assemblies to
complete the project in just 32 hours of effort, which is a very low total
for me.
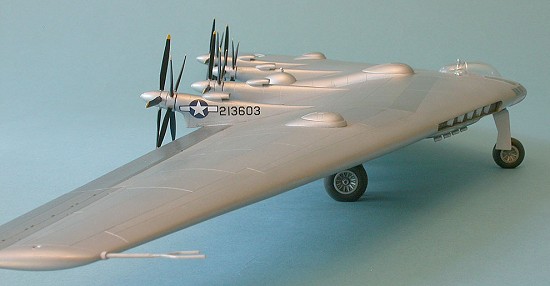
I know I'm going to sound like a broken record on this: this is
a model you never see built. It is funky looking to be sure,
and somewhat challenging to do well because of its fit issues and the
requirement for a natural metal finish on a relatively large model.
These kits aren't made anymore and I don't know when or if they will ever
be reissued. Fortunately, you can pick one up fairly easily on eBay
or at model swap events for not a lot of money. It builds up quickly
and you can definitely be assured that you will the first (and only) person
on your block with a model of this interesting airplane.
July 2005
Baugher, Joseph: Northrop B-35,
http://home.att.net/~jbaugher2/b35.html
If you would like your product reviewed fairly and quickly by a
site that has nearly 300,000 visitors a month, please
contact
me or see other details in the
Note to
Contributors.
Back to the Main Page
Back to the Review
Index Page