| KIT #: | ? |
| PRICE: | $ |
| DECALS: | One option |
| REVIEWER: | Joel Hamm |
| NOTES: |
| HISTORY |
After several seasons of
slaving away at small, limited edition kits of oddities, a change of pace was
called for. Rummaging through the “Probably Never Get to It” stash turned up
this 20+ year old Minicraft / Hasegawa Neptune kit bought during a bid to
 collect every US military plane
available in 1/72. (With the advent of resin and the proliferation of “short
run” companies that ambition is no longer feasible for a single individual in a
single lifetime.) The subject wasn’t terribly enticing, but the multi-color
livery promised an interesting addition to a collection of mostly OD over NG
(Olive Drab over Neutral Gray).
collect every US military plane
available in 1/72. (With the advent of resin and the proliferation of “short
run” companies that ambition is no longer feasible for a single individual in a
single lifetime.) The subject wasn’t terribly enticing, but the multi-color
livery promised an interesting addition to a collection of mostly OD over NG
(Olive Drab over Neutral Gray).
All I know is what I read on the Internet, so don’t blame me if these gleanings don’t jive with a more scholarly sense of history. The Neptune was the only land based patrol a/c designed as such from the start. Previous patrollers had been adapted from transports or bombers. Conceived early in WWII, it first flew just after VE day but did not see combat until the Korean War, where it assumed various ground attack roles in addition to its surveillance duties. During the Cold War P2V’s kept watch over both US coasts, then returned to hot warfare in Viet Nam. The latter of the 7 variants proved useful in peaceful endeavors such as the space program, but were eventually shouldered out of service by the P-3 Orion.
| THE KIT |
This is a BIG model, and
while its parts count is not overwhelming, its size can intimidate a modeler
whose recent building experience has been limited to palm-sized wingspans, and
whose shelf space is accordingly arranged. Sprues are molded in
 crisp, flash free, thin plastic,
which Hasegawa pioneered back when Airfix was considered top of the line.
Surface detail is a mix of properly scaled engraved panel lines, and rows of
petite fasteners, which even a rabid rivet remover would not rush to eradicate.
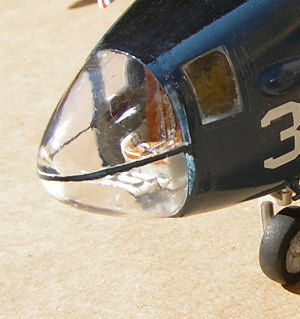
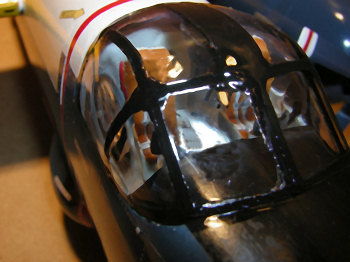
Clear parts are highly transparent, with a degree of optical clarity however
precluding use in the Hubble Space Telescope. The flight deck canopy is split
in two halves with prominent framing camouflaging the seam. Had this been a
cherished project, I might have vacu-sucked a new set of see-through’s, but this
was just a monotony-breaker and enough work already lay ahead.
crisp, flash free, thin plastic,
which Hasegawa pioneered back when Airfix was considered top of the line.
Surface detail is a mix of properly scaled engraved panel lines, and rows of
petite fasteners, which even a rabid rivet remover would not rush to eradicate.
Clear parts are highly transparent, with a degree of optical clarity however
precluding use in the Hubble Space Telescope. The flight deck canopy is split
in two halves with prominent framing camouflaging the seam. Had this been a
cherished project, I might have vacu-sucked a new set of see-through’s, but this
was just a monotony-breaker and enough work already lay ahead.
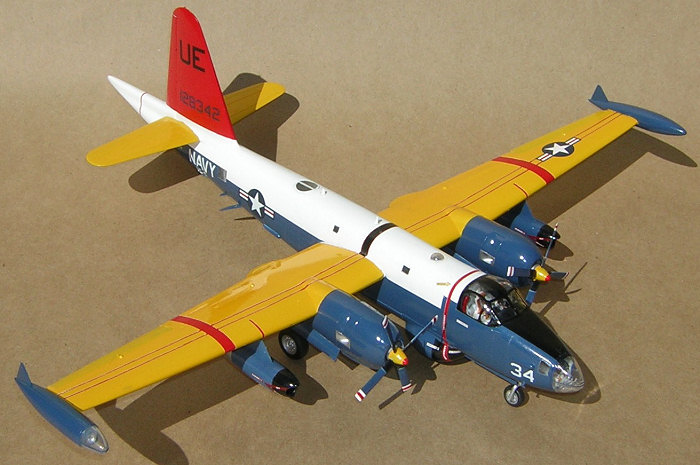
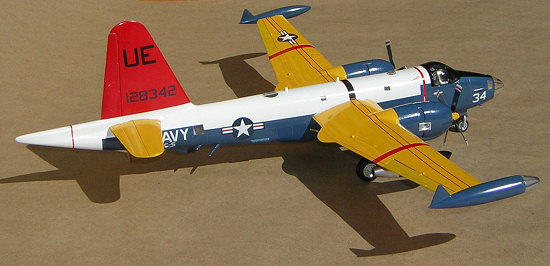
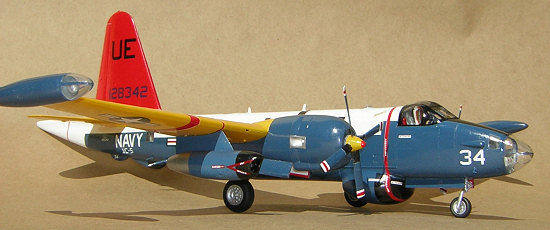
This particular kit produces the 5-or-more color drone controller version. An extensive decal sheet is included, but not extensive enough. Some stripes, such as the chord-wise red wing bands and the over-fuselage walkway must be painted on or scrounged from spares. Considerable difference of opinion is presented between the box art, markings sheet, and instructions. An SOS put out to this site brought several helpful clarifying references. Thanks, Gang.
| CONSTRUCTION |
Initial examination revealed that the kit would come together as a series of pre-painted sub assemblies. Nacelles joining wings. Wings mating to complete fuselage; then breakable bits’n’pieces finally coming on board.
First step was adding to
the forward fuselage several pounds of lead weight; a task that proved twice
useless. After the halves were joined the gel CA glue gave way and each time the
body was tilted an avalanche of metal boulders rolled to the
 opposite end, threatening to
smash through. Next time Pb must be added to plastic, epoxy will be the fixative
of choice. All was otherwise in vain; with that tail sticking into the outfield
the legs would never support all the weight necessary to keep the plane on its
nose. I’m talking about the table legs, not the landing gear.
opposite end, threatening to
smash through. Next time Pb must be added to plastic, epoxy will be the fixative
of choice. All was otherwise in vain; with that tail sticking into the outfield
the legs would never support all the weight necessary to keep the plane on its
nose. I’m talking about the table legs, not the landing gear.
Neither did Step 2 produce any measurable result. With all the portals, the plane’s innards promised to appear naked. A Web search actually provided a few shots of a Neptune’s interior, and several sessions were spent approximating all the intricacies.
Alas, when the masking tape came off the windows nothing could be discerned. Two exceptions: PEB radio racks added to each side of the nose compartment hint at realism, and additions to the flight deck definitely improve the otherwise therein emptiness.
The instrument panel and console are simplistically represented, and were improved with PEB and other plastic bits. Engine controls in the actual aircraft dangle from an overhead console between the pilots’ heads, so this was duly carved from resin and added, along with 6 properly colored levers for the radials’ throttle, prop, and mixture controls. None of this is of course visible, which is just as well, since I omitted controls for the jet pods. The rear bulkhead was blank so I busied it with a cabin door, fire extinguisher, and first aid kit; fairly standard flight deck furnishings.
 The kit designers
must have been confused between the drone controller and the remote controlled
drone; they neglected to include control columns. A matching pair was readily
found in the spares bin, but seats more shapely than those provided were not as
forthcoming. A bit of Dremel-ing improved their contour; and True Details seat
belt decals turned them into receptacles into which the 3 flight crew members
might actually have strapped.
The kit designers
must have been confused between the drone controller and the remote controlled
drone; they neglected to include control columns. A matching pair was readily
found in the spares bin, but seats more shapely than those provided were not as
forthcoming. A bit of Dremel-ing improved their contour; and True Details seat
belt decals turned them into receptacles into which the 3 flight crew members
might actually have strapped.
With the fuselage closed up, attention turned to the wings. Each engine nacelle is in itself a mini-model of considerable complexity. The engines are crudely represented, but not worth replacing, as little can be seen between the tight cowl and large spinner. Landing gear parts are supposed to be trapped between the closing nacelle halves, but are more easily and safely added later if their mounting “tubs” are partially cut away so that the pins can be slid in sideways.
The jet pods are molded with integral intake covers, a ruse worthy of old Aurora castings. It was a simple matter to drill them open, smooth the intake lips, and block off both ends. I actually found a pair of PEB turbine discs to stick to the blank-out panels. They’re hardly convincing; but give an idea of what’s supposed to be in there.
| COLORS & MARKINGS |
This process turned into an
extravaganza of paint and transfers. Each sub-sub assembly: fuselage, wing
panels, tip tanks, jet pods, and nacelles, seemed more easily painted separately
– a debatable point. The double decade old decals did not seem t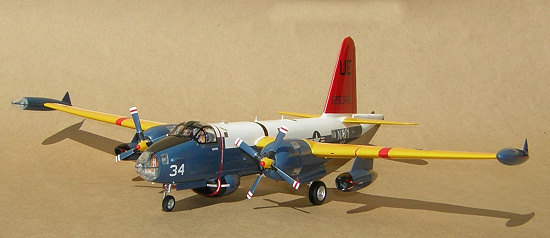 rustworthy,
so I decided to paint the millimeter wide wing walk guides (or whatever they
are), since the fore-aft red bands also had to be painted on. First everything
got gloss white, then red, then the red was covered with strips of tape (3M 471
automotive masking tape – far more flexible than Tamiya or anything else), then
another coat of white, then multiple coats of yellow. Amazingly, when the tape
came up only a few dabs were demanded of a ten-ought brush.
rustworthy,
so I decided to paint the millimeter wide wing walk guides (or whatever they
are), since the fore-aft red bands also had to be painted on. First everything
got gloss white, then red, then the red was covered with strips of tape (3M 471
automotive masking tape – far more flexible than Tamiya or anything else), then
another coat of white, then multiple coats of yellow. Amazingly, when the tape
came up only a few dabs were demanded of a ten-ought brush.
The called for Federal Standard shade of blue is available only in flat, so I faked it by blackening up some gloss True Blue. NMF panels were done in shades of Testors Metalizer, which requires no drying time.
As it turned out the decals were excellent, adversely affected in no way, perhaps even improved, by age. They were properly printed, thin, well behaved in water, and eager to snuggle down without liquid persuasion, though Microset did help to hide the large carrier film margins, which were near totally “invisible-ized” by a misting of Future.
Wheels and prop spinners were painted using DIY masks cut with a hollow gasket punch. Watch FSM Magazine for an upcoming article detailing the process.
| CONSTRUCTION CONTINUES |
 All pieces came smoothly
together, just as on an actual assembly line. Suddenly – it was an airplane!
Almost. Propellers, to avoid breakage, were the final addition. In fashion
less characteristic of Hasegawa than of the Czech molders, who at that time
were still cranking out parts for AK-47’s, the blades, hubs , and spinners are
separate parts; the former being attached to the latter two by fragile
filamentous pins that fail to survive removal from their sprues. Painting
the prop tips delayed completion by almost a week. First the red needed
touch-up, then the white, then the red… until the blades resembled
Thanksgiving turkey drumsticks. Twice the tin of ELO (Easy Lift Off stripper)
come down off its shelf for a fresh start. Second try was with red decal
strips. That also made a mess, so on the last go around I settled for hand
brushing.
All pieces came smoothly
together, just as on an actual assembly line. Suddenly – it was an airplane!
Almost. Propellers, to avoid breakage, were the final addition. In fashion
less characteristic of Hasegawa than of the Czech molders, who at that time
were still cranking out parts for AK-47’s, the blades, hubs , and spinners are
separate parts; the former being attached to the latter two by fragile
filamentous pins that fail to survive removal from their sprues. Painting
the prop tips delayed completion by almost a week. First the red needed
touch-up, then the white, then the red… until the blades resembled
Thanksgiving turkey drumsticks. Twice the tin of ELO (Easy Lift Off stripper)
come down off its shelf for a fresh start. Second try was with red decal
strips. That also made a mess, so on the last go around I settled for hand
brushing.
| CONCLUSIONS |
Large models are an interesting occasional diversion, but they take too long for a modeler of limited patience. Quality suffers toward the end. I think I’ll go back to the little’uns.
November 2006
Copyright ModelingMadness.com. All rights reserved. No reproduction in part or in whole without express permission from the editor.
If you would like your product reviewed fairly and quickly, please contact the editor or see other details in the Note to Contributors.
Back to the Review Index Page2024