Hobbycraft 1/72 DHC-3 Otter
| KIT #: | ? |
| PRICE: | $7 from an IPMS Show Vendor |
| DECALS: | Two options |
| REVIEWER: | Joel Hamm |
| NOTES: | Currently Out of Production, but not hard to find. |
| HISTORY |
 Here am I, Lord. Still stuck in this Utility /
Transport / Trainer rut. Yes, I was supposed to move on to a new theme; but it
wasn’t my fault.
How could I pass up an OOP kit still in its shrink
wrap for that price?
Besides, it would make such a neat companion for its
little brother, the Beaver, which several decades ago started off this
noncombatant collection.
Here am I, Lord. Still stuck in this Utility /
Transport / Trainer rut. Yes, I was supposed to move on to a new theme; but it
wasn’t my fault.
How could I pass up an OOP kit still in its shrink
wrap for that price?
Besides, it would make such a neat companion for its
little brother, the Beaver, which several decades ago started off this
noncombatant collection.
What can you say about say about an off-the-shelf
transport that GOOGLE can’t say better?
De Haviland’s DHC-2 Beaver worked out so well that
they decided to build a larger version. The US Army was its biggest customer,
using its 200 aircraft everywhere from the arctic to the tropics. One is
enshrined in the Army’s
| THE KIT |
Not much to write about in this department either.
Hobbycraft kept true to form, boxing a fairly simple kit sans too many
 problems
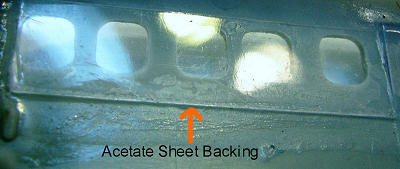
and exhibiting only one molding fault – the cabin windows. These are clear and
properly fitting, but thick and shrink-dimpled on both surfaces. I’ve yet to
devise a totally satisfactory cure for this disorder, but settled on my least
unsatisfactory technique.
problems
and exhibiting only one molding fault – the cabin windows. These are clear and
properly fitting, but thick and shrink-dimpled on both surfaces. I’ve yet to
devise a totally satisfactory cure for this disorder, but settled on my least
unsatisfactory technique.
This consists of discarding to kit panes, backing
the openings with acetate sheet, filling the resultant cavities with masking
medium, then in-situ casting with epoxy, post painting. Epoxy’s strong capillary
action causes a pronounced meniscus, either concave or convex. A perfectly flat
window is possible only by sanding and polishing a slightly ov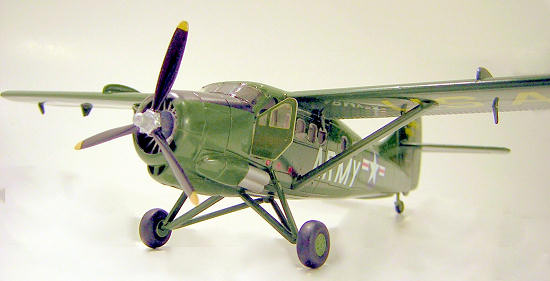 er-filled
portal prior to painting, which
then complicates masking. The alternative is to
settle for a slightly bulged appearance, which is how many aircraft windows
really look.
er-filled
portal prior to painting, which
then complicates masking. The alternative is to
settle for a slightly bulged appearance, which is how many aircraft windows
really look.
The best epoxy applicator is a fine or super-fine Testors Micro-Brush, which picks up then relinquishes a generous droplet of the clear goo without danger of dripping it on an undesired locus. If too much is applied, wipe off the applicator then dip the dry tip into the puddle. The M-B will wick off some of the excess.
(Though not precisely the same boxing, if you actually want to see what comes in the box, then visit this preview. Ed)
| CONSTRUCTION |
The build discussion is getting ahead of itself,
though. After backing the cabin windows, attention turned to the flight deck.
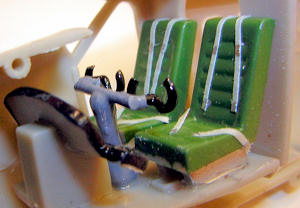 Not a bad
representation, with seats and instrument panel that resemble the real thing.
The yoke / control column is a different story. A giant handlebar is provided
that both pilots are somehow supposed to share, like the cyclic of a Robinson
trainer. Scratch building skills weren’t overtaxed by fashioning a pair of
proper yokes out of wire or whatever.
Not a bad
representation, with seats and instrument panel that resemble the real thing.
The yoke / control column is a different story. A giant handlebar is provided
that both pilots are somehow supposed to share, like the cyclic of a Robinson
trainer. Scratch building skills weren’t overtaxed by fashioning a pair of
proper yokes out of wire or whatever.
The flight deck doors are molded separate from the fuselage and openable. An Otter’s doors, fully opened, pin themselves forward against the cowling. Since the inner surfaces weren’t all that purty, I glued them in the half open position, so authorized viewers (no one but me) can peek inside and admire the set belts fashioned from masking tape with paint buckles. But, again, the build report is getting ahead of itself. The flight deck windows are optically OK, with a snap-tite press fit that was permanent-ized with a bilateral coat of Future.
But I’m getting ahead of myself yet again. Aft of
the flight deck bulkhead there is nothing but a floor to fill the cavernous
void.
A motivated modifier might cut away the molded-in doors,
adorn the inner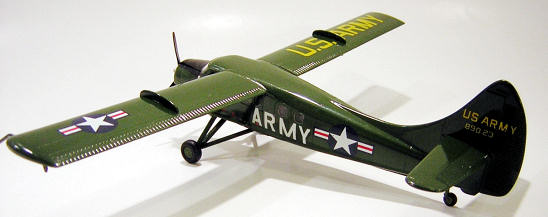 walls with formers and stringers, and stuff the innards with crates and barrels
– but that’s not me.
walls with formers and stringers, and stuff the innards with crates and barrels
– but that’s not me.
The airframe went together without cussing, fussing, fuming, or fidgeting. Didn’t even need any filling or filing. To facilitate cabin window casting, I deferred wing attachment and painted everything separately. If a multi-color scheme is planned, the stall fences and flap hinges should also be left for later to make masking easier. When wing fixation time did roll around, I found the struts were too long, imparting excess dihedral. Sanding them shorter fixed the problem – sorta. I think there’s still too much up angle, but the instructions didn’t include a head-on drawing to get things right. On the subject of struts, there’s an extra pair on the sprue, which should be disregarded, and an extra pair of holes in the mid-belly, which should be filled. Must be for the floatplane version.
| COLORS AND MARKINGS |
Hoo boy! Here’s where I ran into difficulties and
tripled the price of the kit. Markings are provided for one Canadian and one US
Army version, an arctic supply ship with
high visibility dayglo orange panels. I put out a
query on the Readers Forum
requesting info on the proper shade of orange.
Amid a slew of differing opinions, I received from
Hawkeye Hobbies a very generous package containing a bottle of their newest
airbrush finish, dayglo orange, along with several bottles of their aluminum NMF
and sealer. My sincere thanks,
 and
apologies for not being able to report
on their product.
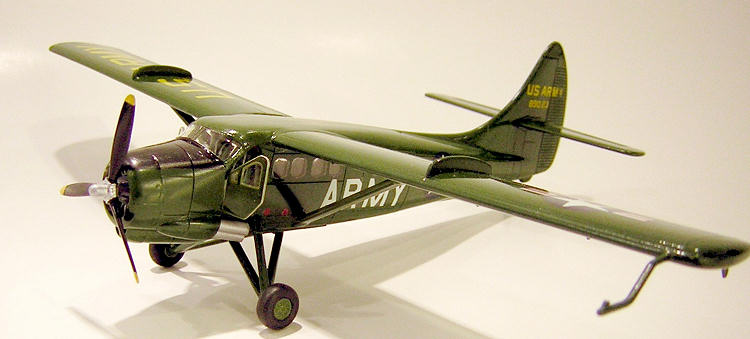
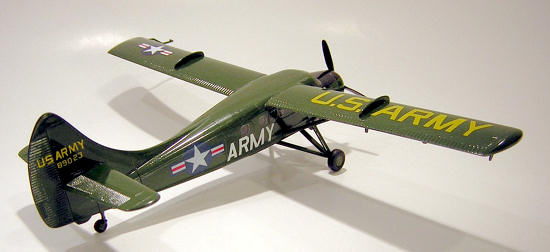
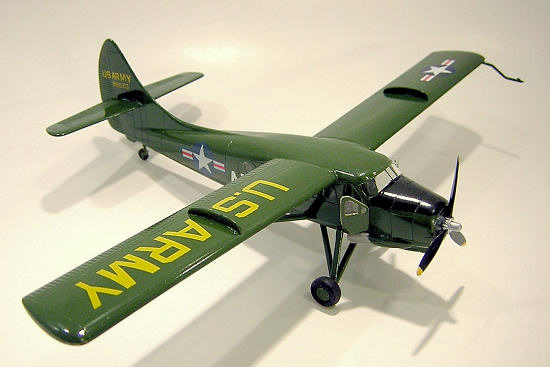
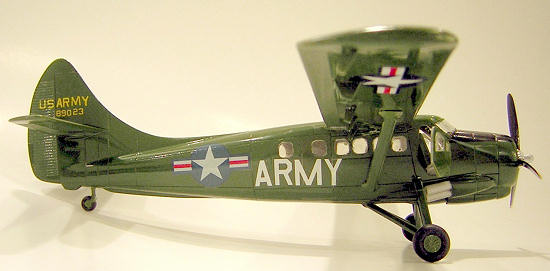
As the photos show, I abandoned the arctic scheme in
favor of boring old olive drab. I promise to paint something
in orange and aluminum and let everyone know how
the stuff works.
I did try the aluminum on the engine exhaust stacks
and it worked fine without rubbing off, though the metallic sheen is hard to
appreciate on such limited application.
and
apologies for not being able to report
on their product.
As the photos show, I abandoned the arctic scheme in
favor of boring old olive drab. I promise to paint something
in orange and aluminum and let everyone know how
the stuff works.
I did try the aluminum on the engine exhaust stacks
and it worked fine without rubbing off, though the metallic sheen is hard to
appreciate on such limited application.
Blame for the livery switch gets put on the kit decals, which lack the white surrounds on markings placed over orange painted panels. My attempts to mask these areas made an utter – no Otter – mess, particularly on the corrugated rudder. After several strippings and re-paints I settled for pre Viet-Nam overall glossy green, amply represented in several GOOGLE images. (Shiny OD won’t be found in any paint collection. It’s made by adding gloss orange to gloss green.) Even if the masking had been successful, the kit decals would still have bunged up the project. They are off register, off color, off size – but do adhere and settle down well.
Procuring the yellow lettering
became a frustrating, and eventually expensive,
project. I had an ancient Micro Scale
sheet of yellow alpha-numerics, but the letters self
destructed into a gazillion shards as soon as they touched water. Several
overcoats of Testors Decal Saver
helped not
at all. I managed to print all the c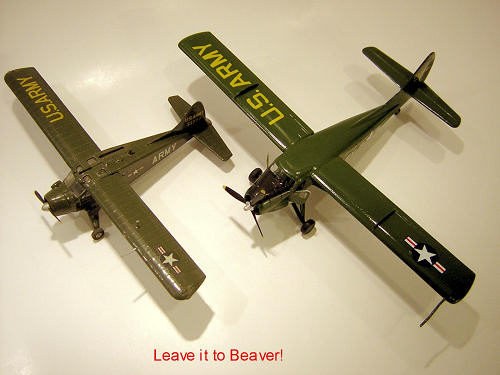 odes
using an ink jet on Testors DIY decal kit.
They looked beautiful on clear paper
with bright white backing, but once transferred to
an olive drab surface they became invisible.
There was no way to duplicate the required ink
density.
odes
using an ink jet on Testors DIY decal kit.
They looked beautiful on clear paper
with bright white backing, but once transferred to
an olive drab surface they became invisible.
There was no way to duplicate the required ink
density.
Squadron Shop had a replacement sheet on sale for only $5 but shipping cost $6. Eventually I broke down and ordered it. Prof. Murphy (of 1st Law of Physics fame) must have had a hand in printing the new sheet, because it no longer contained all the small sizes needed for the tail codes. I added several additional clear varnish coats to the old set and managed to convince a few characters not to disintegrate. Unfortunately, these were not the ones I needed. All the letters for “U.S. ARMY” had been used on previous projects. Modelers are, of course, expert innovators. “U”s and “S”s were made from zeros and eights respectively, with portions painted out. “A”s came from inverted “V’s with hand painted cross bars. “R”s were fashioned from “P”s given prosthetic limbs. “Y”s were Frankenstinian creations born of half “X”s and “I”s. “M”s were the most difficult, being made from inverted “W”s that had been split and re-angled. From a normal viewing distance it al looks acceptable.
| FINAL CONSTRUCTION |
 Not much
to say about the Close of Business fiddly-bits. The windshield is clear and fits
with minimal caulking.
The engine is a rudimentary button that gains
respectability by grace of a nosecone/push-rod spider. The exhaust tubes should
go on before the landing gear struts
to avoid a tricky threading-through task.
Not much
to say about the Close of Business fiddly-bits. The windshield is clear and fits
with minimal caulking.
The engine is a rudimentary button that gains
respectability by grace of a nosecone/push-rod spider. The exhaust tubes should
go on before the landing gear struts
to avoid a tricky threading-through task.
| CONCLUSIONS |
Thanks again to Hawkeye Hobbies for the box of sample paints. I will color something silver and fluorescent orange and post the results right here. Eventually I will run out of utility / transport / trainer thingies and move on to a new theme. Maybe I’ll shock all the MM’ers and build up a one-oh-niner flug Nazi.
| ADDENDUM |
Several months after completing the project, which would be more than a year since receiving Hawkeye’s paint samples, I tried to use them on a test project but found that they had all coagulated despite having never been opened.
August 2008
If you would like your product reviewed fairly and quickly, please contact me or see other details in the Note to Contributors.