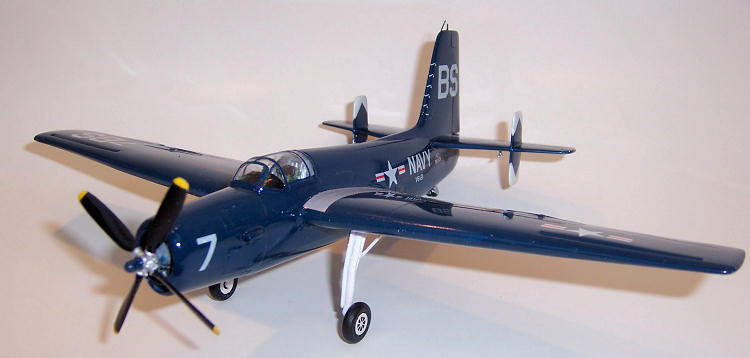
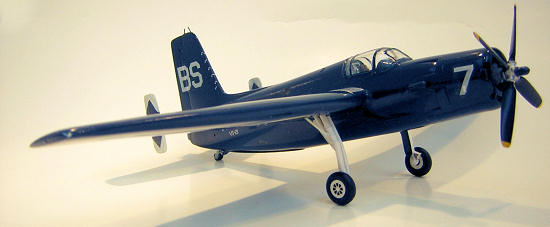
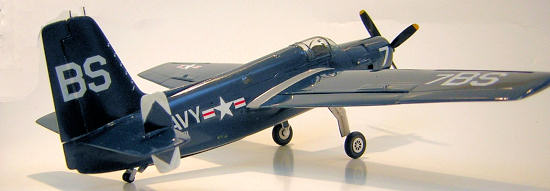
Ace 1/72 AF-2S/SW Guardian
| KIT #: | 72305 |
| PRICE: | $ |
| DECALS: | See review |
| REVIEWER: | Joel Hamm |
| NOTES: | Short run kit with photo etch parts |
| HISTORY |
Mark Twain said of Richard Wagner’s
music:
“It’s not really as bad as it sounds.”
That sentiment summarizes kits from the Russian Ace
company. They are daunting, but can be worked up into an acceptable specimen.
This model
came into the stash several eons ago in fulfillment of the
irrationality of attempting to collect in 1/72 one
of every operational  historical
significance, unattractive endomorphism, and even less appealing rendering in
rough waxy plastic earned it a priority approaching Absolute Zero on the
Get-to-it-One-Day list.
historical
significance, unattractive endomorphism, and even less appealing rendering in
rough waxy plastic earned it a priority approaching Absolute Zero on the
Get-to-it-One-Day list.
Those same un-endearing qualities, however,
exhumed
and promoted it
to top billing at the start of last year's belated modeling season. Interest in
the hobby had waned and skills had atrophied.
Tears would not flow if this
premier project became the focal point of a Mexican
hat dance.
The Guardian was whelped late in WWII, too late to see action therein, as an anti-sub replacement for the TBF Avenger. A two-variant flight would form a hunter-killer team. The hunter version (also kitted by Ace) found its prey with a tumorous radar bulging from its belly – hence the laterally stabilizing vertical finlets. The killer would finish the job with two tons of bombs, depth charges, a homing torpedo, rockets, drop tanks, and a search-light pod; hence its general heft. Detailed technical histories can be Googled from assorted sources, some asserting fascinating claims, notably that a turbojet was mounted in the tail. That’s WWW, Folks; for Wild Wacky Web.
| THE KIT |
 Ace
kits are limited edition injected technology, reminiscent of
Merlin and Mach 2; but not up to those
predecessors’ quality standards. Get the picture? Actually, that is a bit
melodramatic. Gross deformities, the type that would make the kit
unbuildable, are absent; but poor fit, soft plastic, and a surface texture
suggestive of
sand casting lend credence to the fine-print
caveat: “For Experienced Modelers”.
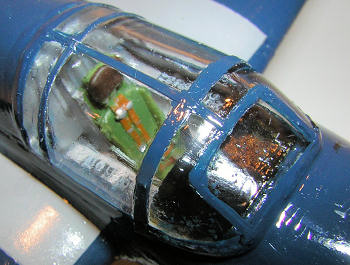
Surprisingly, the injected canopy is thin,
clear, and sharply framed.
An extensive PEB fret is included, but except
for cockpit details, which will be visible through the expansive greenhouse,
the kit is not worth the effort of cutting, bending, and gluing the brass
bits. Most, particularly the wheel well interiors, are best saved for a more
worthy substrate. Resin castings for engine, gear, and interior
would have been a better investment; because the
styrene renderings of these parts will inspire
dumpster
diving into
the spare parts bin, likely also
forays
into the liquor cabinet.
Ace
kits are limited edition injected technology, reminiscent of
Merlin and Mach 2; but not up to those
predecessors’ quality standards. Get the picture? Actually, that is a bit
melodramatic. Gross deformities, the type that would make the kit
unbuildable, are absent; but poor fit, soft plastic, and a surface texture
suggestive of
sand casting lend credence to the fine-print
caveat: “For Experienced Modelers”.
Surprisingly, the injected canopy is thin,
clear, and sharply framed.
An extensive PEB fret is included, but except
for cockpit details, which will be visible through the expansive greenhouse,
the kit is not worth the effort of cutting, bending, and gluing the brass
bits. Most, particularly the wheel well interiors, are best saved for a more
worthy substrate. Resin castings for engine, gear, and interior
would have been a better investment; because the
styrene renderings of these parts will inspire
dumpster
diving into
the spare parts bin, likely also
forays
into the liquor cabinet.
| CONSTRUCTION |
 Most
modelers will deviate from the eight-page instruction pamphlet to work out the
bugs on the main assemblies before tackling the hang-ons. The
Most
modelers will deviate from the eight-page instruction pamphlet to work out the
bugs on the main assemblies before tackling the hang-ons. The 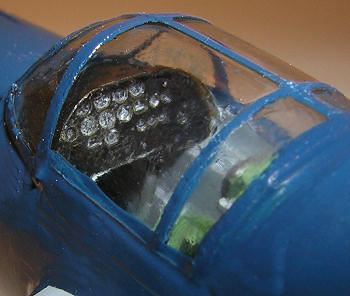 rts
department, I also hunted up a close-enough resin seat from an early jet, some
instrument side consoles, and a rear bulkhead with molded-in structure and radio
box details, all for insertion post-painting of the airframe.
rts
department, I also hunted up a close-enough resin seat from an early jet, some
instrument side consoles, and a rear bulkhead with molded-in structure and radio
box details, all for insertion post-painting of the airframe.
A separate rear entry door is provided for those nutty enough
to detail and paint the anal end of the fuselage interior; but as with the
photo-etched wheel wells, nothing in there is worth seeing. The door doesn’t fit
the opening, but this minor batch of filing and filling is one of the easier
re-fits.
Two small window opening must be dealt with before
closing the fuselage halves. Rather than use the dimpled transparencies, I chose
to blank off the openings with
clear plastic then later fill the depressions with
epoxy. Before clamshell closure, two banks of exhaust stacks are scheduled for
insertion into their fuselage openings; but these parts are best omitted and
replaced later by metal tubing fitted from outside. Likewise can be advised for
the MAD (Magnetic Anomaly Detection) boom in the tail of the appropriate
variant. A blank-out plate should also be cut and glued into the forward section
to prevent seeing past the cylinders of any replacement radial engine that may
be fitted.
The large underbelly opening left by the bomb bay doors allows
most of the fuselage seam to be glued from the inside; but afterward fitting of
these doors causes – well – fits. Lots of filler and sandpaper here, Folks.
The engine must be inserted and the cowl glued on before the
airframe can be readied for the paint shop. The kit engine is amorphous, and the
firewall that is supposed to support it doesn’t fit the fuselage. I scrounged a
slightly better replacement radial, conti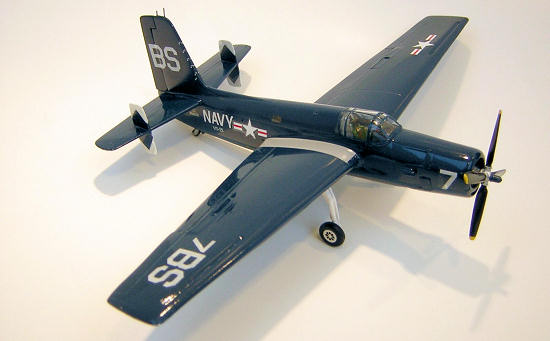 nuing
to hoard an excellent Aeroclub resin and white metal R2800 for an application in
which it can actually be seen and appreciated.
nuing
to hoard an excellent Aeroclub resin and white metal R2800 for an application in
which it can actually be seen and appreciated.
The wing panels are the true disappointment of this kit.
As with all short run injections, the trailing edges demand drastic thinning and
sharpening from inside. Flaps are molded separately, also in uppers and lowers
that need ablation of at least half their thicknesses. Then there’s the leading
edge slots.
What can be said about the way these slots are molded?
AAARRGGGHHH!!!!
Just doesn’t seem sufficient. On the upper wing surfaces
they are represented by indistinct trenches. On the lower they are represented
by – nothing. These parts simply have cut in the leading edge
an elongated rectangular notch that will send
builders scurrying among the sprues for the assigned section
to insert. They will find none.
The technically appropriate fix for this omission is to
cut away the matching segment
of
the uppers, block off and round
over the resultant gap, then use a properly shaped
length of
half-round to create in miniature this
high-lift device. The economically appropriate fix,
the one adopted
in this build, is to fill the cavity in the lower
wing with Bondo, sand and Mr. Surfacer it smooth, throw on a heavy coat of
paint, and display the model on a lower shelf where the underside of the wing
will not be easily glimpsed.
One result of short run molding, serendipitous to those of us who eschew under-wing stores, is the lack of drilled-through holes; but locating dimples are provided for those who model with a full load.
| COLORS & MARKINGS |
Several “disclosure coats” of silver enamel, followed by
buffings with numerically increasing abrasive grades, revealed only the
impossibility of polishing out the waxy plastic to a paintable smoothness. One
alternative for leveling all the surface flaws is a coat of “scratch-filling”
automotive primer, but this obscures the already scarce surface features and
gives the model a “puffy” appearance, as if needing a dose of diuretics.
The “Hail Mary” approach is to pass up on the primers
and cover everything with a heavy coat of gloss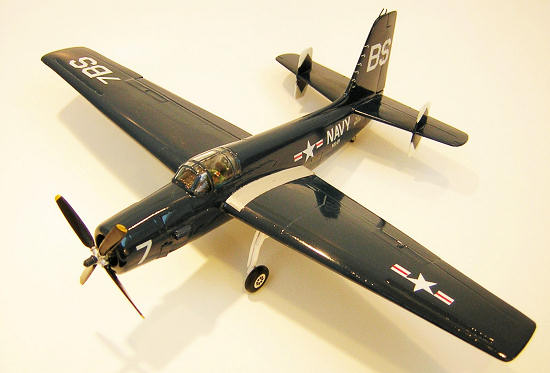 enamel. Laying down a uniform wet-look
takes
some experimentation to get the proper combination of viscosity,
pressure,
spraying distance, speed, and timing between passes. Runs, drips, graininess,
orange peel, and other errors are the penalty for impatience.
enamel. Laying down a uniform wet-look
takes
some experimentation to get the proper combination of viscosity,
pressure,
spraying distance, speed, and timing between passes. Runs, drips, graininess,
orange peel, and other errors are the penalty for impatience.
Dark Sea Blue is the proper color, but
the versions sold by Model Master et al, though they be faithful to the FS
Number, look entirely too black in 1/72 on a dark shelf. Blue hues seem to be
the most susceptible to scale effect.
Adding 1/3 Testors Dark Blue brought the shade back
to something matching the box art and other color photos of both models and the
real thing. Before all the JMN’s start snickering and send the Accuracy GESTAPO
to my house at
The kit decals are perfectly adequate. Their carrier film appears at first overly prominent, but fades after an application of Solvaset, then obligingly disappears under ensuing coats of Future. They will rebel by tearing if slid from their backing or moved around excessively, so are best soaked in warm-to-hot water until they float free of the paper and eased into position on a pool of Micro-Set.
| FINAL CONSTRUCTION |
First step toward completion was filling the two small
fuselage windows with epoxy. The stringiness of this stuff can threaten a new
paint job so I mask the adjacent area with a
Post-a-Note. Epoxy’s strong surface tension won’t
allow for a flat window pane, so unless you’re willing to sand, polish, and
touch-up paint, settle for a slight convexity.
 Starting
from the tail underside, a wealth of little things await affixing. Most are more
easily scratch built than cleaned of mold seam and flash. The main gear struts
are particularly in need of de-seaming. The molded-in torque links can be cut
away in favor of scissors from the PE fret, but the expected improvement is not
worth the effort. One useful brass part, a pair of pairs actually, is the set of
inner and outer wheel hubs, which
minimize the need for surgerizing the indistinctly
molded wheels, and facilitate painting.
Starting
from the tail underside, a wealth of little things await affixing. Most are more
easily scratch built than cleaned of mold seam and flash. The main gear struts
are particularly in need of de-seaming. The molded-in torque links can be cut
away in favor of scissors from the PE fret, but the expected improvement is not
worth the effort. One useful brass part, a pair of pairs actually, is the set of
inner and outer wheel hubs, which
minimize the need for surgerizing the indistinctly
molded wheels, and facilitate painting.
Purely as an experiment in lilly-guilding, I routed out the
molded hubs and painted the entire wheel black before adding the metal. HINT:
use slow set CA or centering errors will become irreparable. Though this build
did not deserve it, the results were excellent, producing a detailed
3-dimentional wheel with real pass-through spokes. Hopefully, this option of
super-detailing landing gear will shortly be more widely adopted by other kit
manufacturers. BTW - Google reference photos suggest the hubs were white, the
struts white, but the wells chromate green.
Photos also suggest that the box art lied by showing the
banks of quadruple exhaust stubs protruding
from
the cowl vents, so these were omitted, with considerable work saving, as the
plan was to cut and form them from hollow solder wire. On the subject of
protuberances that aren’t, photos fail to show part F27, a pitot mast, so don’t
fret over not finding a mounting hole in the lower left wing. You can also fill
the holes in the mid fuselage spine, as no photographic record can be found of
the V-shaped mast shown in the instructions and box art. References vary on the
existence of several small VHF antenna fins also supposedly sprouting from the
spine. When researching subjects, erring is prefe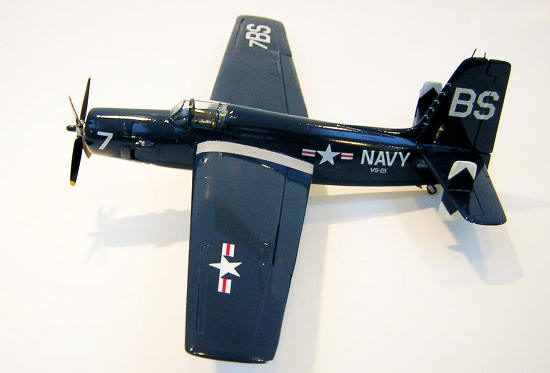 rable
on the “omit” side. I recall viewing a model, an SOC-3 I believe it was, with a
“tree trunk” mast sprouting just aft of the canopy. I queried the builder and
received indignant assurance that the model had been faithfully copied from a
photo, which was promptly produced. Not-so-close examination revealed that the
“mast” was actually the smokestack of a building some distance behind the parked
plane. Fearing for my safety, I congratulated the modeler on his reproduction
skills and hastily retreated.
rable
on the “omit” side. I recall viewing a model, an SOC-3 I believe it was, with a
“tree trunk” mast sprouting just aft of the canopy. I queried the builder and
received indignant assurance that the model had been faithfully copied from a
photo, which was promptly produced. Not-so-close examination revealed that the
“mast” was actually the smokestack of a building some distance behind the parked
plane. Fearing for my safety, I congratulated the modeler on his reproduction
skills and hastily retreated.
Salvation from the general mediocrity of this model can
be found in detailing the cavernous cockpit. As mentioned, I scrounged a
replacement seat and aft bulkhead. Builders may choose from an amoebic injected
instrument panel,
or make a sandwich of the acetate photo-inlay, the
brass overlay, and a sheet styrene backing plate.
Under high magnification, the precise rendering can then be seen of all the
instrument faces; a feature of great import if your models are viewed that way.
Otherwise – well, perhaps some personal comfort is found in the assurance of
their presence.
The instrument panel cowl is rendered in etched brass. A bit
of a bother to form and fit; but its thinness allows for an accurate panel
width. As I said, the canopy is adequately transparent, but anal perfectionists
who enjoy tempting disaster can improve it by smoothing and polishing inner and
outer surfaces.
The injected propeller supplied on the sprues isn’t bad;
but neither is it good. The spares bin yielded up
an unused four blader, likely off a Monogram
Bearcat, or possibly an “Alpha Dog”.
First impulse
was
to taper it to match the kit prop, but checks with Google’s pic library showed
the paddle shape was more correct; with maybe a bare smidge of slimming down at
the root ends,
transplantation of a governor dome, and squaring off
the tips. That shrunk the diameter, but nothing else on this build meets
Smithsonian standards for accuracy. Besides, the spare
prop was already painted, meaning I could get this
millstone off my neck that much sooner.
The project was brought to a semi-successful conclusion by
affixing two stub antenna masts to the vertical fin, though no evidence could be
found of a wire that was supposed to span from either of them.
| CONCLUSIONS |
 The Ace
Guardian started life on a note of apathy, if not antipathy; but eventually the
big blue brute grabbed on to some affection; though the overall disappointing
results did nothing to reignite a passion for playing with plastic. Speaking of
passion, this build is best summarized by comparison to
some
women I’ve known – best viewed from a distance under dim light. But they’d be
correct in saying worse about me.
The Ace
Guardian started life on a note of apathy, if not antipathy; but eventually the
big blue brute grabbed on to some affection; though the overall disappointing
results did nothing to reignite a passion for playing with plastic. Speaking of
passion, this build is best summarized by comparison to
some
women I’ve known – best viewed from a distance under dim light. But they’d be
correct in saying worse about me.
January 2009
Copyright ModelingMadness.com
If you would like your product reviewed fairly and fairly quickly, please contact the editor or see other details in the Note to Contributors.
Back to the Review Index Page 2019