| KIT #: | ? |
| PRICE: | $ |
| DECALS: | none |
| REVIEWER: | Carmel J. Attard |
| NOTES: | Vacuformed kit |
| HISTORY |
Way back in 1942 the USAAF commandeered 24 DC-4 four-engine medium and long range transport from the Douglas production line in Santa Monica which were initially destined for civil airline use. At that time these aircraft were the ideal type to satisfy Army’s requirement for a fast freight and passenger movements to South East Asia. A total of 1088 C-54s were completed which went to the USAF and US Navy, besides many Air forces in South America and also Denmark, Portugal and Turkish AFs. They all had the same basic shape and the only variation being the shape of the radar nose and aerial arrays on top and underneath the fuselage.
 The colour schemes worn by the military C-54s was very
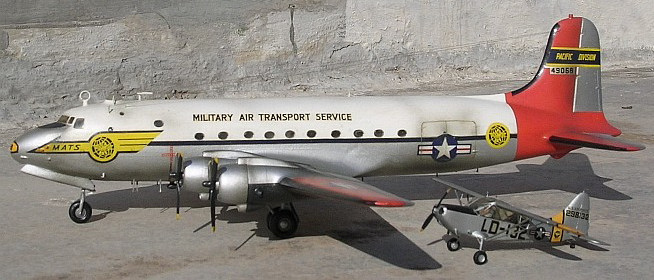
diverse and some quite unique and colourful. The USAF C-54s operated by the MATS
carried the yellow forward fuselage motif on the nose and yellow/blue sphere at
the rear fuselage on otherwise all metal finish. Later versions had white upper
fuselage which was separated from the lower metal finish fuselage by a blue
cheat line. Some even carried international orange tail fin and tail planes.
These served with the MATS Atlantic Division and Pacific Division that operated
close to the Arctic Circle and Antarctica. The SC-54, a type adopted for air-sea
rescue missions’ way back in 1955 carried a large transparent blister on
starboard side, aft of wing root besides many internal changes in equipment.
These were finished in light grey overall with a yellow band outlined in black
at the rear of fuselage. The nose, wing tips had Day-Glo patches, ‘Rescue’ band
in black outlined in yellow with wording in white. 11 C-54s were supplied to the
RAF in 1944 for use by transport command on routes to the Far East with 232 and
246 Squadrons before being returned with other land /lease aircraft at the end
of the war. Among the C-54s was also a particular historic one serial No
42-107451, which was converted for Presidential use, by both President Roosevelt
and then President Truman. The VIP aircraft had four in built state rooms and a
conference room. President Truman named the aircraft,’Sacret Cow’ and is known
to have visited 55 countries between 1944-47. Attractive colours also appeared
on US Navy Skymasters, designated R5D-3. These had white top fuselage and silver
lower surfaces parted by a dark blue cheat line. A US flag on tail unit with
code letters and serial numbers in black on tail and nose areas. Decorative
colours also appeared on C-54 operated by the Blue Angels, while attractive
bright orange areas decorated the type operated by the USCG. R5D-3 Skymaster
serving on Antarctic operation ‘Deep Freeze’ in 1958 attached to VX-6 and based
at NAS Quonset point had mid grey upper fuselage, dark grey radar nose,
aluminium lower fuselage and main planes with rear fuselage, fin and tail planes
are Day-Glo red. South African AF ones were also camouflaged in dark earth and
green.
The colour schemes worn by the military C-54s was very
diverse and some quite unique and colourful. The USAF C-54s operated by the MATS
carried the yellow forward fuselage motif on the nose and yellow/blue sphere at
the rear fuselage on otherwise all metal finish. Later versions had white upper
fuselage which was separated from the lower metal finish fuselage by a blue
cheat line. Some even carried international orange tail fin and tail planes.
These served with the MATS Atlantic Division and Pacific Division that operated
close to the Arctic Circle and Antarctica. The SC-54, a type adopted for air-sea
rescue missions’ way back in 1955 carried a large transparent blister on
starboard side, aft of wing root besides many internal changes in equipment.
These were finished in light grey overall with a yellow band outlined in black
at the rear of fuselage. The nose, wing tips had Day-Glo patches, ‘Rescue’ band
in black outlined in yellow with wording in white. 11 C-54s were supplied to the
RAF in 1944 for use by transport command on routes to the Far East with 232 and
246 Squadrons before being returned with other land /lease aircraft at the end
of the war. Among the C-54s was also a particular historic one serial No
42-107451, which was converted for Presidential use, by both President Roosevelt
and then President Truman. The VIP aircraft had four in built state rooms and a
conference room. President Truman named the aircraft,’Sacret Cow’ and is known
to have visited 55 countries between 1944-47. Attractive colours also appeared
on US Navy Skymasters, designated R5D-3. These had white top fuselage and silver
lower surfaces parted by a dark blue cheat line. A US flag on tail unit with
code letters and serial numbers in black on tail and nose areas. Decorative
colours also appeared on C-54 operated by the Blue Angels, while attractive
bright orange areas decorated the type operated by the USCG. R5D-3 Skymaster
serving on Antarctic operation ‘Deep Freeze’ in 1958 attached to VX-6 and based
at NAS Quonset point had mid grey upper fuselage, dark grey radar nose,
aluminium lower fuselage and main planes with rear fuselage, fin and tail planes
are Day-Glo red. South African AF ones were also camouflaged in dark earth and
green.
 The C-54 was powered by four Pratt & Whitney R-2000-7 or-11
radial engines of 135HP or the C-54G, S, T by R-2000-9 radial engines of 1450HP.
The C-54D had a maximum speed of 274mph at 14,000ft. Normal cruising speed was
239mph t 15,000ft and a maximum range of 3,900 miles. It carried a crew of five
and 14.28 Tons of freight or up to 50 fully equipped troops. The Argentine Air
Force and Navy and the Air Forces of Brazil, Columbia, Congo, Denmark, Ethiopia,
France, Aeronavale, Portugal, Spain, Thailand, Turkey, USN, USAF, VENEZUELA and
RAF operated the C-54. The variants in service with the USAF included the C-54A,
D,E & G, EC-54D with special electronics installation, HC-54D for search and
rescue, TC-54D for training and VC-54D. The Skymaster had a span of 117’1”, a
length of 98’ 11”, and a height of 27’ 61/2”. The C-54 remains in many peoples
minds and is the type that brings back many memories of the past be it in Korea,
or during the Berlin Airlift (See Scott Van Aken's
history on the 1/144 C-54),
or spotted at Keflavik, Mildenhall, or incoming into Luqa airfield, Malta for a
stop over after a fairly long flight from Rota, Wheelus or Sigonella.
The C-54 was powered by four Pratt & Whitney R-2000-7 or-11
radial engines of 135HP or the C-54G, S, T by R-2000-9 radial engines of 1450HP.
The C-54D had a maximum speed of 274mph at 14,000ft. Normal cruising speed was
239mph t 15,000ft and a maximum range of 3,900 miles. It carried a crew of five
and 14.28 Tons of freight or up to 50 fully equipped troops. The Argentine Air
Force and Navy and the Air Forces of Brazil, Columbia, Congo, Denmark, Ethiopia,
France, Aeronavale, Portugal, Spain, Thailand, Turkey, USN, USAF, VENEZUELA and
RAF operated the C-54. The variants in service with the USAF included the C-54A,
D,E & G, EC-54D with special electronics installation, HC-54D for search and
rescue, TC-54D for training and VC-54D. The Skymaster had a span of 117’1”, a
length of 98’ 11”, and a height of 27’ 61/2”. The C-54 remains in many peoples
minds and is the type that brings back many memories of the past be it in Korea,
or during the Berlin Airlift (See Scott Van Aken's
history on the 1/144 C-54),
or spotted at Keflavik, Mildenhall, or incoming into Luqa airfield, Malta for a
stop over after a fairly long flight from Rota, Wheelus or Sigonella.
| THE KIT |
Packed in a sturdy box with a picture of the C-54 (DC-4 in
Capitol Airlines markings), the kit comes in sheets of white vac-form plastic
complete with a large two page ‘Guide’ to assemble the model. As with all
previous Rareplanes kits that I made the instruction sheet has all the hallmark
of ‘Gordon Stevens of Rareplanes’ style of presentation with accurate scale
plans, suggestions for different colour schemes, clear oblique exploded views
and 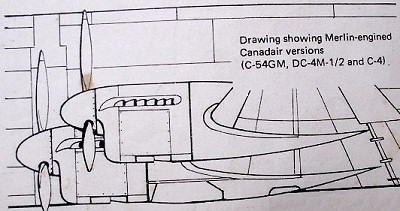 my model contained a set of fine decals covering a US Air Transport Service
machine. I say ‘in my box’ because apparently alternative decals could be
purchased for a nominal fee to make a civil or other military colour scheme as
advertised in the Guide sheet. There are seven stages of assembly to follow so
that one can do a C-54 or a Navy R5D-3 Skymaster. The detail on the surface of
the vac-form kit parts was among the best I have ever come across on vac-form
kits. This was evidence of how detailed vac-form kits have become considering
that the kit was released some 20 years ago or so. Apart from the C-54 which was
powered by American built engines there is included a bonus of parts to build a
set of Merlin engines to enable one to build a Canadian Forces version as C-54G,
DC-4M-1/2 and C-4. Alternatively one can go for a Navy R5D-3 attached to VX-6 of
operation Deep Freeze with a colourful finish.
my model contained a set of fine decals covering a US Air Transport Service
machine. I say ‘in my box’ because apparently alternative decals could be
purchased for a nominal fee to make a civil or other military colour scheme as
advertised in the Guide sheet. There are seven stages of assembly to follow so
that one can do a C-54 or a Navy R5D-3 Skymaster. The detail on the surface of
the vac-form kit parts was among the best I have ever come across on vac-form
kits. This was evidence of how detailed vac-form kits have become considering
that the kit was released some 20 years ago or so. Apart from the C-54 which was
powered by American built engines there is included a bonus of parts to build a
set of Merlin engines to enable one to build a Canadian Forces version as C-54G,
DC-4M-1/2 and C-4. Alternatively one can go for a Navy R5D-3 attached to VX-6 of
operation Deep Freeze with a colourful finish.
| CONSTRUCTION |
The C-54 kit has long disappeared out of circulation and I
recon that if Rareplanes at the time decided to produce another 1,000 more kits,
these would have been sold in a short period of time. Upon making this somewhat
large model I realised that this did not involve all that more work than when
making a smaller vac-form kit. I went about building the model in the following
procedure. The white plastic is first marked with a soft pencil around each
vac-form part and is then scored with a sharp knife making a light cut around
the outline of the moulded part. Each part is then bent and the excess backing
plastic is snapped away with fingers or a small pliers. All cut edges are next
sanded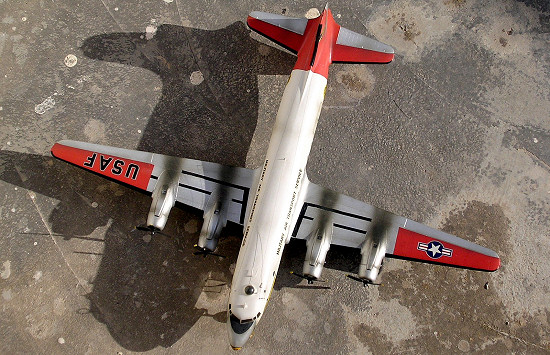 flat on a medium wet
and dry sanding paper which is large enough to take the whole length of
fuselage, and which is stuck with a double-sided tape to a backing piece of
wood. Adding plenty of water makes sanding action smoother. As each part is
sanded correctly, a thin line of ‘flash’ will break away from the component.
This is a good indication as how far you need to go down in sanding. Frequent
checking will ensure that one do not over sand and one also has to ensure a
perfect joint line between pats. Much heavier sanding is required on trailing
edges of rudder, wings, and elevators to obtain sharp edges. All moulding ‘pips’
are cut off with a sharp razor blade before assembly. Liquid cement is used to
join parts together but tube cement is recommended for the sturdier joints.
flat on a medium wet
and dry sanding paper which is large enough to take the whole length of
fuselage, and which is stuck with a double-sided tape to a backing piece of
wood. Adding plenty of water makes sanding action smoother. As each part is
sanded correctly, a thin line of ‘flash’ will break away from the component.
This is a good indication as how far you need to go down in sanding. Frequent
checking will ensure that one do not over sand and one also has to ensure a
perfect joint line between pats. Much heavier sanding is required on trailing
edges of rudder, wings, and elevators to obtain sharp edges. All moulding ‘pips’
are cut off with a sharp razor blade before assembly. Liquid cement is used to
join parts together but tube cement is recommended for the sturdier joints.
I first assembled the engines which consists of cutting out the cowlings and removing the circular front; cut out the air screws and sand to shape, cut out front of coolers and radiators and trim the radial piston engine parts so that they will fit to the bulkhead integrated with the wing assembly. The mainplanes half assemblies follow this. It is suggested to add a block or a complete spar of balsa wood in order to maintain the correct wing section depth. The tailplane parts assembly was a straight forward job, then sanding flat the root end to fit fuselage at a later stage. Next come the fuselage halves where the cockpit area was cut to receive the clear Perspex piece provided. The oval shaped side fuselage windows were carefully drilled and shaped with files to conform to a common template made of wood having a section conforming to the shape of windows that are all similar. The cockpit office consists of a floor held between two bulkheads. Coaming, seats, control columns, console were carefully added and painted in cockpit green, leather brown seats, and shades of grey and black to the surrounding instruments. The forward undercarriage bay was cut and the nose wheel, made from vac-form parts provided with torque links made from stretch sprue was dry run. Nose weight wrapped in tissue paper was inserted forward of bulkhead. Two rear bulkheads were cemented with tube cement. Alternative strips of plastic were added along the fuselage halves joint. The interior was painted cockpit green and after drying rectangular areas was cut at wing root on fuselage to allow wing stubs to fit into.
 The fuselage halves were now carefully joined together and
allowed to dry, securing them with masking tape wrapped around the assembly. As
this was drying, other parts were attended to. The main landing gear was
trimmed, carefully detailed and painted. Before cementing the undercarriage
legs, a metal rod was added as vertical strengtheners and as an axle to cement
wheels to. The wheel well contained two large and two small doors, which were to
be fitted around the undercarriage openings. Separate air scoops were added over
the top of each nacelle. Exhaust pipes were made from curved sprue rod and
cemented to lower of nacelle. As for the propellers mentioned earlier the
instruction sheet suggests that one could use a set from the Revell B-17 kit.
The main wings and tailplanes were now joined to the fuselage. Putty was applied
to the wing roots and centre line of fuselage. These were then sanded smooth and
a light brush coat of liquid cement applied to smoothen down the joints. One
makes sure that the wing had the right dihedral angles according to the plans
provided and that the engine cowls are correctly aligned with the rest of the
nacelles. The undercarriage is then fitted in place and correctly positioned
from front view and side view. All the transparent cockpit areas and astrodomes
were fitted and masked so that they are not scratched or marked during assembly.
Loop and bullet antennae and aerials made from metal pins of correct length were
added at this stage.
The fuselage halves were now carefully joined together and
allowed to dry, securing them with masking tape wrapped around the assembly. As
this was drying, other parts were attended to. The main landing gear was
trimmed, carefully detailed and painted. Before cementing the undercarriage
legs, a metal rod was added as vertical strengtheners and as an axle to cement
wheels to. The wheel well contained two large and two small doors, which were to
be fitted around the undercarriage openings. Separate air scoops were added over
the top of each nacelle. Exhaust pipes were made from curved sprue rod and
cemented to lower of nacelle. As for the propellers mentioned earlier the
instruction sheet suggests that one could use a set from the Revell B-17 kit.
The main wings and tailplanes were now joined to the fuselage. Putty was applied
to the wing roots and centre line of fuselage. These were then sanded smooth and
a light brush coat of liquid cement applied to smoothen down the joints. One
makes sure that the wing had the right dihedral angles according to the plans
provided and that the engine cowls are correctly aligned with the rest of the
nacelles. The undercarriage is then fitted in place and correctly positioned
from front view and side view. All the transparent cockpit areas and astrodomes
were fitted and masked so that they are not scratched or marked during assembly.
Loop and bullet antennae and aerials made from metal pins of correct length were
added at this stage.
| COLORS & MARKINGS |
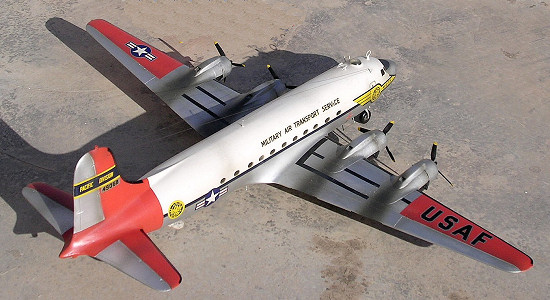
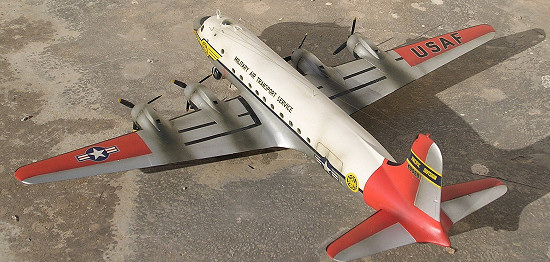
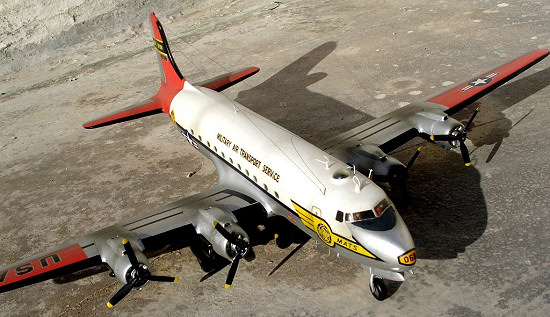
 The upper fuselage was given two coats of Humbrol satin
white, with fine smooth sanding in between and after final coat. Tail planes and
fin and wing tips were also airbrushed in white. These areas were afterwards
coated in high visibility international orange using Tamiya paint. All these
areas were carefully masked and the rest of fuselage and wings were airbrushed
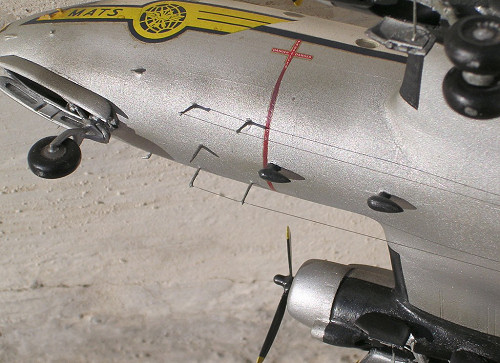
in Hampel brand of silver mixed with 15% varnish and a few drops of white. Areas
in line with exhausts and oil leaks were given fine coats of spray mix of matt
varnish, thinner and few drops of engine grey. The kit was then allowed to set
dry for 24 hours after which it was ready to receive the decals. The quality and
adhesion properties of the decals were superb though they were a tiny bit on the
gloss side. The offer of de-icing boots as black stripes and curves made
decaling so much easier. Black walkways were not supplied but the scale plans
showed these to best advantage and were made from matt black strips using Micro
Scale black decal of correct width and cut to required length. Prop blades were
painted black with standard yellow tips.
The upper fuselage was given two coats of Humbrol satin
white, with fine smooth sanding in between and after final coat. Tail planes and
fin and wing tips were also airbrushed in white. These areas were afterwards
coated in high visibility international orange using Tamiya paint. All these
areas were carefully masked and the rest of fuselage and wings were airbrushed
in Hampel brand of silver mixed with 15% varnish and a few drops of white. Areas
in line with exhausts and oil leaks were given fine coats of spray mix of matt
varnish, thinner and few drops of engine grey. The kit was then allowed to set
dry for 24 hours after which it was ready to receive the decals. The quality and
adhesion properties of the decals were superb though they were a tiny bit on the
gloss side. The offer of de-icing boots as black stripes and curves made
decaling so much easier. Black walkways were not supplied but the scale plans
showed these to best advantage and were made from matt black strips using Micro
Scale black decal of correct width and cut to required length. Prop blades were
painted black with standard yellow tips.
| CONCLUSIONS |
Having produced the C-54 much to my satisfaction I come to form an opinion that this was one of Gordon Stevens ( Rareplanes) masterpieces and I simply managed to get my kit just in time when they were about to be sold out, mostly to US customers. Kits by Rareplanes, Airmodel, Formaplane and Esoteric which were so much on the market some 20 years ago have added a great deal of potential to the scale modelling hobby and immensely expanded the range of kits that one would go for. As for the spare Merlin engines that came with the kit I found this very useful in completing a Lincoln Mk 2 conversion. Now for my next project:, how about a C-124 Globemaster, Airmodel kit, also in MATS markings. We wait and see.
May 2006
Copyright ModelingMadness.com
If you would like your product reviewed fairly and fairly quickly, please contact the editor or see other details in the Note to Contributors.
Back to the Review Index Page 2020