Hobbycraft 1/48 T-33 'Korean War'
|
KIT # |
72801 |
|
PRICE: |
$22.00 in 1998 |
|
DECALS: |
See review |
|
REVIEWER: |
C. Wayne Sharp |
|
NOTES: |
KMC Detail set, Aeromaster Decals |
|
HISTORY |
The History of this historical airplane was very straight forward as it was derived and needed as a Jet trainer in the late 40s and early 1950s. Up until the T-33A came along, a jet trainer was mainly an F-80A as a ‘Captivair’ secured to the ground by steel frames around the wings. The first actual Air Force jet flyable was the TF-80C and was actually a converted P-80B.
 Up until that time the Jet flying training
consisted of 180 hours in the T-6 Texan, 50 hours in a P-51 and then 25
hours in the ‘captive’ P-80A. The Air Force awarded a contract for 20
TF-80C jet trainers in 1948 and they were later designated and changed to
the T-33A
Up until that time the Jet flying training
consisted of 180 hours in the T-6 Texan, 50 hours in a P-51 and then 25
hours in the ‘captive’ P-80A. The Air Force awarded a contract for 20
TF-80C jet trainers in 1948 and they were later designated and changed to
the T-33A
The original F-80B trainer version was to change the F-80C with an 26 inch section added forward of the wing root and another 12 inch section added forward of the rear fuselage for balance and stability. Some other differences were, a smaller 85 gallon fuselage fuel tank and two .50 cal machine guns in the nose instead of the 6 on the F-80. The Air Force also wanted a single piece clamshell type canopy. And a very unusual twin-tailed T-33A was built for stability and it worked but was never adopted.
|
THE KIT |
Yea, the Hobby Craft kits have been cursed and abused for the most part but you have to admit they have a number of subject aircraft that no one else makes and yes they do copy a lot of other people’s kits as well. However, with the exception of the old Hawk/ Testors rendition of the T-33 in quarter scale, ( there have been misquoted information that the Hobby Craft kit was a copy of the Testors/ Hawk kit(s).. this is not so) and no one else makes one. So if you just have to have one, you may as well get it and open the box and start.
 Hobby craft came out with a series of family
related T-33A, RT-33A, the F-94A and F-94B in the early 1990s and these
had been a neglected model type(s) for a long time. They actually came
out with the F-94A / B first with the basic difference being different
tip tanks between the two. Then came the T-33A series with the RT-33A
with two types of wings tips in each kit and then the Korean version with
different tanks again.
Hobby craft came out with a series of family
related T-33A, RT-33A, the F-94A and F-94B in the early 1990s and these
had been a neglected model type(s) for a long time. They actually came
out with the F-94A / B first with the basic difference being different
tip tanks between the two. Then came the T-33A series with the RT-33A
with two types of wings tips in each kit and then the Korean version with
different tanks again.
No, these are not open the box and stick them together and yes there are inaccuracies that make all the ACEs ( Arm Chair Experts) and rivet counters whine and moan, but it don’t matter anyway, they never build so why should it make a difference anyway . But the kits were finely recessed and had passable interiors and some parts could be made better with some good old fashion research and model work.
 I think there was at least 3 boxings for the T-33A
by Hobby craft not sure may have been another one. This one is the Korean
War version and is virtually the same as the rest with the exception that
it came with the different wing tip tanks which is, the 265 Gal. Misawa
type and the standard T-33A, and the two F-94s came with the Fletcher
type tanks.
I think there was at least 3 boxings for the T-33A
by Hobby craft not sure may have been another one. This one is the Korean
War version and is virtually the same as the rest with the exception that
it came with the different wing tip tanks which is, the 265 Gal. Misawa
type and the standard T-33A, and the two F-94s came with the Fletcher
type tanks.
Some of the parts are not defined very well and could use some replacements if you have an old Monogram and/ or the old Testors kits that you can rob from. The intake splitters do not fit very well and are the wrong shape so I used the ones on the Monogram F-80 but they were not much better. The landing gear can be improved with the monogram gear and the Canopy is mediocre at best and the old Testors T-33 Canopy is a better one to use.
The Dive brakes are not open but can be cut open and replaced with the Monogram brakes if you cannot find some replacements from the after market. The old KMC detail set was my salvation but is not made any more, too bad. The kit is just one of those things that if you want a T-33A for your collection then just do a little work and it will turn out ok.
|
CONSTRUCTION |
The thing with this mediocre kit was to give it lots of help and that came in the way of the defunct KMC detail set which I had for some time. I don’t think it is available except in some obscure places these days. Most experiences have told me over the years about after market detail parts and kit help, is that, when it is on the market, it might be a good idea to get it then because it will always be a short run item. Granted, you never know for sure if you can or will ever use it.. that is just one of the chances you take I guess. Life is a bi#%* and then you die.
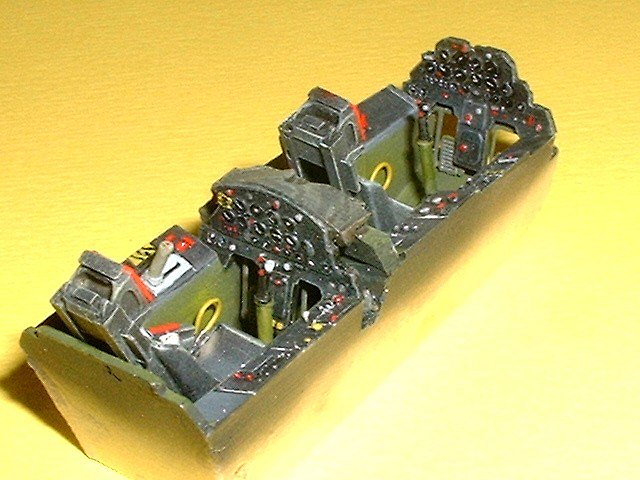 The KMC detail set consisted of a new resin tub with
fairly good raised detail and new seats, resin controls surfaces, new
resin landing gear doors, resin dive brakes, and a etched metal sheet for
the canopy railing and dive brake actuators. It was quite inclusive and a
great help to do a better looking T-33 from the Hobby Craft rendition.
The KMC detail set consisted of a new resin tub with
fairly good raised detail and new seats, resin controls surfaces, new
resin landing gear doors, resin dive brakes, and a etched metal sheet for
the canopy railing and dive brake actuators. It was quite inclusive and a
great help to do a better looking T-33 from the Hobby Craft rendition.
I did the cockpit by usual method of the primary paint job of interior green with umber washes and black panels and seats and details picked out with light gray and metal, and various colors to get to look busy. I used “In-Action book and the “cockpit” internet site to get color scheme and cockpit layout etc..
Most of all the pictures I have of the F-80/ T-33 /
F-94 family was the fact it set with the dive brakes in the down position
and the Hobby Craft kit is molded closed so I cut those out and made a
new brake well with evergreen sheet and added some
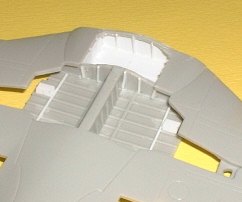 more detail inside
wheel wells and the flap area. Also, the flaps did not have as much
detail as the flaps from the old Monogram kit so I stole those and the
landing gear, wheels and the intake splitters. They just looked better
and they fit up without any trouble.
more detail inside
wheel wells and the flap area. Also, the flaps did not have as much
detail as the flaps from the old Monogram kit so I stole those and the
landing gear, wheels and the intake splitters. They just looked better
and they fit up without any trouble.
I cut out the kit movable surfaces so I could use the resin parts. Actually, the resin landing gear doors were not much better that the kits’ but I used them without any trouble and there were no mold and/ or sink marks on those.
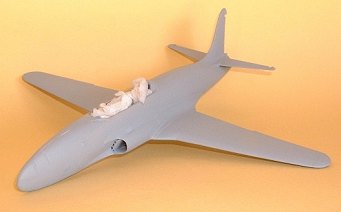
Mainly, the rest of the assembly was standard after I got the cockpit in and then the little “stove pipe” and nose were installed. Before I put the bottom wing on, I added some more detail with plastic strip for the inter main wheel well and inter flap areas. I then glued the bottom section of the wing on and to keep from having a slight gap between the wing joint and the fuselage, I positioned the upper wing to fit the fuselage first and glued the leading edges last and that works for me most of the time.
I tried not to put too many scratches with the sanding of the seams because I was going to put a natural metal finish on and so I tried to make it where I did not have to re- scribe too many places also. After going over it several times to check for cracks and blemishes, I put some gray primer on to double check and then it was ready for the paint table.
|
COLORS & MARKINGS |
Yep, ALCLAD II is more expensive than other brands of metalizer, but it also works better than the rest. You can use it to the last drop where the “other” big name brand, some people swear by, will cook and turn to “jelly” quick after you open the bottle so it is thrown away shortly. I have used the “other” (SNJ) brand many times several years back, it did a fair job but not as good as the Alclad product. This stuff is weird, you must have a good base coat for it to work as advertised. There is nothing wrong with the suggestions from the paint mfg. for a good base primer coat and it works well for most modelers but I am of the mind I could make it work better for my application by doing it “my way” and it seems to work very well. ( your results may differ).
 I wet sanded the gray primer with 1000 grit and after
it was dry, I painted the bird with MM Enamel, (in MY experience, enamel
paints will have a higher gloss factor than any water base acrylics ),
gloss Black metallic ( Gloss regular black and Gloss Chrome Black will
also work very well) ( a good dry and warm day will be best) I thin with Disol to make it flow to give a good “wet” glossy look as it goes on,
and that don’t mean thick, or orange peel will result. After it dries a
day or so, then I go back over it with some wet 2000 grit to remove any
and all Nat turds and dust etc. then, I sprayed again with a very thin
coat of the Black metallic to make it super shiny and slick . I covered
it up and let it dry and “cure” for about a week and a half, the purpose
is to make sure that the enamel paint has dried hard and will not “smoke”
when you put the ALCLAD on. The ALCLAD is a super hot lacquer and will
bubble the enamel if it is still green. ( Not dry enough)
I wet sanded the gray primer with 1000 grit and after
it was dry, I painted the bird with MM Enamel, (in MY experience, enamel
paints will have a higher gloss factor than any water base acrylics ),
gloss Black metallic ( Gloss regular black and Gloss Chrome Black will
also work very well) ( a good dry and warm day will be best) I thin with Disol to make it flow to give a good “wet” glossy look as it goes on,
and that don’t mean thick, or orange peel will result. After it dries a
day or so, then I go back over it with some wet 2000 grit to remove any
and all Nat turds and dust etc. then, I sprayed again with a very thin
coat of the Black metallic to make it super shiny and slick . I covered
it up and let it dry and “cure” for about a week and a half, the purpose
is to make sure that the enamel paint has dried hard and will not “smoke”
when you put the ALCLAD on. The ALCLAD is a super hot lacquer and will
bubble the enamel if it is still green. ( Not dry enough)
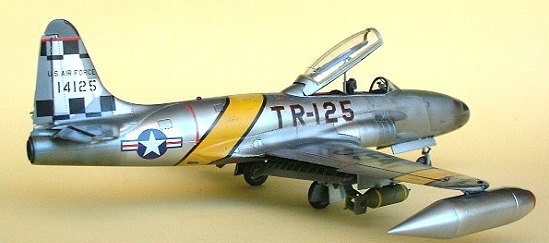
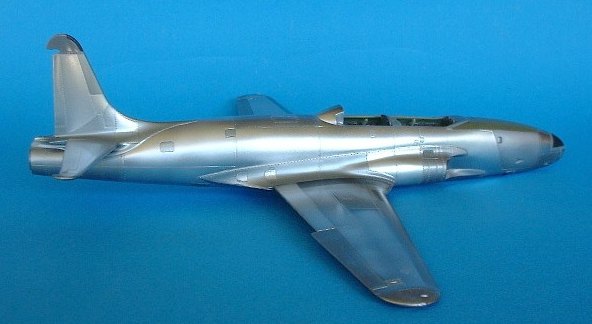 I desired to have some different color panels on
the metal because all natural metal airplanes had different metal color
tones, some tones were the result of the metal panels being cut across
the “grain’ and some with the grain and some batches of aluminum were
color by thickness’ and some other types of metal was used in different
spots etc. and as a result, some looked patchy . the best way to do this
for me is to look at the pictures of the real aircraft and determine
which panels need to be different.
I desired to have some different color panels on
the metal because all natural metal airplanes had different metal color
tones, some tones were the result of the metal panels being cut across
the “grain’ and some with the grain and some batches of aluminum were
color by thickness’ and some other types of metal was used in different
spots etc. and as a result, some looked patchy . the best way to do this
for me is to look at the pictures of the real aircraft and determine
which panels need to be different.
I mask by using plain old scotch tape (and it won’t pull the paint with it when you take it off) mainly because it has very sharp thin edges and you can see through it to line up and / or cut along the panel lines you wish to change. The change for me was to use the MM magnesium color metalizer. When the tape is removed you can blend the two colors with a little SNJ aluminum powder ( just a little dab will do ya) and then when it suits the modeler, in color, I seal it with Testors metal sealer, ( light coat) and then it is ready to put some “stickers” on it.
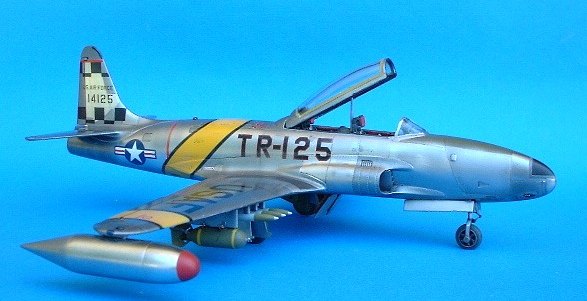
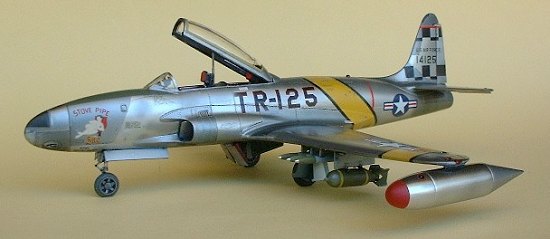
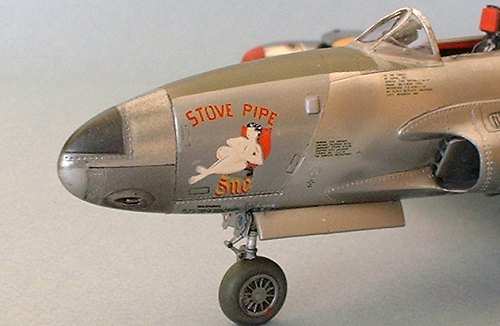
 The markings for this bird was really easy, believe
it or not, the kit decals were not that bad but I had a nice AeroMaster
sheet # 48-267 ( T-33s over Korea Part II), with more selections so I
chose the one for the “Stove Pipe Sue”, from the 51st Fighter
Group, Suwan, Korea, 1953, which was from the same squadron as “Paddy
Daddy” (Kit decals) I even had to use the kit decal checked tail kit
decal ( Aeromaster request).
The markings for this bird was really easy, believe
it or not, the kit decals were not that bad but I had a nice AeroMaster
sheet # 48-267 ( T-33s over Korea Part II), with more selections so I
chose the one for the “Stove Pipe Sue”, from the 51st Fighter
Group, Suwan, Korea, 1953, which was from the same squadron as “Paddy
Daddy” (Kit decals) I even had to use the kit decal checked tail kit
decal ( Aeromaster request).
The yellow fuselage band is decal but I had to paint the wing bands to match. I used some yellow, what I had on hand, and mixed some Orange with it until I got the color as close as I could. I t looks about right and the red nose tip tanks had to be painted also. The black surround on the yellow wing bands are supplied with the decal sheet.
These T-birds in Korea were mainly used by all
fighter units for combat orientation flights and they did get used in
combat and carried ordnance loads and also had two .50cal guns in the
nose. I painted the dive brake inside red, some were during
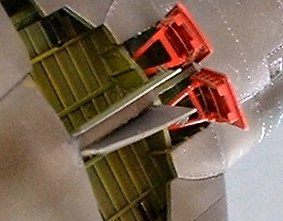 the life time
of the many years the T-bird was in service, however I am not sure if
they were red on this airplane but most pneumatic operated doors on some
Air Force aircraft were painted red for safety reasons, you could get cut
bad or lose something if those things got closed by a joker fooling
around . those things could snap shut in a second.
the life time
of the many years the T-bird was in service, however I am not sure if
they were red on this airplane but most pneumatic operated doors on some
Air Force aircraft were painted red for safety reasons, you could get cut
bad or lose something if those things got closed by a joker fooling
around . those things could snap shut in a second.
The rest of the decals went on very well and then I sealed them again with a little Testors metal sealer and cleaned off all the residue with plain Windex and paper towel and went to work on the canopy.
The kit canopy is just not really correct for the T-bird, the KMC folks saw this and they tried to help by giving me some etched metal replacement pieces to help it out. Did not work very well for me. Then I remembered the old Testors T-33 kit and it was a savior, the canopy looked “correct” with the antenna in the top glass and a separate frame and fit just like it was intended to. All I had to do was install the supplied resin piece inside framing and add the metal latch plates on top and bottom and I was in business.
|
FINAL CONSTRUCTION |
All the ‘add-ons came next, I started with the
landing gear struts which were not as good as the old Monogram F-80. I
stole those and the wheels for this project. The nose wheel in the Hobby
Craft kit was too large. The gear doors went on next and the wind screen.
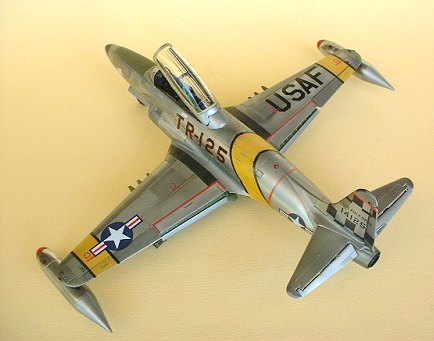
I used the kit ordnance which consisted of
 two 500 lb general purpose
bombs and 6 HVARs and I saved the tip tanks until last. ( all these
aircraft used the 265 Gal. Drop tanks) and they are supplied with this
version of the T-33A. the resin seats were CAed in and the canopy was
polished up and glued in place and we were ready to taxi.
two 500 lb general purpose
bombs and 6 HVARs and I saved the tip tanks until last. ( all these
aircraft used the 265 Gal. Drop tanks) and they are supplied with this
version of the T-33A. the resin seats were CAed in and the canopy was
polished up and glued in place and we were ready to taxi.
|
CONCLUSIONS |
Over all, a nice different build and proves to me again that you don’t always need the super high dollar Tamigawa wunderkits to get a nice build. Those kits have a big investment beginning price and still need a lot of the same thing I did to this kit.
The old T-bird brings back a lot of memories and is one of the most classic aircraft/ Trainers ever produced and I think it is still flying in some areas of the world.
|
REFERENCES |
1. My own collection of T-33 memorabilia and friends who flew them.
2. Internet with Key word T-33A
3. In Action Number 40 Squadron/ signal
publications P-80- T-33 F-94. June 2004 Copyright ModelingMadness.com
If you would like your product reviewed fairly and quickly, please contact the editor or see other details in the Note to Contributors.