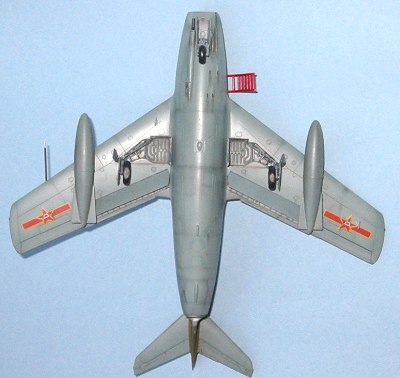
Tamiya 1/48 Mig-15 bis
|
KIT # |
61043 |
|
PRICE: |
£ |
|
DECALS: |
Aeromaster 48-229 used |
|
REVIEWER: |
|
|
NOTES: |
Eduard FE 159 set used |
|
HISTORY |
For some background on the development of the MiG-15, please refer to my previous MiG-15 article here at MM.
This particular MiG-15
was flown by a Russian pilot,
 Capt. Nicolay Ivanov, with the Chinese Air
Force. Capt. Ivanov scored 7 kills in the Korean War, but I couldn’t find
any details on him, so I don’t know which planes he shot down. If any of
you guys have any info on this, please let me know!
Capt. Nicolay Ivanov, with the Chinese Air
Force. Capt. Ivanov scored 7 kills in the Korean War, but I couldn’t find
any details on him, so I don’t know which planes he shot down. If any of
you guys have any info on this, please let me know!
|
THE KIT |
This kit comes with the usual Tamiya quality. Great kit overall. Comes with a very nice engine, and a trolley for the rear fuselage, in case you decide to show your beautifully painted and super detailed VK-1 engine. The kit decals are surprisingly good, thin and in register, unlike most of their stuff.
|
CONSTRUCTION |
The cockpit is very basic, so I decided to use the Eduard Zoom set just to make it a bit more interesting. It’s not like a good resin cockpit, but is a nice improvement over the stock cockpit. Is was painted RLM 65. One thing I don’t understand was that Eduard tells you to remove the cockpit’s front wall. I didn’t know why they did this, but removed it anyway.
 The cockpit sits right
after the intake, and I don’t think you can see the pilot’s feet thru the
intake on the real plane!! So I put there a small piece of black card
paper, and closed the weapons bay. Of course, it didn’t hold, so I had to
open the weapons bay again! I had to open it on my last MiG-15 as well to
add more weight, and on this one I had installed more weight previously
just to be sure.
The cockpit sits right
after the intake, and I don’t think you can see the pilot’s feet thru the
intake on the real plane!! So I put there a small piece of black card
paper, and closed the weapons bay. Of course, it didn’t hold, so I had to
open the weapons bay again! I had to open it on my last MiG-15 as well to
add more weight, and on this one I had installed more weight previously
just to be sure.
I also had some problems with the fuselage assembly on this one. Completely my fault, you really can’t blame this kit for this kind of stuff. Anyway, the problem was that I was in a hurry to close up this thing and start painting, so I made a mistake installing the engine to the front fuselage. The final result was that I got a *big* step on each side. If I was to paint a NMF plane, this would be a major problem, since I hate working with super glue, especially on large areas. And even if I used it, the step was still going to be visible after painting, no matter what. Fortunately, I was going to paint a camouflaged Chinese MiG, so I just used putty and lots of Mr. Surfacer. The final result was pretty good, and after the lines were rescribed and the model painted, you can’t notice what happened.
One other problem was that the glue I used to attach the clear canopy to the plastic frame crazed the clear part. If there’s one thing I don’t like on this kit is this, the flush joint between clear and normal plastic you have to do. It’s the same thing on their Mustang kit. So I had to remove, polish and reattach the clear part.
|
CAMOUFLAGE & MARKINGS |
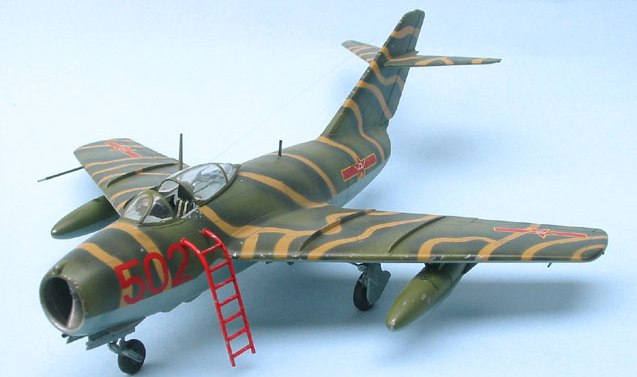
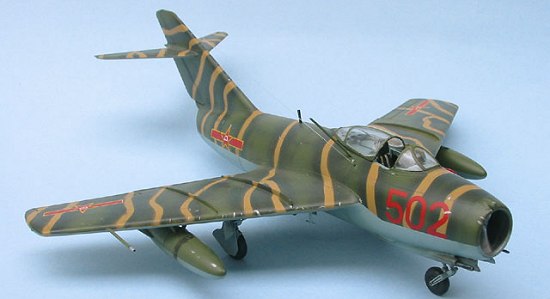
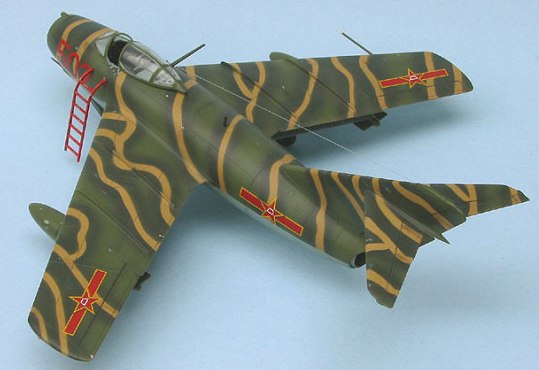
I think the real reason why I keep building this 50´s era jets in acrobatic teams markings, like my last MiG-15, is that I can build the same kit again in war markings! Having the Aeromaster 48-229 (Korean War Aces I) sheet at hand, I chose Capt’s Ivanov plane, wearing a very nice snake pattern. I always liked those green camouflaged MiG-15´s. Since I had no reference pic on this plane, I just tried to get as close as possible to the FS numbers that Aeromaster provided. But I wasn't too worried about that.
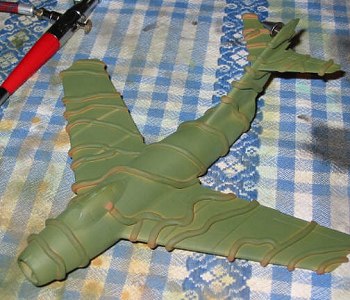 For this one I used the
post-shading technique, were you spray darker camouflage colors over the
panel lines after the base color is applied. I used this one because I
never managed to get the pre-shading to work. This technique consumes
more time, but is fool proof.
For this one I used the
post-shading technique, were you spray darker camouflage colors over the
panel lines after the base color is applied. I used this one because I
never managed to get the pre-shading to work. This technique consumes
more time, but is fool proof.
I first tried liquid masking for the tan color, but the result was a complete disaster, the lines being too hard and angular, not the smooth and fluid look I was looking for. So I used rolled snakes of modeling clay. I painted the tan color first using Tamiya Desert Yellow, masked the snakes and sprayed the lighter green, Gunze (now called GSI Creos) aqueous H340 “field green”. For the darker green I tried to use the same color with 20% black, but it wasn't dark enough, so I used Gunze’s RLM 70 (H65 aqueous). I was a lot pleased with the final results. The underside color is RLM 65 with some RLM 76 added. For the record, the models on the assembly line are: a Me-262, a Bf-109F-4z/Trop, an Fw-190D-9 and a Fw-190A-8/R-8. Now you know why I keep using RLM colors on a Chinese jet.
The Aeromaster decals were those printed by Microscale, so the quality is excellent. They were super thin and opaque, and after a final coat of semi-gloss clear, they looked painted on. This is how every decal should be! Weathering was done with pastels and some paint chipping.
|
FINAL CONSTRUCTION |
 I
used copper wire to add the fluid lines to the landing gear, and the main
antenna was made from stretched clear plastic. Is it just with me or
these things keep breaking off on your models as well?
I
used copper wire to add the fluid lines to the landing gear, and the main
antenna was made from stretched clear plastic. Is it just with me or
these things keep breaking off on your models as well?
|
CONCLUSIONS |
The construction was a bit frustrating, but the painting was pure fun! Overall, a very nice build, and I am very pleased with the final results
August 2003
|
REFERENCES |
MiG-15 in Action;
MiG-15 +4
If you would like your product reviewed fairly and quickly, please contact me or see other details in the Note to Contributors.