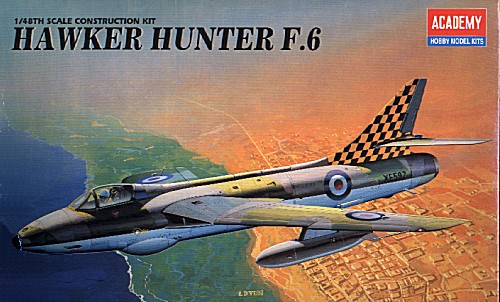
 Kit: HAWKER
HUNTER F.6
 Kit: HAWKER
HUNTER F.6
Scale: 1/48
Manufacturer: Academy
Mfr's No: FA144/#2164
Price: MSRP - $24.95
Media: injection-molded plastic
Decals: Two different aircraft.
Accuracy: See Review
Overall: See Review
Reviewed by: Thomas McKelvey Cleaver (THE AERONUT)
At last, a manufacturer has finally had the good sense to make a state-of-the-art kit of the most-successful British jet fighter, the Hawker Hunter. To my mind, this is the most aesthetic-looking British fighter since the Spitfire, and one of the best-looking jets ever made by anybody. I don't do jets past the 50s (they were still trying to figure it out then, and came up with interesting airplanes, not the computer-generated Sukhoi F-16s and Lockheed Su-27s of today), and the Hunter has long been on my Want List.
I have the good fortune to have a local hobby shop owner who has me make models from awaited kits, so those who want to see what it's really like can do so and be inspired to make a purchase, so I was very happy to walk in earlier this week and be greeted by the kit being put in my hand. On opening the kit, it looks like they got it right. Clean, crisp molding, recessed panel lines, etc. If you've made the Spitfire XIVs, you know the quality I speak of. The model is well-engineered and makes up into subassemblies that go together logically.
When I got to work on the cockpit, I thought the instrument panel looked small. When I got to the ejection seat, I thought it was particularly small. I am familiar with the three Hawker Hunters we have over at Van Nuys Airport, and there was just something wrong, but I couldn't put my finger on it. I went on and assembled the fuselage, with the cockpit floor and instrument panel installed, then let it set up overnight.
Next day I had an e-mail from a friend telling me he'd gotten the kit and that the seat was 1/72, not 1/48. Of course! I decided to use an Aeroclub seat, which would solve the weight-in-the-nose problem, and then discovered the real problem: the floor is too shallow. In fact, the entire cockpit is set up on 1/72 scale! The instrument panel, the depth of the cockpit, everything! There was no way I could slice the fuselage apart and start over, so I was stuck with making the best of a bad bargain.
Fortunately, I had an old seat from the Monogram Voodoo in the parts box. I cut off the bottom, cut off the headrest, slimmed the armrests, and replaced the headrest with the Martin-Baker headrest from the Aeroclub seat. With a little work, it fits under the canopy. Luckily, the cockpit floor area is supposed to be black; with the canopy closed, it looks all right as a display model. The solution is to scratchbuild the cockpit at the outset, making a deeper floor and larger instrument panel from cardstock, then use an Aeroclub seat, something that is outrageous in a supposedly-state-of-the-art model like this, but there's nothing else other than to wait for True Details to ride to the rescue with a resin cockpit. Since I subscribe to the theory that if it looks good at a distance of one foot, it is good, the model is okay, but jeez....
Past that, the airplane looks right. Be very careful in fitting the complex intake system and in fitting the wings to the fuselage. My recommendation from experience is to build the wings as sub-assemblies, then fit them to the fuselage halves before assembling the fuselage, so you can manipulate the pieces to fit without the putty I had to use. When you see the kit and how these parts are to fit together, you'll see what I mean.
The decals look good. There is one bright late-50s airplane with yellow-and-black checkerboard on the vertical fin and horizontal stabilizer, and one more operational-looking airplane from the early 60s. The sheet includes all stencilling. All four pylons are provided, with the early armament of underwing RPs, Matra pods and two bombs, with the large and small drop tanks. All of these are used in different set combinations, so look at photos before making a choice.
So far as possibilities are concerned, they are endless. The Hunter was used by the RAF for 40 years and went from Fifties gloss camouflage to 80s low-viz grey; there were the Black Arrows and Blue Diamonds flight demonstration teams; there were the red/white/grey advanced trainers. The FAA used the unarmed G.A.11 in sea grey-white, in red/white high-viz and overall sea grey low-viz. The airplane flew in 21different air forces and is still operational in Singapore, which means that a modeller will have a lot of choices with markings possibilities, and I'm sure various aftermarket companies are already at work on this. I definitely hope True Details is already at work on a correct cockpit.
Were it not for the cockpit, I would give this kit an A+. As it is, it's a C-. Since the only alternative is the Lindberg reeker and an entire tube of putty to put it right, I also recommend this to anyone with an interest in 50s jets. As it sits on the worktable assembled but unpainted, it looks good. But it could have been a contender...