
Hasegawa 1/72 F-106A Delta Dart
|
KIT # |
? |
|
PRICE: |
£8.99 |
|
DECALS: |
See review |
|
REVIEWER: |
Tim Mansfield |
|
NOTES: |
Frequently re-released – produces an excellent result |
|
HISTORY |
The F-106 Delta Dart is a direct follow on from the F-102 Delta Dagger – with area ruled design for supersonic performance from the outset. For a description of the area rule – and how it was discovered read my review of the Hasegawa F-102 (http://www.modelingmadness.com/reviews/korean/manstf102.htm). The Dart was always a more sophisticated design than the Dagger, it boasted a Pratt & Whitney J-75 engine offering 50% more power than the F-102, and was twice as fast – it is still the fastest single engined aircraft ever! The F-106 made its first flight on 26 December 1956 and served some ANG units upto 1985ish.
 The
role of the F-106 was a radar guided interceptor to protect Continental
America as an integral component of the SAGE (Semi-Automatic Ground
Environment) radar surveillance system. The F-106 was armed with AIM-4
Falcons and Genie unguided nuclear tipped air-to-air missiles.
The
role of the F-106 was a radar guided interceptor to protect Continental
America as an integral component of the SAGE (Semi-Automatic Ground
Environment) radar surveillance system. The F-106 was armed with AIM-4
Falcons and Genie unguided nuclear tipped air-to-air missiles.
An interesting feature of the F-106 was a fully programmable autopilot system – which could fly an entire mission from takeoff, interception thru to landing – with the pilot acting in a monitoring rather than controlling role. This has always made me wonder if an F-106 could perform a flight with a non-pilot aboard. I’ve recently read (but don’t know if I fully believe) that part of the function of the autopilot was to perform an extreme evasion manoeuvre after launching a Genie Nuclear missile, and return to base with a possibly incapacitated pilot, so that the plane could be used again. Seems the answer to my question could be YES!
No F-106s were ever exported – and a total of 277 were built.
|
THE KIT |
This is another classic Hasegawa kit from their golden age of superb kits. My instructions are copyright 1986, but I think this kit goes back a bit earlier than that. I don’t know of any other F-106 in 72nd scale.
I built my first Dart (the flyer) in 1987 – and remember it very fondly for good fit and great decals, then I bought an earlier kit at the IPMS Nationals – planning to build it with left over Massachusetts ANG colours from my first kit.
 Then
Hasegawa released ‘City of Jacksonville’ Bicentennial celebration
aircraft in 2001 - it had to be done, immediately! I started that
earlier kit, then bought a Jacksonville kit for the decals and paint
instructions.
Then
Hasegawa released ‘City of Jacksonville’ Bicentennial celebration
aircraft in 2001 - it had to be done, immediately! I started that
earlier kit, then bought a Jacksonville kit for the decals and paint
instructions.
The plastic from Jacksonville was completed as the Massachusetts ANG version in late 2003.
The kit comprises 43 parts (some duplicated), in hard grey plastic, and a clear canopy and raised surface detail. Decal options vary with the vintage of the kit – but I’ve seen 6 available versions from standard kits.
The only difference I’ve noticed with vintage of kits is that very early kits have a small leading edge fence, and later kits have a sawn notch. I’ve seen photos of both – so check references; using an early kit airframe on City of Jacksonville was a mistake.
|
CONSTRUCTION |
Cockpit
The cockpit consists of a tub, pilot, crude seat and instruments, - the tub forming the nose undercarriage bay. I painted all interior grey - instruments are supplied as decals.
Major Construction
 The
rest of the airframe is very straightforward and offers no difficulty.
Cockpit and exhaust fit into fuselage and wings fit underneath – no
filler is required for this kit. Also fitted at this time are airbrakes,
air-intakes and cockpit. I saved the nose-cone until after painting
because it’s a natural demarcation – and can be filled with lead/putty to
avoid tailsitting.
The
rest of the airframe is very straightforward and offers no difficulty.
Cockpit and exhaust fit into fuselage and wings fit underneath – no
filler is required for this kit. Also fitted at this time are airbrakes,
air-intakes and cockpit. I saved the nose-cone until after painting
because it’s a natural demarcation – and can be filled with lead/putty to
avoid tailsitting.
Weapons Bay
This fits into a HUGE aperture in the mid fuselage and offers all 4 Falcon missiles in the lowered launch position – highly unlikely! This kit does not offer Genie nuclear weapons – or the Vulcan cannon which was fitted to some aircraft towards the end of their careers. The opening is covered by 4 doors which double fold almost flush with the bottom of the aircraft. I did build my original F-106 in this configuration and photographed it flying over my garden. I have to say it is very fragile, and the doors are very difficult to fit accurately. Later I ripped the whole lot out and fitted the doors in their closed positions.
A better option, as fitted to my Jacksonville version, is the Aeroclub ABV203 resin closed weapons bay set – which fits perfectly.
|
COLORS AND MARKINGS |
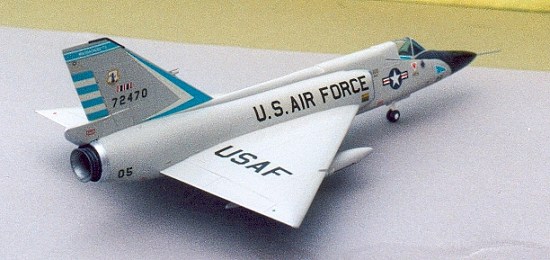
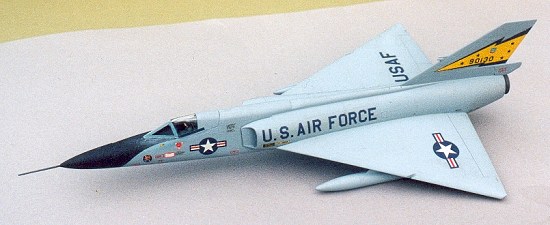
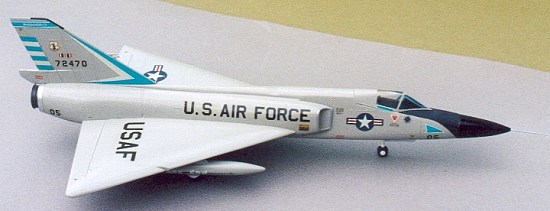
Most USAF are Aircraft Grey (actually FS 16473 ADC Grey) – I probably used the Humbrol equivalent (brushed) on my first F-106, but can’t honestly remember.
By the time I built Massachusetts ANG I had realised that the colour is a very pale cold grey, which sometime has a tinge of blue. I agonised over photos of the F-106 and eventually concluded that the blue was reflected off the sky, and airbrushed this model with Humbrol 166 Light Aircraft Grey. Anti-dazzle panels are Humbrol 12 Flat black.
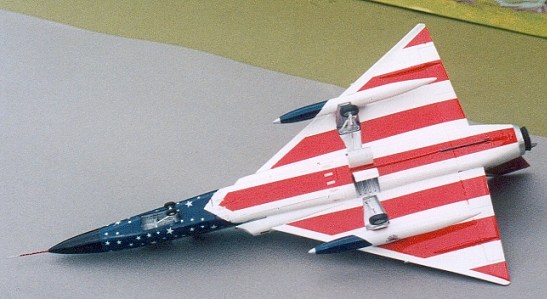
 City of
Jacksonville was sprayed with Halfords Appliance White Acrylic paint.
Rarely shown in photos – this aircraft has broad red stripes under the
wings. These were masked with selotape, and brush painted with Humbrol
19 Signal Red. The blue upper fuselage is painted Humbrol 15, and stars
applied by decal. There is a suggested mix of blue/red for the forward
fuselage which matches the blue decals of fuel tanks and undercarriage
door. However I wasn’t keen on blending paint and just used Humbrol 15
unmixed. The red tail decals didn’t fit too well around the airbrakes,
but Humbrol 153 Insignia Red was a perfect match.
City of
Jacksonville was sprayed with Halfords Appliance White Acrylic paint.
Rarely shown in photos – this aircraft has broad red stripes under the
wings. These were masked with selotape, and brush painted with Humbrol
19 Signal Red. The blue upper fuselage is painted Humbrol 15, and stars
applied by decal. There is a suggested mix of blue/red for the forward
fuselage which matches the blue decals of fuel tanks and undercarriage
door. However I wasn’t keen on blending paint and just used Humbrol 15
unmixed. The red tail decals didn’t fit too well around the airbrakes,
but Humbrol 153 Insignia Red was a perfect match.
The decals go on and adhere really well, even over a non-gloss surface. My 1987 F-106 was built prior to my knowledge of Klear – yet still shows no signs of silvering or lifting.
City of Jacksonville had a superb gloss finish, making it an ideal surface for decals, fortunately they worked really well on the aircraft. NOT so with the compound curves of the forward fuel tanks. These refused to behave, and eventually I painted them – without stars!
Massachusetts ANG used the 16 year old spare unit decals from my first kit, and even older national decals from the parent kit (I didn’t like any of its options). I did treat these with Klear to avoid silvering.
|
FINAL CONSTRUCTION |
 All
that now remains is to fit the undercarriage, which is painted white with
silver jacks, white wheels and grey tyres. Arrestor hook is painted gun
metal and fitted at this point. The nose cone is Gloss black and stuffed
with ballast to avoid tailsitting. Metal around engine intakes, jetpipes
and rear of airbrake is chocolate-foil.
All
that now remains is to fit the undercarriage, which is painted white with
silver jacks, white wheels and grey tyres. Arrestor hook is painted gun
metal and fitted at this point. The nose cone is Gloss black and stuffed
with ballast to avoid tailsitting. Metal around engine intakes, jetpipes
and rear of airbrake is chocolate-foil.
For the purposes of completeness, I have measured the models, multiplied the measurements by 72 to see how large the model would expand to. Then I obtained dimensions from my reference books, and calculated the difference – allowing a generous margin for my measurements, then introduce my fiddle factor.
Height 82mm, x72= 5904mm, 6.17M, Diff = 266mm undersize,
Span 160mm, x72= 11520mm, 11.65M, Diff = 130mm undersize – a child’s handspan,
Length 300mm inc probe, x72= 21.56M, Diff = 40mm oversize - SPOT ON!
Overall a VERY accurate model!
|
CONCLUSIONS |
Does it look like an F-106 – slender, fast, capable - well I think so, hence I’ve built 3. The kit is easy to build and produces an accurate result – which is fortunate as it’s the only F-106 we’re likely to see in this scale. This kit is well served by aftermarket decals – enabling examples from most operating units to be produced.
Overall a delightful kit, which is well recommended for any jet-fighter collection
May 2004
Copyright ModelingMadness.com. All rights reserved. No reproduction in part or in whole without express permission.
If you would like your product reviewed fairly and quickly, please contact the editor or see other details in the Note to Contributors.