Modelcraft/Ocidental 1/48 Harvard IV
| KIT #: | 48-10 |
| PRICE: | $20.00 MSRP |
| DECALS: | See review |
| REVIEWER: | Dan Lee |
| NOTES: | Built mostly OOB, scratch build components for the cockpit and True Details resin wheels |
| HISTORY |
In December of 1939, the RAF realized that the Luftwaffe and RAF were more than likely to fight over the skies of Great Britain and that a combat zone was not the best place to teach young men to fly. The RAF quickly developed a plan (in conjunction with other Commonwealth Air Forces) to move flight training to Commonwealth nations out of the range of prowling Luftwaffe Experten and had lots of space to handle the demands of an accelerated wartime training program.
The RAF quickly set up the British Commonwealth Air Training Plan (BCATP) at numerous bases all over Canada, Australia, New Zealand and South Africa. By the time the program was finished, it had trained some 82000 Commonwealth aircrew for the war effort. Although not considered the “glamorous” part of the war effort as compared to the combat squadrons, the training program set up in Canada and elsewhere had a major impact on how the war in the air was fought. Without it, RAF Bomber Command would not have been able to sustain their costly (in both men and planes) night bombing offensive. Nor would there have been enough RAF and other Commonwealth pilots and aircrew for any other combat theatre.
 The Harvard was a
British wartime derivative of the extremely successful North American SNJ/Texan
trainer family. The Harvard also shared the same quirks as its American
cousins among them was that it was difficult for trainees to fly—it was
said that if you could master a Harvard/Texan then single engine fighters
were easy. The original Mk I was similar to the SNJ/Texan with the
exception of being armed with a pair of .303 Brownings in the wings and
British style controls and avionics. It was used as the primary
instruction and gunnery trainer by the RAF.
The Harvard was a
British wartime derivative of the extremely successful North American SNJ/Texan
trainer family. The Harvard also shared the same quirks as its American
cousins among them was that it was difficult for trainees to fly—it was
said that if you could master a Harvard/Texan then single engine fighters
were easy. The original Mk I was similar to the SNJ/Texan with the
exception of being armed with a pair of .303 Brownings in the wings and
British style controls and avionics. It was used as the primary
instruction and gunnery trainer by the RAF.
As the majority of flight training was moved to Canada, the British Mk Is was quickly replaced by the MkIIs. The major changes between the two types were the removal of all armament and the addition of an extended exhaust pipe to help heat the cockpit in the winter time. Contrary to popular belief, Canada is not a perpetual frozen wasteland but when it gets cold, it can get REALLY cold.
Every nation has a plane that symbolized its experiences in the skies for World War 2. The British have the Spitfire, Hurricane and Lancaster. The Germans have the Stuka or Bf-109. The Americans have the Mustang and the B-17. The Japanese have the Zero. For many Canadians, the aviation symbol of WW2 became the Harvard MkII trainers.
As odd as it
sounds, the Harvard came to be viewed to be as Canadian as stubby brown
beer bottles, maple syrup and ice hockey. In WW2, Canadian pilots flew
pretty much every combat aircraft that the British or Americans built, but
they were someone else’s aircraft—aside from the CF-100 and the doomed
CF-105 Arrow, there aren’t many planes that can be called a true Canadian
warplane. It also didn’t help that aside from the accent (eh?) and the
squadron designations, there really weren’t many distinguishing differences
between an RCAF and a RAF squadron. For many Canadians back home, their
one 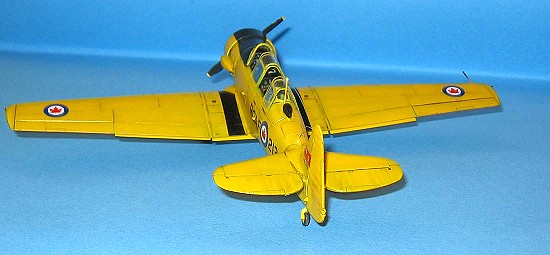 link to the aviation component of its war effort were those Harvards
flying overhead. I would be remiss not to state that all the nations that
participated in the BCATP such as South Africa (where the last 10 retired
Harvards are considered national treasures), Australia and New Zealand
claim the Harvard as part of their aviation heritage as much as Canada.
link to the aviation component of its war effort were those Harvards
flying overhead. I would be remiss not to state that all the nations that
participated in the BCATP such as South Africa (where the last 10 retired
Harvards are considered national treasures), Australia and New Zealand
claim the Harvard as part of their aviation heritage as much as Canada.
By 1950, the RCAF needed a replacement for the war weary MkIIs as the Cold War began to take shape. The Canadian Car and Foundry Company was contracted to build 555 Harvard Mark IVs trainers for the RCAF as well as other NATO and Commonwealth Air Forces. The major noticeable difference was the canopy which looked less like a birdcage than its predecessor. Other less notable changes included an upgraded engine and avionics.
The Harvards continued to serve with the RCAF till the 1966 when they were finally retired. Many of them avoided the scrap heap and were sold off to fly in air shows, air races and in WW2 movies as Japanese aircraft or found a permanent retirement in various museums around the world.
| THE KIT |
 The Modelcraft kit,
from what I understand, is the best available Texan/Harvard in 1/48 scale
(although it is hard to say as I’ve never built the Monogram AT-6 Texan
kit) with excellent detail as well as those fine recessed lines we modern
modelers love.
The Modelcraft kit,
from what I understand, is the best available Texan/Harvard in 1/48 scale
(although it is hard to say as I’ve never built the Monogram AT-6 Texan
kit) with excellent detail as well as those fine recessed lines we modern
modelers love.
The kit consists of two yellow plastic sprues and one sprue of clear parts—which contain two sets of canopies, one for a Mark IV and the other for a Mark II. For more details, see Scott’s preview of the Occidental kit.
| CONSTRUCTION |
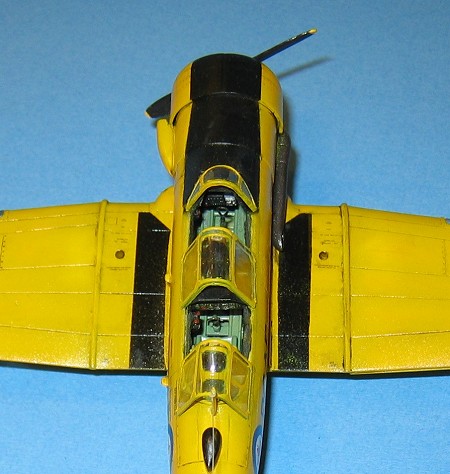
I started with the cockpit. The cockpit is made up of ten parts. Two consoles, two sticks, the two piece cockpit frame, the two seats, the floor and the second console cover. I didn’t like how simplified the cockpit was and decided to make this Harvard my first real scratch “superdetail” job.
I managed to find a few walk around photos to get a better view of the sidewall detail (best photo set of the interior I’ve seen is one from the IPMS Toronto website.) The port side of the Harvard has a lot of conduit and tubing. To simulate that, I cut several lengths of non stripped 30 gauge wire and superglued them to the port side cockpit frame to represent the various hydraulic/fuel lines and electrical conduit. I also used some various broken bits to emulate the hydraulic(?) reservoir and pump that are located between the two cockpits.
 The starboard side
of the cockpit lacks the conduit and tubing of the port side and the
fuselage framing can be seen through it. To simulate the fuselage framing,
I cut several lengths of thin metal rod and superglued them in even spaced
parallel lines from top to bottom. Instead of painstakingly cutting
lengths of half round plastic rod, bending them and then finally gluing
them in, I took several very straight lengths of 30 gauge wire and just ran
it over and perpendicular to the parallel lines of metal rod. Not
particularly accurate, but I’m a lazy guy who doesn’t like to waste a lot
of time working on things that can be barely seen or hidden. My intension
was to provide a rough simulation of the fuselage framing, not an exact
duplicate. The gaps between the wire and plastic can be seen is at very
sharp angles (which are coincidently are covered by the front and rear of
the Harvard.)
The starboard side
of the cockpit lacks the conduit and tubing of the port side and the
fuselage framing can be seen through it. To simulate the fuselage framing,
I cut several lengths of thin metal rod and superglued them in even spaced
parallel lines from top to bottom. Instead of painstakingly cutting
lengths of half round plastic rod, bending them and then finally gluing
them in, I took several very straight lengths of 30 gauge wire and just ran
it over and perpendicular to the parallel lines of metal rod. Not
particularly accurate, but I’m a lazy guy who doesn’t like to waste a lot
of time working on things that can be barely seen or hidden. My intension
was to provide a rough simulation of the fuselage framing, not an exact
duplicate. The gaps between the wire and plastic can be seen is at very
sharp angles (which are coincidently are covered by the front and rear of
the Harvard.)
I contacted the president of the Canadian Harvard Association and discovered through him one of the glaring mistakes of the Occidental kit is that they use American pistol grip style controls instead of the British Spade (or loop) control sticks found on Canadian Harvards. I didn’t have any British spades in my spares kit so I cut off the pistol grips and replaced them with 30 gauge wire loops to simulate the Brit style spades.
I went into my spares box for parts to “reproduce” the various radio and weapons control consoles that were part of the Harvard’s controls, but not part of the Modelcraft/Occidental boxing. The “new” consoles aren’t 100% accurate (or even 50%) but they look good enough to me considering the scale. I cut away the over simplified throttles and glued two unused throttles from my spares box (one of the benefits of having AMS is a lot of spare cockpit parts.) I replaced the plastic throttle sticks with scratch built ones made from copper wire and drops of red painted superglue.
Afterwards, I cut away the two sets of simplified rudder pedals and scratch built my own pair out of strip and rod styrene lengths and pedals from two unused P-51 cockpits. I built them according to photos from the Warbirdtech Vol 11 (North American Na-16/At-6/SNJ.) I don’t think they are to scale, but they look okay to me.
 Another thing that
a picky (or anal, take your pick) modeler should do is to fill in all the
huge openings at the rear of the cockpit. I cut out several pieces of
0.020 sheet styrene to block anyone from seeing the model’s empty tail
section. I also glued 0.010 styrene card at the rear of the wheel wells to
close up the gaps.
Another thing that
a picky (or anal, take your pick) modeler should do is to fill in all the
huge openings at the rear of the cockpit. I cut out several pieces of
0.020 sheet styrene to block anyone from seeing the model’s empty tail
section. I also glued 0.010 styrene card at the rear of the wheel wells to
close up the gaps.
It should be noted that many Harvards have been repainted so the interior colors are everything from Bell Green to Dark Gull Grey. Factory fresh or in service Canadian made Harvards should be US interior green or Zinc Chromate green. I used Gunze H312 (close enough to Zinc Chromate Green) on the cockpit and hand painted the consoles, upper cockpit frame and side boxes flat black. I painted the pedals silver and dry brushed the details on the consoles silver, white and red. When it was dry, I put Gunze Clear Coat on the dials for the glassy effect.
The seatbelts took the majority of the scratch build time as I made harnesses with Tamiya tape and photo etched buckles and harnesses. Due to the size of the buckles, it took me some three hours (and another three to uncross my eyes) to make two sets of harnesses and belts. Note to self: next time, fork over the cash for complete photo etched harnesses.
I put the cockpit aside and started on the fuselage halves. The pitfall of note is that the locator pins for the fuselage are slightly out of alignment. This is not noticeable till you take a look at the metal plate at the top of the rear fuselage which might be out as much as 1mm. I ended up cutting off the alignment pins, glued the cockpit assembly in and took my time gluing the two fuselage halves together to minimize the gaps.
The wings were
easy to put together as a sub assembly. Problems did not appear till I put
the wings on the fuselage. It is a tricky thing to do because there are no
alignment tabs to keep the wings nice and level. After I poured a lot of
liquid glue in the join to weld the wings on and adjusted the dihedral, I
noticed many air bubbles in the seams. I filled the air bubbles with
liquid paper with a toothpick applicator. Liquid paper “filler” isn’t as
good or durable as Mr. Surfacer, but it also isn’t as toxic either, dries
faster and it is ideal for filling very small areas such as the wing
roots. Once the wings were on, I filled in the sink
 marks on the underside
wing tips with superglue and sanded them smooth. Another minor issue is
that landing light sockets (?) located on both wings leading edges were not
aligned (there is a slight overlap), so I sanded them smooth. I ignored
the gaps because I would put small MV lenses in there instead of painting
them silver.
marks on the underside
wing tips with superglue and sanded them smooth. Another minor issue is
that landing light sockets (?) located on both wings leading edges were not
aligned (there is a slight overlap), so I sanded them smooth. I ignored
the gaps because I would put small MV lenses in there instead of painting
them silver.
I decided to detail the engine to the best of my meager abilities. I took superglued lengths of stripped 30 gauged wire to represent the ignition wires and various cables to the cylinders of the rotary engine. I painted the engine black and then dry brushed it with chrome silver and aluminum to make the detail stand out. I painted the pushrods gloss black and the hub dark gull grey. I dry brushed silver onto the various bolts to make them stand out.
There were plenty of seams that needed to be filled with various grades of superglue and sanded. However, none of them are particularly tricky except the plates at the top of the rear fuselage where I took particular care not to sand away the detail.
For those who know the Harvard/Texan much better than I, will recognize that the Occidental Cowling is incorrect. Since I did not have a Monogram kit lying around (which has the correct cowling) and not having the patience or skill to attempt to reshape the cowling, I left it alone.
| COLORS & MARKINGS |
Once I finished sanding the seams down to my satisfaction, I cleaned the model and let it sit there for a couple of months as I got busy doing other things and projects. When I came back to the Harvard, I preshaded the panel lines with Testors Acryl Engine Grey (gloss) instead of flat black because it would not overwhelm the chrome yellow base color.
I took my time
painting this model as I’m not very good with any glossy colors and any
light colors even with an airbrush. I took Gunze H329 Chrome Yellow and
thinned it 50% with rubbing alcohol. I proceeded to airbrush the paint in
very thin 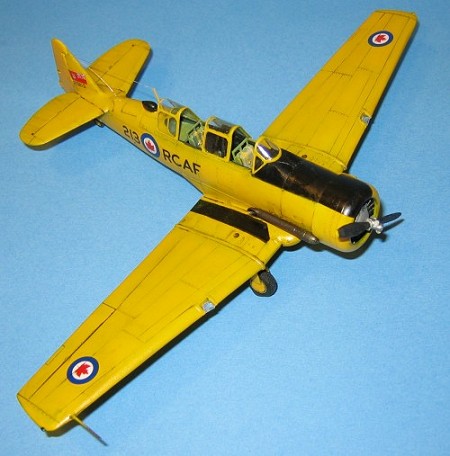 coats as per all the helpful tips I read on the internet. It
took some five very thin coats to get the color I wanted. However, I ended
up with a very grainy coat because of the nature of yellow paint (and my
inexperience with yellow paint) so I took a grey scotchbrite pad to smooth
it out some and then sprayed another thin coat of really thinned paint (2
parts thinner to 1 part paint.) I had to repeat this several times till I
got the yellow coat I was looking for.
coats as per all the helpful tips I read on the internet. It
took some five very thin coats to get the color I wanted. However, I ended
up with a very grainy coat because of the nature of yellow paint (and my
inexperience with yellow paint) so I took a grey scotchbrite pad to smooth
it out some and then sprayed another thin coat of really thinned paint (2
parts thinner to 1 part paint.) I had to repeat this several times till I
got the yellow coat I was looking for.
I masked off the upper forward part of the fuselage and the wing roots for the black antiglare panel and wing walkways. I used Gunze H12 Flat Black—I like this better than Tamiya brand because it remains black unlike Tamiya flat black which sometimes dries into a dark grey.
Decals and Wash
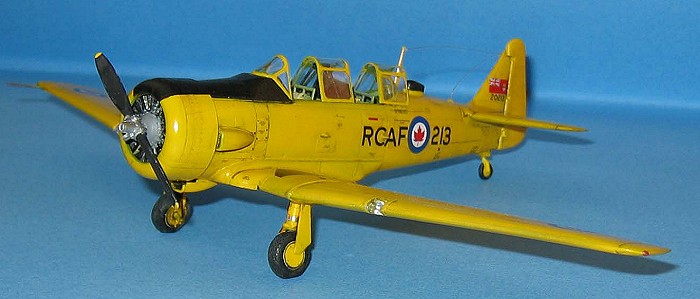
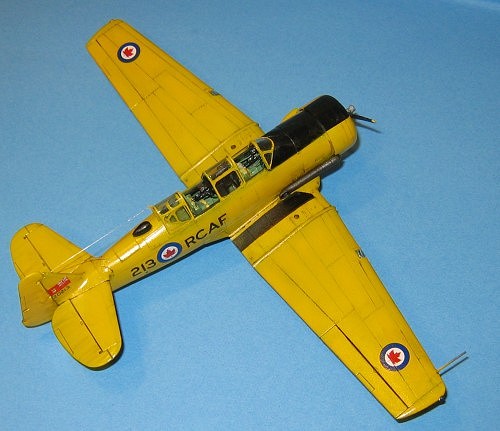
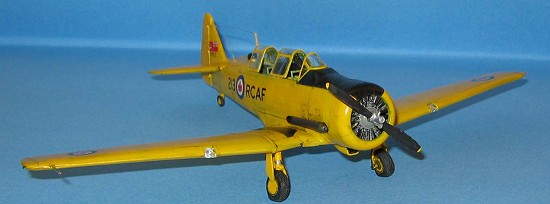
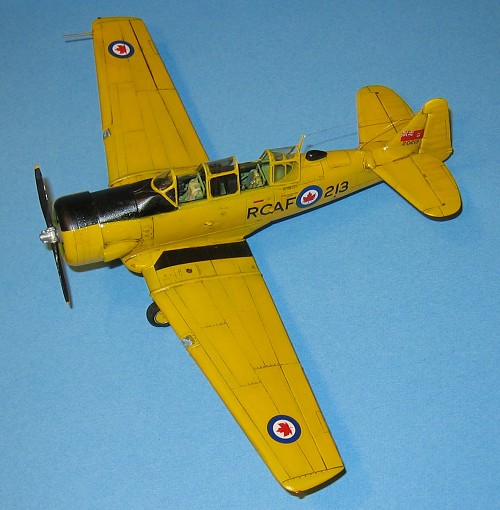
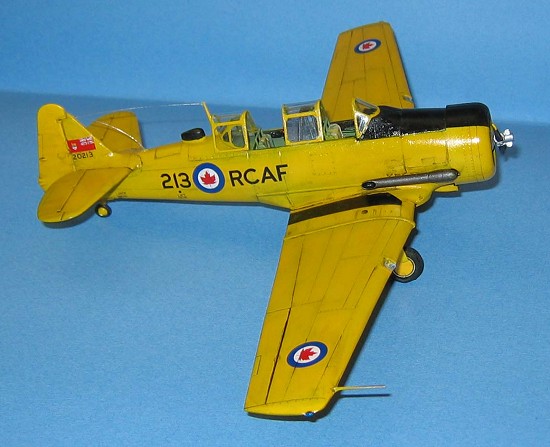
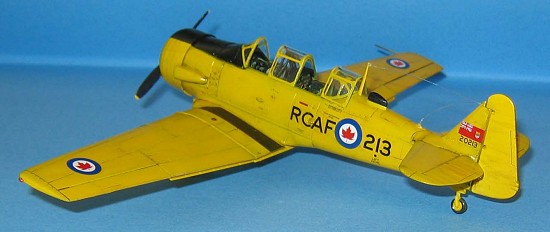
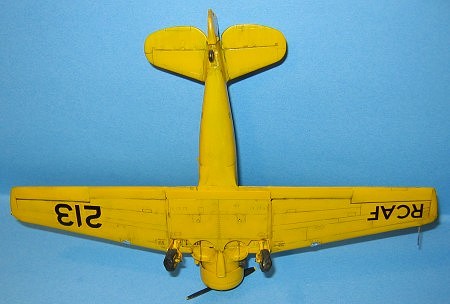
The Modelcraft Canadian Harvard comes with an excellent Leading Edge Decal sheet for the Goldilocks RCAF demonstration team. They are really nice, but I wanted to do a run of the mill trainer. After searching the internet, I found photos of one still flown by the Canadian Heritage Warplane museum in Hamilton, Ontario (a 20 minute flight costs $250 CDN.) Fortunately, the Goldilocks sheet had the numbers I need to replicate the one for the museum plane’s serial number and did some scissor work to get it.
I skipped the gloss coat (Gunze Chrome Yellow is a gloss and I’m lazy enough to skip steps) and put the decals right on the dried paint. I had no problems with the Leading Edge Decals and they worked well with Microsol.
I used my standard watercolor wash of black and raw umber to bring out the detail of the rivets and panel lines. It looked good and worn to me as it was my goal was to show it at the end of its military service in the mid 60s... However, I was told later that Canadian Harvards were kept in near mint condition from beginning to the end so I was wrong and should have made it cleaner and polished it much more than what I actually did.
| FINAL CONSTRUCTION |
I obtained True Detail flattened resin wheels for the Monogram Texan kit, but the hubs are identical to the ones in the Harvard. After the usual drilling and painting (chrome yellow hubs, silver rims and flat black tires), I superglued them to the landing gear. I continued using my trusty roll of 30 gauge wire and superglued two lengths to the struts to simulate brake lines (painted flat black.)
Occidental molded the pitot tube as part of the starboard wing assembly. I have a habit of breaking such things and I don’t really like how it looked so I cut it out and drilled out a hole so I could replace it with a piece of steel tubing.
 I decided to use
Black Magic canopy masks, but I discovered that these masks were for the
Monogram kit and not the Occidental one. I used what I could to mask the
canopies and they are excellent—I recommend them as I hate the tedious work
of masking canopies! Once they were painted with the interior color and
exterior ones, I unmasked them and used Krystal Kleer (and superglue for
the really stubborn canopy parts) to glue them to the model.
I decided to use
Black Magic canopy masks, but I discovered that these masks were for the
Monogram kit and not the Occidental one. I used what I could to mask the
canopies and they are excellent—I recommend them as I hate the tedious work
of masking canopies! Once they were painted with the interior color and
exterior ones, I unmasked them and used Krystal Kleer (and superglue for
the really stubborn canopy parts) to glue them to the model.
All the other parts were painted and quickly assembled with the exception of the Harvard’s extended exhaust pipe—a small 2mm length of 0.06 rod was added to the front of the pipe. It was painted Gunze Burnt Iron and glued to the starboard side of the cowling, but I had to fiddle with it to get it lined up along the fuselage.
I coated the plane in a final coat of Gunze Clear Gloss Coat and after it dried (two days later) I sprayed the cowling and the wing roots with a very light coat Aeromaster Semi Gloss Coat to dull the shine a little bit.
The radio aerials were a big pain in the butt. It took a while to get the monofilament to line up the way they were supposed to. I don’t know about anyone else, but I really suck at aerials and try to avoid them as much as possible—a very good reason to build jets. Tom Cleaver is right about needing a Doc Ock setup because I had only two hands to juggle three or four items. If there is anyone who has a surefire technique with fishing line that does NOT require more than two hands in making radio aerials let me know.
The rest of the small parts went on without incident.
| CONCLUSIONS |
 The Modelcraft/Occidental
Harvard has some accuracy issues (the US style sticks with pistol grips and
the incorrect cowling are the two glaring ones I know of) and its cockpit
is too basic with simplified rudder pedals and a not enough detail (missing
radio boxes). Nor is it a Tamigawa slammer, but it is a good and simple
kit to build if you just want to build it OOB.
The Modelcraft/Occidental
Harvard has some accuracy issues (the US style sticks with pistol grips and
the incorrect cowling are the two glaring ones I know of) and its cockpit
is too basic with simplified rudder pedals and a not enough detail (missing
radio boxes). Nor is it a Tamigawa slammer, but it is a good and simple
kit to build if you just want to build it OOB.
If I build another one, I’ll use the Monogram cowl and build an even more accurate cockpit. (Also need finer sandpaper to make the gloss coat smoother.)
It is obvious from the photos that my Harvard’s landing gear is rather knock kneed. There are two reasons with that. One is the general weakness of the landing gear. The plastic is not stiff and has a tendency to bend. The other problem is entirely my own fault because I drilled the holes in the resin wheels on the wrong angle and they exacerbated the bend so that it looks like my Harvard has very bad ankles or someone stupidly used the landing gear from a Bf-109.
I have always wanted to build a Harvard, but never did because I was not any good with yellow paint (or white or red for that matter) and habitually ran away screaming from any model that had a predominant yellow color scheme. Overall, I am very happy with how this effort turned out (errors and all) as it is my one of my favorite models in my collection (national bias, I guess.) My Harvard Mk IV stands apart from the greens, grays, olive drabs and metal colored models of the rest of my collection.
November 2005
If you would like your product reviewed fairly and quickly, please contact me or see other details in the Note to Contributors.