Revell 1/48 F-86D Sabre Dog
|
KIT # |
5960 |
|
PRICE: |
$ |
|
DECALS: |
Two aircraft |
|
REVIEW & |
Norris Graser |
|
NOTES: |
Historical section by Scott Van Aken |
|
HISTORY |
Because of the rapid development of aircraft design, North American already has proposals for updated F-86s in the late 40s. One was the F-86C heavy escort fighter while the other was the F-86D short range interceptor. As promising as both designs were, the long range aircraft was dropped leaving the F-86D. This aircraft at one time was designated F-95A as less than 25% of its parts were in common with the earlier Sabres. However in the mystical world of appropriations, there was money for an updated plane but not a new one so the F-95A quietly disappeared.
Armed with 2.75 inch 'Mighty Mouse' FFAR (Folding Fin Aerial Rockets), which were really just improved R4M rockets as used by Me-262s in the last week of WWII, the F-86D was supposed to be guided to the target by a ground controller. When within the on-board radar's range, the pilot would then home in on the target and fire his salvo of 24 rockets into the hapless bomber. With 7.55 pounds of warhead per rocket, it was deemed enough to bring down a Soviet bomber.
The J-47 engine provided 5,000 lbs of thrust and an afterburner boosted that to 6,500. Sufficient for the time, but a far cry for the enormous power of today's engines. However it did produce a top speed of 692 mph at sea level which was faster than the F-89C and F-94C by nearly 50 mph. Hughes developed the E-4 fire control system that developed much less power than contracted for and was always a troublesome, maintenance intensive system, as were most early fire control radars.
However the Air Force was proud of its new interceptor and set a low level (125 feet) speed record of 698 mph in late 1952. This record was bested 6 months later by another F-86D at nearly 716 mph. This record lasted less than three months when it was broken by a succession of aircraft including the Hawker Hunter, then the F4D-1 Skyray and then the F-100 Super Sabre, all within a matter of a few months.
The F-86D did go on to provide much needed aerial protection for many years, equipping as many as 20 FIS units. Later, most F-86Ds were modified to F-86L specifications. This included the new SAGE data link system and rewinging with the a slatted '6-3' wing that had 12 inch extentions on the tip. These F-86Ls were eventually to equip 28 Air National Guard units starting with the 108th Illinois ANG at Chicago in 1957 (This unit is currently based at Scott AFB and flying KC-135E tankers). By the early 1960s, the number of units still flying the Dog Sabre had dwindled to a handful and were all gone by the middle of the decade. Now you can only find them in museums or on poles guarding VFW halls and American Legion posts.
|
THE KIT |
This version of the Dog is an early one so there is no parachute housing. Typical of the early version, the fuselage features flush mount NACA scoops, one on either side of the aft fuselage. These pieces are separate and are a snap fit insertion. Not to start rumors about follow on versions of the Dog, but why would they do that? Never mind that there are two later type external scoops left over on the parts tree when you are finished with the model! You’ll find nice scribing on this kit and they didn’t forget representations of vortex generators on the stabilizers and aft fuselage.
MODEL OPTIONS
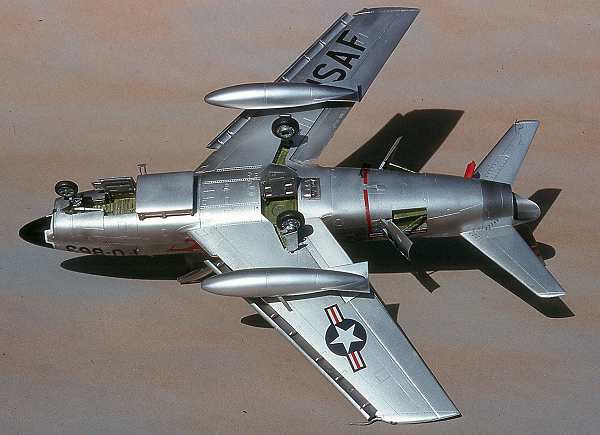
The kit features many options including extended slats, separate flaps, speed brakes and optional rocket tray. The boarding ladder can be used or a small piece inserted so as to be depicted in the stowed position. The canopy can be opened or closed, as well. The radarscope hood on the main panel is also separate. Nice touch as it was a removable item not necessarily in place and often-left sitting on the seat! Cockpit is well detailed & complete with pilot figure. Under wing stores consist of two fuel bags on pylons, complete with a sway brace for each. (Don’t forget to drill the locator holes for the pylon pins if you use the tanks!)
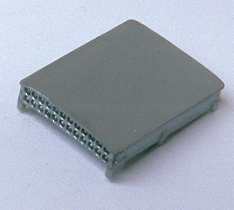 Upper and lower views of the |
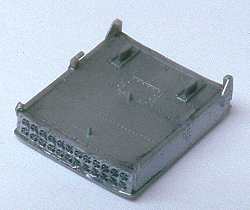 F-86D rocket tray. |
I should mention that there is a tractor and bomb cart included in this release. These items are from a prior release of the Pro Modeler Ground Equipment kit released a few years ago.
I built two models, one in a clean configuration and the other with everything hanging out. Both are on the gear, on the ground, so I can’t comment on closing the slats (which would require removal of actuators.) or how well the gear doors will fit if closed.
Here is what I found using the optional items in open/closed positions:
In both versions I left the canopy open, but it can be closed if you cut the mounting actuators from the aft end. I also used a pilot figure, included in the kit, in one model. Speed brakes can be positioned opened or closed. Closed, they are a perfect fit. The slats are in the lowered position as they should be if the aircraft is on terra firma. Although the flaps are separate pieces, they have tabs that force them into a lowered position; it was not common for them to be in a lowered position when the aircraft was parked. Fortunately, you can cut off the tabs and reposition them to fit even with the rest of the wing. The left flap fits fine but the right one requires a little sanding before it will butt into position. The six-piece Mighty Mouse rocket tray can easily be shown extended or closed. In the lowered position, you just attach it to the bottom of the fuselage. On the actual aircraft a piece of metal came down to fill the void in the fuselage, when the rocket tray was extended. So there is no internal well area to be depicted, just the belly of the airplane. If you don’t use the tray, there is nothing to replace or cover up.
|
CONSTRUCTION |
Putting this model together is simple, but before you assemble the fuselage, you need to complete the sub-assemblies that will be sandwiched in between. This includes a well thought out cockpit, which necessarily features a six part main instrument panel. Who says ‘50s jets had simple cockpits! On the floor is the stick. Rounding out the instrumentation, the side consoles come complete with a throttle and antenna hand control grip for the left side. The seat consists of five pieces. I put it together and set it aside for later placement. The tub itself sits on top of the intake/nose well section. (This is comprised of four pieces.) Just behind the cockpit is a separate piece of decking.
The tail pipe consists of three pieces including a flame holder and outer ring.
After test fitting the cockpit-intake assembly and tail pipe, it was time to put the fuselage together! If there is one piece I don’t care for in this kit, it is the nav light located under the nose. This piece has to be inserted when you close up the fuselage. I would have preferred adding it after the model was just about complete. Test fitting finished, I used a little 5-minute epoxy on the nav light and affixed it to the left side of the fuselage. In fact, I assembled all of the components to the left side fuselage. With the exception of the nav light, I used slow set liquid glue so I could position the sub-assemblies for best fit.
After gluing the fuselage together, I found a little filling and sanding necessary on both the upper and lower seams. Not much attention needed, just a few minutes filling with cyanoacrylate and then sanding to blend the halves. A not quite nasty but bigger seam was found on the underside of the tail, though. This could require a couple of applications of Super Glue for filler and a little more time for sanding. It’s the only trouble spot I found on the model. To complete the fuselage, I added two 3/8th ounce lead fishing sinkers to the inside of the radar nose (to keep the jet on it’s landing gear) and attached it. Perfect fit was achieved and only a light sanding to blend it to the fuselage.
Fuselage finished I turned my attention to the wings. These consist of two top pieces that butt against the wing roots and a full lower wing that assembles across the lower fuselage. Test fitting I found that the lower wing was a snug fit so again using a slow setting glue, I placed it and after cutting the locator pins off the top wings, glued them to the lower. I put a little glue on the wing/wing root areas and pulled the wings up slightly applying pressure where they meet. I kept up this pressure for about 20-30 seconds, long enough for the glue to take hold, and then released them. The result being; a perfect join for both wing roots.
|
PAINT & DECALS |
PAINT
I painted my Dogs using a combination of Floquil metal paints, including Silver, Old Silver and Platinum Mist. Although I did not single out every panel and shade it a different metal, I did polish a few more then others and I did over spray a few with Gunze Mr. Metal Stainless for a slightly different light reflectance. Of note is that the center sections of each wing, top and underside, is a duller metal then the surrounding area. Almost a flat aluminum look is apparent on a real dog. Wheel wells and speed brake bays are interior green. I used ANA 613 (ModelMaster) O.D., for the anti glare though later aircraft did use the equivalent of 36092. The interior was painted with Model Master Interior Black, Interior Green and although it specs out as dark Gull gray 36231, I used Model Master Medium Sea Gray instead. I just think it looks more to scale. Insignia Red was used on the headrest but I used 1103 Testors red (a little more red-orange color) for the aft fuselage fuel dump. The radome color is Gunze Gloss Black (Note that many Sabres had semi gloss, flat black or brown radomes.)
After doing most of the painting, I added gear and gear doors, wheels, fuel dump and whatever small bits left over. I added the very tiny wing tip lights and aft of canopy nav light just about last.
DECALS
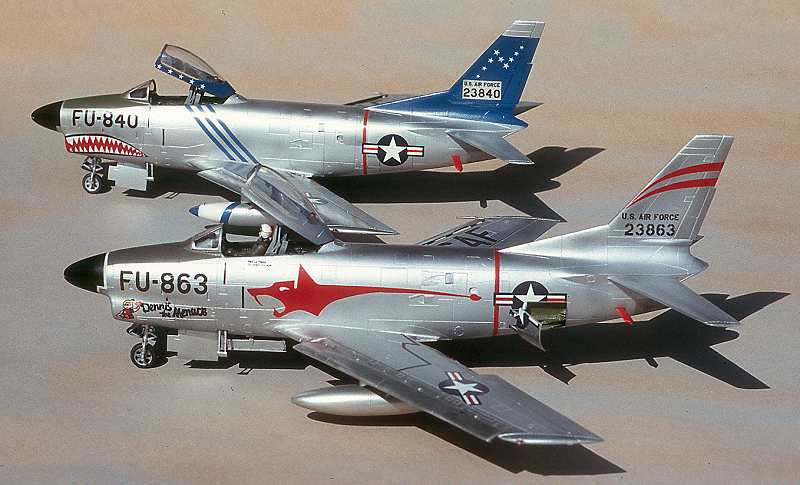
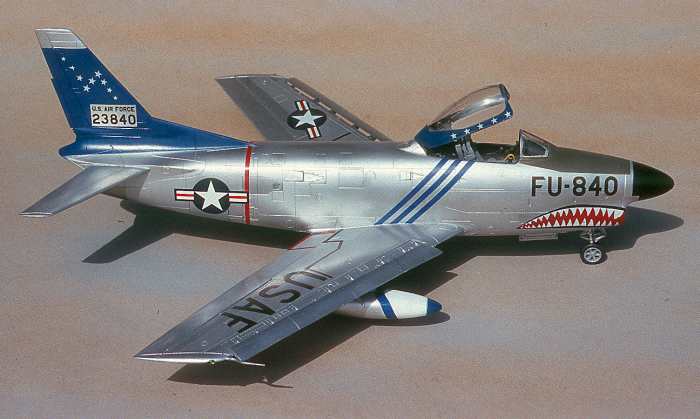
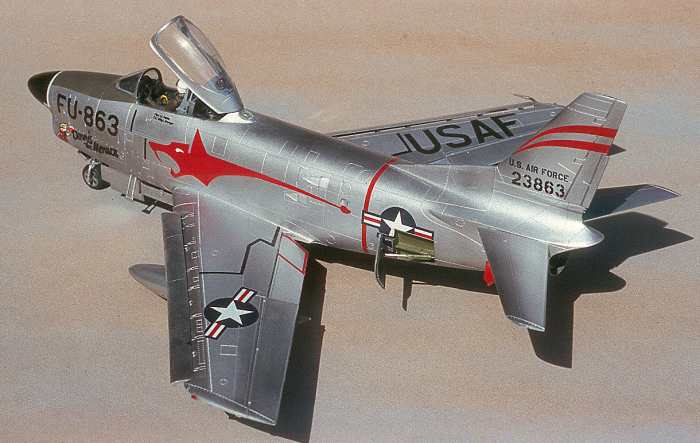
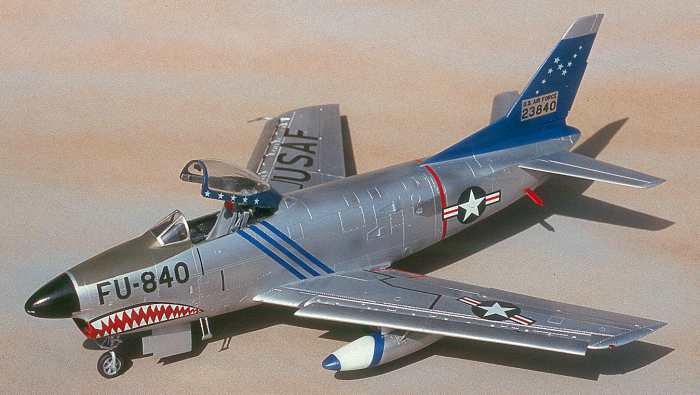
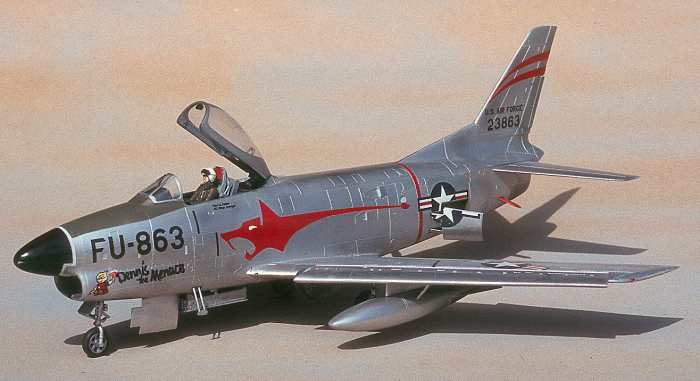
I can’t really comment on the kit decals as my models were built before they were available. However, there are markings for the two aircraft featured in this review, and complete stenciling; CartoGraf did the printing for those in the release, so the decals will top notch. Aircraft featured are Dennis The Menace from the 97th FIS and a shark mouth commander’s aircraft from the 498th FIS.
|
CONCLUSIONS |
I originally had this at the beginning but decided that probably no one would have read the rest of my review if I left it at the top of this piece!
If you want a nice kit of the Dog to build, this is it. Yes, there is an assembly procedure that would go easier if you had an extra hand, and there is even a spot where you will have to add a little filler, but overall, you will be spending more time painting and decaling then assembling this model. I often end up building multiples and have my fill of a particular model kit, hardly ever wanting to do another. However, I am happy to say that’s not so with this one. I know I’ll be building more.
Reference for the historical section from Ray Wagner's The North American Sabre; Doubleday, 1963
If you would like your product reviewed fairly and quickly by a site that averages over 2,800 visits a day, please contact me or see other details in the Note to Contributors.