Novo/Frog 1/72 Meteor IV
| KIT #: | F-200 |
| PRICE: | $5.00 back when dinosaurs roamed the Earth |
| DECALS: | Tw0 options |
| REVIEWER: | David Womby |
| NOTES: |
| HISTORY |
The Gloster Meteor was the RAF’s first jet fighter and saw
action in late WW2. The first post-war variant was the Meteor IV.
Compared to the earlier versions it had longer engine nacelles and clipped
wings. This version took the World Air Speed record in November 1945
and again in September 1946 and gave good service in the RAF’s frontline
squadrons for several years.
For more information on the Meteor, there are lots of books
available but a good overall summary can be found here:
www.meteorflight.com
| THE KIT |
The issue I used was a Russian re-pop of uncertain lineage
but it’s the Frog mould from around 1970. Mine was reasonably
flash free and the mould detail had held up well over the years. There
were two parts sprues and one small one for the canopy. The decals
had gone missing in mine so I don’t know if they were the same as the original
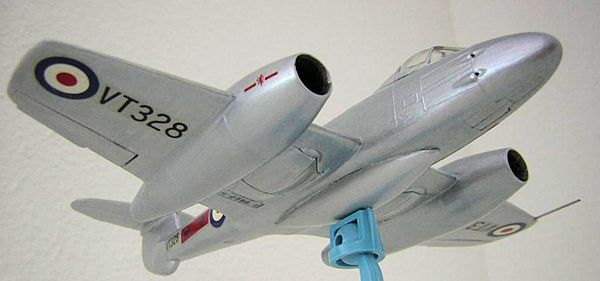
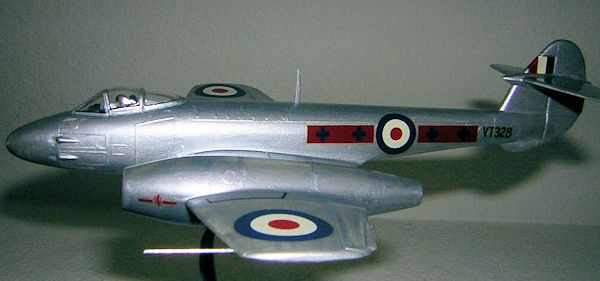
Frog or not. The Frog decals were for two silver painted aircraft one from
RAF 263 squadron and the other from the Royal Netherlands Air Force 323
squadron.
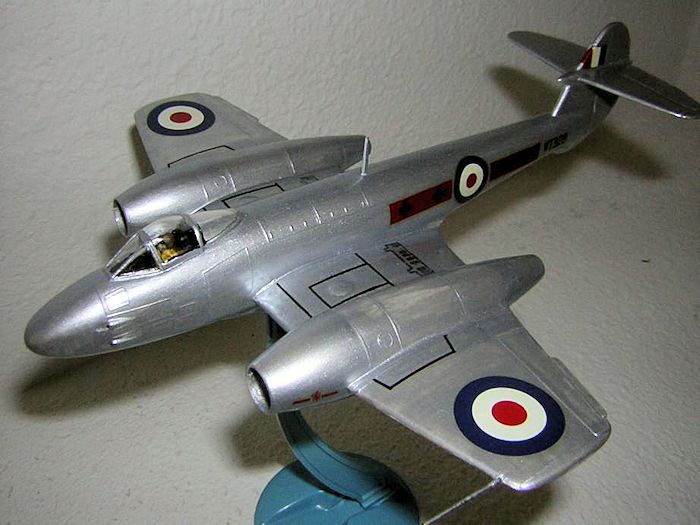
 The model is basic Frog fare - what little detail it has is
raised. Basically I think it's pretty accurate although I think the nose
is too bulbous and I have read it is missing some subtleties like small fillets
where engine nacelle meets trailing edge and a gullwing underside like a
Spitfire. The wing trailing edges are also overthick. However,
when I built it, it was still the only injection 1/72 F.4 available although
there was a resin one from PJ Productions.
The model is basic Frog fare - what little detail it has is
raised. Basically I think it's pretty accurate although I think the nose
is too bulbous and I have read it is missing some subtleties like small fillets
where engine nacelle meets trailing edge and a gullwing underside like a
Spitfire. The wing trailing edges are also overthick. However,
when I built it, it was still the only injection 1/72 F.4 available although
there was a resin one from PJ Productions.
The only options you get are whether or not to fit the
underwing drop tanks and do you want to model the undercarriage up or down!
Scott has a nice preview here that shows the sprues.
| CONSTRUCTION |
The interior is minimal – pilot, seat, floor and a control
column. That suited me fine as I don’t detail cockpits but do put the
pilot in there.
 The parts fit very well except and I had few troubles making
this model. One area that needed work was getting the engine fronts to
fit. Some carving was required to make the engine fronts sit correctly in
the nacelles. Also, the upper wing roots needed some plastic card strips
to fill the gaps. Other than that, there wasn't much filling needed.
I also managed, as I knew I would, to sand off all the moulded airbrake detail
when sanding the wing roots.
The parts fit very well except and I had few troubles making
this model. One area that needed work was getting the engine fronts to
fit. Some carving was required to make the engine fronts sit correctly in
the nacelles. Also, the upper wing roots needed some plastic card strips
to fill the gaps. Other than that, there wasn't much filling needed.
I also managed, as I knew I would, to sand off all the moulded airbrake detail
when sanding the wing roots.
I build my models ‘in flight’ and learned the hard way that I
must test fit the main undercarriage doors BEFORE joining the wing halves
so I can be sure they sit flush! On this Meteor, they fitted pretty
well after a slight thinning with a sanding stick.
The trailing edges of the wings are rather too thick on this kit and will
benefit from sanding down to a thinner profile.
| COLORS & MARKINGS |
A word here about the current formulation of Model Master
Acryl Silver – it worked just great! I brushed painted this model with
several light coats. At first I thought it was just laying on a clear coat and
that there was precious little silver being applied but after second then third
light coat, it really looked good to my eyes. In fact a bit too good for RAF
High Speed Silver paint - almost good enough for bare metal.
Of course, I did end up with something looking more like silver paint because
foolishly I had primed the seam areas with a very dark grey paint and it took a
LOT more than 3 coats to cover that!!! Note to self - next time prime with light
grey or white!!!
The canopy framing is silver painted decal film - one coat of mid-grey then
two of Acryl Silver all by hand.
The hardest part of this model were the decals!!!!!
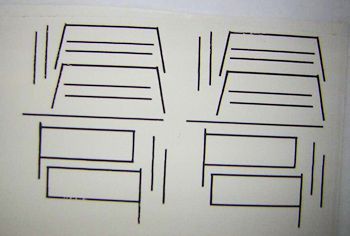 Firstly, I tried a new technique and printed some airbrakes
on decal paper using my ink jet to replace the ones I sanded off. I
coated them with Testors Dullcote from a rattle can and, when trimmed, they went
on quite nicely - no solvent used at all. I know they still look a
bit too prominent. They were initially way too black, so I
overpainted them with a thin coat of Acryl Silver which toned them down enough
for my liking. I also botched them because I didn't notice until
after printing them that the port and starboard airbrakes are 'handed' - they
mirror each other and I made them all the same! I was too lazy to make another
set but I did make some wing walk markings as the model looked bare without them
and they were simple to make! The home made wing walk markings were a bear to
get into place and I ended up scraping some of the black marking off as I
positioned (and re-positioned) them. I had to touch them up quite a bit after
and they still look a bit rough in places - SIGH.
Firstly, I tried a new technique and printed some airbrakes
on decal paper using my ink jet to replace the ones I sanded off. I
coated them with Testors Dullcote from a rattle can and, when trimmed, they went
on quite nicely - no solvent used at all. I know they still look a
bit too prominent. They were initially way too black, so I
overpainted them with a thin coat of Acryl Silver which toned them down enough
for my liking. I also botched them because I didn't notice until
after printing them that the port and starboard airbrakes are 'handed' - they
mirror each other and I made them all the same! I was too lazy to make another
set but I did make some wing walk markings as the model looked bare without them
and they were simple to make! The home made wing walk markings were a bear to
get into place and I ended up scraping some of the black marking off as I
positioned (and re-positioned) them. I had to touch them up quite a bit after
and they still look a bit rough in places - SIGH.
This kit came in a bag with no decals, but a kindly fellow modeler from
Arizona kindly provided a set of the original Frog ones (along with a ton more
spares RAF/SAAF decals).
The old Frog decals responded well to Florida sunlight to get
rid of the slight yellow tinge but were rather resistant to conforming to the
surface. The underwing and overwing decals went on OK but I could see some
cracks in the fuselage roundel/squadron bars before I started and so I coated
them with Future before using them. I had a problem a few years back
trying to make this same model using original Frog decals and it never did come
right despite globs of decal solvents! That particular model did not
survive the attempt at decalling, so I was VERY nervous about using these old
Frog decals.
 I had no decal solvents to hand, so I had considered the
technique I had read about where you lay the decals on WET Future! However, in
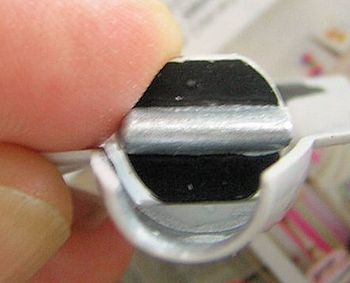
the end, I just applied them all to the glossy paintwork. That worked OK
except for the fin flash which would not conform to the taper leading to the
front edge of the fin. In the end, one of the flashes just dropped off
while I was fiddling and I glued it back on with Future. The red front end
of both flashes cracked as I tried to get them to lay on the fin, so I touched
it all up with red and from a distance it looks OK to me (about 20 feet away!).
Some of the decals are also slightly out of position I think but they were so
fragile and the whole process of applying them was so tense, I did not dare
trying to move them once applied!
I had no decal solvents to hand, so I had considered the
technique I had read about where you lay the decals on WET Future! However, in
the end, I just applied them all to the glossy paintwork. That worked OK
except for the fin flash which would not conform to the taper leading to the
front edge of the fin. In the end, one of the flashes just dropped off
while I was fiddling and I glued it back on with Future. The red front end
of both flashes cracked as I tried to get them to lay on the fin, so I touched
it all up with red and from a distance it looks OK to me (about 20 feet away!).
Some of the decals are also slightly out of position I think but they were so
fragile and the whole process of applying them was so tense, I did not dare
trying to move them once applied!
By the way, when I applied the port fuselage roundel/bars, I
was horrified to see cracks still appeared and even worse, they went all foggy!
It must have been the Future which failed to hold them together but clouded up
in the water. Maybe I should have let it dry longer before wetting the
decals but I get impatient. A stressful 30 minutes ensued before I could
be sure the cloudiness was disappearing as the decal dried so I proceeded to add
the other roundels/bars. When completely dry the Future coated decals actually
looked great!
The whole model got one coat of Future (brushed on). That also had its
problems as I put on a bit too much and had a couple of puddles on lower points
that needed wicking up with paper towel.
| CONCLUSIONS |
 This kit has doubtless been overtaken by the new MPM Meteor IV but is a nice
simple build for relative beginners or people like me who like to do simple
models for relaxation or nostalgia reasons.
This kit has doubtless been overtaken by the new MPM Meteor IV but is a nice
simple build for relative beginners or people like me who like to do simple
models for relaxation or nostalgia reasons.
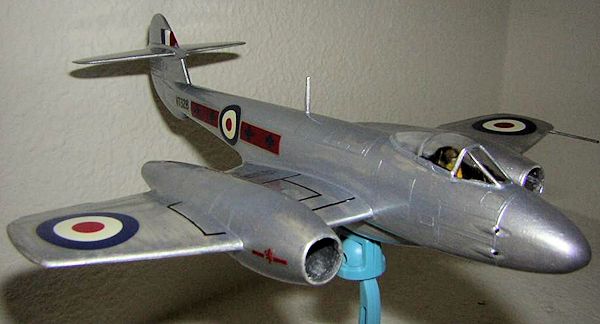
Anyway, I am pleased to report that, unlike my previous attempt at the
Frog/Novo Meteor F4 with these decals, this one got completed without taking a
seriously terminal test flight across the room as its predecessor did. Anyway -
the finished article looks good in my display case fitted on one of my ever
dwindling stock of the wonderful Frog Skybase stands.
The next Meteor F4 I build will DEFINITELY have aftermarket decals!
Even if I want to make another 263 Sqdn aircraft, I'll adapt the ones from the
Xtradecal Meteor sheet that are for a 263 Sqdn F8!!
| REFERENCES |
Fighting Colours by M.J.F. Bowyer
Postwar Military Aircraft No2, Gloster Meteor by Chaz Bowyer
Coronation Wings by Eric Bucklow
David Womby
September 2013
Copyright ModelingMadness.com. All rights reserved. No reproduction in part or in whole without express permission from the editor.
If you would like your product reviewed fairly and fairly quickly, please contact the editor or see other details in the Note to Contributors.