| KIT #: | SH 72224/72078 |
| PRICE: | $43.00 each |
| DECALS: | Three and two options |
| REVIEWER: | Torben Plesberg |
| NOTES: | Short run kits, RB decals 72004 for Swedish Tp 83 Pembrokes |
| HISTORY |
The Hunting Percival P 66
Pembroke made its maiden flight in November 1952. It was a military development
of the civil Percival Prince twin engine transport aircraft. It had a 2.59 m
longer span for a higher take off weight. The Pembroke entered service with the
RAF in 1953 to replace the venerable Avro Anson, an aircraft produced in huge
numbers (+ 11.000) from 1935 to 1952. The Pembroke was only produced in a number
of 128, and 56 were delivered to the RAF. The Aircraft served for quite a long
time and was not phased out before 1988, the last unit being Squadron no 60
based at RAF Wildenrath in Western Germany. Among the last Pembrokes in service
was a photo reconnaissance version with the important task of picturing every
military movement in the DDR which could be detected from the air corridors to
Berlin. In 1968 when Soviet troops occupied Czechoslovakia, photos
 taken from
the Pembrokes revealed that the Soviet troops actually came from the GDR, since
the Soviet troops had left their accommodations there. The innocent looking
Pembroke in the role as a hot spy-plane!
taken from
the Pembrokes revealed that the Soviet troops actually came from the GDR, since
the Soviet troops had left their accommodations there. The innocent looking
Pembroke in the role as a hot spy-plane!
Germany ordered 33 Pembrokes, and the aircraft were operated by all three armed services of the Bundeswehr: Heer, Luftwaffe and Marine. Belgium ordered 12 aircraft, Denmark 6 and Sweden 16 as the Tp 83.
The Swedish aircraft were attached to the air bases to provide a quick transfer of personal from base to base. Some 6 Pembrokes were modified to take a Lansen radar in the nose. These aircraft were used as flying classrooms for education of radar operators with A 32 Lansen aircraft. Other Pembrokes were used in ELINT operations, SAR missions, as test platforms and as flying ambulances with 6 stretchers. The Pembroke could carry 1150 kg of cargo or ten passengers with a flight crew of two.
After a few years of service the Flygvapnet lost two Pembrokes, one in a crash and the other in a hangar fire. The two aircraft were replaced by buying two surplus planes from the Danish Air Force, when the six Danish Pembrokes were retired already in 1961. In Denmark the Pembrokes were used for transport between the bases and for SAR operations. During a SAR operation it was the job of the Pembroke crew to find the excact spot on the sea from where the May-Day call was transmitted, and guide the S-55 helicopter to pick up the wrecked sailors. The S-55 only had a short range and not sufficient flying time to make a search for survivors.
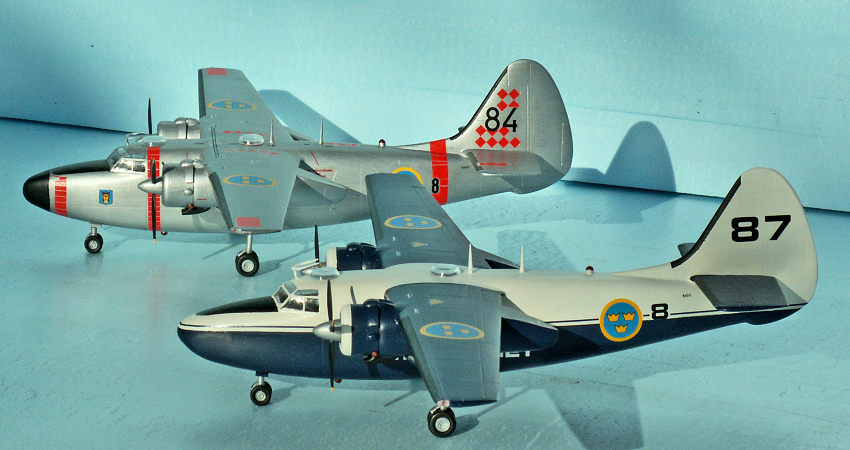
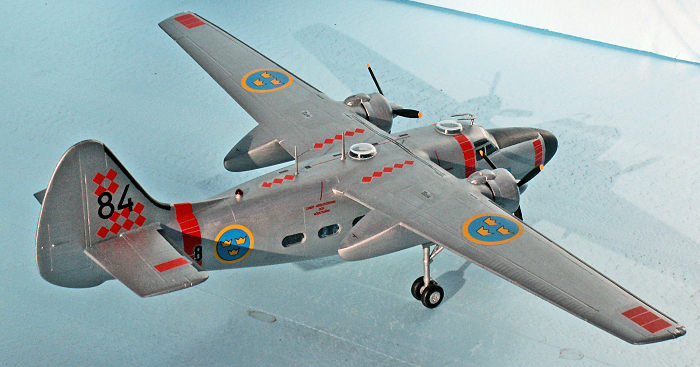
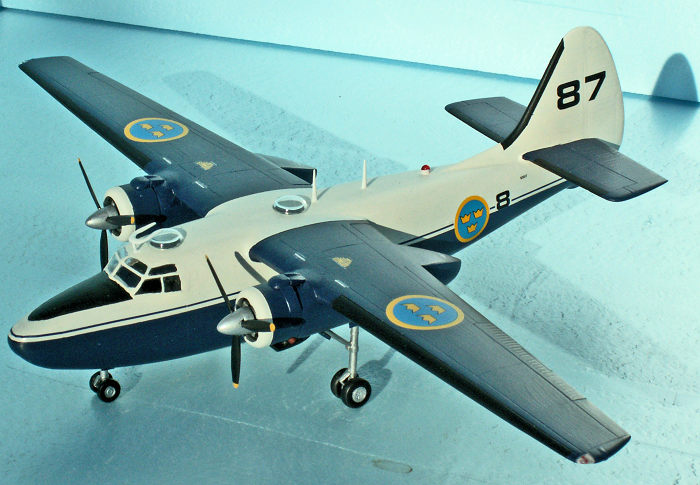
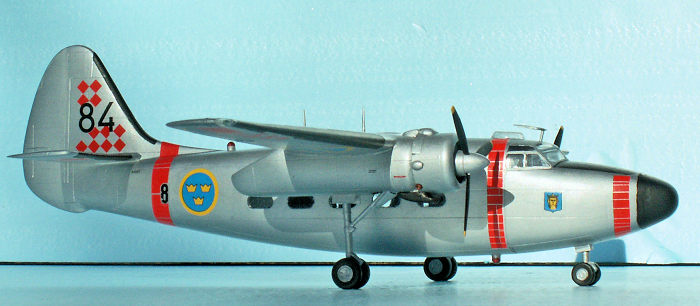
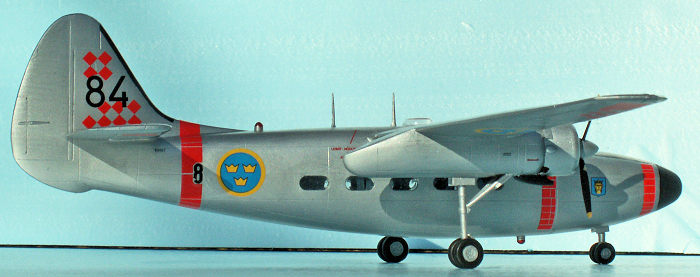
Two of the Swedish Pembrokes are preserved in museums, the 84 of the F 3 wing and the 85 of the F 13 wing. Besides a Pembroke is kept in flying condition, seemingly one of the ex-Danish planes: the 87 of the F 8 wing in the VIP color scheme. However, it is not the original Danish plane, which was scrapped. The 87 comes from Squadron no 60 of the RAF, purchased after this unit was disbanded in the late eighties. It is civil-registered as SE-BKH and belongs to Flygexpo and is exhibited at Västerås Flygmuseum. Before the plane was painted as the 87, it was operated in the British color scheme, without the RAF markings of course, and named “Sir Percy”.
 The
subjects of my Pembroke models are the 84 of the F 8 wing, probably the most
colorful of all Swedish Pembrokes, and the 87 also from the F 8 wing with the
special blue and white VIP color scheme. The 87 model is supposed to be the
original ex-Danish plane, and not the fake 87 of the Västerås Flygmuseum.
The
subjects of my Pembroke models are the 84 of the F 8 wing, probably the most
colorful of all Swedish Pembrokes, and the 87 also from the F 8 wing with the
special blue and white VIP color scheme. The 87 model is supposed to be the
original ex-Danish plane, and not the fake 87 of the Västerås Flygmuseum.
I wonder why the owners of the 87 did not choose to make it the 83! This plane has got the same nose as the SE-BKH, and therefore more correct compared to the ex-Danish planes with a circular window in front under the nose for the landing light. The fake 87 doesn’t have the two astrodomes on the dorsal, the 83 did only have the rear astrodome.
| THE KIT |
SH 72224 comes in a nice box with a picture of a RAF Spy-Pembroke on the top – and bottom. There is a badge with the three Scandinavian roundels and the text “Scandinavian Service”. The decal sheet has three options for Flygvapnet, Flyvevåbnet and Ilmavoimat. SH 72078 has a Luftwaffe Pembroke on the top and bottom of the box, and a decal sheet with two options for Composante Aérienne Belge and the Luftwaffe.
The instructions (both kits!) consist of twelve A 5 pages with the obligate story of the Pembroke in Czech and English on page one. Pages two and three show the five sprues with numbers of the parts, the resin parts, the photo-etched parts, and a color review with reference numbers to Gunze colors. Pages four to nine show with 13 exploded sketches how to put the models together. Finally, pages ten to twelve show how to paint and decal the respective options.
Some of the resin and photo-etched parts are for the exterior aircraft and may therefore be reasonable. Applying the parts for the interior will be a waste of time and effort, as nothing can be seen from the outside on the finished models. Even if there are nine fairly large windows in the fuselage it will be too dark inside to see the fine details. The nice seats are hardly noticeable, the nice smoke grey and sky blue colors of the passenger cabin disappear completely in the darkness, the cockpit interior is all black and through the small windows of the canopy absolutely nothing can be seen.
Do concentrate on the exterior of the aircraft!!
 The length
of the wings correspond to the Sea Prince of the Royal Navy. However, parts no
C26-29 will increase the span to Pembroke standard. The rear end of the engine
nacelles may look in two different ways: either use parts C3+4 for the smaller
look or parts C1+2 for the more bulbous look. The fit of all these parts is
rather bad, no matter what solution you choose. The Swedish Pembrokes had the
smaller nacelles to the rear.
The length
of the wings correspond to the Sea Prince of the Royal Navy. However, parts no
C26-29 will increase the span to Pembroke standard. The rear end of the engine
nacelles may look in two different ways: either use parts C3+4 for the smaller
look or parts C1+2 for the more bulbous look. The fit of all these parts is
rather bad, no matter what solution you choose. The Swedish Pembrokes had the
smaller nacelles to the rear.
There are three options for the nose. The all plastic nose is too pointed and need to be corrected if you want a normal Pembroke nose. The two transparent noses are more correct, and one of them is for the Danish variant with a circular window for the landing light. However, the landing light is not with the kit, but it is no big deal to make it.
The general fit of the parts is acceptable. However, there are a few bad fits: The nacelles to the wings, and the wings to the fuselage. There is a lot of filling to do, and it is not possible to put the wings into the slots of the wing stubs! The slots must be cut or filed broader – downwards.
| CONSTRUCTION |
Before construction you will have to decide, which actual plane you want to model. My choice was to model two planes of the Flygvapnet – one with a standard color scheme, and one with the special VIP blue/white color scheme.
If you follow the instructions it is not very difficult to build the Pembroke. First thing to do is putting the 9 windows in place in the fuselage halves. They fit remarkably well. They only need to be pressed in place in the openings, and no glue is necessary. However, it is a good idea to lock the windows with a layer of clear varnish on the inner sides.
Next
step is to assemble the interior and paint it. The cockpit interior is flat
black and the cabin interior is smoke grey from the bottom sides of the windows
and up, and sky blue beneath the
 windows.
But don’t spend too much time doing the interior. When the model is finished,
you can see nothing of your effort!
windows.
But don’t spend too much time doing the interior. When the model is finished,
you can see nothing of your effort!
The Pembroke needs nose weight, and 27 g of lead was more than sufficient. The room beneath the cockpit floor is not big enough for that weight, and the floor of the cockpit got some of the lead bars, which were painted black and thus almost invisible from the outside. The assembly of the fuselage halves was not easy, because one of them was warped in the rear end, leaving a gap of some 10 mm. Some small clamps solved this problem.
The assembly of the wings caused no problems, however the thickness of the wing tip pieces (26-29) did not match the wings, and some sanding, filling and re-scribing of recessed panel lines was necessary to get an acceptable result. The fit of the wings to the wing stubs of the fuselage was absent. It was simply not possible to press the wings in place! It took some time to file the slots of the wing stubs big enough to make the wings fit properly. The assembly needed filing and sanding a couple of times to get smooth enough.
The tail planes also had a bad fit to the two small holes of the stubs. Since the tail planes are rather thin, the assembly is fragile. A piece of 1.5 mm brass wire would do the strengthening to avoid a tail plane falling off by an accidental push.
The nacelles fit well together. Be careful to place part B10 in the right place. The hole in B10 should be placed exactly where the main gear leg ends in the nacelle! Otherwise it will get more difficult to glue the undercarriage correct in place. The nacelles fit well to the wings and need no filling. However, there are no stopping pins to secure the exact position. The parts C3+4 or C1+2 fit rather badly end need a lot of filling and sanding. And forget the grooves of parts C3 and C4. They will disappear during the filing and sanding to make the parts fit! The Swedish Pembroke had the smaller rear ends of the nacelles.
 The cowling
assembly is straight forward, however the propellers must be glued in place,
unless you decide for running propellers. This will need some modification, most
important a 2mm gauge brass shaft and the drilling away of central the pin of
the engine. The front opening of the cowlings is too small, 9.5 mm gauge. It
should be 11 mm – a job for the lathe or a large circular file.
The cowling
assembly is straight forward, however the propellers must be glued in place,
unless you decide for running propellers. This will need some modification, most
important a 2mm gauge brass shaft and the drilling away of central the pin of
the engine. The front opening of the cowlings is too small, 9.5 mm gauge. It
should be 11 mm – a job for the lathe or a large circular file.
The exhaust pipes are too bad. They neither fit nor look right. I made some proper exhausts from 1.5 mm gauge brass tube, drilling the hole larger with a 1.3 mm gauge drill. It is difficult to make the exhausts the right length and make them fit in the openings in the cowlings, which are too small to take the exhausts. Be careful not losing an exhaust inside the cowling! The length of an exhaust pipe outside the cowling is smaller than 2 mm. The length of the brass tube should be about 6 mm.
The undercarriage legs are easy to glue in place, i.e. if part B10 is glued correct in place! The small nose wheel leg should be glued in place through the small square opening and into the hole in the bottom of the cockpit floor. This must be done BEFORE you add the lead bars for nose weight under the cockpit floor.
There are three options for a nose, and on the after-market there are two more, if you want a Lansen radar nose on your Pembroke. In the least six Pembrokes were modified to train the radar operators of A 32 Lansen aircraft. The grey plastic nose A17 has a wrong shape – it is too pointed as seen from above. I cut off about 12 mm of the front and glued a suitable piece of Ureol on, and in this way it was possible to reshape the nose to a more correct look. This was for the Pembroke with the standard color scheme. For the VIP version I choose the transparent nose F2 with the 8 mm gauge window under the tip of the nose. The shape of this part is correct, and it is a simple job to make the landing light behind the window. I put a 3 mm disc of aluminum tape on the front of the light, and when a sun beam hits the aluminum disc, the landing light is on! Only the 8 mm Gauge window remains transparent. The rest of the nose is painted as the fuselage.
 On the
dorsal there are two astrodomes with a flat top, parts F11. The opening beneath
the domes are 8 mm gauge. I drilled this hole on the standard colored Pembroke
for the rear dome, mostly because there was too much dust on the inner sides of
the fuselage windows. This opening allowed me to blow the dust away with
compressed air. However, I did not drill the hole for the dome above the
cockpit. This would be far too dangerous, a risk of cracking the transparent
canopy. I made this “opening” with a disc of black decal paper, and when both
domes were glued in place, it was not possible to see any difference! A hole or
a black decal – both provides the same optical effect.
On the
dorsal there are two astrodomes with a flat top, parts F11. The opening beneath
the domes are 8 mm gauge. I drilled this hole on the standard colored Pembroke
for the rear dome, mostly because there was too much dust on the inner sides of
the fuselage windows. This opening allowed me to blow the dust away with
compressed air. However, I did not drill the hole for the dome above the
cockpit. This would be far too dangerous, a risk of cracking the transparent
canopy. I made this “opening” with a disc of black decal paper, and when both
domes were glued in place, it was not possible to see any difference! A hole or
a black decal – both provides the same optical effect.
| COLORS & MARKINGS |
Pembroke no one: aluminum all over. There are flat black anti icing devices on the front of the outer wings, tail planes and fin. The nose is flat black, too, and so is the anti-glare area in front of the canopy. The exhaust pipes are brick red, propeller blades flat black with yellow tips. Undercarriage legs are silver and tires are tire black. The engine cylinders are silver with a touch of black, and the space between the cylinders is black. Carburettor intakes on the underside of the cowlings are black. There are two small beacons: one on the dorsal in front of the fin extension a little to the starboard, and one on the ventral at the cowling fronts. All colors used are Revell Aqua colors. They are easy to apply if the paint is well stirred and thinned with Revell Aqua Thinner.
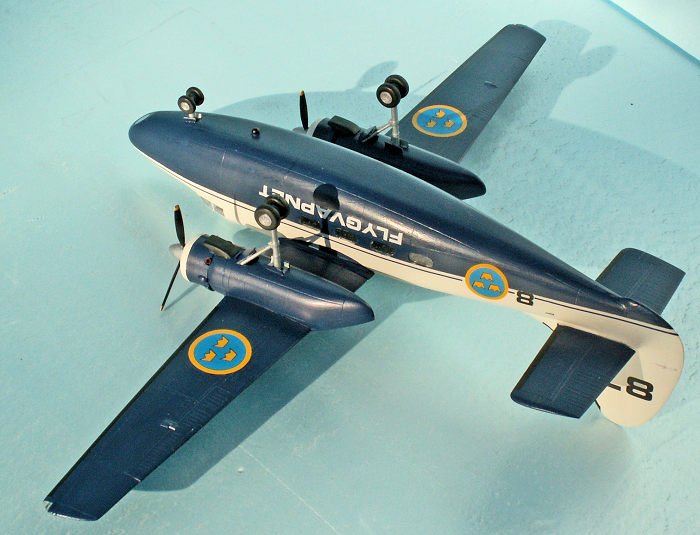
 Pembroke no
two – the VIP: Upper side of fuselage, fin and rudder + rings in front of the
cowlings are white, off white I suppose. Under side of fuselage, wings, engine
nacelles + cowlings, and tail planes are dark blue, actually “Lufthansa blue”,
Revell Aqua color no 350.
Pembroke no
two – the VIP: Upper side of fuselage, fin and rudder + rings in front of the
cowlings are white, off white I suppose. Under side of fuselage, wings, engine
nacelles + cowlings, and tail planes are dark blue, actually “Lufthansa blue”,
Revell Aqua color no 350.
Decaling: I bought a special decal sheet from RB Decals covering Tp 83 Pembrokes of Flygvapnet. There are options for nine aircraft, including the VIP aircraft with the blue/white color scheme. I choose to make the 83007 “84” from the F 8 wing, and the VIP 83017 “87” also from F 8, Barkarby near Stockholm. This decal sheet is high quality with perfect register, and the stencils are readable with a magnifying glass. Decaling the models was rather easy, with the exception of the narrow blue band around the nose of the VIP plane. The blue band had to be cut in very small pieces to get around the nose. However, because of the high quality of the carrier film, it was possible to make it look acceptable. Doing this, I looked at the drawing that came with the decal sheet, and this explains why the original looks different, the blue line droops a little more at the nose tip.
Some details were added after the painting and decaling. There are two pointed antennas behind the rear dome. They are white on the 87, and silver on the 84, likewise the horseshoe antenna above the cockpit. The beacons were made of some clear sprue from the kit and they were painted transparent red with a permanent marking pen and glued in place with clear varnish, and painted white or silver on the half nearest to the fuselage.
| CONCLUSIONS |
Building the two Pembroke models was a thrilling job, and they were made from two different boxings: SH 72078 Pembroke C Mk 54, and SH 72224 Pembroke Scandinavian Service. Apart from the decal sheets, the kits are almost identical. However, the Scandinavian service kit comes with two more resin bars with parts and a small fret with photo-etched detailing parts, mostly for the interior. Thus the “Scandinavian Service” kit is a better buy than the C Mk 54 kit. However, as mentioned before: the interior is invisible on the finished model, so why take all the trouble to make a super detailing of the interior of the aircraft?
Both kits are warmly recommended if you take an interest in this neat little transport aircraft of the cold war period. The kits are not recommended for beginners.
| REFERENCES |
Wikipedia article on the Percival Pembroke in English
Article on WWW. Avrosys.nu article on the Tp 83 Pembroke in Swedish Service with some good photos, also in English.
Björn Karlström: Flygplansritningar 5, Svenska Flygvapnets Transportflygplan 1926-1989. Allt om Hobby AB, Box 42006, S-126 12 Stockholm, Sweden. ISBN 91-85496-30-8
This book contains a drawing of the Tp 83 to a 1/72 scale and 14 good photos of the Pembroke in Flygvapnet service. Very recommendable, even if the drawing is not entirely correct, the length is too long by 7 mm, and the span is too long by 2.4 cm.
My own photos of the Tp 83 taken at Malmslätt 1962 and Bulltofta 1963.
2 May 2017
Copyright ModelingMadness.com If you would like your product reviewed fairly and fairly quickly, please
contact
the editor or see other details in the
Note to
Contributors.
Back to the Main Page
Back to the Review
Index Page
Back to the Previews Index Page