Airfix 1/72 DHC-1 Chipmunk
| KIT #: | 134 |
| PRICE: | 2 s 6 p (1970 price) |
| DECALS: | Two options |
| REVIEWER: | Torben Plesberg |
| NOTES: |
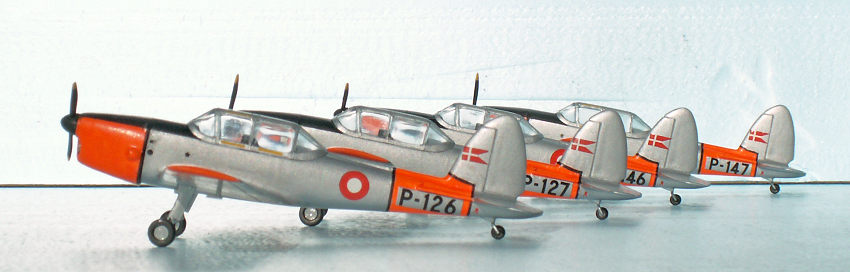
Stoppel decals for RDAF Chipmunks. Four planes built. |
| HISTORY |
The DHC 1 Chipmunk was designed as a primary trainer to succeed the classic DH 82 Tiger Moth. First flown in May 1946 the Chipmunk was a design of the Canadian De Havilland Company. It is a tandem seated single engine all metal monoplane with the control surfaces fabric covered. The undercarriage was a tail wheel construction corresponding to most war planes at that time. The Chipmunk was fully aerobatic and was ordered in hundreds for the RAF as the new primary trainer. The RCAF also ordered the Chipmunk, mostly with a different canopy. Some other air forces ordered the Chipmunk, among these the Royal Danish AF.
Flyvevåbnet (= the RDAF) ordered all together 27 aircraft, and they succeeded the Danish built KZ II T, a product of the Scandinavian Aero Industry (SAI). The KZ II T was very similar to the Chipmunk, but with an open cockpit and it was a tubular steel construction covered by fabric. The engine was the same, a DH Gipsy Major X in line rated at 145 hp. The problem with the KZ II T was that there after some years of service were too few left, and it was not possible to buy new aircraft, because the SAI factory in Kastrup burned down.
 The
Chipmunks served with the Flying School at Avnø, however, some of the aircraft
were attached to the air force bases as liaison aircraft.
The
Chipmunks served with the Flying School at Avnø, however, some of the aircraft
were attached to the air force bases as liaison aircraft.
Once a year in October some 50 pupils from the departure classes of the Danish high schools are invited by Flyvevåbnet to visit the Flying School for a couple of days to get an orientation about the education as a pilot. In 1964 I was one of the lucky guys. The highlight of the visit was a flight in a Chipmunk in the front seat to get an idea of flying an airplane. The instructor in the back seat took off and landed, and I did the rest of the flying. This was not my first experience as a pilot. When I was 14 years old, I had a flight with my uncle in a Cessna 150, and he also took off and landed, and I was flying the machine for about an hour. When I told it in the school the following day, my comrades simply did not believe my story! However, I did not qualify to be a military pilot because of my glasses – what a pity!
The Chipmunks served with Flyvevåbnet for 25 years with only one fatal accident, and they were succeeded from 1975 by the SAAB T 17 Supporter, a side by side elementary trainer with a 200 HP Lycoming boxer engine. However, 17 Chipmunks from Flyvevåbnet are still flying with civil registrations. In the beginning of their civil career (1976) they were not allowed to fly in the color scheme of Flyvevåbnet. The Danish flag on the fin was not allowed to be a “split-flag” – just a normal rectangular one. The code was not allowed either, but as the years passed, the Chipmunks now look exactly as they did when they served with Flyvevåbnet – with the exception of a large civil registration on the fuselage sides or on the top of the fin and rudder. The Swedes know how to place a very small civil registration on the fuselage sides beneath the tail planes. This is much better for the illusion of a veteran military aircraft. The Plane I flew in 1964 –the P-126 – was sold to USA and is now with the Valiant Air Command in Florida.
| THE KIT |
The Airfix DHC
1 Chipmunk was released in 1970 and comes in a plastic bag, which is fastened to
the instructions with staples. The bag contains three sprues, two large ones
with parts in medium grey styrene for the airframe and a small one with two
canopies, one for the RAF
 version
and one for the Canadian version. There is furthermore a transparent stand, if
you want the model exhibited flying. The decal sheet has two options: one for
WK574 of the RAF, and one for the RCAF 18026.
version
and one for the Canadian version. There is furthermore a transparent stand, if
you want the model exhibited flying. The decal sheet has two options: one for
WK574 of the RAF, and one for the RCAF 18026.
All parts are numbered, and the instructions has five views showing how to put the model together. If you want to use the stand, you must cut away a wall from the center of the wing. There are two four view drawings showing how to paint and decal the two options. On the front side of the instructions there is a “sales promotion” drawing of a RAF Chipmunk during takeoff, and on the back side there is a short history of the Chipmunk in English, French and German. It is a simple kit and the 22 parts fit well together. It is an easy build, but it may be difficult to deal with the small flaws to get the Chipmunk look quite right. The top of the fin and rudder is not correct, and the RAF version need to have anti-spin fins on the rear fuselage just in front of the tail planes.
| CONSTRUCTION |
If you want to do the RAF version, you
must add anti spin fins on the fuselage just ahead of the tail planes. Plastic
strips 0.3 x 1.0 x 12.0 mm are about the correct size. But they are impossible
to glue to the fuselage, because it has a rounding towards the tail plane. This
rounding should not be there – a flaw of the kit – and it must be sanded away
before the anti-spin fins can be glu ed
in place. I used white glue for this operation. The inner edge of the fins must
be oblique at an angle that secures the fins are perpendicular to the vertical
centerline of the fuselage. The fins may fall off if you touch them
incidentally, however, the paint will in the end lock the fins to the fuselage.
ed
in place. I used white glue for this operation. The inner edge of the fins must
be oblique at an angle that secures the fins are perpendicular to the vertical
centerline of the fuselage. The fins may fall off if you touch them
incidentally, however, the paint will in the end lock the fins to the fuselage.
The rivets and raised panel lines should not be there. If you compare the fuselage of the small model with a photo of the real thing, you will know exactly why! On such a small model scale size rivets will not be possible to detect. However, in 1970 even a small model should show a few rivets (in hopeless oversize that is!) The easiest way of removing the rivets is to sand them off before the assembly of the wings to the fuselage. The fin and rudder will look differently from the starboard and the port side, and this has much to do with the way of making the fin: The rudder is placed on the port side fuselage half only. This means that the underside of the rudder is lower to the starboard than to the port. It is difficult to eliminate this flaw, but you must take the trouble, if you want a correct looking model! I filled the wrong opening, and scribed a new one placed one mm above with a triangular needle file. The top of the rudder has a wrong shape and needs to be corrected. A photo of the fin and rudder of the real thing will show you the correct shape.
The interior is extremely simple: only the two seats come with the kit – and two pilots, that is a pilot and a student of course! I never put pilots in my models. When the canopy is painted and glued in place, it is impossible to see details inside – so it would be a waste of time to make cockpit details. The seats had some big ejection pin marks, and these were removed.
 The
middle of the wings need some correction to the rear to be married to the
fuselage. About 0.5 mm must be filed away, and then the fit to the fuselage is
rather good. When the wing is glued in place, it is a good thing to secure the
position with a small clamp in the front and to the rear, and not remove the
clamps until the following day. The tail planes fit very well in the slots of
the fuselage, and they are even perpendicular! However, when glue is applied,
the material soften a bit, and it is necessary to check the perpendicularity now
and then until the glue is hardened. On one of the four models this appeared to
be a problem to take care of. Maybe I applied a bit too much glue!
The
middle of the wings need some correction to the rear to be married to the
fuselage. About 0.5 mm must be filed away, and then the fit to the fuselage is
rather good. When the wing is glued in place, it is a good thing to secure the
position with a small clamp in the front and to the rear, and not remove the
clamps until the following day. The tail planes fit very well in the slots of
the fuselage, and they are even perpendicular! However, when glue is applied,
the material soften a bit, and it is necessary to check the perpendicularity now
and then until the glue is hardened. On one of the four models this appeared to
be a problem to take care of. Maybe I applied a bit too much glue!
When the wings are glued in place, there is some filling and sanding in the joints to do. On the upper side of the wing stubs at the flaps, there are some sink marks to deal with in the usual way. The tail planes also need some filling – with glue – and sanding. The blending of the fuselage and the elevators to the rear is not good enough and need to be reshaped with a small square needle file.
| COLORS & MARKINGS |
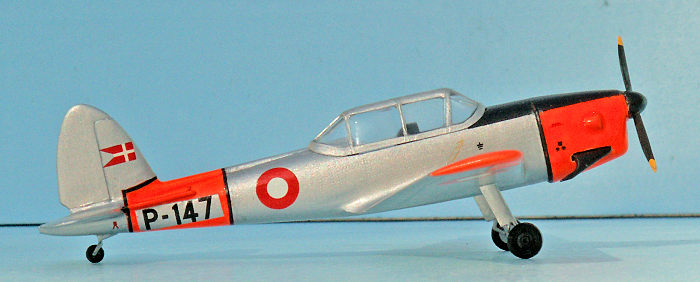
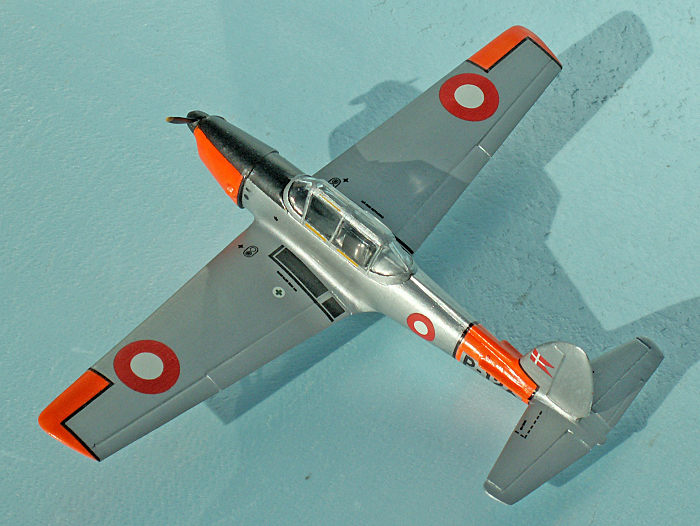
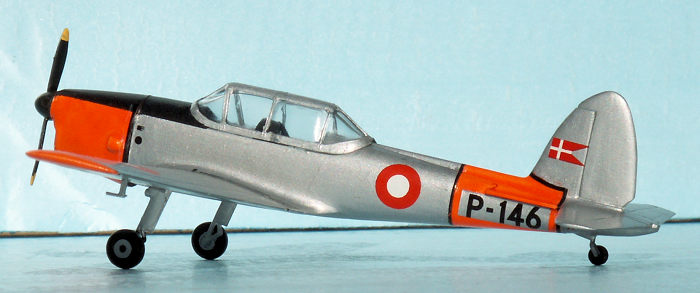
The color scheme of a Danish Chipmunk is overall aluminum. There are day-glo areas on the wing tips, the rear fuselage and the cowling. The da-glo areas are outlined in black. Propeller, spinner and anti-glare area in front of the canopy are matt black. Instrument panels and areas around are also matt black. Inside is a light grey color – as far as I remember.
The color
scheme is not a simple one, and it is important to paint in a certain order.
First the whole airframe got a matt white color three times. White is necessary
for the da-glo effect and b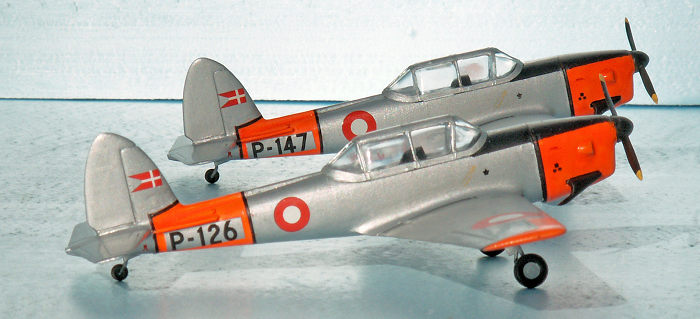 esides
it is a good grounding for the aluminum color. The da-glo areas were all
carefully masked and got three layers of paint before the full da-glo effect was
obtained.
esides
it is a good grounding for the aluminum color. The da-glo areas were all
carefully masked and got three layers of paint before the full da-glo effect was
obtained.
In one place, however, I did not mask. The curved line on the fin was freehand, and I painted a couple of mm more than might be necessary. The final configuration of the curve will be done by the black outline, which was made later as a decal.
The airframe got aluminum Aqua color from Revell (361-99). The color was diluted with plain water to get the right viscosity for brush painting. With a broad brush the job was quickly done - in two phases: the wings first and then the fuselage + tail planes, fin and rudder. The Aqua colors from Revell dries extremely quickly, not more than 15 minutes. Two layers were enough for a decent covering. Now it was time to deal with the fine raised lines caused by the masking tape between the dayglow and aluminum areas. They were either filed away with a triangular needle file or wet sanded with grain 1200, very carefully not to spoil the nice da-glo areas.
The canopy painting was done in five steps, and masking with thin Tamiya Tape stripes is obligate to get a decent result. 1) For masking of the top, four stripes are needed. 2) For the horizontal frames in the bottom, two stripes needed. 3) The six vertical frames needed twelve stripes. 4) The frames in the front and to the rear needed four stripes. 5) Free hand painting of the curved parts of the lower framing in the front and to the rear. All frames were painted twice to get a proper covering. The Revell Aqua aluminum was perfect for the job, the drying time being about ten minutes. All of the four canopies were painted in this way.
The decaling was a major job, because it includes the black outlining of the da-glo areas. First thing to do was to produce the black lines and curves. On a piece of clear decal paper I drew ten black lines 12 cm long with a technical 0.7 mm pen, the distance between the lines being about 2 mm. Besides, I drew 3 half circles with a gauge of 30 mm, corresponding to the curving of the black outline on the fin. The decal paper got two layers of clear varnish and when dry, my black lines were ready to be cut and applied.
I quickly learned that the length o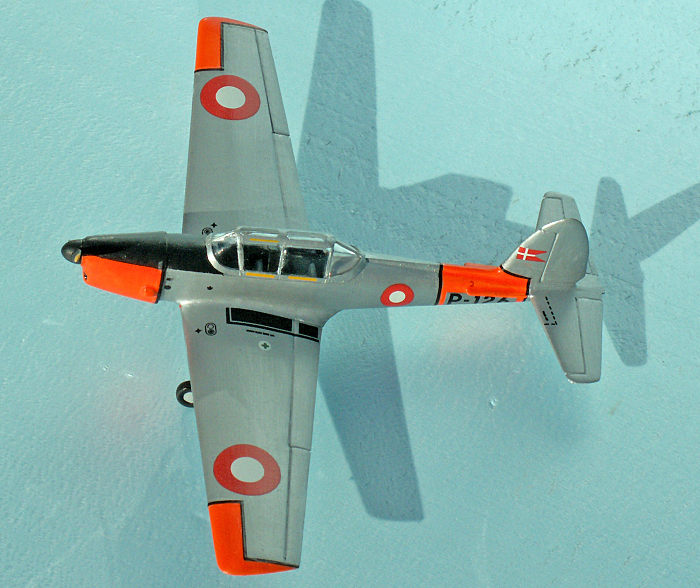 f
the black stripes always should be exactly right, because it was very difficult
or impossible to correct the length after applying without the risk of damaging
the colored areas. To get the length correct, I measured on the model using
compasses with a needle on each leg and marked the found distance on the clear
side of the black stripe. Then the stripe was cut, and I could be sure that the
length was right – every time. It took about two hours to outline a model.
Fortunately the decal paper was of a very good quality and the stripes were
rather easy to apply.
f
the black stripes always should be exactly right, because it was very difficult
or impossible to correct the length after applying without the risk of damaging
the colored areas. To get the length correct, I measured on the model using
compasses with a needle on each leg and marked the found distance on the clear
side of the black stripe. Then the stripe was cut, and I could be sure that the
length was right – every time. It took about two hours to outline a model.
Fortunately the decal paper was of a very good quality and the stripes were
rather easy to apply.
The outline stripe for the cowling was special, because the stripe must be without clear carrier film to the rear. The most difficult part was the aft fuselage and the bottom of the fin. There was two dimensional curving and the anti- spin fin to cause problems. To deal with the two dimensional curving, it was necessary to split the black lines into smaller pieces. I was happy to realize, that the pieces cut from the half circles had the correct curving for the fin. After the application of the black outline decals, there was some touch up work with the aluminum color, especially on the fin where all da-glo color above the black curved outline should be painted over.
Next step is the normal decaling of the model. Fortunately my friend Jacob Stoppel has produced a decal sheet covering the Chipmunk of Flyvevåbnet. One sheet has two options: either P-127 or P-146. I had bought two sheets, and I was thus able also to do P-126 and P-147. However, there was only roundels and flags for one machine on a sheet. In my stocks I had some older Stoppel sheets with Danish roundels and flags, which I had bought back in the seventies. Among these I found eight roundels for the wings of two aircraft, four smaller ones for the fuselage, and four very small split-flags for the fins.
The Stoppel Chipmunk sheet has also the walk ways for the wings and about 30 smaller markings of the Chipmunk. The walk way was rather simple to make – if you have some black decal paper in your stocks, and I had some surplus black lines from the outlining job. In other words: I was able to decal two chipmunks completely, and another two with only the most important decals. However, at a normal viewing distance you can’t see the difference! Stoppel decals are high quality decals – although not to a Cartograf standard. You can’t actually read the very small letters, but as Jacob says, it is more important that there is something to simulate text, than actually to be able to read it with a magnifying glass. The very small decals can be extremely difficult to apply, especially the P- number on the front of the cowling. That’s why the decaling may be the most time consuming job of a small model.
| CONCLUSIONS |
The ancient Airfix Chipmunk kit can easily be made into the Danish “version” with the anti-spin fins and the complex color scheme. I can only recommend this fine little kit to anyone who fancy the neat little Chipmunk from De Havilland Canada. My four kits were bought in London in 1970, and they were stored for more than 46 years, before I decided to build the models, among these the P-126 – the plane I flew in October 1964 during “operation stud. luft.” – the unofficial name of the program of Flyvevåbnet, inviting the coming graduates to learn how to become an air force pilot. Luft means air in Danish.
| REFERENCES |
Wikipedia. Article on DHC 1 Chipmunk
A lot of photos of the Chipmunk of the Royal Danish Air Force and as civil-registered warbirds.
31 March 2017
Copyright ModelingMadness.com
If you would like your product reviewed fairly and fairly quickly, please contact the editor or see other details in the Note to Contributors.
Back to the Main Page Back to the Review Index Page Back to the Previews Index Page