
Airfix 1/72 Spitfire F.22
| KIT #: | A02033 |
| PRICE: | 65 yuan RMB |
| DECALS: | Two options |
| REVIEWER: | Richard F |
| NOTES: |
| HISTORY |
 Yes,
that's the famous image of the mighty Spitfire but it couldn't be
further away from the model in this kit from Airfix. Back in 1940 a
typical Spitfire Mk I or II had a bit over 1,000hp from its Merlin
engine and could manage about 320 knots. This monster, which came
along just 5 years later, had a Griffon with more than 2,100 hp and
could race along at nearly 400 knots. Instead of eight rifle-calibre
machine guns it had four 20mm cannons. Instead of the classic
Spitfire cockpit, the 22's pilot had a great view from the bubble
canopy.
Yes,
that's the famous image of the mighty Spitfire but it couldn't be
further away from the model in this kit from Airfix. Back in 1940 a
typical Spitfire Mk I or II had a bit over 1,000hp from its Merlin
engine and could manage about 320 knots. This monster, which came
along just 5 years later, had a Griffon with more than 2,100 hp and
could race along at nearly 400 knots. Instead of eight rifle-calibre
machine guns it had four 20mm cannons. Instead of the classic
Spitfire cockpit, the 22's pilot had a great view from the bubble
canopy.| THE KIT |
 To
steal shamelessly from that preview:
To
steal shamelessly from that preview:"General detailing is excellent with nice interior sidewall detail and good wheel well detail. The latter is marred by ejector pin markings that, due to the depth of the wells, will be nearly impossible for most of us to remove. These pesky little buggers are also prominent on the inside of the seat, but since Airfix provides a pilot, it is assumed that this will be covered up. The kit offers the option of having the plane built in a flying mode with separate closed gear door options. ...
"The interior is more than satisfactory for the scale with a nicely detailed framework, floor, control stick and instrument panel. A decal is supplied for the panel. The kit offers two canopy options, one for open and one for closed."
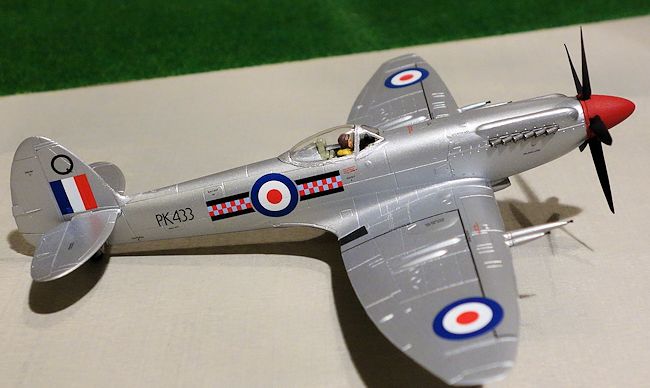
The kit offers two marking variants, one for a silver plane with colourful markings and the other for a camouflaged example used in an air race. As you can see, I preferred the silver one.
| CONSTRUCTION |
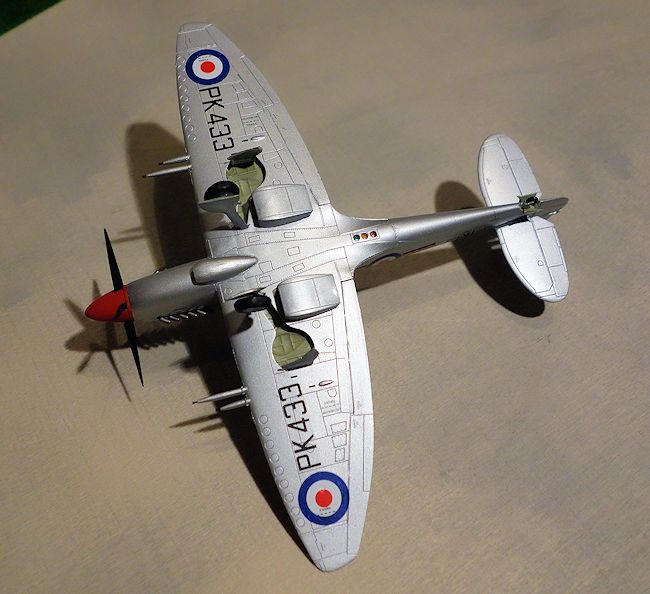
Where to start? I mean, I've read hundreds of reviews on MM and damn me if they ever tell me where to start my builds. Lacking any advice whatsoever, I decided to follow the instructions until I saw step 1 was making the propeller. That didn't seem to make much sense so ignored it and moved on to step 2 which was the cockpit. This is actually fairly complex, considerably more so than the other two Spitfire kits mentioned above. It has a better pilot than the other two, though. I painted it a sort of pale green colour and gave my pilot a nice brown flight suit with yellow life vest. Not sure if that's right but it's what I always do for pilots of that era - ever since I was a kid my WW2 pilots dressed the same way. The cockpit goes together easily enough, but you do need to concentrate as it has a few parts that all have to align properly. I needed to cut the pilot's legs off to get him to fit. The instrument panel has a nice colour decal, and there is a clear-moulded gunsight which I put on at the end.
 The
fit on this kit is not perfect, but doesn't take much effort really. I
did need a bit of filler to address the fairly large gap between the
rear centre of the wing where it joins the fuselage (underneath). The
trailing edges either side of that also don't fit perfectly. Outboard,
underneath the wings (near the roundels) I had no problems at all. The
fit there was fine, contrary to some other build reviews I've seen. I
left a tiny glue smudge visible in the underside photos but that's me,
not the kit.
The
fit on this kit is not perfect, but doesn't take much effort really. I
did need a bit of filler to address the fairly large gap between the
rear centre of the wing where it joins the fuselage (underneath). The
trailing edges either side of that also don't fit perfectly. Outboard,
underneath the wings (near the roundels) I had no problems at all. The
fit there was fine, contrary to some other build reviews I've seen. I
left a tiny glue smudge visible in the underside photos but that's me,
not the kit.
The worst spot is the nose, right in front of the canopy. There are too not-very-well moulded surface features there (I think they are meant to be fuel caps or similar, based on the decal labels that go there). You will need a bit of filler and a bit of sanding to get this to look smooth. When I say "a bit" I really do just mean a bit. I spent maybe three minutes applying filler here and another 15 sanding it off once it was dry. It is not quite what you'd expect from a new issue but certainly nothing like building an old Airfix kit from back in the day where you might spend a whole night sanding and still make no progress (as my recent Il-2 build taught me).
Remember to paint and install the "traffic lights" before you seal up the fuselage - they go in from the inside. I followed the instructions for the order of the colours. It's just occurred to me as I write this that they might have been wrong - worthwhile checking - and now having checked it seems I was indeed wrong. The right order seems to be red rear, green middle, amber front.
Oh well!
| COLORS & MARKINGS |
Speed silver is a cool name and a cool colour and sometimes you just have to go with what you like. I used a spraycan of Tamiya TS-17 gloss aluminium because it is what I can lay my hands on easily. I am absolutely not an expert (and there are many who are - find them on the forum or other forums if it's important to you) but my feeling is that a high speed silver should be just a wee bit glossy but not look like bare or polished metal. To my eye this paint is satisfactory.
I sprayed a few coats of that on (probably could have done with one more as in certain light at certain angles it seems the finish is just a little underdone). I did the inside of the wheel wells in the same pale green I used for the cockpit. Tyres were black as you'd expect.
 The
spinner should be gloss red according to the instructions but in keeping
with the more matt finish of the plane I went with Tamiya flat red,
brushed on.
The
spinner should be gloss red according to the instructions but in keeping
with the more matt finish of the plane I went with Tamiya flat red,
brushed on.
The decals were great - such a contrast to those epic fail decals that blighted so many Airfix kits until recently. I used Mr Mark Softer and a couple of times I really pushed it - if you look carefully you'll see where it was overdone. I didn't get any major failures but be careful if you use a powerful decal solution like that. There are lots of data stencils and as they are actually legible I broke my normal lazy pattern and actually applied them all (well, almost all). They do add to the overall impression and help to break up the uniformity of the silver.
I don't really like the heavily enhanced panel line look, especially on silver planes, so I was more than happy to leave them alone without washes or other emphasis. In my (humble and personal) opinion this is a bit more realistic looking than the other approach. Each to their own, right?
You have another option, as noted above, to do a camouflaged air race plane. As far as I can see you could probably skip the "4" decal and that plane would then be more-or-less a line bird.
My chosen markings belong to a 1951 Spitfire from No. 603 Squadron based in Edinburgh, Scotland.
| CONCLUSIONS |
I can thoroughly recommend this kit. It has just a
few minor irritations with the fit around the nose, but honestly, this is easily
handled. Everything else goes together nicely and the finished model certainly
looks like a Mk 22 Spitfire to me. Serious Spitfire experts may be able to
identify flaws but they will probably also
 be able to
fix them. For anyone else, including beginners or inexperienced builders, this
is a great, affordable kit of a cool looking plane which you can easily put
together in a weekend (although it took me longer to finish it, total time spent
actually doing it was about a weekend's worth).
be able to
fix them. For anyone else, including beginners or inexperienced builders, this
is a great, affordable kit of a cool looking plane which you can easily put
together in a weekend (although it took me longer to finish it, total time spent
actually doing it was about a weekend's worth).
I'll also go out on a limb and say that while I enjoyed the PR19 the most of the three (PR19, IX and 22) this is probably the most satisfying kit even despite the blemish on the nose section, mainly because it has a better cockpit and generally more detail than the IX and slightly more subtle panel lines than the PR19. But they're so affordable you can easily get all three (and, I guess, the new-mould early Spit to round it out).
Recommended.
| REFERENCES |
http://en.wikipedia.org/wiki/
April 2014
If you would like your product reviewed fairly and fairly quickly, please contact the editor or see other details in the Note to Contributors.