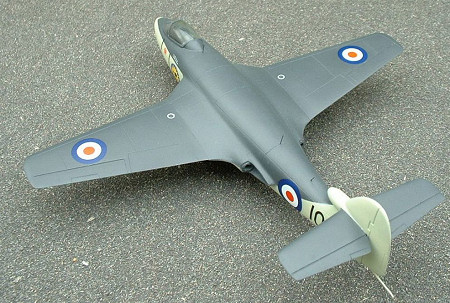
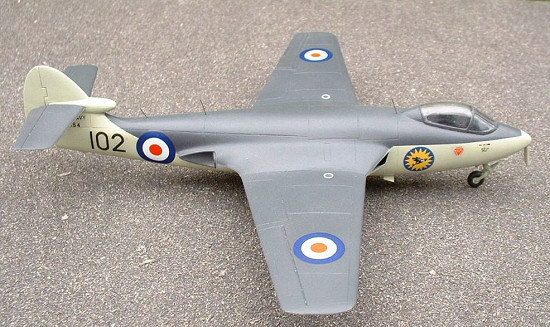
Novo/Frog 1/72 Sea Hawk
| KIT #: | ? |
| PRICE: | $Currently out of production |
| DECALS: | Wouldn't recommend using them |
| REVIEWER: | Pat Cauthery |
| NOTES: | Aeroclub metal landing gear and ejection seat used. |
| HISTORY |
The Sea Hawk originated in a 1945 proposal for a high performance medium range fighter powered by a Rolls Royce Nene jet engine, originally with capability of a rocket motor in the tail. The project was taken on by the Navy, minus the rocket motor, and three prototypes were flown between 1947-49 . Hawker were give a production order for 151 aircraft in November 1949.
 With Hawker’s factories being given priority for production of the Hunter,
development and production of the Sea Hawk was transferred to Armstrong
Whitworth in 1952. The Sea Hawk entered front line service in 1953 with 806 “Ace
of Diamonds” Sqd which shortly afterwards embarked on HMS Eagle for a
Mediterranean cruise.
With Hawker’s factories being given priority for production of the Hunter,
development and production of the Sea Hawk was transferred to Armstrong
Whitworth in 1952. The Sea Hawk entered front line service in 1953 with 806 “Ace
of Diamonds” Sqd which shortly afterwards embarked on HMS Eagle for a
Mediterranean cruise.
The Sea Hawk is perhaps best known for its service during operation “Musketeer” the Anglo-French landings in Suez in 1956. Aircraft from HMS Albion, Bulwark and Eagle supported the invasion, attacking airfields and military installations and providing general close air support.
The Sea Hawk was exported to the Netherlands and West Germany and ex-FAA aircraft were also sold to the Indian Navy which operated them up until 1984.
| THE KIT |
 In a word, basic. Have a look at
Scott’s preview to see
what you are getting yourself into. 16 pieces of softish grey plastic.
In a word, basic. Have a look at
Scott’s preview to see
what you are getting yourself into. 16 pieces of softish grey plastic.
This must be based on one of Frog’s earliest offerings and has much in common with a number of their other 1950’s FAA kits, like the Attacker and the Gannet in that you get a solid cockpit with stuffed and mounted pilots head and gear doors moulded in the closed position.
I bought the Aeroclub metal set which provides you with new undercarriage, gear doors and arrester hook.
| CONSTRUCTION |
As I wanted to try to “improve” this kit there were a number of stages before the whiff of polystyrene cement hit the air. I drilled out the cannon barrels and jet exhausts and then hacked open the gear doors and cockpit. Some of the panel lines and rivets were sanded off and lines rescribed using Dymo tape and a pin. Although the rear of the intakes are blanked off, you can still see right through the model if you look from the side so some more blanking was added.
 A rudimentary cockpit floor was also added, and some lead shot glued into the
nose. I used an Aeroclub ejector seat to make the cockpit look occupied. This
has the benefit of providing further noseweight. As according to the Modeldecal
sheet I planned to use the aircraft featured rarely used the drop tanks
supplied, , I cut off the tip of one of these and used it to form a crude
instrument shroud at the front of the cockpit.
A rudimentary cockpit floor was also added, and some lead shot glued into the
nose. I used an Aeroclub ejector seat to make the cockpit look occupied. This
has the benefit of providing further noseweight. As according to the Modeldecal
sheet I planned to use the aircraft featured rarely used the drop tanks
supplied, , I cut off the tip of one of these and used it to form a crude
instrument shroud at the front of the cockpit.
All the cockpit innards were painted Gunze Tire Black, except the seat cushions that were painted khaki.
After the fuselage halves were joined, I added bits of plastikard to box in the wheel wells and filled in any gaps with putty and Mr Surfacer 500. It later became obvious that the mountings for the undercarriage provided by Frog were too far outboard so to hold the Aeroclub main gear I drilled small holes in the correct position, taking care not to drill through the wing! I then needed to fill in the large mounting point for the Frog main gear, which was done with glue and shreds of plastikard and sanded flat.
 I had also intended to use the Aeroclub vac-canopy but this seemed quite a bit
too large for the kit. Perhaps it fits the Airfix kit but I couldn’t think of a
way of matching it to this kit. The Novo canopy looked a bit thick and had some
“nodules” of clear plastic on the inside. I steeled myself and cut these off
with an X-acto and then sanded with 600, 1000 and 1200 grit paper. The canopy
appeared utterly ruined but to my surprise after polishing with toothpaste and a
cotton wool bud and two dips in Future it recovered adequately. A useful lesson
to me that a scratched canopy can be recovered.
I had also intended to use the Aeroclub vac-canopy but this seemed quite a bit
too large for the kit. Perhaps it fits the Airfix kit but I couldn’t think of a
way of matching it to this kit. The Novo canopy looked a bit thick and had some
“nodules” of clear plastic on the inside. I steeled myself and cut these off
with an X-acto and then sanded with 600, 1000 and 1200 grit paper. The canopy
appeared utterly ruined but to my surprise after polishing with toothpaste and a
cotton wool bud and two dips in Future it recovered adequately. A useful lesson
to me that a scratched canopy can be recovered.
The wings and tailplanes are one piece and the wings required plenty of sanding to remove what are either “guide” marks for placing the roundels or huge ejector pin marks.
Two small strakes for the underside of the fuselage were made using spare plastic.
I drilled a small hole in which to locate the Aeroclub arrester hook, which by this time I had lost. I used a spare hook that came from the Italeri Hellcat kit which I then broke and ended up fashioning something from thin plastic rod. The arrester hook later turned up in another kit box.
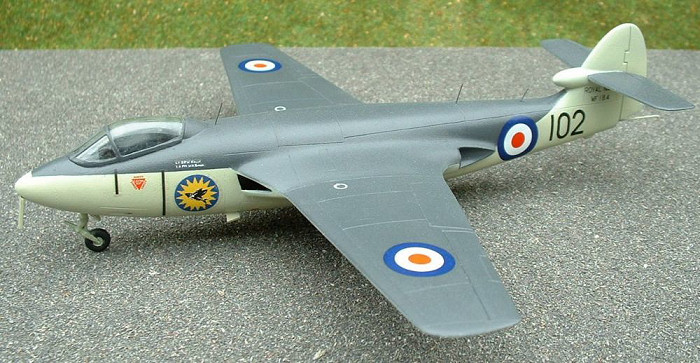
| COLORS & MARKINGS |
Inspiration came from Modeldecal sheet no. 18 which provides decals for a Sea Hawk F1 of 898 Sqd FAA based at RNAS Brawdy in 1954. The top surfaces were painted Gunze Extra Dark Sea Grey H333 and the bottom and sides Gunze Sky H73. The wheel wells were painted aluminium and the white metal landing gear and outside of the gear doors, Sky.
 The Modeldecal decals were pretty old and needed a lot of nursing as the carrier
film wrinkled as soon as it was slid off the backing sheet and showed no sign of
settling. I used Micro-set and after a suitable drying period pressed the
wrinkles down with my thumb. I managed to ruin one set of fuselage numbers this
way so I replaced these with numbers from a Carpena sheet. I think I lined these
up straight!! I also used Fantasy Printshop post-war roundels. The demarcation
between the grey and the sky showed a little on the white of the fuselage
roundels indicating I should have used a white blanking patch.
The Modeldecal decals were pretty old and needed a lot of nursing as the carrier
film wrinkled as soon as it was slid off the backing sheet and showed no sign of
settling. I used Micro-set and after a suitable drying period pressed the
wrinkles down with my thumb. I managed to ruin one set of fuselage numbers this
way so I replaced these with numbers from a Carpena sheet. I think I lined these
up straight!! I also used Fantasy Printshop post-war roundels. The demarcation
between the grey and the sky showed a little on the white of the fuselage
roundels indicating I should have used a white blanking patch.
The model was then given an overall coat of Micro Satin.
On removal of the canopy masking I spotted that disaster had struck. Unseen by me some shards of plastic had attached themselves to the inside of the canopy and rather spoilt the overall effect – presumably attracted by static generated by the polishing process. Although the temptation to test the gliding properties of the kit was strong I prised off the canopy with a cocktail stick, blew out the plastic shreds and reattached with white glue. This all made a hell of a mess as some of the paint lifted around the canopy area and the airbrush was brought out again for some more EDSG and topcoat.
The final touch was to add the three small aerials down the spine which were made from fine plastic rod attached with white glue.
| CONCLUSIONS |
 MPM do an up-to-date 1/72 version of the Sea Hawk which I imagine will now be
most modellers choice, although I suspect it may not exactly “fall together”.
For those preferring a vintage kit there is also an Airfix Sea Hawk that I think
offers such intricacies as a hole where the cockpit goes and gear doors that are
not permanently sealed. The Frog/ Novo kit is probably therefore bottom of the
pile but does allow you to put as much or as little updating into the kit as you
choose. It is one of the most basic kits I have ever seen so I would say is
certainly suitable for total beginners or for modellers looking to practice
their skills on.
MPM do an up-to-date 1/72 version of the Sea Hawk which I imagine will now be
most modellers choice, although I suspect it may not exactly “fall together”.
For those preferring a vintage kit there is also an Airfix Sea Hawk that I think
offers such intricacies as a hole where the cockpit goes and gear doors that are
not permanently sealed. The Frog/ Novo kit is probably therefore bottom of the
pile but does allow you to put as much or as little updating into the kit as you
choose. It is one of the most basic kits I have ever seen so I would say is
certainly suitable for total beginners or for modellers looking to practice
their skills on.
| REFERENCES |
Royal Navy Aircraft Since 1945 – Ray Williams
April 2006
Copyright ModelingMadness.com. All rights reserved. No reproduction in any form without express permission from the editor.
If you would like your product reviewed fairly and quickly, please contact the editor or see other details in the Note to Contributors.