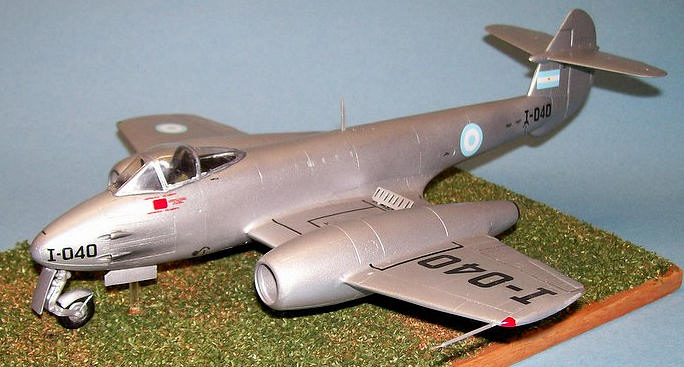
SOL Modelismo 1/48 Gloster Meteor F.4
| KIT #: | 48001 |
| PRICE: | Approximately $50.00 $16.98 (14.96 at Squadron) |
| DECALS: | Several options |
| REVIEWER: | Pablo Calcaterra |
| NOTES: | Falcon canopy used |

| HISTORY |
When World War II ended the British
Government had a considerable debt with
Having in service as fighters the Hawks
75 O (export version of the P-36 with fixed landing gear) and other outdated
planes the Argentine Air Force went ahead with a plan upgrade her capabilities.
Therefore in 1947 100 Gloster Meteors Mk4 were purchased (Contracts included 30
Lincolns, 15 Lancasters, 24 Vickers Viking, 12 Airspeed AS.65 Consul, 70 De
Havilland DH-104 Dove for other branches of the Force)
Version purchased was actually G.41 G,
which had a shorter span than the Mk4. It had two Rolls Royce Derwent V (1,585
kg thrust). They carried 4 x 20 mm guns in the nose and later on they were
adapted to carry bombs or rockets under the wings. A couple of pictures taken of
some of the first 12 planes had their gyro gun sight still in English and with
the Fw-190 and Bf-109 settings! The explosive to destroy the gun sights was
removed as it was considered dangerous and unnecessary.
This would turn the Argentine Air Force
into the most powerful one in
In May 1947 12 pilots from the fighter
squadron were sent to the
 The planes arrived by ship in July 1947
and were assembled in BAM El Palomar. Although it was intended that one of the
planes would fly for the
Mannuwal was the first Air Force pilot to
fly a Meteor in
Sqn Ldr Digby V.
The Regimiento 4 de Caza Interceptora was
created on
As there were no fuel depots in the base,
a truck with 7,500 litters had to travel from
On
Though not officially homologued, 1st
Lt Mannuwal in another especially prepared machined reached 15,100 mt for some
minutes.
Guns supplied with the planes were
second-hand and therefore did not work properly or at all. In 1949 Gloster
delivered another 400 second-hand guns, as it was not allowed to sell new
armament.
Grupo 2 and 3 were based on different
bases throughout their life (
Towards 1958 flame outs of the engines
provoked several accidents to a point when some pilots lots their life and all
flying was stopped. With a modification to the Derwent (Mod 321) this problem
was eliminated. Another problem that these planes experienced was the tendency
of the nose wheel to retract when landing or not lock in the down position.
There are many pictures of Argentine Meteors resting on their nose with the
wheel retracted.
Around the end of the 50s and with the
new Sabres in service the role of the Meteors changed from Interceptor to
Fighter-bombers and therefore the tail code was changed from “I” to “C”.
In 1962 the Escuadrilla 46 de Acrobacia
was created (Acrobatic Team). Planes were painted in white (top) and red
(undersurfaces). This team shared the coordinated maneuvers during visits they
made to several neighbor countries.
By 1966 there were 39 Meteors left and
all based in
In terms of colours, the planes were
painted in silver when they originally arrived. In 1957 the upper side of the
nose in front of the windshield was painted in black (anti reflection). During
several exercises different ID bands were applied (yellow on wings and fuselage
or white/red or white/black squares on the tail among others). Around 1964 all
the planes were painted using the RAF cammo scheme (green and gray) with light
blue undersides.
A couple of fighter pilot’s
perspectives:
An former Argentine Air Force fighter
pilot told me recently that
he considered it to be a respected plane for
the times, that required some careful handling (endurance, flight and landing on
one engine). It was very easy to fly. Commands were a little bit hard and
required some strength to operate because they were actuated by cables (not
hydraulics). But it had great maneuverability and the pilots who flew the
Meteors proudly said they were Meteor pilots.
 Nelson Godoy, another pilot who is member
of the Argentine Fighter Pilot Association told me the following:
“In my case it was my first single seat plane I
have ever flown. Meteors had in Argentina a lengthy and proud tradition and
therefore belonging to this group meant to be sort of a Knight of the Air. It
was the transition between the planes that had to keep the enemy in the gun
sight and the next generation that used radar and the first missiles.
I was impressed by the sturdy construction,
simple design and avionics even though the profile of wings and high tail would
not allow it to fly transonic. But it had nice lines and the Meteor really lured
you to fly her notwithstanding the fact that avionics were simple, moveable
surfaces were actuated by cables, pressurization was lost as years went by,
there was no G suit and endurance was very limited.
Flying these planes was a matter of pride and a
challenge at the same time.
Starting the engine was not a problem but the ground crew had to keep a safe
distance to avoid being sucked by the turbine. Taxing the plane was done using
the breaks on the main landing gear. Inflatable rubber chambers pushed break
pads. This system had to be used with care especially during landing. The
mudguard was removed once the bases had converted their runways from grass to
asphalt. This meant that mudguards became obsolete and maintenance was greatly
improved. Taxing was easy. The nose landing gear suspension was sturdy and
efficient.
When at the start of the runway you had to
follow a checklist. Once the throttle was pushed the feeling was different, you
could feel the vibration of the engines and the thrust. When the breaks were
released the pleasure and responsibility of flying a single seat warplane
started.
As some said:
“I released the breaks and the plane left (the ground)”. You could feel
the acceleration when your back was now firmly pushed against the seat and the
speed was climbing fast. Landing gear up and immediately we were doing 800
km/hr. Then you had to reduce the power and enjoy the speed and the great visual
field that the Meteors had. Due to the fact that pressurization was not working
anymore, all the noises and vibrations could be felt. It was an experience for
all the senses. When firing the guns you could smell the cordite.
This plane was designed as an interceptor and
climbed fast. It was a fast nice gun platform. As endurance was limited, flights
had to be carefully planned and executed. Having many hours flown in Meteors
meant that you had done a significant number of cycles.
The parachute was located on the seat. The
position of the pilot was comfortable, especially the rudder pedals.
Pilots had to wear some special long gloves (Musketeer type) made of
carpincho leather (a very large mammal that lives in Eastern Argentina). The
first outstanding sensation was the reaction to the stick to move the ailerons.
You got used to this pretty fast. In order to do a climbing turn you had to pull
the stick and keep it to one side at the same time. There was no compensation
for the ailerons so once on the ground the ground crew had to adjust them
manually and this new setting had to be verified in the next flight.
Some systems were actuated by large handles
(air breaks are an example). In case of a hydraulic problem that would affect
the landing gear creating an emergency you had to turn a handle almost 70 times.
Another example was the system to open and close the hood that was another
handle linked to a chain.
When it was received in Argentina the Meteors
were interceptors (and thus the use of the “I” prefix). They had gyroscopic gun
sights (but some of the planes did not have the). As time passed and the planes
started to be relegated by more modern planes they were used for air to ground
missions (“C” prefix).
All the above were not considered a problem or
difficulty. These things were part of flying this technology. With time these
issues would become natural for a Meteor pilot but only the pilots that flew the
Glosters understood them.
Every flight was very nice but the short
endurance limited the time in the air. Landing the plane was a special phase. It
required great skill and precision. A mistake was hard to fix. The most
important things was the careful use of the brakes as these could only be used
no more than 3 times for no more than 3 to 4 seconds at a time. If you used them
for more than time or more than 3 times the heat would burn the breaks and the
end of the runway would arrive pretty fast...
Taxiing was simple if everything had gone right
with the breaks.
Spirit of Corps in the group and each squadron
had the highest value and importance. Support and work with the ground crew was
paramount.
The badge with the character used by the Meteor
pilots (Bolido) was given to the pilots after their first flight along with the
scarf. The one that can be seen in the picture is more than 40 years old and it
is one of my most valued possessions.
After more than 20 years of service the planes
and their systems started to get degraded and lost their capabilities. Therefore
the studies to remove them from service started.
Of course, this meant the F-86 Sabre (added to
the Air Force inventory some years before) and the newly incorporated Skyhawks
from the V Brigada Aérea based in Villa Reynolds, San Luis Province
On top of that, the Mirage system was going to
be added to the Air Force. Many pilots that flew during the Malvinas War in 1982
did their first significant flights with the Meteors.
The availability of new systems determined that
1969 was the last promotion that would be trained in Meteors. This was the Nº
XXXII Promotion from the Escuela de Aviación Militar.
I was one of that last group of pilots. Among
others we can find Lt. Kahijira (a notable Mirage pilot), Miguel Navarro (of
Pucara Squadron fame in Malvinas). Squadron Leader was Commander J.A. Gutierrez.
Many officers encouraged us to finish our study and know our new mounts in
detail. The course included theorical subjects, practice with a cover under the
hood (blind flying), written and oral exams. As there were not two-seaters in
service you became the commander of the plane once you left the ground. Your
only support was the “ladero” (the experienced pilot that flew his plane beside
yours) who would give you directions on the radio. When my day arrived we
reviewed all the procedure with my leader and ladero, our Squadron Leader. There
were a few clouds over Buenos Aires but the weather was perfect. I still
remember the good wishes and affection of the veteran ground crew: they knew
that I was part of the last promotion on the Glosters. Start up was normal and
once we accelerated I realized that this was completely different. That all my
hours flown in Morane Saulniers were a different league and that I had a higher
degree of certainty that I had chosen the correct branch in the Air Force.
After finishing the checks upon reaching
operative height we started to do turns, climbs and dives in order to get used
to the characteristics of this plane and gain confidence. Then it was the moment
to try the airbrakes. We dove to the clouds below and reached 780 km/hr.
Suddenly the ladero said: “Deploy air brakes,
There is another anecdote. The last official
flight took place on December 28th 1970. I was not able to take part due to the
fact that I was assigned to do a different task on that date. It was a very
relevant date for the Air Force and the civilian population. Nevertheless there
were some Meteors that still had available hours to be flown and they flew for
some extra months. I can count myself among those privileged few pilots. On
March 17th 1971 I had just returned from a flight in C-051 when a message was
received. Mine was to be the very last flight of a Meteor in the Argentine Air
Force. I always thought that the fact that I had flown the very last flight of a
Meteor in the country compensated my disillusion that I had not been able to
participate in the celebrations that had taken place the previous December”
| THE KIT |
The kit comes in a corrugated small box
with a color printed copy of a late Meteor. All the parts are in individual
plastic bags and all these bags are protected by a single large bubble wrap
plastic.
The box contents 38 resin pieces, 5 clear
vacuum for the canopy and lights and 3 (very soft) white metal pieces for the
landing gear.
 The parts have lots of a sticky substance
that it is really hard to clean even with water and detergent. They stuck to
each other and it was really hard to remove them as they could break…which leads
to the next criticism: the olive green resin is extremely and I repeat extremely
brittle. I had to fix many scratched or broken parts that had suffered the
slightest of the pressures when I was holding them (i.e. thin wing trailing
edges).
Instructions are 7 black and white A4
pages: 3 with steps to build the kit, 4 with details about the different decals
options. Steps are quite well described and have the colors (Humbrol range) for
each part.
In terms of decals the ones supplied with
the kit are very good in terms of quality (Aztec) though all stencils are in
Spanish (and therefore early planes cannot be made as their stencils were still
in English) and these are also incomplete or the wrong size.
There are 4 planes that can be originally
be made with these decals is listed below, but the presence of the different
sized “I” allows you to make also early planes. Combination of some of the
numbers can be used to build other planes like I did (I-040)
·
C-057
·
C-084 Grupo 2 de Caza Bombardero, 1961
·
C-002 BAM El plumerillo, Mendoza, 1963
·
C-032 Escuadrilla Acrobática 46, 1962
| CONSTRUCTION |
I started this kit in 2004 (I bought it
in Argentina early in the 2000s and brought it to Canada).
The first task was to remove all the
pouring stubs that were quite large in some parts. Once these were sanded I
proceeded to clean all the parts and remove that sticky substance from the
surfaces. I tried detergent and water and also sanding with a 600 grit sand
paper. Eventually a combination of both methods succeeded in leaving a clean
surface to work on.
Then I painted with my airbrush all the
internal parts: cockpit and instrument panel in matt black, seat in RAF interior
green, engine in black, aluminum for the wheels wells.
Details were highlighted in silver.
I still remember I took the kit to a
business trip to Alabama and sanding and sanding the parts to help to get a
decent fit for the following steps. So much sanding that I had to go to a shop
in the area and buy sanding paper of coarser grit.
My kit had two parts that were unusable:
the left fuselage half (completely bent) and the cockpit/nose landing gear
support structure (the later had snapped off). Diego Piedrahita, the owner and
manufacturer of Sol Modelismo sent me spares for me to use at no cost.
In the meantime I first put the wings
together (main landing gear wheel wells, bottom central section, top surfaces,
engine inside nacelles and bottom external wing halves). Fit was not good at and
parts required lots of sanding to get a decent fit. I used two parts epoxy
throughout the construction as it would cover the unions and it is easy to sand.
The wings were completed with the rings for the front of the engines and the
exhaust ducts. This step was easy compared to what was coming…
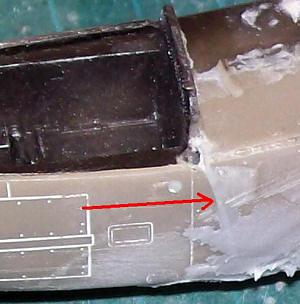 …I tried and I juggled with the fuselage
halves, still not glued together, and the wings. There was no way to get them to
fit. When the fuselage panel lines of the two halves were properly aligned, it
would be miss aligned with the wings or it would not fit the room between the
two upper wings. When the alignment with the wings was fine, the fuselage panels
of each half would not match…The other problem was that as I had followed the
directions the fuselage halves, when put together, would not fit the wings
because the internal side of the wheel wells would not allow them to fit. They
were on the way…Nerve cracking experience…even more if you consider that I
managed to break the left fuselage side around the cockpit area! This picture
shows the area already fixed and the gap covered with two-part epoxy
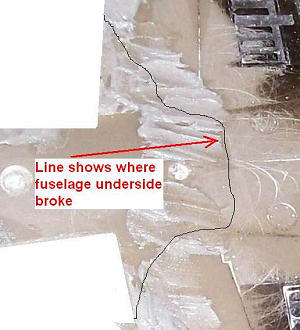 The central lower wing piece includes
part of the fuselage. This one is bent upwards it practically goes inside the
fuselage! Trying to bring it down (not using hot water…) I snapped it. I glued
it back with instant glue in a corrected angle but the union was quite evident.
I covered it with two parts epoxy glue.
After a week of frustration just trying
to dry fit these parts without damaging them I left the kit aside at this point
to build something like a Tamigawa or more engaging…
6 years later…
Earlier in 2011 when talking about kits
with my friend Juan Contreras who lives in Australia he expressed his interest
in my non-completed Meteor… that lighted the fire and gave me the will to finish
it.
Going back to the terrible fit I realized
that if I glued the fuselage halves leaving a gap between the two parts of the
left side of the fuselage and covered the gap with two parts epoxy then this
part would be done and the panel lines would match properly. To make them fit to
the wings I finally gave up, sanded the part of the wheel well that was in my
way and hence everything fit fine. Still, care had to be taken to make sure that
wings and fuselage were at 90º as this kit has a notorious fit.
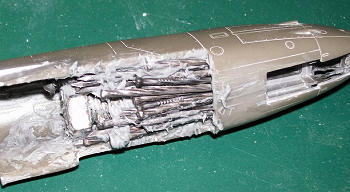 Now to the next problem: the tail-sitter.
Instructions mention that you have to add as much weight as you can…but does not
say how much. I put the main parts (including horizontal tail surfaces) together
with masking tape, stuffed as much metal as I could under and behind the cockpit
and tried the balance the kit over some plastic parts. There was absolutely no
way to add enough weight to prevent it from being a tail sitter. In hindsight I
should have tried to eat out some of the resin inside the back of the fuselage.
Not only that but Fabian Nevarez told me that he had built the kit and the white
metal wheels are so soft that after some weeks his had bent inside the fuselage
under the resin weight. Therefore it was not only a problem of having a tail
sitter but even if I could fix it, the wheels would not work. I toyed with the
idea of putting it on a stand made of a single clear plastic piece to represent
it flying…but was afraid that the brittle resin would not stand the drilling
process. More about my solution below.
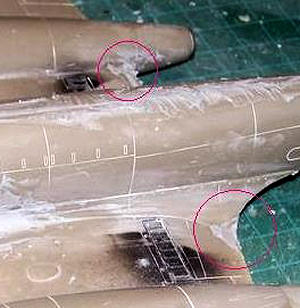 So finally now things were taking shape.
With a lot of dry fitting and care I glued the fuselage to the wings…but I was
not careful enough so I managed to break the wing trailing edge in a couple of
spots. Note also the amount of epoxy glue used to cover the trenches (not gaps)
between fuselage and wings.
Next step: the tail. I believe that I
have oversanded the fuselage halves as this was narrow that the fuselage/tail
part. Fact is that pouring stub of the fuselage halves is so irregular that I
took it all out when it seems that part of the stubs should have stayed to give
the fuselage the correct width…which also somehow explains the gaps at the root
of the wings. After gluing this part to the fuselage I added some extra epoxy
glue and by thinning the tail unit and “expanding” the fuselage achieved a
significant reduction of the step. I had to be very careful not to erase a
couple of access doors on the fuselage.
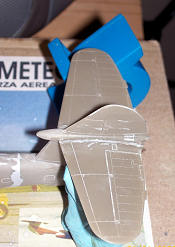 The horizontal tail surfaces came next.
As there is no structure to stick them in place I supported them using some blue
tac and a plastic clamp while the glue was curing.
Fit here was very good and practically no filler was required (at last!)
To finish the main components I glued the
instrument panel and the seat. Another problematic area: the edge of the
cockpit. This is another single piece that does not fit at all, leaving terrible
gaps and not being flush with the nose. After using some plasticard to increase
the height and fill the gaps I still could not get a decent fit. I was forced to
use huge amounts of two-part epoxy again and in the subsequent sanding process
lost the two access panels located on either side of the windshield.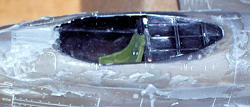
Now it came to the canopy. The one
supplied by Sol Modelismo I found difficult to fit. Only by “crushing” it all
the edges would sit on the fuselage. Luckily I realized that I had purchased
more than 10 years ago some sets from Falcon. One included the canopy for
Tamiya’s Meteor. Event though I think it sits a little bit too high the fit was
perfect.
After months of hard work the plane was
ready for painting.
| COLORS & MARKINGS |
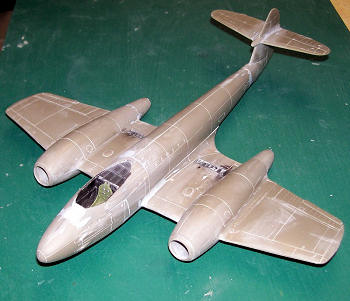 I first gave the plane a hand of Model
Master Acryl 4757 Medium Sea Grey. With this color I checked imperfections and
also achieved a lighter base for the Aluminum paint. There were some minor areas
of concern around the cockpit that were easily fixed.
All the canopy clear parts I masked and
gave the frames a coat of black.
Then the entire plane including landing
gear doors received a couple of nice coats of Model Master Acryl Aluminum.
I used a sharpened black pencil to
highlight the moveable surfaces and sanded black pastel applied with a brush to
dirty the guns and some other minor areas.
Two coats of Future sealed everything
properly for the decals.
I played a lot with my references in
terms of relevant machines, type of “0” (cero) style that the planes had and
what was available in the Aztec sheet. Regretfully I could not find a
combination that would allow me to represent an historical significant plane. I
wanted one of the early planes but the stencils had to be in English… that I did
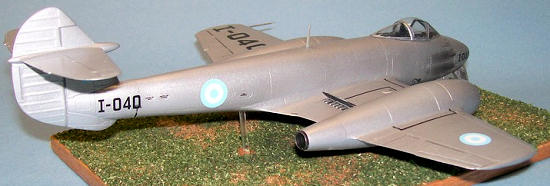
not have. I finally had to settle with I-040. This plane was an ex-RAF Gloster
G.41F Meteor s/n EE5889 (G-5-140). It was received in Argentina on October 15th
1949. On November 12th 1952 and being flown by Lt. R. Gouarderes the
engines flamed out on final to land and she landed heavily on her gear. Damage
was such that it was
Aztec decals go fine with no problem, had
no issues with Set/Sol solutions and the only criticism that I have is that some
of the stencils seem to be too wide…not as fine/subtle for the scale.
 The only “major” issue related to my
build that affected the decals was the one that goes under the fuselage, close
to the tail, and that shows where the support the plane. As my fuselage was
somehow narrow due to my oversanding this decal ended up being too tall and
reaching the tail number.
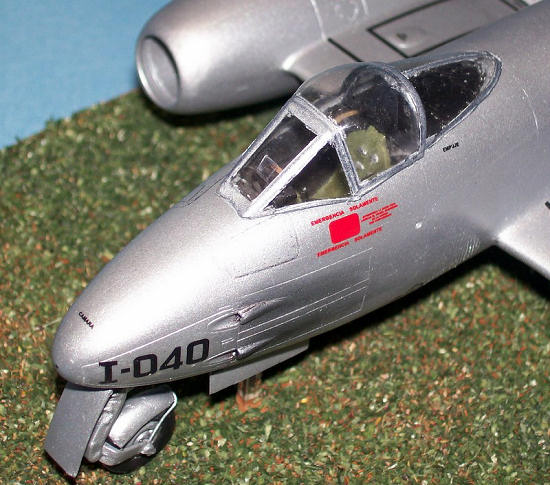
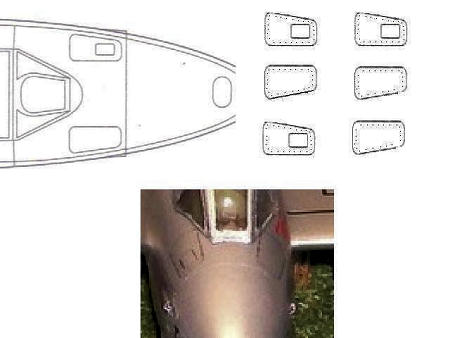
To replace the panels located beside the
windshield that I had sanded out I scanned some scale plans (from Warpaint
series), made it sharper with the computer and added (using Paint) the little
dots representing the fastening screws. These panels were then printed in clear
decal paper, protected with a coat of Testors decal spray and with some
difficulty (they trended to curl up) placed around the windshield.
A thin coat of Model Master Acryl Clear
Semi-Gloss sealed the decals on the kit.
| FINAL CONSTRUCTION |
Looking to the pictures of the planes I
realized that the mudguards are missing. None. Nothing. Nada. The planes used
these until the later part of the life of the Meteors in Argentina when modern
bases had no more grass runways.
Now I understood why most of the options
(decals) were for late planes…
After playing with different parts from
the spares box and trying to find one that would have a decent contour I finally
settle with t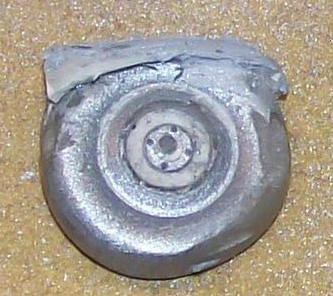 he rounded part of the HobbyCraft 1/48 Bf 109 under wing guns. With
lots of epoxy I got a good shape…not perfect but decent. As I had nothing
available for the main landing gear I created the mudguards using two-part epoxy
100%. No plastic piece underneath. It took me around 4 nights to finish and
paint them, retouching the black rubber parts in the process.
With instant glue and two-part epoxy I
attached the landing gear. The wheels stayed in place with generous amounts of
instant glue. I bent some stainless wire and made the support for the mudguards.
I scratchbuilt some details for the
landing gear actuating system and added the doors, airbrakes (very fragile and I
broke them in half a couple of times), fuselage antenna (scratchbuilt), pitot on
the left wing (made up of two pieces taken from the spares box).
The exhaust was given a light brush with
aluminum over the black to add some metallic looks.
 I scratchbuilt the clear part and added
the gunsight (supplied with the kit). Finally I glued the 2-part canopy. But
this was not the end…
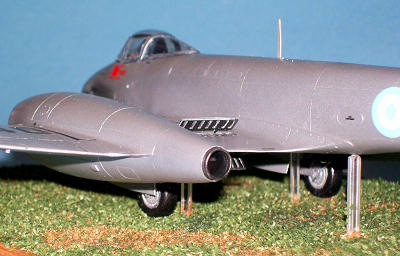
…as I still had not only a tail sitter
but also a kit that had very weak legs I finally decided to cut a rectangular
piece of wood and on 4 carefully located places I drilled some holes. On these I
glued 4 thick and clear pieces of plastic. I painted the wood brown and with
white glue I added different shades of grass.
These 4 rectangular clear pieces fit
exactly in the wheel wells and under the tail just behind the wings. I know they
don’t look great but from a distance you cannot see them. And depending on the
angle they cannot be seen if you are looking closely to the kit. Fair enough for
me!
| CONCLUSIONS |
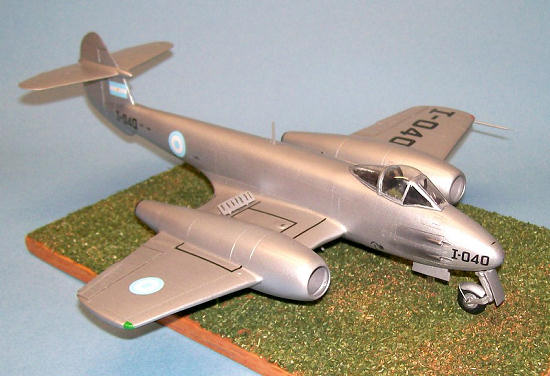
In the end and with months of work the
plane looks like a Meteor.
The kit itself is not recommended. If you
want to kitbash the Tamiya offers then you might away with it. Too much work,
very bad fit, bent parts, brittle resin.
This kit and article are dedicated to
Nelson Godoy who put me in contact with many of the Argentine pilots that flew
during the 1982 war and thus made a dream come true!
With thanks to:
Nelson Godoy
EC
Fabian Nevarez
Juan Contreras
Jose Miguel Rodriguez
| REFERENCES |
Guia de Aeronaves Miliatares 1912-2006
(Eduardo Juan Amores Oliver – Direccion de Estudios Historicos Fuerza Aerea
Argentina)
Gloster Meteor (Tony Buttler – Warpaint
Series No 22)
Gloster Meteor en Argentina (Atilio
Marino)
September 2011
If you would like your product reviewed fairly and quickly, please contact me or see other details in the Note to Contributors.