Frog 1/72 E.E. Canberra PR.7
| KIT #: | F-323 |
| PRICE: | $2 (!) |
| DECALS: | One option |
| REVIEWER: | Peter Burstow |
| NOTES: |
Aussie Decals & NKR Models vacformed canopy used |
| HISTORY |
 Australia's Government Aircraft Factory at Avalon, assisted by a swarm of
sub-contractors, undertook licenced production of the English Electric Canberra
B.2 in the 1950's. Produced at a leisurely rate, 48 Mk. 20s were manufactured
from 1953 to 1958, with the factory ticking over in 1959 doing some conversions
to Mk. 21 trainers.
Australia's Government Aircraft Factory at Avalon, assisted by a swarm of
sub-contractors, undertook licenced production of the English Electric Canberra
B.2 in the 1950's. Produced at a leisurely rate, 48 Mk. 20s were manufactured
from 1953 to 1958, with the factory ticking over in 1959 doing some conversions
to Mk. 21 trainers.
Supplemented by five English built B.2s and a pair of T.4s the Canberras
remained in Australian service until 1982.
The Australian Canberras saw active service during the Malayan Emergency and
Vietnam. They also did extensive photographic survey work in Australia, New
Guinea and Indonesia, participated in exercises, air races and atomic trials.
Several ended their days as targets or on fire dumps, most were scrapped, but
fortunately a number survive in museums or as gate guards, and at least one is
still flying.
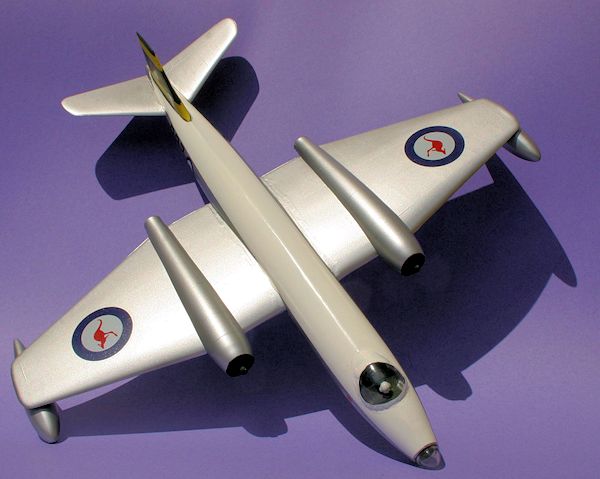
| THE KIT |
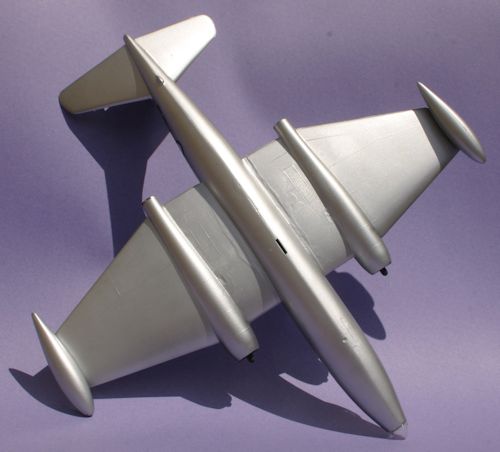
15 parts are moulded in a hard silver-grey coloured plastic, the nice stuff that
shows the flow lines. All parts had been removed from the sprues, probably why
so many bits were missing. There was heavy raised rivet detail on the fuselage
and wings, but only light raised lines indicating the control surfaces. The
startling thing, to those used to more modern kits, is how thick the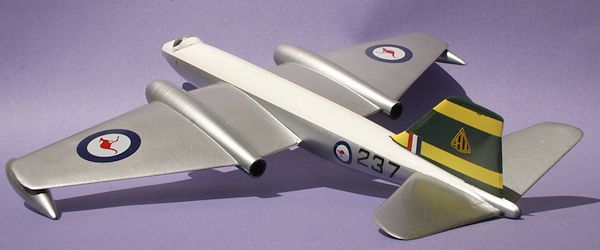 parts are.
This model will be very strong when built. A couple of minor sink marks, a small
area short shot, and a tiny bit of flash was all that needed cleaning up.
parts are.
This model will be very strong when built. A couple of minor sink marks, a small
area short shot, and a tiny bit of flash was all that needed cleaning up.
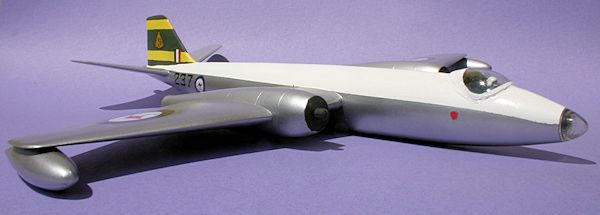
Cockpit detail, duh, solid cockpit with a pilots head and a headrest. Engines?
Well there is a bulge about half way along the wings. Solid at the front, with a
bullet fairing for the starter, and a blanked off hole at the rear. No wheel
well detail, not even a wheel well. Yes there is a hole to plug in the one piece
wheel, gear and door part, another hole for the inner door, about a scale foot
thick. One of the inner doors, the nose wheel and both nose wheel doors were
missing from my kit, so I guess this one is flying, hey! the stand is missing
too.
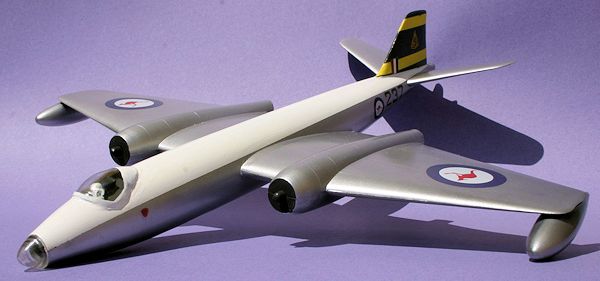
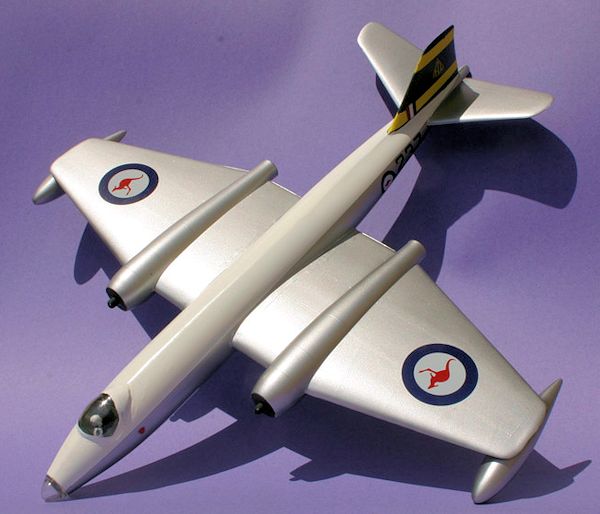
Decals represent one aircraft, WH773 which really was a Canberra PR.7. They
don't look too bad, but I won't use them.
| CONSTRUCTION |
Lots of sub-assemblies here. I started by dryfitting the fuselage halves, fit
was OK but there was a bit of a warp. With the nose and tail joined I could
stick my finger into the gap halfway along the fuselage. The instructions
suggest holding it together with rubber bands, so maybe it was moulded like
that. After running a bead of liquid poly on both mating surfaces I used some
serious clamps to hold it all together. Next morning I ran some superglue into
the gap right around. It looked like it would hold, but I was not going to take
any chances. I fitted a 5/32” (about 4mm) bolt, with washers and a nut, right
through the wing root. That should keep it together.
With the canopy sorted, and a nice vacformed nose cone as well, I gave the clear
parts a swim in floor polish and left them to dry.
 placement guides) off the fuselage and wings. I probably
should have scribed the control surface hinge lines before sanding off the
raised detail, but only remembered in time to do the entrance hatch, and that only lightly. My Canberra is going to be a smoothie.
placement guides) off the fuselage and wings. I probably
should have scribed the control surface hinge lines before sanding off the
raised detail, but only remembered in time to do the entrance hatch, and that only lightly. My Canberra is going to be a smoothie.
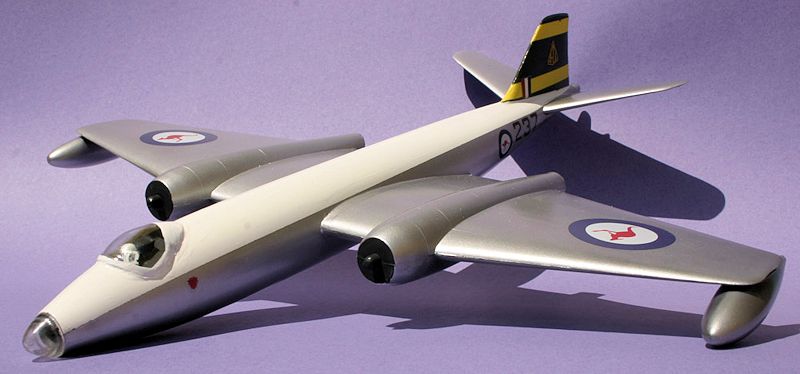
| COLORS & MARKINGS |
I decided on a RAAF Mk.20, as I already had Aussie Decals sheet 72039, Canberra
Mk.20 silver schemes. I picked the ARDU version A84-237 as it had a little
colour, green and yellow tail, and I already have built some other ARDU
aircraft. During trials at Woomera, 237 got hit by a Karinga cluster bomb and
destroyed in August 1982.
 I gave the top of the fuselage and tail a couple of coats of gloss white, then a
coat of gloss yellow on the tail. After leaving it to dry overnight I masked off
the yellow stripes and I also filled up a couple of spots on the joints that the
gloss white picked up. Then I sprayed the tail dark green. Probably not the
right shade, I used touch up paint that came with my front fence.
I gave the top of the fuselage and tail a couple of coats of gloss white, then a
coat of gloss yellow on the tail. After leaving it to dry overnight I masked off
the yellow stripes and I also filled up a couple of spots on the joints that the
gloss white picked up. Then I sprayed the tail dark green. Probably not the
right shade, I used touch up paint that came with my front fence.
| CONCLUSIONS |
| REFERENCES |
Stewart Wilson, Lincoln Canberra & F-111 in Australian Service, Aerospace,
Weston Creek, 1989.
http://en.wikipedia.org/wiki/English_Electric_Canberra
April 2013
If you would like your product reviewed fairly and fairly quickly, please contact the editor or see other details in the Note to Contributors.