| KIT: | Classic Airframes 1/48 Hawker Sea Hawk FGA.6 |
| KIT #: | 465 |
| PRICE: | $55.00 MSRP. Currently out of production |
| DECALS: | Four options |
| REVIEWER: | Ben Brown |
| NOTES: | Cutting Edge ejection seat used. |
| HISTORY |
The Hawker Sea Hawk was the replacement to British Royal Navy’s Supermarine’s Attacker. In an air arm that has been afflicted by quite a few ugly flying machines, the dainty Sea Hawk seemed to be an oddity. Well-liked by its pilots, the little jet offered good performance, excellent handling, good reliability, and in the words of one Fleet Air Arm pilot, “greeted everyone with a friendly whistle.”
 Equipped with a Rolls-Royce Nene
engine of 5000 lbs thrust, the jet could reach almost 600 mph. It’s size,
weight, and performance was almost the same as it’s U.S. Navy counterpart, the
F9F Panther. The first production Sea Hawk flew in 1951, began to equip FAA
squadrons in 1953. Sea Hawks first saw combat during the Suez Crisis in 1957.
They were able to deliver weapons deeper into enemy territory than the
short-ranged RAF Hunters. The Sea Hawks performed well, and only suffered two
losses. In 1971, Sea Hawks were back in action, this time with the Indian Navy,
when Pakistani forces attacked Indian airfields. Sea Hawks remained in FAA
service until it was replaced by the Supermarine Scimitar beginning in 1960, and
they continued to fly in the Indian Navy until 1984. Currently, there is one
Sea Hawk still flying on the European air show circuit, and there are rumors of
a second one being restored to flying condition in the US.
Equipped with a Rolls-Royce Nene
engine of 5000 lbs thrust, the jet could reach almost 600 mph. It’s size,
weight, and performance was almost the same as it’s U.S. Navy counterpart, the
F9F Panther. The first production Sea Hawk flew in 1951, began to equip FAA
squadrons in 1953. Sea Hawks first saw combat during the Suez Crisis in 1957.
They were able to deliver weapons deeper into enemy territory than the
short-ranged RAF Hunters. The Sea Hawks performed well, and only suffered two
losses. In 1971, Sea Hawks were back in action, this time with the Indian Navy,
when Pakistani forces attacked Indian airfields. Sea Hawks remained in FAA
service until it was replaced by the Supermarine Scimitar beginning in 1960, and
they continued to fly in the Indian Navy until 1984. Currently, there is one
Sea Hawk still flying on the European air show circuit, and there are rumors of
a second one being restored to flying condition in the US.
| THE KIT |
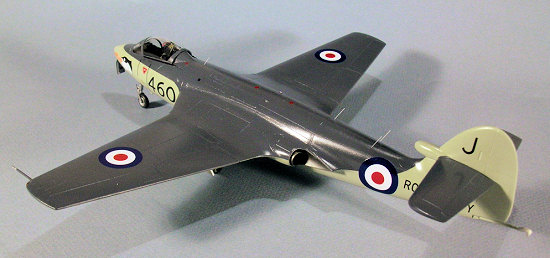
Molded in grey plastic, the kit provides the option for folded wings and drop tanks. The cockpit, wheels, main gear wells, intake, and exhaust parts are provided in resin. A photo-etched fret includes an instrument panel, seat belts, intake guide vanes, and some antennae. The injected one-piece canopy is thick but fairly clear. A dip in Future does wonders for it. There have been comments that the canopy’s shape is off, but I can’t for the life of me see where. I don’t doubt the other reviewer is right. My eyes must be going.
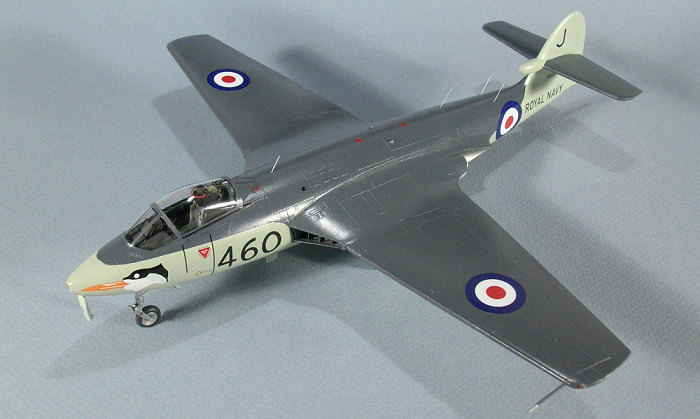
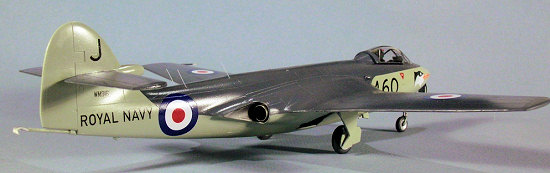
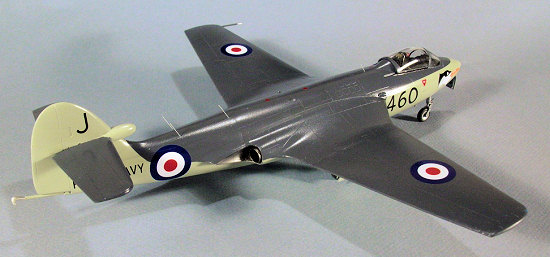
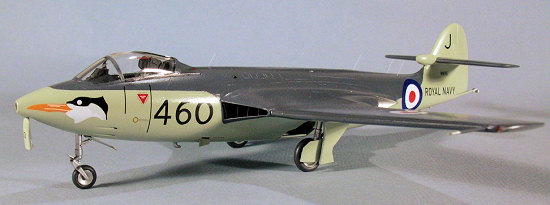
Decals are provided for four aircraft, an 804 Squadron FGA.6 from the Suez Crisis, an 893 Squadron FB.3 from the HMS Eagle, an 860 FGA.50 from the Netherlands, all in Extra Dark Sea Grey over Sky, and an 806 Squadron FGA.6 in Extra Dark Sea Grey over white. Classic Airframes also provides yellow and black identification stripe decals for the 804 Squadron jet.
| CONSTRUCTION |
I began by
cleaning up the resin parts and removing the casting blocks. I sanded the sides
of the cockpit tub down as much as possible, so it wouldn’t spread the fuselage
sides out and cause fit problems with the lower half. There are several panels
that stick up from the edges of the consoles and these interfere with the raised
detail molded into the fuselage, so I broke them off and saved them to glue in
place after the cockpit was installed, along with several other panels that are
provided with the resin parts.
 Classic provides a photo-etched instrument panel
with a film background for the instruments. When assembled, the panel looks
pretty good, although I think 1/48 scale is pushing the limits of relief
etching. Etched instrument bezels and knobs don’t quite stand out enough for
this scale. The seat looked too wide and I didn’t want to mess with the
photo-etched seat belts, so I found a Cutting Edge Martin-Baker Mk.2 seat to
replace it. I’m not 100% sure it’s the right seat for the Sea Hawk, but it
looks pretty close. Sea Hawk cockpits were painted black, but to avoid a black
hole-look, I painted my kit’s cockpit a very dark grey. I then picked out the
knobs and switches with silver and light grey.
Classic provides a photo-etched instrument panel
with a film background for the instruments. When assembled, the panel looks
pretty good, although I think 1/48 scale is pushing the limits of relief
etching. Etched instrument bezels and knobs don’t quite stand out enough for
this scale. The seat looked too wide and I didn’t want to mess with the
photo-etched seat belts, so I found a Cutting Edge Martin-Baker Mk.2 seat to
replace it. I’m not 100% sure it’s the right seat for the Sea Hawk, but it
looks pretty close. Sea Hawk cockpits were painted black, but to avoid a black
hole-look, I painted my kit’s cockpit a very dark grey. I then picked out the
knobs and switches with silver and light grey.
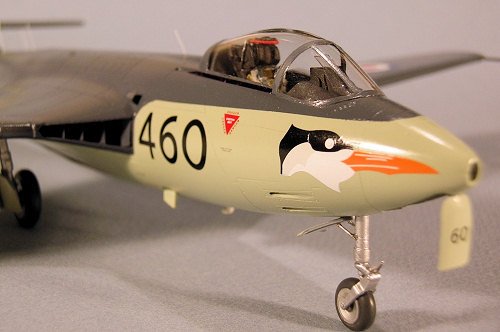
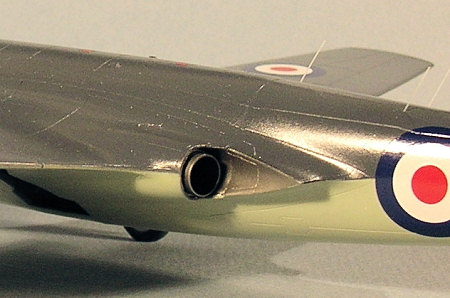
Every review of this kit I’ve read mentions the cockpit interfering with the plastic plate that the nose gear strut mounts to. One mentioned removing the aft end of the plate, which I tried. I cut the plate off a few millimeters aft of the plug for the strut, then notched the forward part of the cockpit tub a little to clear the part of the plate that remained. A little test-fitting showed this solved the interference problem. The gun troughs are too shallow, so I bored them out with a drill bit and a file. This would have been a good time to drill out the cartridge starter exhaust behind the left intake, but I forgot to do this until it was too late.
I glued the cockpit tub, main gear well, and intake parts in place, then used the faint lines molded in the intakes as guides to cut notches for the photo-etched vanes. I left off the photo-etched plate that is supposed to secure them because it was a pain in the neck to deal with. Besides, the vanes fit fine without it. They should be deeper inside the intake and should be curved to direct incoming air to the engine, but once installed, they still look pretty good. There is plenty of room behind the cockpit for weight to keep the nose wheel on the ground. The instructions recommend 10g of weight, so I used that as my starting point and added a few more grams for good measure.
 Now, time to close up the fuselage
and see what all of the fuss was about. I started by gluing the area around the
exhausts together first, then worked my way forward. The upper fuselage half
appeared to be slightly bowed at the nose, because there was a gap at the tip of
the nose that had to be forced closed. I got in a hurry and didn’t let the glue
set long enough, so the two fuselage halves pulled apart a little, causing a
small gap a couple of millimeters long on the nose. These were the only spots
in the nose area that required anything more than Mr. Surfacer. Once the glue
had dried, I opened up the oval environmental system intake on the nose.
Now, time to close up the fuselage
and see what all of the fuss was about. I started by gluing the area around the
exhausts together first, then worked my way forward. The upper fuselage half
appeared to be slightly bowed at the nose, because there was a gap at the tip of
the nose that had to be forced closed. I got in a hurry and didn’t let the glue
set long enough, so the two fuselage halves pulled apart a little, causing a
small gap a couple of millimeters long on the nose. These were the only spots
in the nose area that required anything more than Mr. Surfacer. Once the glue
had dried, I opened up the oval environmental system intake on the nose.
I set the forward fuselage aside,
and went to work on the aft fuselage. I only applied glue to the vertical fin
and rudder, leaving the forward part of the fuselage “loose.” My thinking was
to make sure the fit around pen nib fairings at the exhausts was good, then take
care of any mismatches that might result at the top and bottom of the fuselage
where they would be easier to fill and sand. There are two plates (parts A8 and
A27) that are supposed to help close off the inside of the forward fuselage at
the exhausts and make up part of the pen nib fairings on the aft fuselage.
Rather than glue them inside the forward fuselage and deal with fit problems
later, I glued them to the aft fuselage instead, to make it easier to clean up
the joint at the fairing. I added some short sections of sprue around the
perimeter of the forward fuselage to help align everything. A little
test-fitting and sanding made the plates fit right inside the forward fuselage.
I then glued the aft fuselage on, starting at the pen nib fairings and working
my way to the centerline of the fuselage. Amazingly, there were no gaps when I
was finished, other than a tiny sink mark on the top and bottom, caused by the
plastic melted by the liquid cement not quite filling the gap. One thing I
didn’t realize until later was the little tabs that are supposed to keep the
exhaust nozzles from dropping into the fuselage are not far
 enough inside the
fuselage, so the nozzles to stick out too far. I had to remove them with a file
after I had painted the model, which was not fun. The horizontal stabilizer
parts fit together without any problems, then they slotted into the vertical
stabilizer, leaving a small gap that I filled with Mr. Surfacer.
enough inside the
fuselage, so the nozzles to stick out too far. I had to remove them with a file
after I had painted the model, which was not fun. The horizontal stabilizer
parts fit together without any problems, then they slotted into the vertical
stabilizer, leaving a small gap that I filled with Mr. Surfacer.
After gluing the wing halves together, I cut notches in the wing tips and added some chunks of clear sprue for the nav lights. I had drilled holes in them and put a drop of Tamiya clear red and clear blue paint to represent the bulbs. The tabs for the wing fold hinges don’t fit into the cutouts in the stub wings very well, so I spent a little time with a knife and a file to help them. I made the mistake of not adding some plastic tabs around the inside edges of the stub wings to help align the outer wing panels, so I had to sand and rescribe the top of one wing and the bottom of the other where the parts met. If I had done this operation right in the first place, I could have got away with using a little Mr. Surfacer in that area.
I think the Sea Hawk looks better with the canopy closed, so I didn’t have to worry about how I was going to cut the canopy and windscreen apart. The curvature of the fairing aft of the cockpit doesn’t match that of the canopy, so the aft part of the canopy doesn’t touch the fuselage. I reshaped the fairing with a sanding stick until the canopy fit down into the grooves scribed into the fuselage. After filling the seam around the windscreen with white glue and letting it dry, I masked the canopy for painting.
The forward nose gear has a navigation light that was fitted to Sea Hawks later in their career. Photos of the jet I was building don’t show the light, so I removed it. The 806 Squadron jet did have this light and the FGA.50 probably did. The shell casing ejection fairings are flat on the bottom, so they want to stick out of the fuselage at an angle. I filed them down so they pointed vertically down like they do on the full size jet.
| COLORS & MARKINGS |
 I
normally use Xtracolor paint for my models’ exteriors, but this time I decided
to live on the wild side and use acrylics. I first painted the undersides
Tamiya Sky mixed three parts flat white to two parts Sky. Once the undersides
had dried, I masked and painted the topsides using Gunze Extra Dark Sea Grey,
which looked much too dark on the model. I went back over it with Polly Scale
EDSG, which looked a lot better.
I
normally use Xtracolor paint for my models’ exteriors, but this time I decided
to live on the wild side and use acrylics. I first painted the undersides
Tamiya Sky mixed three parts flat white to two parts Sky. Once the undersides
had dried, I masked and painted the topsides using Gunze Extra Dark Sea Grey,
which looked much too dark on the model. I went back over it with Polly Scale
EDSG, which looked a lot better.
I found a lot of conflicting information about whether the landing gear struts and wells were painted Sky or silver. I finally settled on silver, since that seemed to be the norm for other fighters.
After letting the paint dry for a few days, I sprayed the model with Polly Scale clear gloss, then applied the decals. They went down without any problems, but just to be safe, I put the roundels down over discs of white decal to prevent any dark grey paint from showing through. Classic’s decal sheet seems to be pretty comprehensive, and includes a few stencils that are visible in photos. I used discs of red decal film for the fuel filler caps on the fuselage, and a black disc for the cartridge starter exhaust that I forgot to drill out.
| FINAL CONSTRUCTION |
Once the
decals were dry I washed the model and sprayed it with several coats of Polly
Scale clear satin. FAA jets were gloss, but using gloss paint on a model would
have made it too shiny. I then added the landing gear, a pitot tube, and
exhaust nozzles. The real Sea Hawk’s bifurcated exhaust would be very hard to
make from scratch in 1/48 scale, so I just used short, straight sections of
 telescoping brass tube with a blanking plates on the end. These look better
than the resin kit parts, which are too large in diameter and don’t have any
depth to their interiors. Since I had removed the tabs that were to keep the
exhaust parts from dropping into the interior of the model, I ended up losing
not one, but three exhausts down the holes! Fortunately, I have a good supply
of brass tube, and the super glue on the lost parts seems to be doing a good job
keeping them from rattling around inside the model.
telescoping brass tube with a blanking plates on the end. These look better
than the resin kit parts, which are too large in diameter and don’t have any
depth to their interiors. Since I had removed the tabs that were to keep the
exhaust parts from dropping into the interior of the model, I ended up losing
not one, but three exhausts down the holes! Fortunately, I have a good supply
of brass tube, and the super glue on the lost parts seems to be doing a good job
keeping them from rattling around inside the model.
While I was studying photos of the canopy, trying to see what other reviewer says is the shape problem, I noticed the Sea Hawk has a rubber strip on each side of the fuselage that I would guess is an aerodynamic seal for the canopy. I cut two strips of .005 styrene to shape, ran a black Sharpie marker over them, and glued them in place, thus hiding the gap I missed earlier with the white glue. Finally, I drilled some small holes in the fuselage and under the wing and added some antennae made from toothbrush bristles. The real antennae were white, and I wouldn’t have to worry about accidentally bending them while dusting.
| CONCLUSIONS |
 I didn’t
think this was as bad a kit as some reviews have said. As a matter of fact, I
thought it was an enjoyable build. It doesn’t fit together like a Tamiya kit.
I’ve said before that the newer Classic Airframes kits are more like adding
resin detail parts to an ‘80s Monogram kit. If you get rid of the aft part of
the nose gear mounting plate, you’ll solve a good percentage of the kit’s fit
problems. As with all Classic Airframes kits, this one isn’t for beginners or
modelers with a deficit of patience. While the Trumpeter kit is far easier to
build, and is readily available, if you happen across one of these beauties on a
vendor’s table, give it a try.
I didn’t
think this was as bad a kit as some reviews have said. As a matter of fact, I
thought it was an enjoyable build. It doesn’t fit together like a Tamiya kit.
I’ve said before that the newer Classic Airframes kits are more like adding
resin detail parts to an ‘80s Monogram kit. If you get rid of the aft part of
the nose gear mounting plate, you’ll solve a good percentage of the kit’s fit
problems. As with all Classic Airframes kits, this one isn’t for beginners or
modelers with a deficit of patience. While the Trumpeter kit is far easier to
build, and is readily available, if you happen across one of these beauties on a
vendor’s table, give it a try.
| REFERENCES |
Thunder and Lightnings http://www.thunder-and-lightnings.co.uk/
Warpaint #29 Hawker Sea Hawk, by T. Butler
Sea Hawk, 4+ Publications
Sources:
Sprue Brothers http://www.spruebrothers.com/
Meteor Productions http://www.meteorprod.com/
August 2007
If you would like your product reviewed fairly and quickly by a site that has nearly 400,000 visitors a month, please contact me or see other details in the Note to Contributors.