Donets Toy Factory 1/72 Canberra Tp.52
| KIT #: | F 203 |
| PRICE: | @60 cents |
| DECALS: | Two options |
| REVIEWER: | Torben Plesberg |
| NOTES: | Ex-Frog kit |
| HISTORY |
The English Electric Canberra was conceived during the closing phase of WWII, and the Air Ministry specifications were asking for a successor to the De Havilland Mosquito – jet powered of course. The aircraft was designed to carry a bomb load up to 10.000 Lbs. and with speeds and at altitudes that made defensive armament unnecessary.
The contract for a prototype was signed shortly after VE-day in May 1945. However, the prototype did not make its first flight until 4 years later. The prototype fulfilled almost all expectations and 132 aircraft were ordered even before the maiden flight was done. The first production variant, the B 2, was entering squadron service in May 1951. It was an immediate success with its top speed of 540 mph and a service ceiling of 48.000 feet, and it was easy to fly, handled like a fighter.
The Canberra was an immense success, and was built in many versions and for many foreign air forces. Even the USA bought the Canberra, but more important: the right to license build the Canberra under the designation Martin B-57. All together some 900 Canberras were built in the UK, 48 in Australia and Martin built 403 examples of the B-57. Canberras were used by the Indian Air Force for some decades. Three were used by the Luftwaffe and the Swedish Air Force, Flygvapnet, purchased two T 11.
 The Swedish
Canberras were actually the B 2. However, they were modified with a T 11 nose
cone, and they entered service in 1960 as Tp 52, which was a sort of “fake”
classification, since their purpose was not at all transport. The 52001 was used
exclusively as a spy plane for SIGINT operations, and the 52002 was used as a
test plane for testing of electronic equipment. The 02 flew mostly with a Lansen-type
nose-radome. The “correct” designation would be S 52 for the 01 (S means spaning=
reconnaissance) and P 52 for the 02 (P means provflygplan= test aircraft). I
guess the Swedes were rather cautious not to provoke the Soviet Union and
therefore called their spy plane a “transport plane”. The episode when a Soviet
MiG 15 fighter shot down a Swedish C-47 on an SIGINT mission, was only 8 years
ago!
The Swedish
Canberras were actually the B 2. However, they were modified with a T 11 nose
cone, and they entered service in 1960 as Tp 52, which was a sort of “fake”
classification, since their purpose was not at all transport. The 52001 was used
exclusively as a spy plane for SIGINT operations, and the 52002 was used as a
test plane for testing of electronic equipment. The 02 flew mostly with a Lansen-type
nose-radome. The “correct” designation would be S 52 for the 01 (S means spaning=
reconnaissance) and P 52 for the 02 (P means provflygplan= test aircraft). I
guess the Swedes were rather cautious not to provoke the Soviet Union and
therefore called their spy plane a “transport plane”. The episode when a Soviet
MiG 15 fighter shot down a Swedish C-47 on an SIGINT mission, was only 8 years
ago!
The Canberras served with Flygvapnet until 1974 without any incidents, and they were succeeded by a couple of SE 210 Caravelle air liners, which were obtained from the Scandinavian Airlines Systems, when the type was being phased out of airline service. The Caravelles got the Flygvapnet designation Tp 85, which was more likely, since the Caravelle was a transport aircraft!
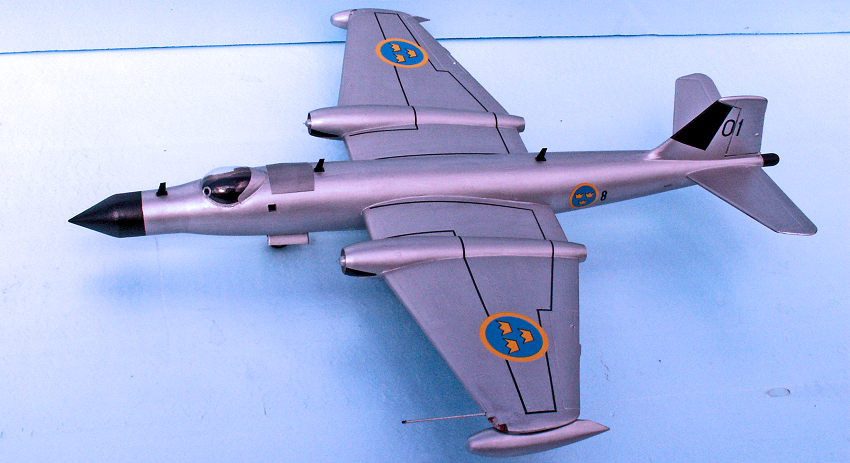
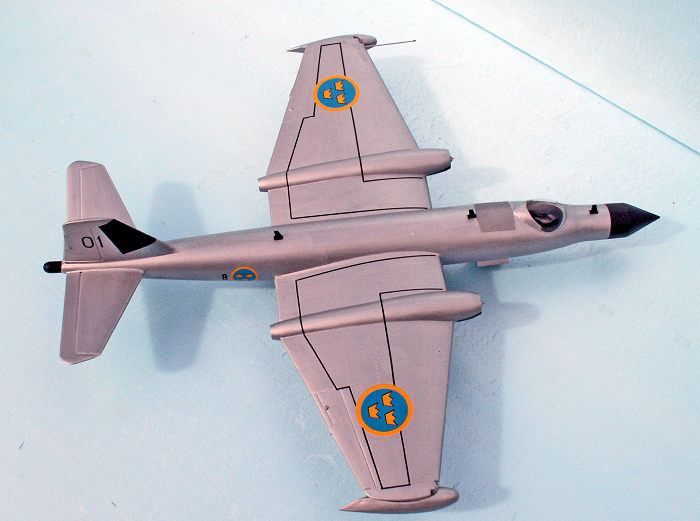
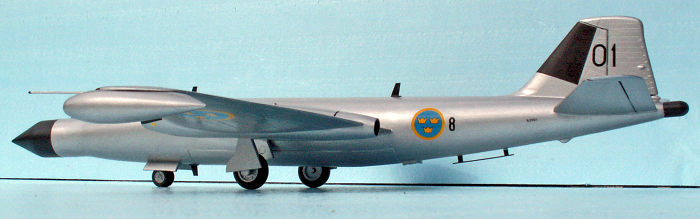
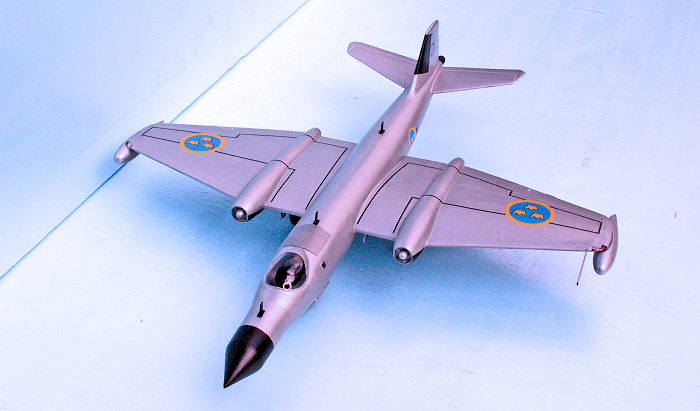
Both Swedish Canberras survives to this day: The 01 is on a permanent exhibition in the Svedinos Car & Aircraft Museum at Ugglarp, and this aircraft is the subject of my model. The 02 is on a permanent exhibition in the Flygvapnet Museum at Malmslätt.
The Swedish Air Force is rather unique, because they have had so many different transport aircraft types in service and often in small numbers, one or two! The most numerous transport aircraft ever was the Junkers Ju-86 with 41 aircraft. Number two was the Hunting Percival Pembroke with 18 aircraft. Number three was Douglas C-47 and Lockheed C-130, each with 8 aircraft. Number four was the Junkers Ju-52/3M with 5 aircraft. Then there were 12 different types with either 2 or 3 aircraft, and 13 different types with only one aircraft!
| THE KIT |
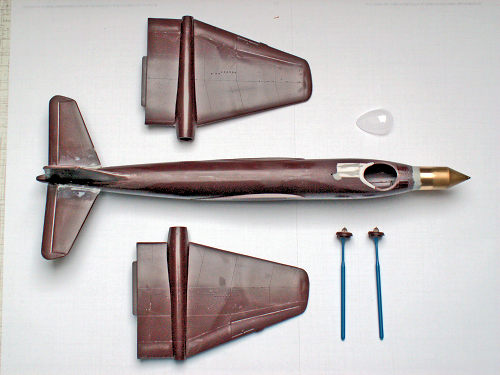
Comes normally in a cheap looking box with a primitive drawing of a Canberra on the top. I have this information from the search engine of scalemates.com, because the kit I bought came in a plastic bag and without decal sheet. The instructions were in the plastic bag and consists of a single A4 sheet of grey paper with the original drawings and exploded sketches from FROG and with Russian text only. However, it is a simple kit to build, and the instructions are good enough, even if you don’t understand Russian. There are some options: undercarriage up or down, with normal bomb bay doors or a pod with four 20 mm guns for the rear bomb bay.
There
are 5 sprues in brown plastic and with the numbers of the parts corresponding to
the instructions. A small sprue contains the clear parts: the asymmetrical B 8
canopy, three windows, the small nose cone, and a part for the cockpit interior.
There is some flash on a few of the parts, but it is
 easy
removable. Wing tip tanks is another option. There are fortunately no rivets at
all, and the raised panel lines are very fine, and they will not spoil the look
of the finished model. The kit was just what I needed for a model of the Swedish
spy-plane, the Tp 52 Canberra, which actually is a T 11, and the price of 60
cents was quite a bargain!
easy
removable. Wing tip tanks is another option. There are fortunately no rivets at
all, and the raised panel lines are very fine, and they will not spoil the look
of the finished model. The kit was just what I needed for a model of the Swedish
spy-plane, the Tp 52 Canberra, which actually is a T 11, and the price of 60
cents was quite a bargain!
The Donetsk Toy Factory is situated in the Russian town of Donetsk, in the least until 1991, when Ukraine became a sovereign state with no connection to the main state of the old Soviet Union – Russia.
| CONSTRUCTION |
The
kit is a rather simple one with less than fifty parts. The challenge of building
the Tp 52 is the T 11 nose cone and the B 2 canopy. Besides, both ends of the
engines need a”touch up”. The Canberra is a typical tail-sitter and would need a
lot of weight in the nose. Therefore it was a good idea to turn the T 11 nose
cone on the lathe in solid brass. Of course you can buy a nose cone on the
aftermarket, but this
 would be
in resin. You can probably also get a B 2 canopy, but buying these two items
spoils the challenge completely + it is far too expensive, when the kit was at
only 60 cents!
would be
in resin. You can probably also get a B 2 canopy, but buying these two items
spoils the challenge completely + it is far too expensive, when the kit was at
only 60 cents!
From a drawing in Karlström’s Flygplansritningar 5 and the Observer’s Book of Aircraft 1959 + some photos I made a sketch of the nose cone, and figured out that the weight would be in excess of 50 gram, more than enough for a tail sitting proof nose weight. The Unimat 3 lathe was too small for this job, and I had to activate the Proxxon PD 400, which is a fairly large lathe. It was a rather simple job to turn the cone, and the weight was even 60 gram measured on an electronic scale. This weight would be too much, and in order to realize the exact need for nose weight, I made a dry assembly of the kit with tape and a couple of sprue pieces for the two undercarriage legs in the wings. Then I taped a small ruler to the nose and put 2 Kroner coins on the ruler until the nose tipped down. The exact weight was then 10 gram for the ruler and 24 gram for the four coins needed – 34 gram. However, less than this weight would be needed thanks to the leverage of the nose cone, which is placed well forward of the ruler.
60 gram was too much, and I could drill as much as possible with a 10 mm gauge drill from the rear side of the cone. However, it was very difficult to clamp the cone in the three claw chuck, even because the cone has no parallel sides. The weight of the cone was reduced with 20 gram, and 40 gram would be more than enough to make the model absolutely tail sitting proof!
 A test
with the finished model standing on its undercarriage showed that it took 20
gram of weight on the tail planes to create the tail sitting mode. The leverage
effect reduced the need for nose weight, and the sufficient nose weight demand
is only 25 gram in the nose cone. This is 5 gram above the critical weight for
tail sitting.
A test
with the finished model standing on its undercarriage showed that it took 20
gram of weight on the tail planes to create the tail sitting mode. The leverage
effect reduced the need for nose weight, and the sufficient nose weight demand
is only 25 gram in the nose cone. This is 5 gram above the critical weight for
tail sitting.
Next step was to cut the nose off the two fuselage halves and this should be done in the very spot, where the gauge exactly matches the gauge of the thick end of the nose cone. There was a step of 1.5 mm turned down in the thick end of the cone, which would make it easy to glue the cone in place and with a drop downwards of about 3 degrees.
The fuselage halves were glued together with the nose cone in place. When the glue had set, it was possible to remove the cone and glue it in place in the exact correct position. Now the most spectacular modification was done, and it solved at the same time the problem of a sufficient nose weight.
The other modification was to produce a B 2 canopy, and this was more difficult than the nose cone. I have seen a conversion kit for a B 2, and this included the front part of the fuselage with the recess for the canopy – and the canopy itself.
It was by far not a simple matter to change a B 8 canopy with a B 2 ditto. And
the first step was to produce the canopy. During my
build of the Swedish Catalina Tp 47 I learned how
to shape a smaller blister from heated acetate using a positive master made of
Ureol. I used exactly the same method to make the B 2 canopy. I had to try three
times before I succeeded in making a perfect work piece for the canopy. It was
difficult to cut the thin acetate, however, by cutting in s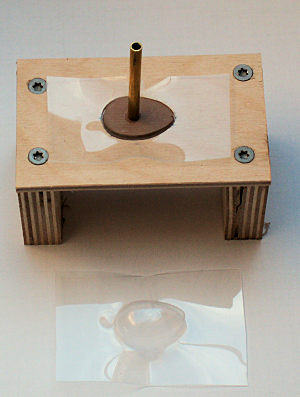 mall
pieces at a time I finally got the finished canopy. Simultaneously I was cutting
the recess in the fuselage, from which the opening for the B 8 canopy had been
closed. It was a long and tedious job to make the recess match the canopy, but
absolutely necessary. This job was comparable making the radome for the
Shackleton AEW 2, or the jet pod for the Tp 80
Lancaster.
mall
pieces at a time I finally got the finished canopy. Simultaneously I was cutting
the recess in the fuselage, from which the opening for the B 8 canopy had been
closed. It was a long and tedious job to make the recess match the canopy, but
absolutely necessary. This job was comparable making the radome for the
Shackleton AEW 2, or the jet pod for the Tp 80
Lancaster.
After having looked at the nose cone and compared it to the photos of the real thing, I realized that the cone was too thin – about 1.5 mm. And I knew from the beginning that the brass work piece was not quite thick enough for the correct gauge of the cone. To deal with this new problem I cut two pieces of 0.4 mm plastic card to cover the entire perimeter of the cone, and glued them around the cone, the outer one was about 1.5 mm longer than the inner one. Now the gauge was right, and left was a large filling and sanding job to make the cone blend properly with the fuselage. The front end of the 0.8 mm plastic card tube also had to be sanded and filled to conform the pencil shaped front.
The fin is far too thick in the front end. It must be sanded down to get a reasonable sharpness in the flight direction. This is a flaw of the kit.
The front ends of the engines must be modified. The B 8 engines have a fairly long center cone. This must be cut away and I turned a pair of much smaller cones in the lathe using an acryl rod gauge 4.5 mm. The length of the new cones was 3.5 mm. To get a proper clean intake I cut a one mm slice of a 10 mm gauge brass tube and glued it to the engine front. The difference between the rings and the nacelles was filled and sanded a couple of times. The inner gauge of the brass ring is 9 mm and matches exactly the intake gauge.
In the hot end of the engines it was necessary with a similar operation to get a clean exhaust opening. Parts no 8 of the kit were simply too bad, and they were replaced by 3 mm slices of a 7 mm gauge brass tube. Three times filling and sanding was obligate to make the rings blend with the nacelles. The inner gauge of a 7 mm tube is 6 mm.
The undercarriage was straightforward to assemble and caused no problems. Only some antennas remain, but these will finish the model after the painting and decaling job.
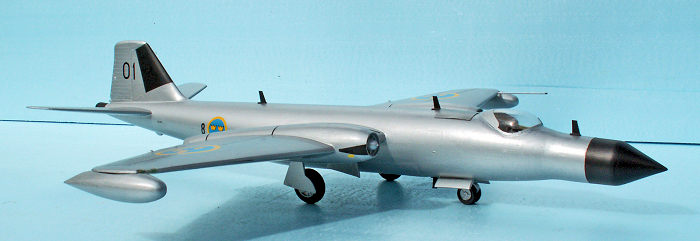
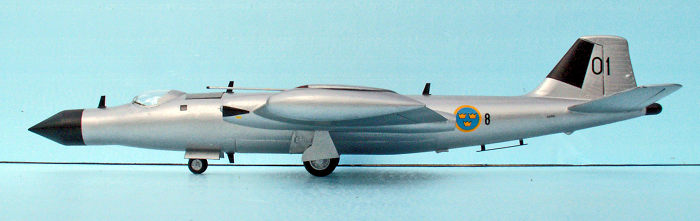
| COLORS & MARKINGS |
The Tp 52 is aluminium-colored overall. This rather dull color scheme is only varied by some black spots: the pencil-nose cone, the tires and the large built-in antenna in the fin. On the side of the nacelle fronts there are some triangles to camouflage the dirt from the starter-cartridges. The airframe got three layers of Revell Aqua aluminium metallic 99.
The
Swedish three crown markings came from a Flying Colors Aero-Decals sheet no
72001 d. The actual sizes of the roundels are 180 cm for the wings and 96 cm for
the fuselage. The sheet uses the actual size as reference! The decals are first
class, in register and correctly colored. The 01 numbers came from another
Flying Colors sheet: no 72002 modern Swedish numerals in black. There are 9
different sizes on the sheet, each for two models. The correct size for the
Canberra was 8.5 mm tall numerals.
 The wing
number – 8 – was also taken from a FC sheet: no 72010 Swedish Air Force Numerals
(thick) 1935-63. The wing numerals come in black, white and yellow in four
sizes. 5.5 mm is the correct size for the Tp 52. The only problem was the AF
serial number: 52001. However, I found these tiny numerals on a RBD sheet: J 26
Mustang part II no 72006. There was a decal for 26005, and the missing 1 was
taken from the spare numerals on the sheet. It was possible to make any Mustang
serial number of the Flygvapnet. The tiny numerals are rather difficult to
handle and place properly on the model.
The wing
number – 8 – was also taken from a FC sheet: no 72010 Swedish Air Force Numerals
(thick) 1935-63. The wing numerals come in black, white and yellow in four
sizes. 5.5 mm is the correct size for the Tp 52. The only problem was the AF
serial number: 52001. However, I found these tiny numerals on a RBD sheet: J 26
Mustang part II no 72006. There was a decal for 26005, and the missing 1 was
taken from the spare numerals on the sheet. It was possible to make any Mustang
serial number of the Flygvapnet. The tiny numerals are rather difficult to
handle and place properly on the model.
The Swedish Canberras were with standard British stenciling, with the exception of the danger markings on the nacelles. These were of the standard Swedish type, a yellow rectangle with red letters. The yellow rectangle was possible to make, the red letters not – however they will be almost invisible in this small scale. The walk lines on the wings would be possible to make. I drew 12 lines in black china-ink with a 0.7 mm technical pen on a piece of clear decal paper, each line 10 cm long. After a layer of clear gloss varnish had dried, I cut the lines with about 0.75 mm of carrier film on either side of the lines. The lines were rather easy to apply, but they must be precisely cut in length and the cutting angles must be suitable to conform the national roundels. The black lines were sealed by a layer of Satin Cote, HB Acrylic 135.
| FINAL CONSTRUCTION |
Behind the canopy there is an inspection door. This was made of some self-adhesive metal foil from the logo of a Danish car salvation firm (a falcon). The door was painted with steel color, which is slightly darker than the aluminium color of the airframe. The small circular window of the canopy was made of the same material, and was punched twice with my revolver punch. The tiny ring was about the right size, and it was painted with the standard airframe color.
There
was four blade antennas to make – from 0.4 mm plastic card. They are placed as
follows: One on the top of the pencil nose, one behind the canopy and one on the
dorsal at the rear edge of the wings, an finally one between the nose wheel
doors and front bomb bay doors. The rather long pitot tube is on the leading
edge of the port wing almost at the navigation lights. In the rear end there is
a dome 5.8 mm
 gauge and
9 mm long. The rear end of the fuselage (4 mm) must be cut off and replaced by
the dome. Besides there is a beam approach aerial on the ventral situated a
little in front of the fin. All antennas are matt black, Engine black Model
Master 4888.
gauge and
9 mm long. The rear end of the fuselage (4 mm) must be cut off and replaced by
the dome. Besides there is a beam approach aerial on the ventral situated a
little in front of the fin. All antennas are matt black, Engine black Model
Master 4888.
I realized from an article from the Swedish Aviation Historical Society on the Tp 52 that the 01 always flew with the wing tip tanks to get the maximum range of operation. The tip tanks of the kit were assembled, painted and glued on the wing tips of the model. However before the tanks were glued in place, I cut the recesses for the navigation lights, which were made of 2.8 mm thick acryl. The “lights” were drilled with a 0.5 mm drill some 1.5 mm down, and the holes were filled with red and green paint.
The very last item was a pair of air exchangers which were made of plastic strip 1.5 x 1.5 mm and 5.5 mm long. They are situated on the ventral just aft of the rear bomb bay doors.
| CONCLUSIONS |
Even if the kit is rather old and simple, it can be made into a reasonable model with a little effort. The challenge for me was to change the B (I) 8 into the Tp 52 (T 11), and I think this job was successful. Anyway it was a very cheap kit, and it would have been possible to buy the most important conversion parts on the aftermarket: the pencil nose dome and the B 2 type canopy. Each of these parts might well cost in the least ten times as much as the kit, and the challenge would be gone. The few flaws of the kit are not difficult to deal with. The kit is recommendable for all modelers who fancy a B 8 Canberra in 1/72 scale (or a Tp 52). The model is rather large, about the size of a DC-3.
| REFERENCES |
Björn Karlström: Flygplansritningar 5 – Swedish AF Transport Aircraft 1926-63 in scale 1:50, 1:72 and 1:144.
Allt om Hobby AB, Box 42006, S-126 12 Stockholm. ISBN 91-85496-30-8
Wikipidea article: English Electric Canberra.
Nordic Airpower # 2 Flygvapnet by Anders Nylén and Jan Jørgensen ISBN 978-87-993688-1-5
Book on Flygvapnet with about 500 color photos of first class quality. The right book if you want to know more about the Swedish AF, and especially for the modeler, because of the photos as documentation.
http://www.spyflight.co.uk/tp52.htm Canberra type Tp 52. Article on the Tp 52 translated into English from the magazine ”Kontakt” of the Swedish Aviation Historical Research Group.
William Green & Gerald Pollinger: The Observer’s Book of Aircraft 1959 Edition. Published by Frederick Warne & Co., Ltd London and New York. P 102-103 Canberra B (I) 8 and P 104-105 Canberra T 11
http://www.plasticfantastique.com
This website has a walk around of the Swedish spy plane and contains a lot of
photos of the 01 from the Svedinos Car & Aircraft Museum at Ugglarp (on the
Swedish west coast south of Falkenberg)
Thanks t
If you would like your product reviewed fairly and fairly quickly, please contact the editor or see other details in the Note to Contributors.
Back to the Main Page Back to the Review Index Page Back to the Previews Index Page