
Hallam Vac 1/72 Scottish Aviation Twin Pioneer CC.1
| KIT #: | 503 |
| PRICE: | $? |
| DECALS: | options |
| REVIEWER: | Carmel Attard |
| NOTES: | Vacuform kit |

| HISTORY |
The prototype Twin Pioneer G-ANTP made its first flight 46 years ago (25-6-55) and an order of 20 type CC.1 was placed by the Air Ministry which was later increased to 39 with the final seven being type CC.2, which had structural modifications. Originally the two power plants consisted of Leonidas 514 engines (550 HP). These were later replaced with Leonidas 531s (640HP). The first CC.1 series flew on 29-8-57 and trials were carried out at A&AEE at Boscombe Down, followed by other trials in tropical terrain and conditions.
In August 1959 78 Sq
at Khormaksar received some Twin Pioneers to supplement its single engine
Pioneers and by August 59 it completely re-equipped with the Twin type. The
Twin Pioneers were busily engaged in moving troops and supplies around the
wilderness and on occasions, lending support to the Sultan of Oman who was
facing a similar problem with
 incursions into Oman and
Muscat. A series of double engine failures caused problems with No 78 Sq.
losing two aircraft on the same day. Unsuitable soft/ hard landing strips
were also causes of failures during landings.
Other squadrons that operated the twin Pioneers were No.152 Sq based at Muharraq in Bahrain: No.21 Sq, which reformed with the types at Benson in May 1959. The squadron then moved to Kenya and in June 1965 to Aden. No 152 operated around the Persian Gulf and in 1959 No.209 Sq based at Seletar began to receive Twin Pioneers. These operated in Borneo and Malaya. Finally the last of Twin Pioneer operators was No.230 in the UK. These operated the type in interesting camouflage colourscheme. The SRCU 9Short Range Conversion Unit) at Odiham also flew three Twin Pioneers for training of aircrews.
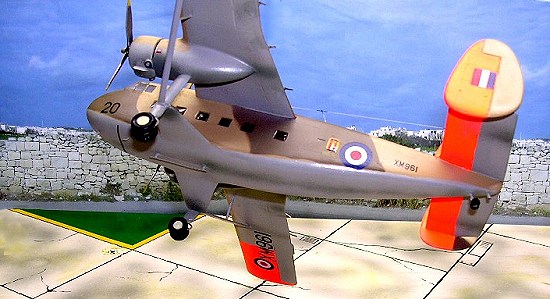
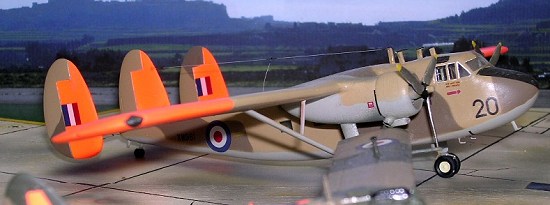
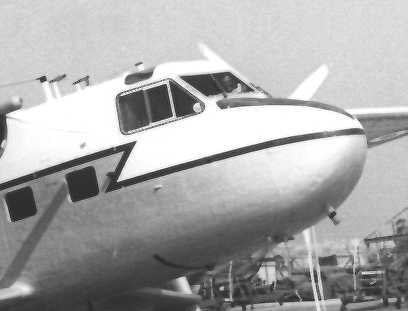
Twin Pioneer XM961, the subject of the scale model assembled represents one from the SRCU squadron, while XL993, which is the subject issued in the decal which is supplied with the Hallam-Vac kit was also attached to this squadron in later life until it was preserved for the RAF Cosford Aerospace Museum after representing the Twin Force at the Royal Review at Abington in 1968. The Royal Malay Air Force also received 14 Twin Pioneers.
Interesting past movements and fate of typical Twin Pioneers that were spotted landing at Hal-Luqa airfield in Malta circa 1965-66.
Serial No Date landed Occasion Service history and fate
XL968 25-10-66 On transit 21Sq to UK AAEE, 21, 78,21 SOC 18-12-67
XM957 -------65 To 27 MU, ex21 For Storage 78,21,AAEE, 209
XL992 3-7-65 from Khormaksar SOC 30-10-68
XM963 24-7-65 on transit 21Sq to UK 21,78,21,209, SOC 14-8-68
XM939 2-9-65 From Aden to UK SOC 9-10-68
XM940 7-10-65 on transit 21Sq to UK 230, SF Odiham , SRCU,
78,21,152, SOC 30-10-68
XL-993 29-9-66 on transit 21Sq to UK, SMU 78,21,TO 8388m 6-2-69
Preserved in RAF Museum
XL991 10-6-65 on transit 78Sq to 27MU FSS, 78,209, Ditched in Malaya
On 29-9-67
XM286 20-5-65 in 152 Sq markings 78,152,21,152, SOC 30-10-68
Twin Pioneer CC1 and CC2 squadron operational history period
 No 21 Sq, Eastleigh and
Khormaksar May59-Sep67
No 78 Sq, Khormaksar
Oct 58-Jun 65
No 152 Sq, Muharraq
Dec 58-Sep 67
No 209 Sq, Seletar
Mar59-Dec68
No 230 Sq, Odiham
Jan 60-Dec 61
| THE KIT |
 Hallam-Vac,
the vac form kit manufacturer and is well known for the release of original
kit subjects has produced a very accurate scale model of the Twin Pioneer
CC1. (Pattern No. 503). Several of the twin engine type of communication
aircraft like the Valetta, Pembroke, Twin Pioneer and even French ones like
the Flamant and the Coarse SO40, make such interesting subjects, yet are
never tackled by the known plastic injection kit manufacturers. Thanks to
Hallam-Vac for filling these gaps with true scale, nostalgic kits like the
Twin Pioneer, Brigand, and Welkin etc.
 The
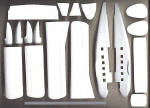
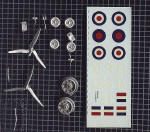
Twin Pioneer kit mainly consists of white vac form plastic comprising
fuselage halves, mainplane and tail plane parts, fin and rudder pieces,
engine nacelle parts, and a very clear cockpit canopy that contain fine
impressions to assist with painting of the outline of window frames. The
front engine cowling with all the details of the front engine interior,
propellers, fine undercarriage legs, wheels, parts for air intakes, and
tail wheels are all produced in white metal. These had the minimum of flash
apart from the joint lines, which are inevitable with cast parts but again
are very minute and easily filed down with a smooth needle file.
 The plastic parts of the
scale model are very accurate, measuring 7.54 inches in overall
length, having a wingspan of 12.75. This means that the kit appears to be
slightly more accurate in overall dimensions than the four view scale
drawings supplied with the kit, which works out some 3/32 inches oversize
in span. A clear strip of acetate is supplied for use with side windows,
which is fitted in place from the inside of the model. However as customary
with me when making vacform kits of this type, I preferred to fill the cut
and shaped windows with Kristal Kleer liquid. In spite of the slightly
oversize in wing span the scale plans proved to be very helpful for shaping
accurately the parts and check with them. One may have to make one's own
judgment and assume the placing of smaller parts as aerials and antennae,
which do not always appear on the plan view. Making reference to photos of
the real aircraft makes the process much easier. For that benefit I am
submitting a close up photo to indicate the size and position of the
upper forward fuselage antennae. These small pieces are made from the
excess plastic that accompany the vacform kit.
 An
assembly drawing is also provided, and though not drawn to the correct
prospective it is easy to follow to put the main parts together. However
there is not the slightest indication as to the cockpit interior layout,
seating arrangement etc. The clear cockpit canopy provided yearns for such
details. I did some homework on this area and took some pictures with the
hope that it can be of use to refer to. Additional parts such as control
gear, rudder bars, seats, fire extinguisher, front coming and instrument
panel, central console etc. were all made from scratch using plastic card
and stretch- sprue items.
| CONSTRUCTION |
 In
order to reinforce the wings I have found it suitable to insert pieces of
sprue of the correct thickness in between the wing parts at the leading
edge area. Thus the wide wingspan became sturdier with little chance of
sagging in warm weather. I have used this method on my Rareplanes kit of
the NA Savage and it worked miracles and retained its firm straight wing
shape. One should not leave out the aileron trim tab, which with no intent
seemed to have been overlooked. These are very clearly indicated on the
plans and can very easily be added to both sides of the wings ailerons,
being tapered at the rear with a smooth file upon drying. Plastic pieces
are provided to shape out the main wheel supports and Contrail rod parts
are recommended for the outer wing u/c supports. Incidentally, I got these
Contrail rods set from Aeroclub some time ago and these are a must for
likewise vacform kit modelers. These I found very handy and readily
available for operations of this sort.
 Now comes the tricky
part. When the aircraft is viewed from the front, the fuselage brackets
that support also the wheels arrangement looks slightly tilted downwards as
you go away from the fuselage. This tilt is very important to produce onto
the kit itself when fitting these parts because this may be the deciding
factor for the final overall sit of the finished true scale model itself.
There are two other stages that would need more than the Norman observation
during assembly. The first of these is the correct positioning of the
tailplane and checking it from time to time during the process of drying.
This is a simple task but is very rewarding. All it amounts to is to align
the leading edge of the tail plane exactly at 90 degrees to the centreline
(joint line) of the fuselage halves. As for the level of the tail planes
these should be at the same straight level to the leading edge of the main
planes, i.e. one behind the other, when these are viewed from the front.
The other somewhat tricky part concerns the fitting of the fin and rudder parts at its right place with the tail planes ends. Once the oval fin and rudder parts have dried, reference is now made to the port side view of the scale plans provided with the kit. A datum line is drawn or marked in pencil the inner face of the port fin and rudder piece. This so called datum line which also corresponds with another one marked on the inner face of the starboard fin and rudder piece will now serve as a guide when it comes to assemble the parts together on the tail plane ends. Having followed this sequence there you have a perfectly aligned and accurate tail unit assembly from the first attempt.
The final part is adding the eight or so tiny aerials, antennae etc and the rest of the white metal parts in their respective place. Two tiny outlets can be added to both sides of the under cowling air intakes and wing tip light clear parts are shaped and fitted to wing tip corners.
| COLORS & MARKINGS |
Assuming all the
parts are all fitted in place and the cockpit area has been painted and
dried out now comes the decision as to which colour scheme you want to
finish the model. In my case the Hallam-vac kit was supplied with a double
identical decal sheet for a sand-dark earth camouflaged aircraft with black
under surfaces. I should have elected to do this colour scheme as the Twin
Pioneer XL993 was one of those I have seen in Malta and photographed myself
though in a different 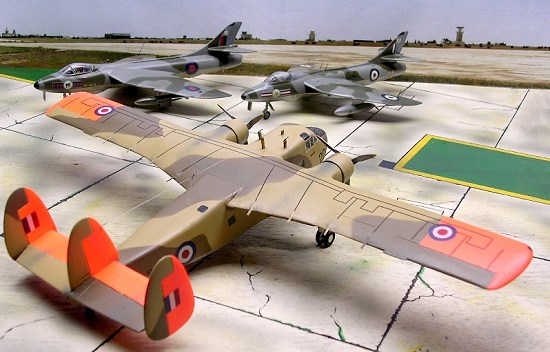 livery
of white and silver scheme, (see photo taken on 29-9-66) but it is my
custom to suggest a more colourful finish with models that I do. So my
fancy went for XM961 during the time it served with the Short Range
Conversion Unit in the UK. This Twin Pioneer also carried the same
camouflage colours but with a difference that it had light aircraft grey
undersides and black serial numbers under wing and on fuselage sides. But
best of all it carried high visibility dayglo orange wing tip areas,
tailfin areas and trailing edge of tail plane areas.
Even before the kit was airbrushed in the various colours, the assembled kit with all the putty at joint lines sanded down, surface detail refreshed and with a base coat of matt light grey paint, the kit looked just right and of correct proportions when compared with photos of the actual machine. I must also add that although I have not made the other kit of same aircraft produced to 1/144 scale but one thing I can say is that having seen good photos of this smaller scale kit, the Hallam-Vac model is much more convincing of the two and definitely closer in appearance to the life size immortal Twin Pioneer. An excellent kit of this workhorse with a long service history overseas in RAF service in particular.
The Royal Malay Air Force has also used the Twin Pioneer in service. Appropriate Malay decals also appear on the market from time to time. What I can suggest is that way back in 1969, Frog used to have a good kit of the HP Herald in the RMAF markings and I believe that these markings fit exactly to the Twin Pioneer. I know because I have bought the Herald from Woolworth of Bellingham, Teesside,UK way back in 1969.
| CONCLUSIONS |
Having made the Twin Pioneer kit, this is now placed next to my other kits of the Valetta, Sea Prince and Pembroke and among them they recall a vast period of RAF history and experience that are difficult to recall in books. Only those who lived it or were near enough to be fascinated by the sound of the piston radial engine coming out of these aircraft or rather milestones of communication type of aircraft, would know what I mean.
January 2005
Copyright ModelingMadness.com
If you would like your product reviewed fairly and fairly quickly, please contact the editor or see other details in the Note to Contributors.