Heller 1/100 Sud-Ouest SO-9000 Trident
| KIT #: | 79725 |
| PRICE: | $AUD 12.00 MSRP |
| DECALS: | One option |
| REVIEWER: | George Oh |
| NOTES: |
| HISTORY |
I’d never heard of the French Sud-Ouest SO-9000 Trident before. It was developed in 1955 as a fighter that would climb quickly to altitude, fire its one missile, then go home – a point-defence interceptor (like the WWII German Me163 Komet). Again, like the Komet, it had a rocket in its tail, but in addition, it had its two wingtip turbojets. The French specifications saw the Trident being developed in direct competition with the Dassalt Mirage. If it had won-out over the Mirage, can you imagine a Trident in RAAF or Israeli markings? It lost because the Mirage had more capability.
| THE KIT |
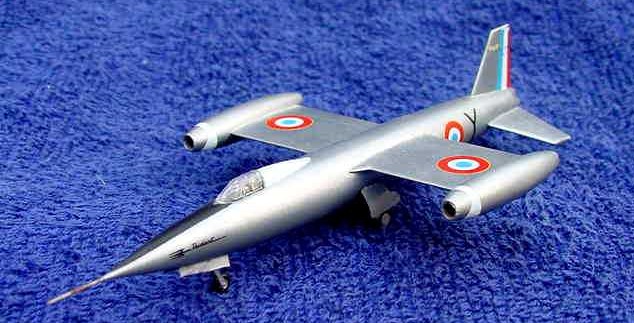
When I saw the Heller 1/100-scale model of it, I was captivated by it’s smooth spindle-like fuselage, its unusual arrow-like shape, its sleek lines, and the positioning of its engines on the tips of its stubby square wings. But $ 12-00 for so small a model seemed a bit steep. Naturally, when I saw one on sale for $ 3-00, I grabbed it.
 The kit was
moulded in 20 thick hard brittle silver-grey plastic parts, and 1 small
clear piece. This was going to be a quick build. The deficiencies of the
model were several. The nose-mounted spike would be fragile. There was
absolutely nothing under the thick, tiny canopy and the whole surface was
covered with relatively ginormous raised rivets. Absolutely none of the
flying surfaces showed any signs of control surfaces. And underneath, the
undercarriage doors were represented by thick malformed slabs of plastic.
The kit was
moulded in 20 thick hard brittle silver-grey plastic parts, and 1 small
clear piece. This was going to be a quick build. The deficiencies of the
model were several. The nose-mounted spike would be fragile. There was
absolutely nothing under the thick, tiny canopy and the whole surface was
covered with relatively ginormous raised rivets. Absolutely none of the
flying surfaces showed any signs of control surfaces. And underneath, the
undercarriage doors were represented by thick malformed slabs of plastic.
The decal sheet provided French National roundels with separate centres and four coloured patches so I wouldn’t have to paint panels. But the roundels were marred by a slightly out of register orange boarder. On the plus side, all of this was fixable by a modeller.
| CONSTRUCTION |
I started by
cutting groves in the nose of each fuselage half in line with the nose
spike, then removing the spike itself. A splash of Testors black was
brushed inside the fuselage halves and I joined them, trapping the
single-piece wing in 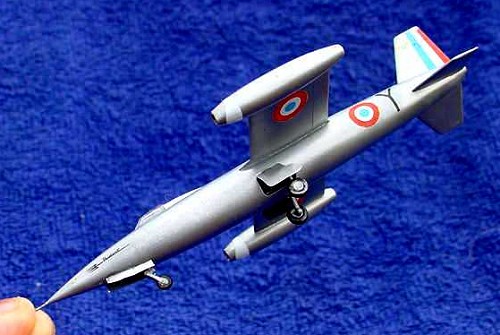 between. After I’d centralised the wing, I glued it
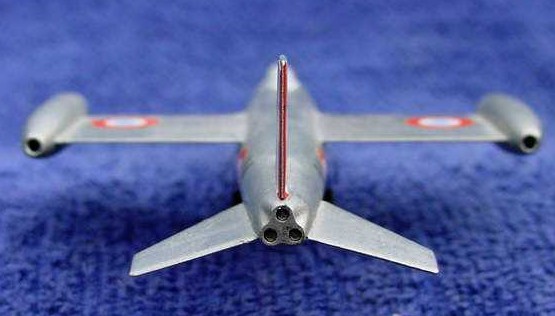
in place. The 3-outlet tailpipe and the three identical tailpieces were
also attached (ensuring the angles were right). The turbojet halves were
joined, then the assemblies were attached to the wingtips. I inserted long
wooden skewers into the jets to use as guides to ensure that they were
parallel to the centre-line of the fuselage. The airframe was complete,
but the hard work was yet to come.
between. After I’d centralised the wing, I glued it
in place. The 3-outlet tailpipe and the three identical tailpieces were
also attached (ensuring the angles were right). The turbojet halves were
joined, then the assemblies were attached to the wingtips. I inserted long
wooden skewers into the jets to use as guides to ensure that they were
parallel to the centre-line of the fuselage. The airframe was complete,
but the hard work was yet to come.
The gaps between the fuselage and the wing & tail roots, and the fuselage join seams were filled with Tamiya putty, then Mr Surfacer 500, and wet-sanded, finishing with 1200 wet n’ dry to get a smooth finish. In the sanding process, all those huge raised rivets were removed as well. Those grooves I cut in the nose halves – they formed the pilot hole that I used to drill a hole big enough for a sewing pin. I slipped the pin inside the fuselage via the wheel wells and, when it stuck its tip out through the hole, I fixed it (and a few bits of scrap plastic to support it) in place with superglue gel dribbled in along the same path. At this point, I plugged the cockpit and wheel wells with tissue, and painted it.
| COLORS & MARKINGS |
When I painted my Trident, I
went straight to Testors metaliser (stainless steel). This comes in a
bottle, but must be sprayed on then buffed to a lustre. It also shows in
outstanding clarity, any little imperfection in the surface – like where
the filling needs a bit more work. After spraying then buffing the first
coat, I masked-off the control surfaces that were indicated in the painting
guide, then resprayed and rebuffed the model. This gave me a slightly
different shade on the control surfaces, and demarcation lines that were
barely scratches in the paint. After removing the masks, I One-Go’ed the
whole 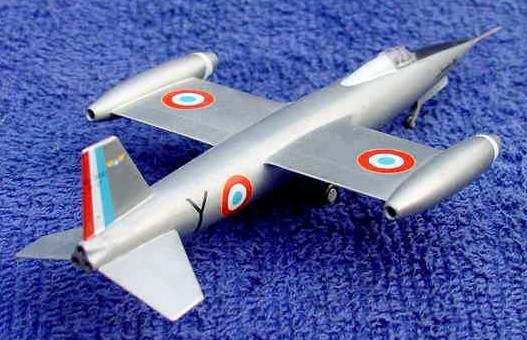 surface. This toned-down the chrome-like finish to something more
realistic, considering its scale. I’d elected not to panel it much ‘cos it
was only an experimental aircraft so it wouldn’t have received a lot of
weathering etc. Later references would show otherwise.
surface. This toned-down the chrome-like finish to something more
realistic, considering its scale. I’d elected not to panel it much ‘cos it
was only an experimental aircraft so it wouldn’t have received a lot of
weathering etc. Later references would show otherwise.
More construction
I spied a beautiful pair of Aeroclub white-metal 1/144-scale modern aircraft (ejector) seats in Just Planes (No. W006. Are there any more available out there?) so I grabbed them for this project. Despite the different scales, they’d fit perfectly. I painted one and superglued it onto a length of sprue that I continually trimmed till the seat was at just the right height. OK, it’s barely visible under that thick canopy, but I know it’s there. But the hard work was yet to come. At this point, I decaled it.
Decals
I couldn’t repair the out-of-register borders on the roundels, so I settled for trimming them till they were of a uniform width all of the way round. I hate those separate centres, because I have to keep checking it from different directions and distances to get them positioned correctly. The big problem was the white decal patches. They weren’t opaque enough, they produced a dark strip where they overlapped, they wrinkled because they were trying to fit a curved surface and the one behind the canopy was too big. I shoulda’ painted white first, applied the decals, then sprayed the stainless steel - used the decals as masks. One tail flash decal folded-over, but the black anti-dazzle pattern behaved itself. On the plus side, I didn’t need a setting solution.
| FINAL CONSTRUCTION |
As I stated
before, the doors were too thick to be useable. My solution was to place a
sheet of thin metal foil over each wheel-well and burnish it with a cotton
bud. This gave me an outline of the required shapes for the doors. I
 carefully cut them out with nail scissors ensuring that a long tag was left
at the top of each. Then I smoothed them out and gave them the same curve
as the fuselage by gently rolling them under a knife handle. I attached
the new undercarriage doors by supergluing the tags to the inside of the
fuselage. To achieve this, I had to manufacture a tool - a wire bent in
multiple planes. This wasn’t easy, but at least I have realistically-thin
doors under my little Trident.
carefully cut them out with nail scissors ensuring that a long tag was left
at the top of each. Then I smoothed them out and gave them the same curve
as the fuselage by gently rolling them under a knife handle. I attached
the new undercarriage doors by supergluing the tags to the inside of the
fuselage. To achieve this, I had to manufacture a tool - a wire bent in
multiple planes. This wasn’t easy, but at least I have realistically-thin
doors under my little Trident.
I elected to use the kit wheels & legs because they were too small to improve or replace. I brush-painted the legs silver and tidied-up the main wheels by gluing a thin plastic disk over the outside of each as a hubcap. This model was a tail sitter. The fix was to cut two lengths of coat hanger wire as long as the wheel base, and slide them in via the wheel wells. I white-glued the canopy in place, and my Trident was complete. The small canopy makes you realise what a large portly aircraft the Trident was.
| CONCLUSIONS |
 This small kit
didn’t need much assembly. It took a lot of work because I elected to
paint it silver and re-do the undercarriage doors. On the whole, I am
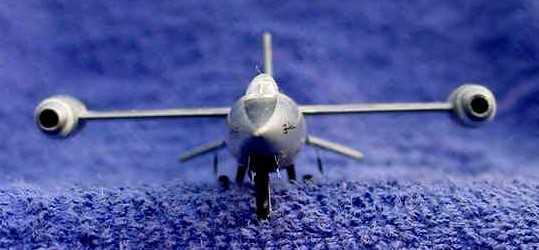
happy with my Trident. The nose spike is right on the centre line, and so
securely attached that I can support the whole model horizontally on it.
The ramjet engines are parallel and level. I am even happy with its
overall smooth finish and colour. While this is not a huge model, it is a
basic kit and so it is great for a beginner. I got one because it is an
unusual subject so I wanted one, and it is the only model I have ever seen
of a Trident. In short, I am a modeller. Now, I’ve discovered three other
Trident kits (‘Aint that always the way? Ed) - Pend Oreille has a
resin one in 1/48 scale (see Kit Preiews), Heller has one in 1/50-scale,
and Mach 2 has a flashy SO.9050 in 1/72-scale. The 9050 has different U/C
doors and no nose spike.
This small kit
didn’t need much assembly. It took a lot of work because I elected to
paint it silver and re-do the undercarriage doors. On the whole, I am
happy with my Trident. The nose spike is right on the centre line, and so
securely attached that I can support the whole model horizontally on it.
The ramjet engines are parallel and level. I am even happy with its
overall smooth finish and colour. While this is not a huge model, it is a
basic kit and so it is great for a beginner. I got one because it is an
unusual subject so I wanted one, and it is the only model I have ever seen
of a Trident. In short, I am a modeller. Now, I’ve discovered three other
Trident kits (‘Aint that always the way? Ed) - Pend Oreille has a
resin one in 1/48 scale (see Kit Preiews), Heller has one in 1/50-scale,
and Mach 2 has a flashy SO.9050 in 1/72-scale. The 9050 has different U/C
doors and no nose spike.
| REFERENCES |
I didn’t have any - only the box-art and the painting/decal guide. Later, I found some photos on the Internet under Sud-Ouest. They showed a weathered Trident without an anti-dazzle panel
November 2004
Copyright ModelingMadness.com
If you would like your product reviewed fairly and quickly, please contact me or see other details in the Note to Contributors.