Falcon 1/48 Sea Hawk
|
KIT # |
|
|
PRICE: |
$31.98 |
|
DECALS: |
See Review |
|
REVIEWER: |
|
|
NOTES: |
Vacuform with white metal bits |
|
HISTORY |
The Hawker Sea Hawk was the first completely successful British jet-powered carrier fighter. It was roughly equivalent to the U.S. Grumman F9F Panther, with which it shared a powerplant - the very successful Nene centrifugal turbojet - and of similar performance to the U.S. Navy's jet mainstay of the Korean War. While the Sea Hawk began its development process two years prior to the Panther, it first flew in the same year as the XF9F-2, and yet it entered service with the Fleet Air Arm in 1951, three years after the Panther had reached the same milestone. Even so, it was the most successful British jet of the postwar period, a time marked by a strange technological lethargy in the British aviation industry.
 The P.1040, as the
Sea Hawk was initially know at Hawkers, began as a proposal for a single-engine
jet fighter in the fall of 1944, which was not acted on until nearly a year
later when it was rejected by the Air Ministry in favor of maximizing production
of Meteors and Vampires. In January 1946, the design was proposed to the
Admiralty as a carrier-based fighter; this resulted in an order in May 1946 for
three prototypes, the first of which flew September 2, 1947 - within a few
months of the XF9F-2 in the U.S.
The P.1040, as the
Sea Hawk was initially know at Hawkers, began as a proposal for a single-engine
jet fighter in the fall of 1944, which was not acted on until nearly a year
later when it was rejected by the Air Ministry in favor of maximizing production
of Meteors and Vampires. In January 1946, the design was proposed to the
Admiralty as a carrier-based fighter; this resulted in an order in May 1946 for
three prototypes, the first of which flew September 2, 1947 - within a few
months of the XF9F-2 in the U.S.
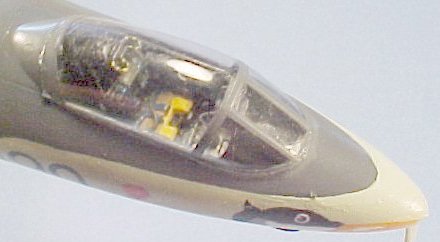
The most original feature was the bifurcated engine exhaust, which neatly solved the problem of excessive loss of thrust associated with early turbojets when a longer exhaust pipe was used. While the casual observer might think the Sea Hawk a twin-engine design like the McDonnell F2H Banshee, it had a single Nene at the center of gravity, which greatly aided its handling in flight. Pilots enjoyed the outstanding handling characteristics of the Sea Hawk, which were in direct opposition to the Supermarine Attacker, the other naval jet fighter under development at the time. Pilots particularly liked the fact the cockpit was as far forward as it was, giving good visibility for both combat and carrier landings.
The Sea Hawk F.Mk.1 was ordered into production in 1949. The outbreak of the Korean War gave added impetus to the need for the airplane, but Hawker was now deeply involved in the problems associated with creation of the Hunter. Production was shifted to Sir W. G. Armstrong Whitworth Aircraft, which had responsibility for further development and all production past the first 35 F.Mk.1s, the first of which flew November 14, 1951.
Service trials with the Hawker-built aircraft occupied most of 1952 while production hit its stride at Armstrong-Whitworth. 806 became the first operational Sea Hawk squadron in March 1953.
 Following
production of 60 Mk.1s, 40 F. Mk.2s appeared with powered controls. The demand
for increased operational versatility was met with 116 F.B.Mk.3s which could
carry bombs in place of the under wing drop tanks. The 97 FGA Mk.4s appeared
with a "4 store" wing and the ability to carry rockets outboard of the pylons,
but performance suffered. The Admiralty decided to upgrade the FB Mk.3s and FGA
Mk.4s with the Nene 103, offering an increase in power from 5,000 to 5,200 lbs
of thrust, to be known as the FGA Mk. 5 and Mk.6 respectively. Few were re-engined,
but 87 new-build FGA Mk.6s were taken into service. When the last of these were
delivered in January 1956, production of the Sea Hawk for the FAA came to an
end.
Following
production of 60 Mk.1s, 40 F. Mk.2s appeared with powered controls. The demand
for increased operational versatility was met with 116 F.B.Mk.3s which could
carry bombs in place of the under wing drop tanks. The 97 FGA Mk.4s appeared
with a "4 store" wing and the ability to carry rockets outboard of the pylons,
but performance suffered. The Admiralty decided to upgrade the FB Mk.3s and FGA
Mk.4s with the Nene 103, offering an increase in power from 5,000 to 5,200 lbs
of thrust, to be known as the FGA Mk. 5 and Mk.6 respectively. Few were re-engined,
but 87 new-build FGA Mk.6s were taken into service. When the last of these were
delivered in January 1956, production of the Sea Hawk for the FAA came to an
end.
In the spring of 1956, the Sea Hawk began a second production life, when the Royal Netherlands Navy ordered 22 to replace their Hawker Sea Furies; these were delivered july 1957 and January 1958. In March 1958 they became the first European fighter armed with the Sidewinder AAM, and remained in first-line service until 1964.
Following the Dutch order, the Federal German Republic ordered 64 FGA Mk.6s for its newly-reborn Marineflieger. These, the Sea Hawk Mk. 100 and 101, were distinguished by a larger vertical fin and rudder, and the first was delivered in February 1958. 52 of these were delivered knocked-down and assembled by the Focke-Wulf Company, which assumed responsibility for maintenance and repair.
In late 1959, the Indian Navy purchased 9 Sea Hawk F.B. Mk.3s which were refurbished to Mk. 6 standards. This was followed by an order for 14 new-build FGA Mk.6s in 1961, which became the last new Sea Hawks built. 22 more ex-Royal Navy aircraft were purchased in 1961-62. All served with No. 300 "White Tiger" squadron aboard INS "Vikrant." 28 German aircraft were purchased as attrition replacements in 1966. These Sea Hawks served as the first line fighter strength of the Indian Navy until they were replaced by Sea Harriers in 1983-84, which makes the Sea Hawk one of the longest-serving first-generation jet fighters.
Operation Musketeer:
 "Operation
Musketeer", the Anglo-French-Israeli plan to de-fang Egyptian President Gamal
Abdel Nasser and regain control of the Suez Canal, was carried out in October
and early November 1956. Sea Hawks were operated by 800, 802 and 810 Squadrons
aboard HMS "Albion," 804 and 897 Squadrons aboard HMS "bulwark," and 899
Squadron aboard HMS "Eagle," making the Sea Hawk numerically the most important
British airplane operational during the conflict.
"Operation
Musketeer", the Anglo-French-Israeli plan to de-fang Egyptian President Gamal
Abdel Nasser and regain control of the Suez Canal, was carried out in October
and early November 1956. Sea Hawks were operated by 800, 802 and 810 Squadrons
aboard HMS "Albion," 804 and 897 Squadrons aboard HMS "bulwark," and 899
Squadron aboard HMS "Eagle," making the Sea Hawk numerically the most important
British airplane operational during the conflict.
The Sea Hawks were given the assignment of neutralizing the Egyptian Air Force and protecting the Anglo-French strike aircraft against attacks by the Egyptian MiG-15s, as well as defending the fleet against possible attacks by the Il-28 "Beagle" aircraft the Egyptians were known to possess. Most of these aircraft were grounded because the Egyptians did not have enough trained crews yet to man them. The Sea Hawks neutralized the Egyptian Air Force bases and then proceeded to provide close air support to the Anglo-French paratroops dropped in the Canal Zone. The Sea Hawk proved as adept at this work as had the Grumman Panther during the Korean War. This was the only combat the Sea Hawk experienced during its long career.
In the years after Operation Musketeer, the Sea Hawk was replaced by the Scimitar and the Sea Vixen. The last squadron to replace its Sea Hawks in 1960 was 806, which had been the first to equip with the type nearly eight years earlier.
|
THE KIT |
The Falcon vacuform kit of the Sea Hawk is the only 1/48 kit of this airplane available. There was an ancient Airfix release in the mid-1960s, and there has been a more recent release by MPM, both in 1/72.
The kit provides white metal landing gear, white metal ejection seat, and two very clear Falcon vacuform canopies, in addition to ten vacuform airframe parts. At present, the kit no longer has decals, which originally provided markings for an "Ace of Spades" aircraft of 806 Squadron, so the modeler will be required to dig out appropriate decals from the decal dungeon. In my own case, I also turned to my friend John Lester to produce the seabird insignia of 899 Squadron on his ALPS printer.
|
CONSTRUCTION |
Construction starts with removal of the parts from the backing sheet. As I have mentioned before, I like to draw around the part with a No.2 pencil, score around the part with an X-acto blade, pop the part loose then sand it down till the pencil line just disappears. I give a bit of extra sanding to the trailing edges of wings and horizontal stabilizers.
 The kit has a
complex construction. the fuselage is parted right at the trailing edge, with
the forward fuselage being divided horizontally - with the upper part also
including the upper wings - while the rear fuselage is divided vertically. This
creates certain difficulties of assembly that will be dealt with later.
The kit has a
complex construction. the fuselage is parted right at the trailing edge, with
the forward fuselage being divided horizontally - with the upper part also
including the upper wings - while the rear fuselage is divided vertically. This
creates certain difficulties of assembly that will be dealt with later.
I used the vacuform cockpit tub, then added in more details, and used Pro Modeler individual instrument bezel decals for the instrument panel. I scratch built the forward and aft bulkheads of the cockpit with Evergreen sheet, and installed all this in the upper fuselage half.
I opened up the gun ports in the lower fuselage and then ran some Evergreen tubing in. when dry, this was trimmed on the outside and sanded smooth. I also made some sidewalls for the nose gear well with Evergreen sheet.
Things start to get difficult when you use the parts for the intake trunking and the exhaust. Do not use the exhaust! The parts do not fit easily within the fuselage and will create further fit difficulty when attaching the rear fuselage. I used some short lengths of Evergreen tubing for the exhausts. The intake trunking does not fit together well. I installed it, installed the vacuform main gear wells, and glued the forward fuselage together. I then added in a lot of putty to the intakes, which would be sanded and filed down later.
Be careful when attaching the rear fuselage that you put a spreader bar inside so that the rear fuselage can be stretch to have the same cross section as the forward fuselage - it wants to be more vertically oval otherwise. I glued this in, then filled the huge seam gaps with cyanoacrylate for strength. When that was dry I put on a considerable bit of Squadron green putty and set this aside to dry and cure for a few days.
 Once everything
was dry, it was time for serious use of the various grades of sanding sticks.
Sand down, check for seams, add more putty, let it set up, sand some more,
repeat as necessary - you know the drill. The one fortunate thing I could think
of regarding this horrid fuselage joint was that it was right where the
yellow-and-black "Operation Musketeer" stripes would go. With those different
colors and different visual geometry from the surrounding FAA camouflage, the
observer's eyes would be visually distracted from any minor ball-ups still
around. Eventually, the project took on the shape of a Sea Hawk, and it was
time for Mr. Surfacer and then rescribing the panel lines. I then attached the
horizontal stabilizers and the four wing pylons I made from thick Evergreen
sheet.
Once everything
was dry, it was time for serious use of the various grades of sanding sticks.
Sand down, check for seams, add more putty, let it set up, sand some more,
repeat as necessary - you know the drill. The one fortunate thing I could think
of regarding this horrid fuselage joint was that it was right where the
yellow-and-black "Operation Musketeer" stripes would go. With those different
colors and different visual geometry from the surrounding FAA camouflage, the
observer's eyes would be visually distracted from any minor ball-ups still
around. Eventually, the project took on the shape of a Sea Hawk, and it was
time for Mr. Surfacer and then rescribing the panel lines. I then attached the
horizontal stabilizers and the four wing pylons I made from thick Evergreen
sheet.
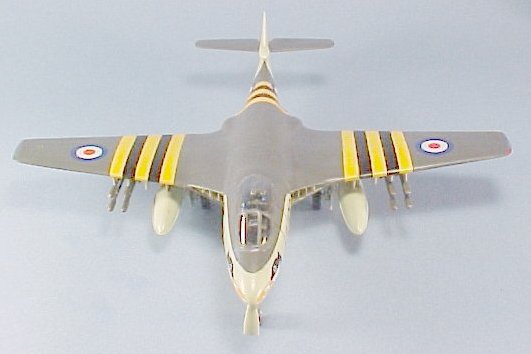
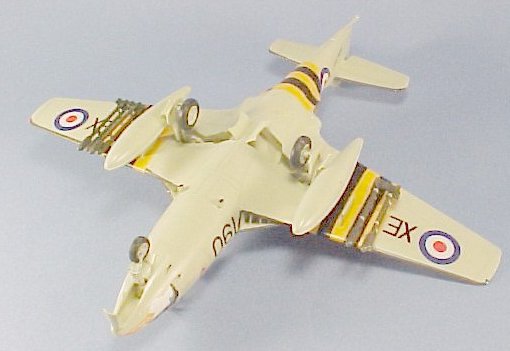
It was now time to finish the intakes. I added the splitter plates, made with .010 Evergreen sheet, then cut plastic and bent it and test-fitted it to be the intake fences. This was fiddly, but worked by working from the outer one to the middle one to the inner one.
Since the landing gear was painted the underside color, I installed it at this point. The model required a couple of fishing weights immediately aft of the cockpit, which I had installed during assembly.
I had decided already to have the very clear canopy closed, so I glued in the very nice KMC Martin-Baker Mk.2 ejection seat and then glued the canopy in position after I had Futured it. I masked the canopy using Scotch transparent tape.
|
PAINT & DECALS |
Painting:
 I gave the model a
coat of light grey first to insure I had indeed gotten all the seams. Two of
the little buggers showed up and were promptly dispatched with a final dose of
Mr. Surfacer. I then "pre-shaded" the model along the panel lines and filled in
the area of the ID stripes all in black.
I gave the model a
coat of light grey first to insure I had indeed gotten all the seams. Two of
the little buggers showed up and were promptly dispatched with a final dose of
Mr. Surfacer. I then "pre-shaded" the model along the panel lines and filled in
the area of the ID stripes all in black.
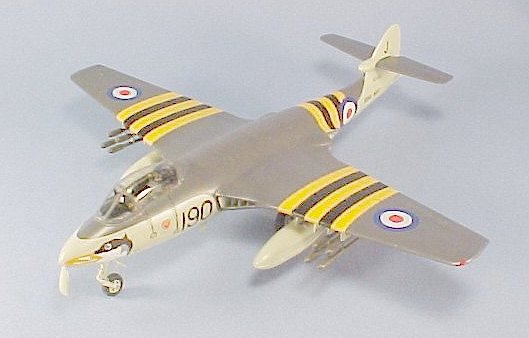
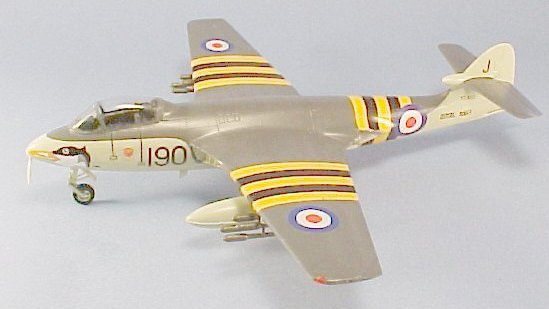
When this was dry I masked off the black stripes (they were 12 inches wide, making this easy in 148). I then painted the yellow stripes with Tamiya Flat Yellow - applying this over the black resulted in a slightly "ragged" final look, which would be correct for these temporarily-applied markings. When this was dry I masked off all the stripes.
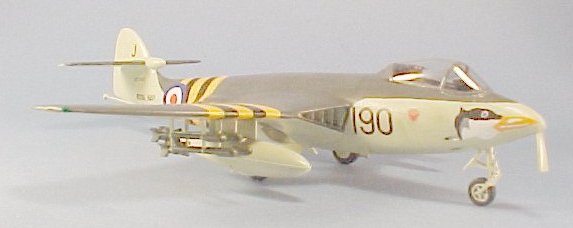
The upper surface was painted with Tamiya Dark Grey, which was then "faded" a bit for looks. I sealed this with ModelMaster sealer, then masked over the entire upper camouflage pattern and painted the lower color with Gunze-Sanyo "Sky," which is a close match for the FAA postwar "Sky" color (which was different from the WW2 color).
When I unmasked the model, I could see it was going to look good, and that the fuselage stripes did indeed hide any problems with that joint. I gave the model a coat of Future and let it dry.
Decals:
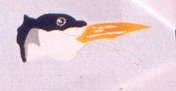
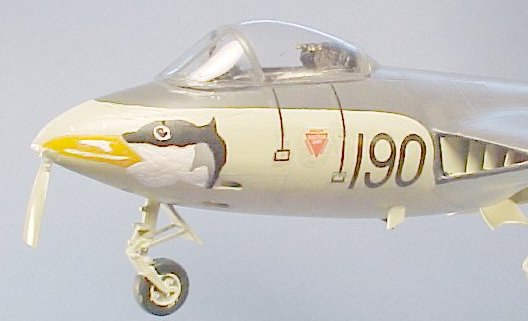 The kit has no decals. I was able to obtain a picture of the 899 Squadron
insignia, the well-known seabird, which I sent to John Lester with sizing
information. He produced several copies of each decal on his ALPS, and they
were applied. I found I had to touch them up with paint once they were set.
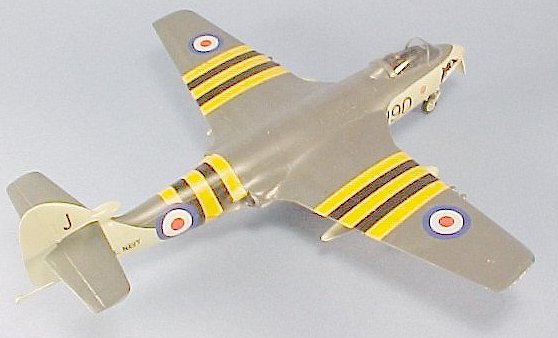
The other markings came from the decal dungeon. Thank goodness the wing stripes
were over the under wing serials, so all I had to find was an "X" and "E", which
didn't require British fonts. I backed the national insignia decals with
circles cut from white decal sheet to avoid the bleed-through of the ID
stripes. When everything had set up, I washed the model, then gave it another
coat of Future. That was followed with a coat of Future mixed with a bit of
Tamiya "Flat Base" to make a dulled-down but still glossy finish that was more
accurate-looking.
The kit has no decals. I was able to obtain a picture of the 899 Squadron
insignia, the well-known seabird, which I sent to John Lester with sizing
information. He produced several copies of each decal on his ALPS, and they
were applied. I found I had to touch them up with paint once they were set.
The other markings came from the decal dungeon. Thank goodness the wing stripes
were over the under wing serials, so all I had to find was an "X" and "E", which
didn't require British fonts. I backed the national insignia decals with
circles cut from white decal sheet to avoid the bleed-through of the ID
stripes. When everything had set up, I washed the model, then gave it another
coat of Future. That was followed with a coat of Future mixed with a bit of
Tamiya "Flat Base" to make a dulled-down but still glossy finish that was more
accurate-looking.
Final Finish:
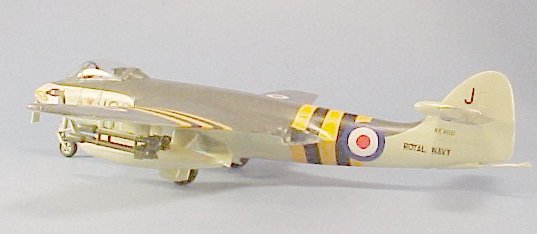
The underwing rockets came from the parts box, where they had originally been part of the armament for an Airfix Spitfire. I used drop tanks from a Hasegawa F4U-4 Corsair, which are the proper size for the drop tanks used by the Sea Hawk.
|
CONCLUSIONS |
I now have the three main combat types used by the Fleet Air Arm in "Operation Musketeer." With the Hawker Hunter and F4U-7, I only need to do an F-84F with the decals I have for the French ones that flew from Lydda during the operation. If I can lay hands on an Aeroclub Canberra B.Mk.6 I can do it as one of the Canberras that flew from Malta, and my collection will be almost complete.
This is the most difficult Falcon vacuform I have done. It will require some advanced modeling skills and quite a bit of patience to get that fuselage joint tamed, but the end result is a good looking model of an airplane unlikely to be kitted in injection plastic anytime soon.
Thanks to Falcon Models for the review kit
August 2002
Copyright ModelingMadness.com. All rights reserved. No reproduction in any form without express permission from the editor.
If you would like your product reviewed fairly and quickly, please contact the editor or see other details in the Note to Contributors.