MPM 1/48 P-63 Kingcobra
|
KIT # |
48033 |
|
PRICE: |
$29.98 |
|
DECALS: |
See review |
|
REVIEW |
|
|
NOTES: |
|
|
HISTORY |
The P-63 "Kingcobra" was developed from the XP-39E "Airacobra," which tested a different wing from the standard P-39, which took flight in April 1941 with a laminar airfoil, square-cut tail, and Allison V-1710-47 (with the supercharger that the Air Force had ordered deleted from the production P-39). The results were so promising that the Air Force ordered two further prototypes, now designated the XP-63, on June 27, 1941. Of the nine new sing-engine fighter prototypes flown in the two years following U.S. entry into the war, only the P-63 - known by Bell as the "Kingcobra" - went into mass production.
The P-63 did not match the P-47 Thunderbolt or the Merlin-powered P-51 in
high altitude performance with its single-stage supercharger. However, had the
P-51 not existed, the P-63 might well have been equipped with a two-stage
supercharger - since it had the necessary range to be an effective escort
fighter and the performance to meet the enemy on equal terms.
 Had that happened,
we might think today of the Kingcobra the way we think of the Mustang. As it
was, 1,725 P-63A and 1,227 P-63C Kingcobras were produced; 2,456 P-63As and
P-63Cs went to the Soviet Union where they enjoyed success as frontal fighters,
while 300 P-63C Kingcobras served in the French Air Force.
Had that happened,
we might think today of the Kingcobra the way we think of the Mustang. As it
was, 1,725 P-63A and 1,227 P-63C Kingcobras were produced; 2,456 P-63As and
P-63Cs went to the Soviet Union where they enjoyed success as frontal fighters,
while 300 P-63C Kingcobras served in the French Air Force.
The French Kingcobras were initially used for coastal patrols in the Mediterranean and later for ground attack missions in the final offensives to liberate the Channel ports from their die-hard German defenders. After the outbreak of hostilities between France and the Viet Minh in 1946, G.C.2/9 took their Kingcobras to French Indochina in 1947. The aircraft were operated in the ground attack role until 1949 when they were replaced by Grumman Bearcats.
|
THE KIT |
MPM first released their Kingcobra in 1995. The kit has hit the shelves in versions that allowed the modeler to build either a P-63A and RP-63G "Pinball," a P-63C with resin conversion set for the tall-rudder P-63F, and a bubble-canopy P-63D. The kit is not one of the better releases from MPM, but when it is compared to its competition - a truly dreadful collection of bad plastic from HiTech that includes a canopy too small to fit the model - it begins to look better. With some extra effort, the result does look like a Kingcobra, but this is no "out of the box" shake-and-bake proposition.
I chose the P-63C/P-63F kit, as I was considering doing the P-63F, an airplane I used to know personally when it was owned by Jack Flaherty in the 1970s and flown regularly if unspectacularly at the Reno and Mojave Air Races. One look at the resin conversion set, however, and I decided to stick with the P-63C.
|
CONSTRUCTION |
Construction starts with taking a razor saw to cut the major parts off the trees, and clean them up. There is considerable flash, as well as the remnants of the injection gates to be sanded off and smoothed over.
 I took a look at the seat the kit came with and immediately went looking in
the spares box for something else. I ended up using the seat from a Hasegawa
Hellcat that had been built with a resin cockpit. While nosing through the
spares box, I came up with two 55 gal drop tanks for a Tamiya P-51B that would
add something to the look of the model when completed.
I took a look at the seat the kit came with and immediately went looking in
the spares box for something else. I ended up using the seat from a Hasegawa
Hellcat that had been built with a resin cockpit. While nosing through the
spares box, I came up with two 55 gal drop tanks for a Tamiya P-51B that would
add something to the look of the model when completed.
I painted the cockpit interior parts, door interiors, the landing gear and gear doors and wheel wells "Bell Green," a 50-50 combination of Gunze-Sanyo Field Green FS34097 and Green FS34092. I painted the various black boxes and the instrument panel Tamiya semi-gloss black, dry brushing everything with Testors Aluminum Metallizer to pop out detail. I used instrument decals from a ProModeler sheet to do the instrument panel, and added an Eduard photoetch seatbelt set as a final touch.
I then assembled the fuselage, adding about 4 ounces of weight in the nose to avoid tail-sitting, and set it aside. The nose is too small. Fortunately, I had the four-bladed Aeroproducts paddle prop and spinner from the Eduard P-39 kit, which I used here. I shimmed the nose to widen it, and added some extra plastic on the lower are of the nose to get it the right size and shape to fit the spinner. A lot of putty was necessary here to smooth all this out.
I then proceeded with the wings, which required sanding down to thin the trailing edges, and the use of some .010 plastic sheet to box in the main gear wells. The fit of wing to fuselage was not good, and required some major re-shaping of the fillet joint to get them together without large gaps. When they were glued together, I attached the butt-joined horizontal stabilizer, which also needed some trimming to insure that the hinge line of the elevators was perpendicular to the fuselage centerline. Putty was then liberally applied to all joints and the model was set aside to dry.
A nasty little surprise:
 As I was sanding down the model, it appeared "bent" to me looking
down at it in plan view. I brought out my ruler, laid it along the fuselage
centerline and discovered that the airplane is very slightly bent like a banana
along the centerline, so that it has more curve on the right side than the left.
Not by much, and the average viewer looking at if from the side won't notice it,
but it's there. The solution is to know this ahead of time and be sure to get
the fuselage parts straight along the centerline using a ruler for visual
alignment. Let it not fit toward the nose and sand that down and trim out the
forward cockpit area.
As I was sanding down the model, it appeared "bent" to me looking
down at it in plan view. I brought out my ruler, laid it along the fuselage
centerline and discovered that the airplane is very slightly bent like a banana
along the centerline, so that it has more curve on the right side than the left.
Not by much, and the average viewer looking at if from the side won't notice it,
but it's there. The solution is to know this ahead of time and be sure to get
the fuselage parts straight along the centerline using a ruler for visual
alignment. Let it not fit toward the nose and sand that down and trim out the
forward cockpit area.
After sanding everything down, applying Mr. Surfacer 500 to all seams and sanding that down, the model appeared ready to proceed. I shot it overall a light coat of grey, saw that some joints needed more putty and sanding, and did that. Another coat of light grey paint let me see that the model was ready for its final coat of paint.
I cut the vacuform canopy out after Futuring it and attached it before painting, masking it with shiny Scotch tape, which leaves no residue when removed from a surface that is covered with Future.
|
PAINT & DECALS |
Painting:
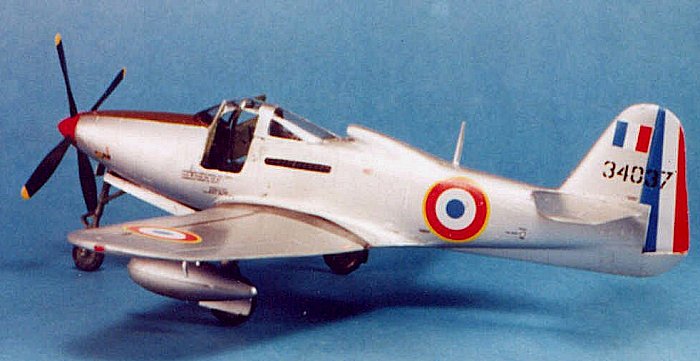
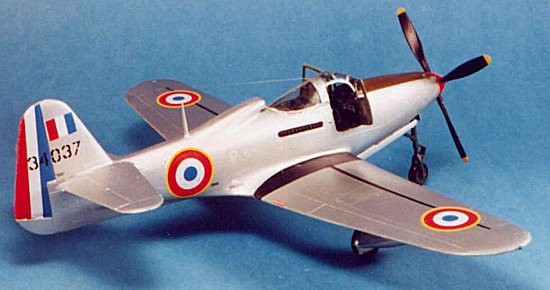
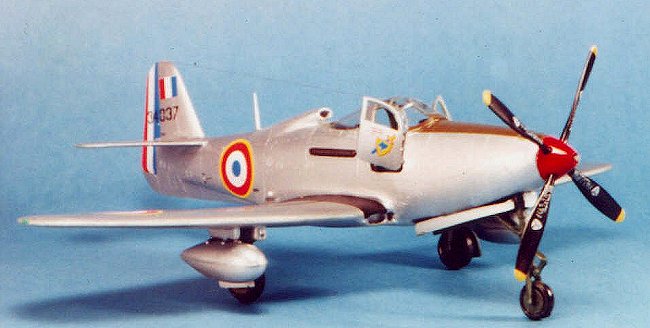
I shot the model with an overall coat of SnJ Aluminum, then airbrushed the anti-glare panel with Gunze Sanyo Olive Drab 41. I used the SnJ polishing powder on various panels to give a multi-hued effect which you can see in person but does not show up well in the photographs. When all was finished, I gave the model a coat of Testors Metalizer sealer.
Decals:
I used the kit decals. However, the serial number for the rudder differs from the serial number on the service block, so I replaced the rudder serial with MicroScale numbers ("34037" instead of "44037"). The decals went on with no problem and settled under a coat of Microsol.
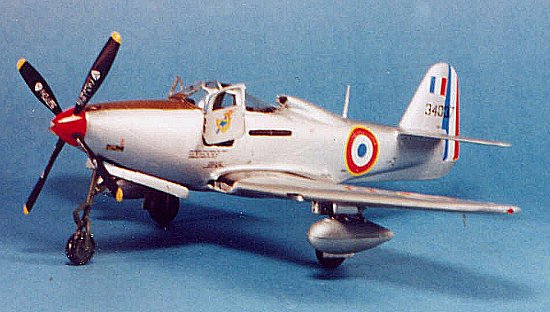
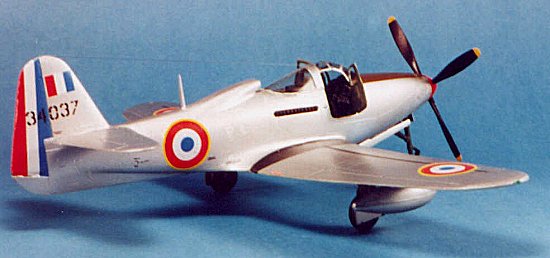
Final Assembly:
After shooting another coat of Sealer over everything, I attached the landing gear, prop and drop tanks. I used nylon thread for the antenna wire.
|
CONCLUSIONS |
This is not an easy kit, and with the "banana bend" would not be a model I would enter in a contest; however, that is something I should have caught on my own while building the model. It is the most accurate model of a P-63 Kingcobra currently available. With some modeling skill and patience, it ends up looking pretty nice sitting next to its little brother, the Eduard Airacobra. Until someone comes up with a better kit, this is something you can create using the spare parts from the Eduard model.
Copyright ModelingMadness.com. All rights reserved. No reproduction in part or in whole without express permission.
If you would like your product reviewed fairly and quickly, please contact the editor or see other details in the Note to Contributors.
Back to Reviews Page 2024